2002 BMW M6 CONVERTIBLE ESP
[x] Cancel search: ESPPage 101 of 186

101n
OverviewControlsMaintenanceRepairsDataIndex
Parking lamps (side marker
lamps)
With the switch in this position,
the front, rear and side vehicle
lighting is switched on.
For lighting on one side for parking as
an additional feature, refer to page 102.
Low beams
When the ignition is switched off
while the low beams are on, the
headlamps go out and only the
parking lamps (side marker lamps)
remain on.
390de732
"Follow me home":
When you activate the headlamp
flasher after parking the vehicle and
switching off the lights, the low beams
will come on for a brief period. You may
also have this function deactivated if
you wish.<
"LIGHTS ON" warningWhen the driver's door is opened with
the ignition key at position 0 a chime
will sound for several seconds to
remind you that you have forgotten to
switch off the lights
.
Vehicles with alphanumeric Check
Control
*:
The reminder is provided by the Check
Control, refer to page 85.
Daytime driving lamps
*
The headlamps are automatically
switched on for daytime driving at
ignition key position 2.
Automatic headlamp control
*
When the switch is set to this
position the system automati-
cally activates and cancels the
low beams in response to changes in
ambient light ( in tunnels, at dusk, etc.)
as well as rain and snow.
The vehicle's external lights
remain on constantly when you
switch on the front fog lamps after the
headlamps have come on automati-
cally.<
Automatic headlamp control
cannot serve as a substitute for
the driver's judgement in determining
when the vehicle lights should be
switched on. For example, the sensors
are not able to detect fog. To avoid
safety risks, you should respond to
these kinds of low-visibility situations
by switching the headlamps on manu-
ally.<
You can have the sensitivity of
your vehicle's automatic head-
lamp control adjusted.<
Parking lamps/Low beams
Page 105 of 186
105n
OverviewControlsMaintenanceRepairsDataIndex
Air conditioningTemperature
The numbers in the display
panel are reference figures for
general orientation. We
recommend a setting of 70 7
(22 6) for a congenial in-car climate.
When you start the vehicle, this system
adjusts the air to the selected tempera-
ture as quickly as possible, and then
maintains that temperature constantly.
Air distribution
You can direct the emerging
air toward the windows ,
toward your upper body or
into the footwell . All inter-
mediate settings are also available. In
the setting, there is a low flow of air
onto the windows to keep them free of
condensation.
Air supply
You can control the emerging
air's flow rate through an infi-
nitely-variable range. The
heating and ventilation
become more and more effective as the
air supply settings are increased. In the
"0" setting, the blower and climate
control are switched off and the outside
air supply is blocked.
Rear window defroster
The indicator lamp comes
on to indicate that the rear
window defroster is in operation. The
rear window defroster switches off
automatically.
Cooling
The air conditioning cools
and dehumidifies the
incoming air before reheating it to the
selected temperature. Depending on
the weather, the windshield may fog
over briefly when the engine is started.
You can reduce condensation forming
on the windows by switching on the air
conditioning.
Condensation forms in the air
conditioning system during opera-
tion, which then exits under the vehicle.
Traces of condensed water of this kind
are thus normal.<
Recirculated-air mode
You can respond to
unpleasant odors in the
surrounding environment by using this
mode to temporarily suspend the flow
of outside air into the vehicle's interior.
The system then recirculates the air
currently within the vehicle.
If your vehicle is equipped with a multi-
function steering wheel
featuring a
recirculated-air button then you can
also select the recirculated-air mode
from this location (refer to page 22).
If the windows should fog over in
the recirculated-air mode, switch
the recirculated-air mode off and
increase the air supply as required.<
Page 110 of 186
110n
Automatic climate control
*
Air conditioning
The air is cooled and
dehumidified and Ð
depending on the temperature setting Ð
warmed again when the air conditioning
is switched on. Depending on the
weather, the windshield may fog over
briefly when the engine is started. You
can reduce condensation forming on
the windows by switching on the air
conditioning.
Condensation forms in the air
conditioning system during opera-
tion, which then exits under the vehicle.
Traces of condensed water of this kind
are thus normal.<
Maximum cooling
With the engine running
this program provides
maximum cooling at outside tempera-
tures above approximately 41 7 (5 6).
60 7 (16 6) appears in the tempera-
ture display 9, and the system reverts to
the recirculated-air mode while simulta-
neously providing maximum airflow
through the vent outlets only. That is
why you need to keep these open if you
select this program.
Automatic recirculated-air
control (AUC)
You can respond to
unpleasant external odors
by temporarily stopping the flow of
outside air. The system then recircu-
lates the air currently within the vehicle.
Press the button repeatedly to run
through the following control sequence:
>Indicator lamps off: outside airflow
operational
>Left-hand indicator lamp on Ð AUC
mode: the system recognizes pollut-
ants in the outside air and blocks the
flow of air when necessary. The
system then recirculates the air
currently within the vehicle.
Depending on the air quality, the
automatic system then switches back
and forth between outside air supply
and recirculation of the air within the
vehicle
>Right-hand indicator lamp on: the
flow of external air into the vehicle is
permanently blocked. The system
then recirculates the air currently
within the vehicle.
If you have a multifunction steering
wheel with the recirculated-air button
(refer to page 22), you can also use it to
switch between "Off" and the recircu-
lated-air mode or AUC and the recircu-
lated-air mode.
If the windows should fog over in
the recirculated-air mode, switch
the recirculated-air mode off and
increase the air supply as required.< Rear window defroster
When the rear window
defroster is activated, the
indicator lamp comes on. The rear
window defroster switches off automat-
ically.
Page 113 of 186
113n
OverviewControlsMaintenanceRepairsDataIndex
The conceptThe BMW Universal Transmitter
replaces up to three hand-held transmit-
ters to control different devices such as
a garage door opener, alarm systems or
a door locking system. The BMW
Universal Transmitter recognizes and
"learns" the transmitted signal from each
of the original hand-held transmitters.
The signal of an original hand-held
transmitter can be programmed on one
of the three channel buttons. Following
that, each of the devices can be actu-ated with the appropriately-programmed
channel button. The indicator lamp
flashes to confirm transmission of the
signal.
Before you sell your vehicle, the
programmed channel buttons should
be cleared. Refer to page 115 for the
description of this process.
To prevent potential injuries or
damage during the programming
operation and before every remote trig-
gering of a programmed device using
the BMW Universal Transmitter, be sure
that there are no persons, animals or
objects within the range of movement
of the respective device. Also, comply
with the safety precautions of the orig-
inal hand-held transmitter.<
To Canadian residents:
During programming, your hand-
held transmitter may automatically stop
transmitting after two seconds. This
may not be long enough to program the
BMW Universal Transmitter. If you are
programming from one of these hand-
held transmitters, the Universal Trans-
mitter's lamp may begin to flash in a
series of double flashes. If this occurs,
continue to hold the button on the
Universal Transmitter while you reacti-
vate your hand-held transmitter. You
may have to repeat this function several
times while programming.<
Before programming, read the
"User's information" section on
page 115.<
The original hand-held transmitter
If this symbol is depicted on the
packaging or in the user's
instructions for the original
hand-held transmitter, it may be
assumed that this original hand-held
transmitter is compatible with the BMW
Universal Transmitter.
Checking for the change codeIn order to determine whether the orig-
inal hand-held transmitter is equipped
with a change code system, you may
either refer to the instructions for the
original hand-held transmitter or
program a channel button as described
in the left column on page 114 under
"Programming."
Following that, press and hold the
programmed channel button of the
BMW Universal Transmitter. If the indi-
cator lamp of the BMW Universal
Transmitter flashes rapidly for two
seconds and then stays on continu-
ously, the original hand-held transmitter
is equipped with a change code
system. If the change code system is
available, program the channel buttons
as described in the right-hand column
on page 114 under "Programming a
hand-held transmitter with change
code."
If you have additional questions,
please consult your BMW center
or call 1-800-355-3515.<
BMW Universal Transmitter
*
Page 114 of 186
114n
BMW Universal Transmitter
*
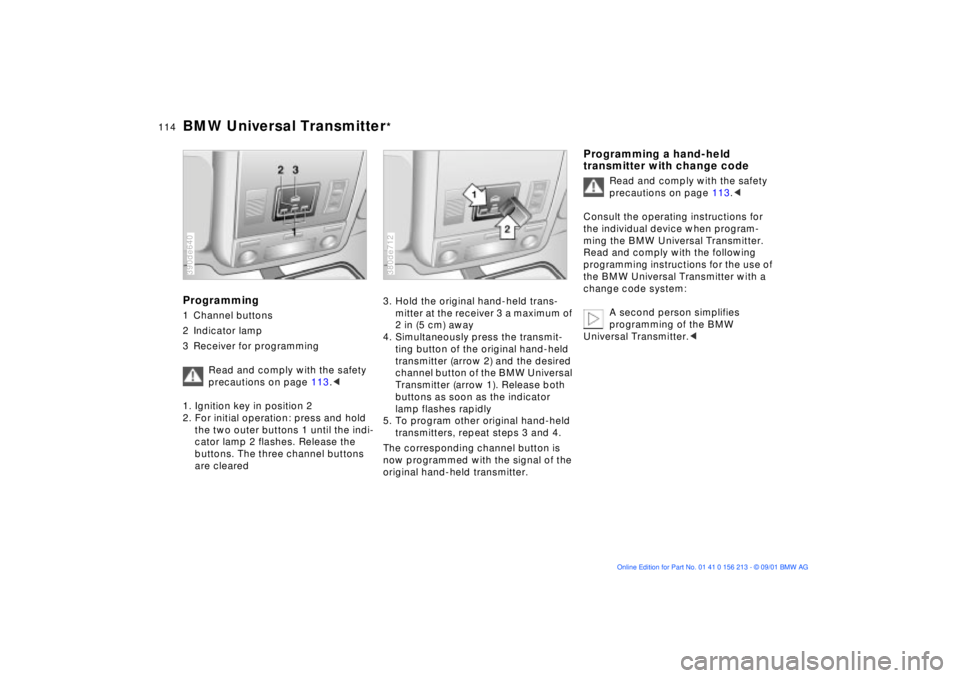
Programming1 Channel buttons
2 Indicator lamp
3 Receiver for programming
Read and comply with the safety
precautions on page 113.<
1. Ignition key in position 2
2. For initial operation: press and hold
the two outer buttons 1 until the indi-
cator lamp 2 flashes. Release the
buttons. The three channel buttons
are cleared390de640
3. Hold the original hand-held trans-
mitter at the receiver 3 a maximum of
2 in (5 cm) away
4. Simultaneously press the transmit-
ting button of the original hand-held
transmitter (arrow 2) and the desired
channel button of the BMW Universal
Transmitter (arrow 1). Release both
buttons as soon as the indicator
lamp flashes rapidly
5. To program other original hand-held
transmitters, repeat steps 3 and 4.
The corresponding channel button is
now programmed with the signal of the
original hand-held transmitter.380de712
Programming a hand-held
transmitter with change code
Read and comply with the safety
precautions on page 113.<
Consult the operating instructions for
the individual device when program-
ming the BMW Universal Transmitter.
Read and comply with the following
programming instructions for the use of
the BMW Universal Transmitter with a
change code system:
A second person simplifies
programming of the BMW
Universal Transmitter.<
Page 127 of 186
127n
OverviewControlsMaintenanceRepairsDataIndex
Cargo loading Roof-mounted luggage rack
Always position and secure the
load correctly. If you do not, it can
endanger the passengers during
braking or evasive maneuvers.
Do not exceed the approved gross
vehicle weight or the permissible axle
weights (refer to page 171). If you do,
the operating safety of the vehicle is no
longer ensured and you are in violation
of the law.
Do not carry hard or heavy objects
unsecured in the passenger compart-
ment. If you do so, they may be
projected through the air during braking
and evasive maneuvers, thus endan-
gering vehicle occupants.<
A special roof-rack system is available
as an optional extra for your BMW.
Please observe the precautions
included with the installation instruc-
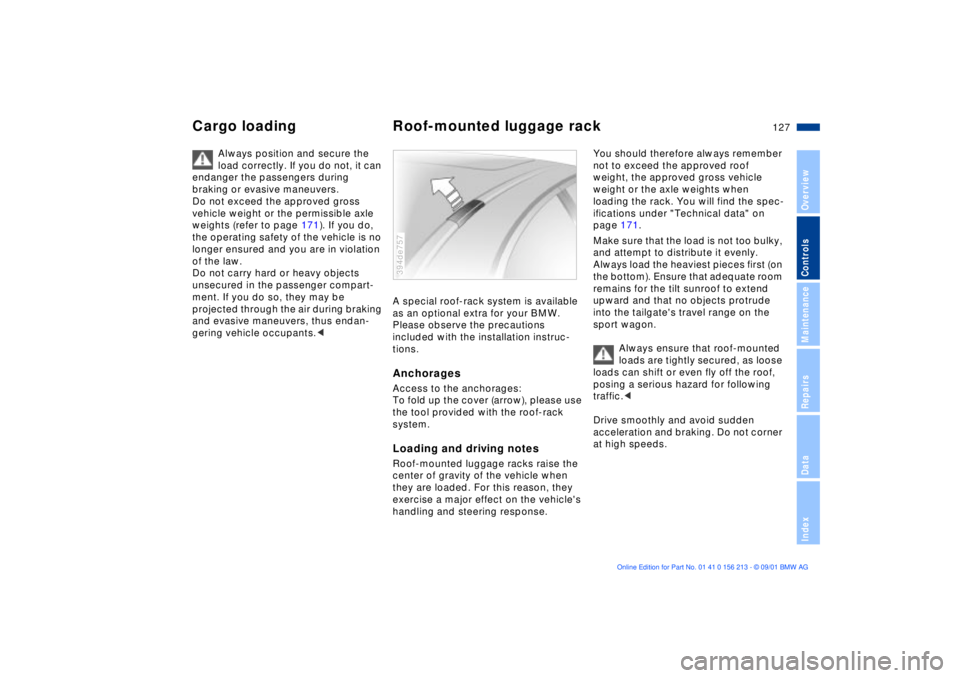
tions.AnchoragesAccess to the anchorages:
To fold up the cover (arrow), please use
the tool provided with the roof-rack
system.Loading and driving notesRoof-mounted luggage racks raise the
center of gravity of the vehicle when
they are loaded. For this reason, they
exercise a major effect on the vehicle's
handling and steering response.394de757
You should therefore always remember
not to exceed the approved roof
weight, the approved gross vehicle
weight or the axle weights when
loading the rack. You will find the spec-
ifications under "Technical data" on
page 171.
Make sure that the load is not too bulky,
and attempt to distribute it evenly.
Always load the heaviest pieces first (on
the bottom). Ensure that adequate room
remains for the tilt sunroof to extend
upward and that no objects protrude
into the tailgate's travel range on the
sport wagon.
Always ensure that roof-mounted
loads are tightly secured, as loose
loads can shift or even fly off the roof,
posing a serious hazard for following
traffic.<
Drive smoothly and avoid sudden
acceleration and braking. Do not corner
at high speeds.
Page 131 of 186

131n
OverviewControlsMaintenanceRepairsDataIndex
Driving notes Antilock Brake System
Brakes:
Do not drive with your foot resting
on the brake pedal. Even light but
consistent pedal pressure can lead to
high temperatures, brake wear and
possibly even brake failure.
Aquaplaning:
When driving on wet or slushy roads,
reduce vehicle speed. If you do not, a
wedge of water may form between the
tires and the road surface. This
phenomenon is referred to as aqua-
planing or hydroplaning. It is character-
ized by a partial or complete loss of
contact between the tires and the road
surface. The ultimate results are loss of
steering and braking control.
Driving through water:
When there is water on the roads, do
not drive in it if it is deeper than
1 ft (30 cm), and even then, only at
walking speed, otherwise the vehicle
can sustain damage to the engine, the
electrical systems and the transmission.
Rear parcel tray:
Do not place heavy or hard objects on
the cargo area cover. These objects
could endanger vehicle occupants
during heavy brake applications or
evasive maneuvers.
Clothes hooks:
Hang items of clothing from the hooks
so that they will not obstruct the driver's
vision. Do not hang heavy objects on
the hooks. If you do so, they could
cause personal injury during braking or
evasive maneuvers.<
The conceptThe Antilock Brake System (ABS) keeps
the wheels from locking during braking,
thereby enhancing active driving safety.Braking with ABSIf you are in a situation that requires full
braking, you will exploit the full benefits
of the ABS system if you apply
maximum pedal pressure ("panic stop").
Since the vehicle maintains steering
responsiveness, you can avoid possible
obstacles with a minimum of steering
effort, despite the full brake application.
Pulsation at the brake pedal combined
with sounds from the hydraulic circuits
indicates to the driver that ABS is in its
active mode.
Page 132 of 186

132n
Brake systemBrake fluid level If the brake fluid level is too low and
brake pedal travel has become notice-
ably longer, there may be a defect in
one of the brake system's hydraulic
circuits.
Proceed to the nearest BMW
center. Higher brake application
pressure may be necessary under these
conditions, and the vehicle may exhibit
a slight tendency to pull to one side
when the brakes are applied. Braking
distances may also be longer. Please
remember to adapt your driving style
accordingly.<
Disc brakesLimited vehicle use, extended periods
with the vehicle parked or in storage,
and operating conditions in which
braking is restricted to gentle, low-
pressure applications will all increase
the tendency for corrosion to form on
the rotors; this is often accompanied by
a simultaneous accumulation of
contamination on the brake pads. The
pads must exert a certain minimal level
of pressure against the rotors for the
disc brakes' inherent self-cleaning
effect to remain effective; the pressure
available under the above conditions
may not provide adequate cleansing.
If the brake rotors are corroded, they
will tend to respond to braking with a
pulsating effect that even extended
brake applications will fail to cure.
When driving in heavy rain and on wet
roads it is a good idea to apply light
pressure to the brake pedal every few
miles. Monitor traffic conditions to
ensure that this maneuver does not
pose a hazard to you or to other road
users. The heat generated in this
process helps dry the pads and rotors
to ensure that your brake system will
respond with undiminished efficiency
when you need it.When descending steep hills and
extended grades, downshift to a gear
that will allow you to continue safely
with only a minimal amount of braking.
By minimizing the loads placed on the
brake system, this strategy helps
ensure that optimal brake system
response will remain available at all
times.
Do not coast with the clutch
depressed or with the transmission
or selector lever in Neutral. Do not coast
with the engine shut off. The engine
provides no braking effect when the
clutch is depressed and there is no
power-assist for braking or steering
when the engine is not running.
Never allow floor mats, carpets or any
other objects to protrude into the area
around the accelerator, clutch and brake
pedals and obstruct their movement.<
Brake pads
For your own safety: use only
brake pads that BMW has
approved for your particular vehicle
model. BMW cannot evaluate non-
approved brake pads to determine if
they are suited for use, and therefore
cannot ensure the operating safety of
the vehicle if they are installed.<