2002 BMW 330I clutch
[x] Cancel search: clutchPage 56 of 155

56n
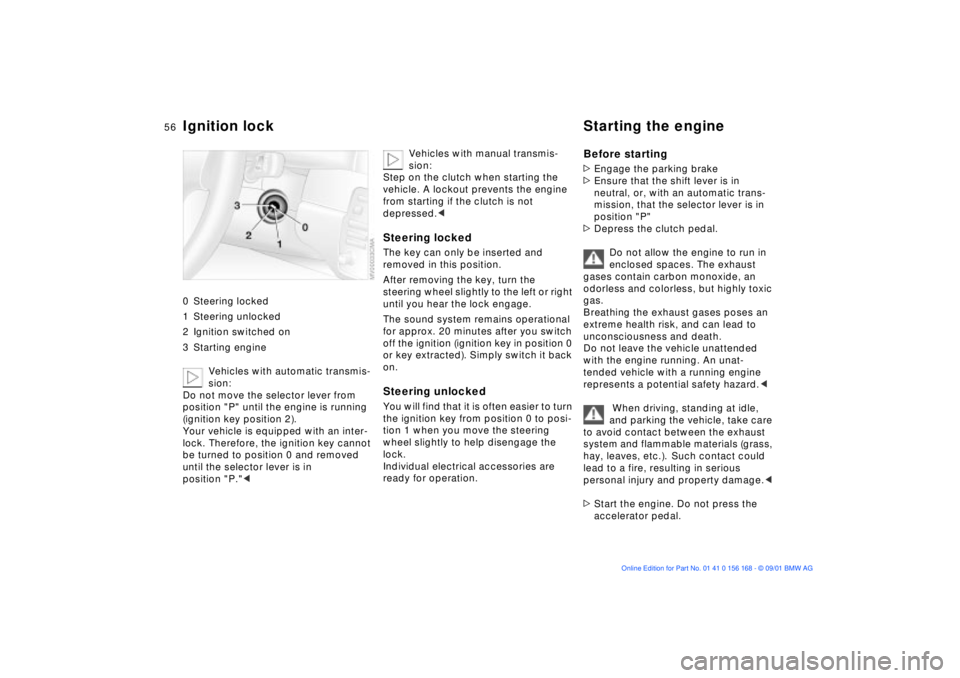
Ignition lock Starting the engine 0 Steering locked
1 Steering unlocked
2 Ignition switched on
3 Starting engine
Vehicles with automatic transmis-
sion:
Do not move the selector lever from
position "P" until the engine is running
(ignition key position 2).
Your vehicle is equipped with an inter-
lock. Therefore, the ignition key cannot
be turned to position 0 and removed
until the selector lever is in
position "P."<
Vehicles with manual transmis-
sion:
Step on the clutch when starting the
vehicle. A lockout prevents the engine
from starting if the clutch is not
depressed.<
Steering lockedThe key can only be inserted and
removed in this position.
After removing the key, turn the
steering wheel slightly to the left or right
until you hear the lock engage.
The sound system remains operational
for approx. 20 minutes after you switch
off the ignition (ignition key in position 0
or key extracted). Simply switch it back
on.Steering unlocked You will find that it is often easier to turn
the ignition key from position 0 to posi-
tion 1 when you move the steering
wheel slightly to help disengage the
lock.
Individual electrical accessories are
ready for operation.
Before starting>Engage the parking brake
>Ensure that the shift lever is in
neutral, or, with an automatic trans-
mission, that the selector lever is in
position "P"
>Depress the clutch pedal.
Do not allow the engine to run in
enclosed spaces. The exhaust
gases contain carbon monoxide, an
odorless and colorless, but highly toxic
gas.
Breathing the exhaust gases poses an
extreme health risk, and can lead to
unconsciousness and death.
Do not leave the vehicle unattended
with the engine running. An unat-
tended vehicle with a running engine
represents a potential safety hazard.<
When driving, standing at idle,
and parking the vehicle, take care
to avoid contact between the exhaust
system and flammable materials (grass,
hay, leaves, etc.). Such contact could
lead to a fire, resulting in serious
personal injury and property damage.<
>Start the engine. Do not press the
accelerator pedal.
Page 58 of 155

58n
Parking brake Manual transmission The parking brake is primarily designed
to prevent the vehicle from rolling while
parked. It operates on the rear wheels.To engageThe detent engages automatically, the
indicator lamp in the instrument cluster
comes on when the ignition key is in
position 2, refer to page 18.To releasePull up slightly on the lever, press the
button (arrow) and lower the lever.
If exceptional circumstances
make it necessary to engage the
parking brake while the vehicle is in
motion, do not pull it with excessive
pressure. Keep your thumb pressed
against the release button while care-
fully pulling the lever up to apply
moderate pressure.
Excessive pressure can lead to over-
braking and loss of traction (fishtailing)
at the rear axle.
The brake lamps do not come on when
the parking brake is engaged.
Vehicles with manual transmission:
Always engage the parking brake when
parking on hills and slopes, as first gear
or reverse may not provide adequate
resistance to rolling.
Vehicles with automatic transmission:
Place the selector lever in "Park."<
To avoid corrosion and one-sided
braking, apply the parking brake lightly
from time to time when coasting to a
standstill (at a traffic signal, for
example), provided that it is safe to do
so.
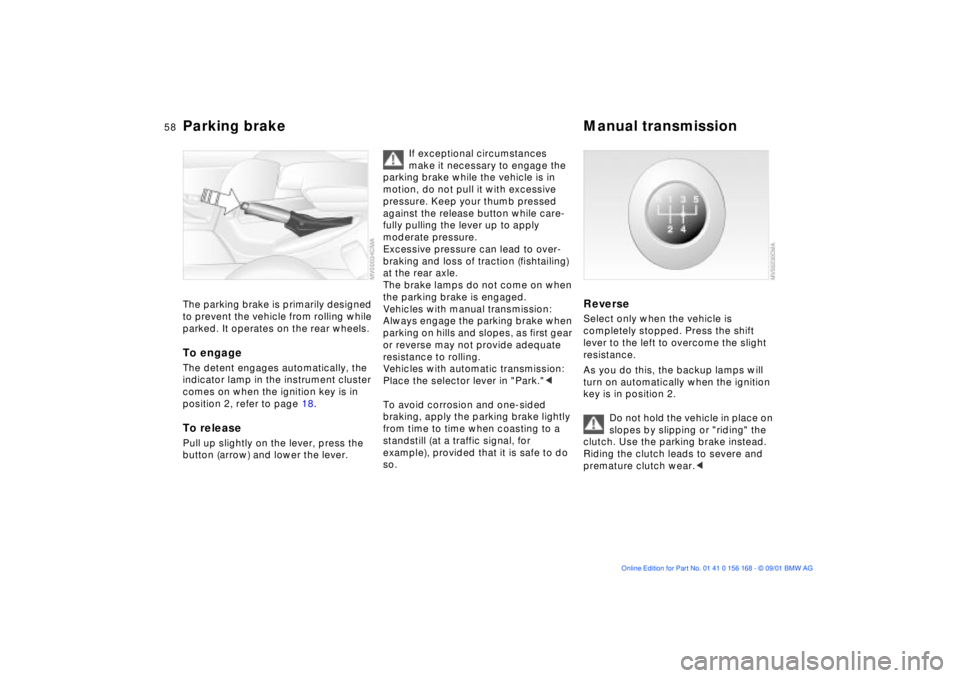
Reverse Select only when the vehicle is
completely stopped. Press the shift
lever to the left to overcome the slight
resistance.
As you do this, the backup lamps will
turn on automatically when the ignition
key is in position 2.
Do not hold the vehicle in place on
slopes by slipping or "riding" the
clutch. Use the parking brake instead.
Riding the clutch leads to severe and
premature clutch wear.<
Page 65 of 155

65n
OverviewControlsMaintenanceRepairsDataIndex
Cruise control
*
To deceleratePress button (Ð) briefly:
If you are already driving with active
cruise control, the speed is decreased
by approx. 0.6 mph (1 km/h) every time
you tap the button.
Press and hold button (Ð):
With the cruise control active, the
system automatically reduces the
throttle opening to slow the vehicle.
When you release the button, the
system registers and maintains the
current speed.
To cancel the cruise controlWhen the system is activated, press the
button. The indicator lamp stays on.
You can use the cruise control again
whenever you want by calling up the
speed that was stored last.
In addition, cruise control is canceled
automatically:
>When the brakes are applied
>When you apply pressure to the
clutch pedal, or when you move the
automatic transmission selector lever
from D to N
>If you exceed or fall below the
programmed speed for an extended
period (by depressing the acceler-
ator, for example).
Recall the stored speedPress button:
The vehicle accelerates to and main-
tains the last speed stored.
Page 104 of 155

104n
To ensure that your vehicle continues to
provide maximum economy throughout
an extended service life, we request
that you devote careful attention to the
following instructions.
Engine and differentialThe first 1,200 miles (2,000 km):
Attempt to constantly vary both vehicle
and engine speed during these initial
miles while remembering to avoid
engine speeds in excess of 4,500 rpm
and/or vehicle speeds of over 100 mph
(160 km/h):
Always obey all official speed limits.
Refrain from using full throttle and avoid
pressing the accelerator beyond the
kickdown point.
After the initial 1,200 miles (2,000 km)
you can gradually increase both engine
and vehicle speeds.
Please remember to observe these
same break-in procedures if either the
engine or the differential is replaced
later in the course of the vehicle's
service life.
TiresOwing to technical factors associated
with their manufacture, tires do not
achieve their full traction potential until
an initial break-in period has elapsed.
We thus ask you to drive with extra care
during the first 200 miles (300 km).
Always obey all official speed limits.
When the vehicle is operated on
wet or slushy roads, a wedge of
water may form between the tire and
the road surface. This phenomenon is
referred to as aquaplaning, or hydro-
planing, and can lead to partial or
complete loss of traction, vehicle
control and braking effectiveness.
Reduce your speed on wet roads.
rotors achieve the optimal pad-surface
and wear patterns required for trouble-
free operation and an extended service
life later on.
To break in the separate parking brake
drums, apply the parking brake lightly
when coasting to a standstill (at a traffic
signal, for instance); use caution to
avoid posing a danger to other road
users. You can prevent corrosion in the
drums by periodically repeating this
procedure.
The rear brake lamps do not come
on when you apply the parking
brake.
Vacuum for the brake system servo unit
on your BMW is available only when the
engine is running. When you move the
vehicle with the engine off Ð when
towing, for example Ð substantially
higher levels of pedal force will be
required to brake the vehicle.
operate at optimum efficiency.
Remember to engage the clutch care-
fully during this initial period.
Break-in procedures
Page 106 of 155

106n
Brake systemBrake fluid level If the brake fluid level is too low and
brake pedal travel has become longer,
there may be a defect in one of the
brake system's hydraulic circuits.
Proceed to the nearest BMW
center. It may be necessary to
apply higher levels of pressure to the
pedal when stopping and braking
distances may also be longer. Please
remember to adapt your driving style
accordingly.
and operating conditions in which
braking is restricted to gentle, low-
pressure applications will all increase
the tendency for corrosion to form on
the rotors; this is often accompanied by
a simultaneous accumulation of
contamination on the brake pads. The
pads must exert a certain minimal level
of pressure against the rotors for the
disc brakes' inherent self-cleaning
effect to remain effective; the pressure
available under the above conditions
may not provide adequate cleansing.
If the brake rotors are corroded, they
will tend to respond to braking with a
pulsating effect that even extended
brake applications will fail to cure.
When driving in heavy rain and on wet
roads it is a good idea to apply light
pressure to the brake pedal every few
miles. Monitor traffic conditions to
ensure that this maneuver does not
pose a hazard to you or to other road
users. The heat generated in this
process helps dry the pads and rotors
to ensure that your brake system will
respond with undiminished efficiency
when you need it.
When descending steep hills and
extended grades, downshift to a gear
that will allow you to continue safely
with only a minimal amount of braking.
By minimizing the loads placed on the
brake system, this strategy helps
ensure that optimal brake system
response will remain available at all
times. Use care to avoid exceeding the
approved engine-speed range, refer to
page 66.Do not coast with the clutch
depressed or with the transmis-
sion in neutral. Do not coast with the
engine shut off. The engine provides no
braking effect when the clutch is
depressed and there is no power-assist
for braking or steering when the engine
is not running.
BMW 325xi, 330xi: always refer all
brake inspection and service work to
your BMW center, as failure to observe
the special procedures could result in
damage to brake system components.
Never allow floor mats, carpets or any
other objects to protrude into the area
around the accelerator, clutch and
brake pedals and obstruct their move-
ment.<
Brake pads
For your own safety: use only
brake pads that the manufacturer
has released for your particular vehicle
model. The manufacturer cannot eval-
uate non-approved brake pads to
determine if they are suited for use, and
therefore cannot ensure the operating
safety of the vehicle if they are
installed.<