2002 BMW 325I WAGON towing
[x] Cancel search: towingPage 6 of 155

Contents
Owner service procedures
Technical data
Index
Replacement procedures:
Onboard tool kit124
Windshield wiper blades124
Lamps and bulbs125
Changing a wheel129
Battery133
Fuses133
Assistance, giving and
receiving:
Jump-starting134
Towing the vehicle135Engine data140
Dimensions141
Weights142
Capacities143Everything from A to Z146
Page 60 of 155

60n
Automatic transmission with Steptronic
*
Indicator/Headlamp flasher
Possible displays
P R N D SD M1 M2 M3 M4 M5
Electronic transmission control
module
If the indicator lamp comes on,
there is a malfunction in the
transmission system.
Bring the vehicle to a stop, select trans-
mission position "P", engage the
parking brake and switch the engine off
(ignition key to position 0).
Wait a few seconds, then start the
engine.
If the indicator lamp goes out after a
few seconds, normal transmission
performance has been restored. Drive
off normally.
If the indicator lamp does not go out, all
selector lever positions can still be
selected; however in the forward posi-
tions the vehicle has limited perfor-
mance as it drives only in 3
rd and 4
th
gear.
If this happens, avoid extreme engine
loads and consult the nearest BMW
center.
Never work in the engine
compartment when a drive gear
(forward or reverse) is engaged. If you
do this, the vehicle could move.<
For towing or jump-starting, refer to the
information beginning on page 134.
1 High beams (blue indicator lamp)
2 Headlamp flasher (blue indicator
lamp)
3 Turn signal indicator (green indicator
lamps accompanied by a periodic
clicking sound from the relay).To signal brieflyPress the lever up to but not beyond
the detent. It then returns to the center
position when released.
If the flashing of the turn signal
indicators and the clicking from
the relay are both faster than normal,
one of the turn signal indicators has
failed.<
Page 99 of 155

99n
OverviewControlsMaintenanceRepairsDataIndex
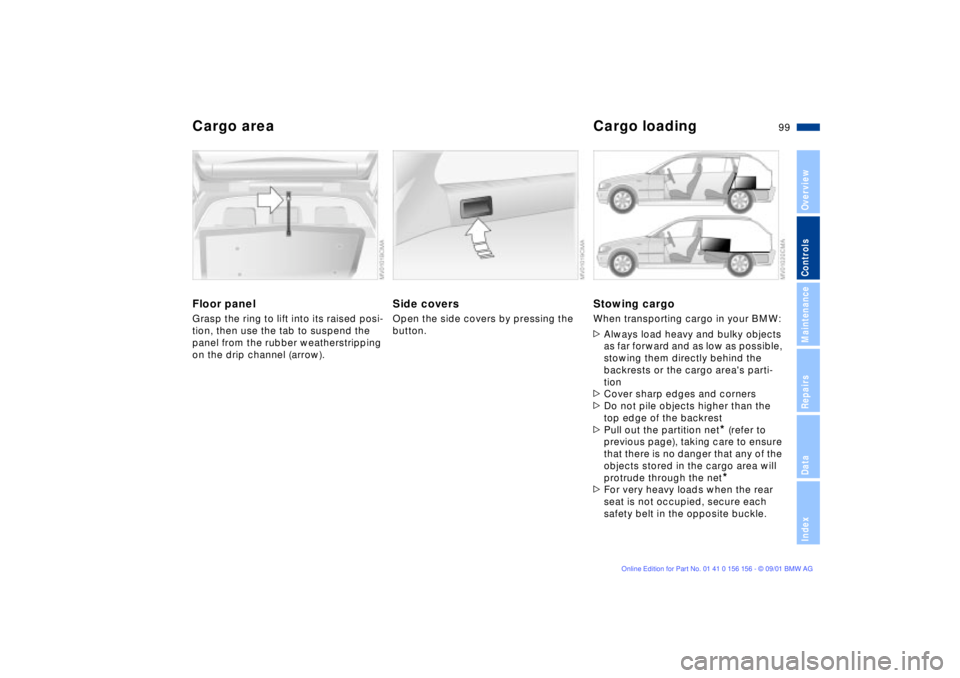
Cargo area Cargo loadingFloor panelGrasp the ring to lift into its raised posi-
tion, then use the tab to suspend the
panel from the rubber weatherstripping
on the drip channel (arrow).
Side coversOpen the side covers by pressing the
button.
Stowing cargoWhen transporting cargo in your BMW:
>Always load heavy and bulky objects
as far forward and as low as possible,
stowing them directly behind the
backrests or the cargo area's parti-
tion
>Cover sharp edges and corners
>Do not pile objects higher than the
top edge of the backrest
>Pull out the partition net
* (refer to
previous page), taking care to ensure
that there is no danger that any of the
objects stored in the cargo area will
protrude through the net*
>For very heavy loads when the rear
seat is not occupied, secure each
safety belt in the opposite buckle.
Page 104 of 155

104n
To ensure that your vehicle provides
maximum economy throughout a long
service life, we request that you
observe the following information.
Engine and differentialUp to 1,200 miles (2,000 km):
Constantly vary both engine and vehicle
speed, remembering not to exceed
4,500 rpm or 100 mph (160 km/h)
during this period.
Always obey all official speed limits.
Do not use full throttle, and avoid
pressing the accelerator beyond the
kickdown point during these initial
miles.
You can then proceed to increase both
engine and vehicle speed once the
initial 1,200 miles (2,000 km) have
elapsed.
You should also observe the same
break-in procedures if the engine or
differential is replaced later in the
course of the vehicle's life.
TiresDue to technical factors associated
with their manufacture, tires do not
achieve their full traction potential until
after an initial break-in period. We thus
ask you to drive with extra care during
the first 200 miles (300 km).
Always obey all official speed limits.
When the vehicle is operated on
wet or slushy roads, a wedge of
water may form between the tire and
the road surface. This phenomenon is
referred to as aquaplaning, or hydro-
planing, and can lead to partial or
complete loss of traction, vehicle
control and braking effectiveness.
Reduce your speed on wet roads.
rotors achieve the optimal pad-surface
and wear patterns required for trouble-
free operation and an extended service
life later on.
To break-in the separate parking brake
drums, apply the parking brake lightly
when coasting to a standstill (at a traffic
signal, for instance), provided that
traffic conditions allow you to do so.
To avoid corrosion, repeat this proce-
dure from time to time.
The brake lamps do not come on
when the parking brake is
engaged.
Vacuum for the brake system servo unit
on your BMW is available only when the
engine is running. When you move the
vehicle with the engine switched off Ð
when towing, for example Ð substan-
tially higher levels of pedal force will be
required to brake the vehicle.
operate at optimum efficiency.
Remember to engage the clutch care-
fully during this initial period.
Break-in procedures
Page 135 of 155

135n
OverviewControlsMaintenanceRepairsDataIndex
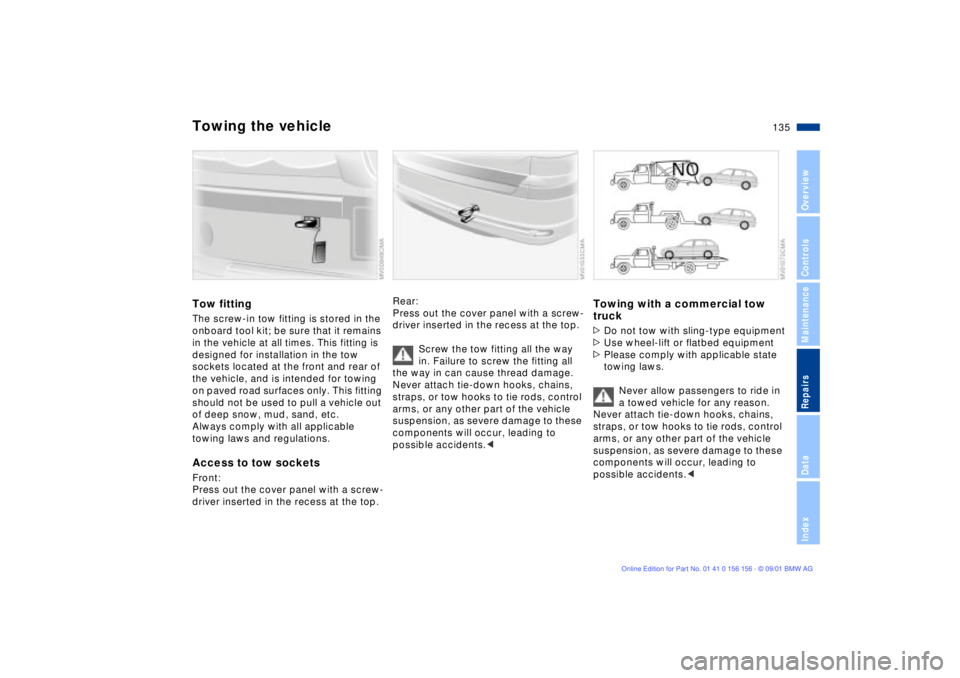
Towing the vehicleTow fittingThe screw-in tow fitting is stored in the
onboard tool kit; be sure that it remains
in the vehicle at all times. This fitting is
designed for installation in the tow
sockets located at the front and rear of
the vehicle, and is intended for towing
on paved road surfaces only. This fitting
should not be used to pull a vehicle out
of deep snow, mud, sand, etc.
Always comply with all applicable
towing laws and regulations.Access to tow socketsFront:
Press out the cover panel with a screw-
driver inserted in the recess at the top.
Rear:
Press out the cover panel with a screw-
driver inserted in the recess at the top.
Screw the tow fitting all the way
in. Failure to screw the fitting all
the way in can cause thread damage.
Never attach tie-down hooks, chains,
straps, or tow hooks to tie rods, control
arms, or any other part of the vehicle
suspension, as severe damage to these
components will occur, leading to
possible accidents.<
Towing with a commercial tow
truck>Do not tow with sling-type equipment
>Use wheel-lift or flatbed equipment
>Please comply with applicable state
towing laws.
Never allow passengers to ride in
a towed vehicle for any reason.
Never attach tie-down hooks, chains,
straps, or tow hooks to tie rods, control
arms, or any other part of the vehicle
suspension, as severe damage to these
components will occur, leading to
possible accidents.c
Page 136 of 155

136n
Towing the vehicleBMW 325xi, 330xi, 330xd:
Towing with a raised axle1 Place the transmission in neutral
2 Switch off the engine
3 Towing speed:
30 mph (50 km/h)
4 Towing distance:
max. 95 miles (150 km).
Remove the rear driveshaft for
longer towing distances with the
front axle lifted; remove the front drive-
shaft for towing over longer distances
with the rear axle lifted. Failure to
comply with this will result in damage to
the transfer box.<
Page 148 of 155

Everything from A to ZDistance warning70
Door keys28
Doors
electrical malfunction31
locking and unlocking29
manual operatiom31
DOT Quality Grades,
tires108
Draft-free ventilation87, 90
Drawbar weight142
Drink holder, refer to
beverage holder93
Drive belts17
Driving notes105
DSC (Dynamic Stability
Control)19, 73
Dynamic Brake Control
(DBC)74
Dynamic Stability Control
(DSC)19, 73 E
Electric power windows37
Electrical malfunction
doors31
fuel filler door22
sliding/tilt sunroof39
tailgate33 Electrical power socket95
Elements of operation14
Energy Control65
Engine compartment
essentials113
Engine coolant143
Engine data140
Engine oil
capacity143
consumption115
disposal116
quality116
specifications116
viscosity116
Engine oil level115
checking115
indicator lamp19
Engine specifications140
Engine speed140
F
Fault displays67
Filling capacities143
Fittings, tow starting and
towing135
Flashlight92
Flat Tire
Monitor80, 109, 132 Flat tires107, 129, 132
Fog lamps83
Follow me home lamps82
Front fog lamps83
Front seat adjustment40
Fuel consumption69
display66
Fuel filler door22
electrical malfunction22
manual operation22
Fuel gauge66
Fuel injection system140
Fuel reserve indicator
lamp66
Fuel tank capacity143
Fuel tank gauge66
Fuses133
G
Gasoline gauge66
Glove compartment92
Gross vehicle weight142 H
Handbrake57
Hands-free system94
microphone94 Harman Kardon premium
sound system91
Hazard warning triangle22
HDC (Hill Descent
Control)77
Head restraints43
Headlamp cover, care125
Headlamp flasher83
Headlamp washer
system114
capacity143
Headlight control82
Heated seats46
High beams20, 60, 83
bulb replacement125
High Performance Synthetic
Oil116
Hill Descent Control
(HDC)77
Holder for beverage
cans93
Hood release112
Horn14
Page 151 of 155

Everything from A to Z
151n
OverviewControlsMaintenanceRepairsDataIndex
Steering wheel lock55
Stopping the vehicle56
Storage compartments92
Stroke140
Switching off the engine56
Symbols8
Synthetic oils116 T
Tail lamps
bulb replacement127
Tailgate33
electrical malfunction33
manual operation33
remote control
operation30
Tank capacity143
Technical data140
Technical
modifications10, 120
Telephone preparation94
Temperature display
outside temperature68
Temperature gauge
engine coolant66 Temperature
layering87, 90
Temperature
settings86, 89
The Automatic Differential
Brake (ADB-X)75
Thigh support41
Third brake light128
Tilt alarm sensor36
operation via remote
control30
switching off36
Tire change129
Tire inflation
pressures24, 107
Tire inflation pressures,
table25
Tire Pressure Monitor
(RDC)78, 109, 132
Tire pressure, indicator78
Tire pressure,
monitoring78
Tire Quality Grading109
Tire replacement108
Tire tread107
wear indicators (TWI)107 Tools124
Torque140
Tow fittings135
Towing the vehicle135
Trailer weights142
Transmission57
Transmitter keys28
Transporting children
safely51
Tread depth, tires107
Tread wear indicators107
Trip odometer65
Turn signal
indicators20, 60
Turn signals
bulb replacement126
U
Uniform Tire Quality
Grading109
Use antifreeze, radiator117
V
Vehicle keys28
Vehicle Memory54
Vehicle weight142
Vehicle, starting55
Ventilation85, 88
draft-free87, 90 W
Warning lamps17
Warning messages67
Warranty and Service Guide
Booklet (Canadian
models)119
Washer fluid, adding114
Washer reservoir, filling114
Washing your vehicle, refer
to the "Caring for your
vehicle" manual
Water on roadways105
Weights142
Wheel and tire
combinations110
Wheels and tires107
Windshield washer system
capacity143
filling114