2002 BMW 325I WAGON tow
[x] Cancel search: towPage 98 of 155

98n
Cargo areaTo remove cargo cover and
partition net1. Press the buttons on the sides
(arrow 1)
2. Extract the case by pulling to the rear
(arrow 2).InstallationSimply slide the case forward in the two
side holders until it engages.
Storing with backrests folded
forwardSupports for the case are also provided
on the rear sides of the backrests
(arrow 1).
Slide the case into the supports as
shown in the illustration, continuing
until the detent engages (arrow 2).
Ensure that the cargo cover is toward
the front of the vehicle, with the parti-
tion net's loop on the top.
You can pull the partition net out and
insert it in the holders above it in the
upper roof area.
To ensure that the case centers
correctly, remember to insert it
from the right side, always continuing
until the detents snap into place. Failure
to observe the prescribed insertion
procedure could also result in damage
to the door's upholstery.<
Page 99 of 155

99n
OverviewControlsMaintenanceRepairsDataIndex
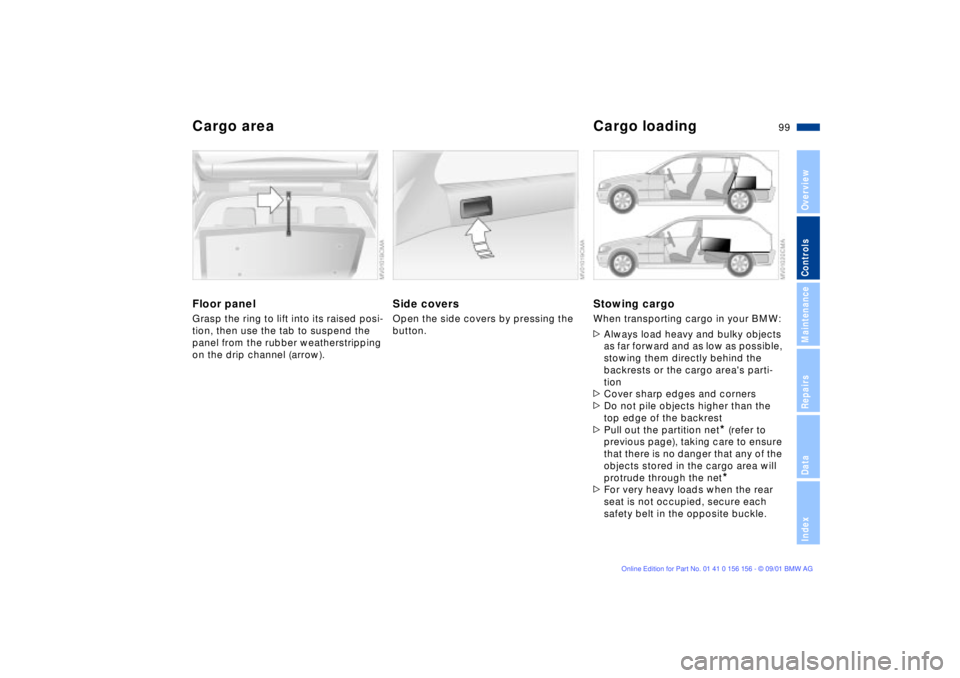
Cargo area Cargo loadingFloor panelGrasp the ring to lift into its raised posi-
tion, then use the tab to suspend the
panel from the rubber weatherstripping
on the drip channel (arrow).
Side coversOpen the side covers by pressing the
button.
Stowing cargoWhen transporting cargo in your BMW:
>Always load heavy and bulky objects
as far forward and as low as possible,
stowing them directly behind the
backrests or the cargo area's parti-
tion
>Cover sharp edges and corners
>Do not pile objects higher than the
top edge of the backrest
>Pull out the partition net
* (refer to
previous page), taking care to ensure
that there is no danger that any of the
objects stored in the cargo area will
protrude through the net*
>For very heavy loads when the rear
seat is not occupied, secure each
safety belt in the opposite buckle.
Page 100 of 155

100n
Cargo loading Roof-mounted luggage rack
*
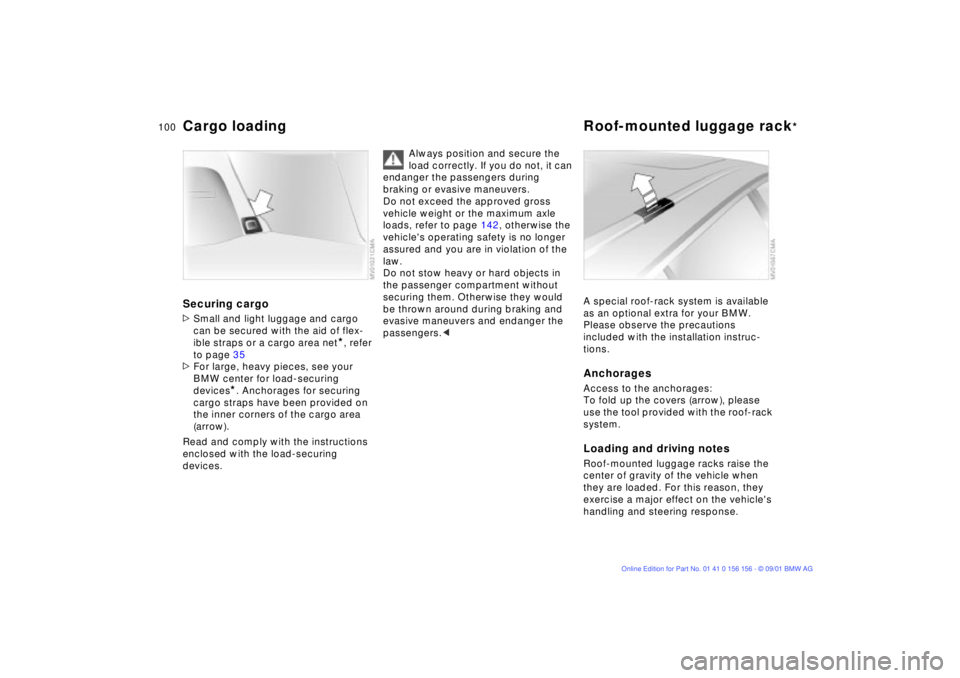
Securing cargo >Small and light luggage and cargo
can be secured with the aid of flex-
ible straps or a cargo area net
*, refer
to page 35
>For large, heavy pieces, see your
BMW center for load-securing
devices
*. Anchorages for securing
cargo straps have been provided on
the inner corners of the cargo area
(arrow).
Read and comply with the instructions
enclosed with the load-securing
devices.
Always position and secure the
load correctly. If you do not, it can
endanger the passengers during
braking or evasive maneuvers.
Do not exceed the approved gross
vehicle weight or the maximum axle
loads, refer to page 142, otherwise the
vehicle's operating safety is no longer
assured and you are in violation of the
law.
Do not stow heavy or hard objects in
the passenger compartment without
securing them. Otherwise they would
be thrown around during braking and
evasive maneuvers and endanger the
passengers.<
A special roof-rack system is available
as an optional extra for your BMW.
Please observe the precautions
included with the installation instruc-
tions.AnchoragesAccess to the anchorages:
To fold up the covers (arrow), please
use the tool provided with the roof-rack
system.Loading and driving notesRoof-mounted luggage racks raise the
center of gravity of the vehicle when
they are loaded. For this reason, they
exercise a major effect on the vehicle's
handling and steering response.
Page 104 of 155

104n
To ensure that your vehicle provides
maximum economy throughout a long
service life, we request that you
observe the following information.
Engine and differentialUp to 1,200 miles (2,000 km):
Constantly vary both engine and vehicle
speed, remembering not to exceed
4,500 rpm or 100 mph (160 km/h)
during this period.
Always obey all official speed limits.
Do not use full throttle, and avoid
pressing the accelerator beyond the
kickdown point during these initial
miles.
You can then proceed to increase both
engine and vehicle speed once the
initial 1,200 miles (2,000 km) have
elapsed.
You should also observe the same
break-in procedures if the engine or
differential is replaced later in the
course of the vehicle's life.
TiresDue to technical factors associated
with their manufacture, tires do not
achieve their full traction potential until
after an initial break-in period. We thus
ask you to drive with extra care during
the first 200 miles (300 km).
Always obey all official speed limits.
When the vehicle is operated on
wet or slushy roads, a wedge of
water may form between the tire and
the road surface. This phenomenon is
referred to as aquaplaning, or hydro-
planing, and can lead to partial or
complete loss of traction, vehicle
control and braking effectiveness.
Reduce your speed on wet roads.
rotors achieve the optimal pad-surface
and wear patterns required for trouble-
free operation and an extended service
life later on.
To break-in the separate parking brake
drums, apply the parking brake lightly
when coasting to a standstill (at a traffic
signal, for instance), provided that
traffic conditions allow you to do so.
To avoid corrosion, repeat this proce-
dure from time to time.
The brake lamps do not come on
when the parking brake is
engaged.
Vacuum for the brake system servo unit
on your BMW is available only when the
engine is running. When you move the
vehicle with the engine switched off Ð
when towing, for example Ð substan-
tially higher levels of pedal force will be
required to brake the vehicle.
operate at optimum efficiency.
Remember to engage the clutch care-
fully during this initial period.
Break-in procedures
Page 107 of 155

107n
OverviewControlsMaintenanceRepairsDataIndex
Information for your safetyThe factory-approved radial tires are
matched to the vehicle and have been
selected to provide optimum safety and
driving comfort.
It is not merely the tire's service life, but
also driving comfort and Ð above all else
Ð driving safety that depend on the
condition of the tires and the mainte-
nance of the specified tire inflation
pressure.
Incorrect tire inflation pressure is
a frequent cause of tire damage. It
also significantly influences the road-
holding ability of your BMW. Be sure to
check the tire inflation pressure,
including the space-saver spare tire or
the spare tire, on a regular basis, at
least twice a month and before every
extended journey, refer to page 24. If
this is not done, incorrect tire pressures
can cause driving instability and tire
damage, ultimately resulting in an
accident.<
Tire tread Ð tire damageInspect your tires frequently for tread
wear, signs of damage and for foreign
objects lodged in the tread. Check the
tread depth.
Tread depth should not be allowed to
go below 0.12 in (3 mm), even though
the legally specified minimum tread
depth is 0.063 in (1.6 mm). Tread wear
indicators (arrow) are embedded in the
base of the tire's tread. Their locations
are indicated by the legend TWI Ð Tread
Wear Indicator Ð at various points on
the tire's shoulder. When the tread
reaches a depth of 0.063 in (1.6 mm),
these indicators appear to signal that
the tires have worn to the minimum
legal level. Below 0.12 in (3 mm) tread
depth, there is an increased risk of
aquaplaning, even at relatively
moderate speeds and with only small
amounts of water on the road.
Do not drive on a deflated (flat)
tire. A flat tire greatly impairs
steering and braking response, and can
lead to complete loss of control over
the vehicle.
Avoid overloading the vehicle so that
the permitted load on the tires is not
exceeded. Overloading leads to over-
heating and causes damage inside the
tires. The ultimate result can assume
the form of a sudden air loss.
Unusual vibrations encountered during
normal vehicle operation can indicate a
flat tire or some other vehicle malfunc-
tion. The type of problem can be
caused by contact with curbs, etc. This
is also true for irregularities in the
vehicle's handling characteristics, such
as a pronounced tendency to pull to the
left or right. Should this occur, respond
by immediately reducing your speed.
Proceed carefully to the nearest BMW
center or professional tire center, or
have the vehicle towed in to have it, its
wheels and tires inspected.
Tire inflation pressure
Tire condition
Page 115 of 155

115n
OverviewControlsMaintenanceRepairsDataIndex
Engine oilChecking oil level1. Park the vehicle on a level surface
2. Switch the engine off after it has
reached normal operating tempera-
ture
3. After approx. 5 minutes, pull the
dipstick out and wipe it off with a
clean lint-free cloth, paper towel, or
similar material
4. Carefully push the dipstick all the
way into the guide tube and pull it
out again
5. The oil level should be between the
two marks on the dipstick.
As with fuel economy, oil consumption
is directly influenced by your driving
style and vehicle operating conditions.
The oil volume between the two marks
on the dipstick corresponds to approx.
1.1 US quarts (1 liter). Do not fill beyond
the upper mark on the dipstick. Excess
oil will damage the engine.
Adding engine oilWait until the level has dropped to just
above the lower mark before adding oil.
However, you should never let the oil
drop below the lower mark.
BMW engines are designed to
operate without oil additives; the
use of additives could lead to damage
in some cases. This is also true for the
manual transmission, the automatic
transmission, the differential, and the
power steering system.<
Recommendation: have the oil changed
by your BMW center.
Page 124 of 155

124n
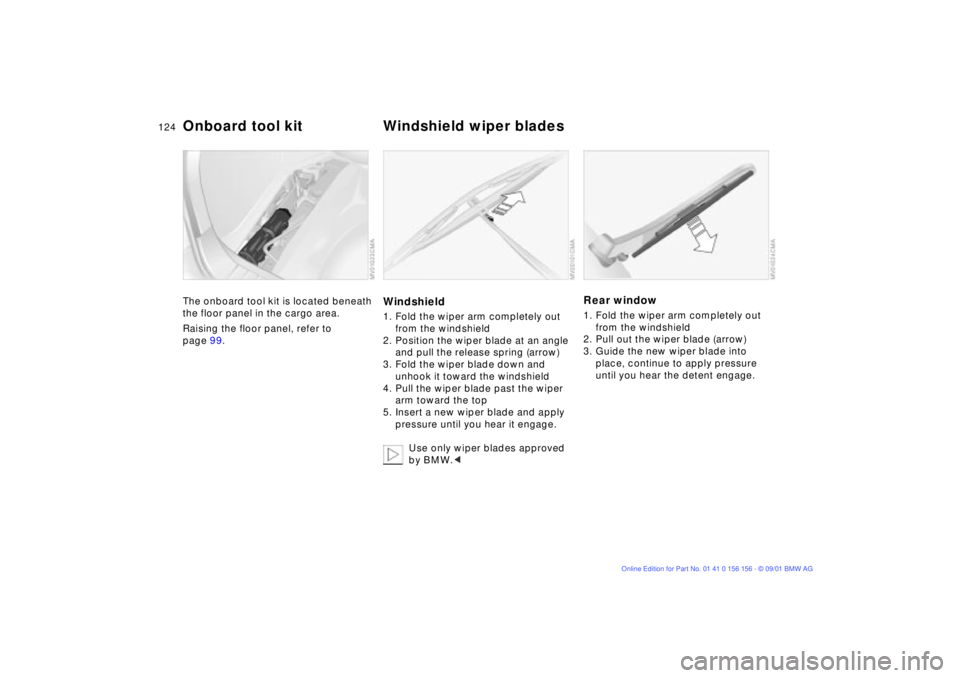
The onboard tool kit is located beneath
the floor panel in the cargo area.
Raising the floor panel, refer to
page 99.
Windshield1. Fold the wiper arm completely out
from the windshield
2. Position the wiper blade at an angle
and pull the release spring (arrow)
3. Fold the wiper blade down and
unhook it toward the windshield
4. Pull the wiper blade past the wiper
arm toward the top
5. Insert a new wiper blade and apply
pressure until you hear it engage.
Use only wiper blades approved
by BMW.<
Rear window1. Fold the wiper arm completely out
from the windshield
2. Pull out the wiper blade (arrow)
3. Guide the new wiper blade into
place, continue to apply pressure
until you hear the detent engage.
Onboard tool kit Windshield wiper blades
Page 126 of 155

126n
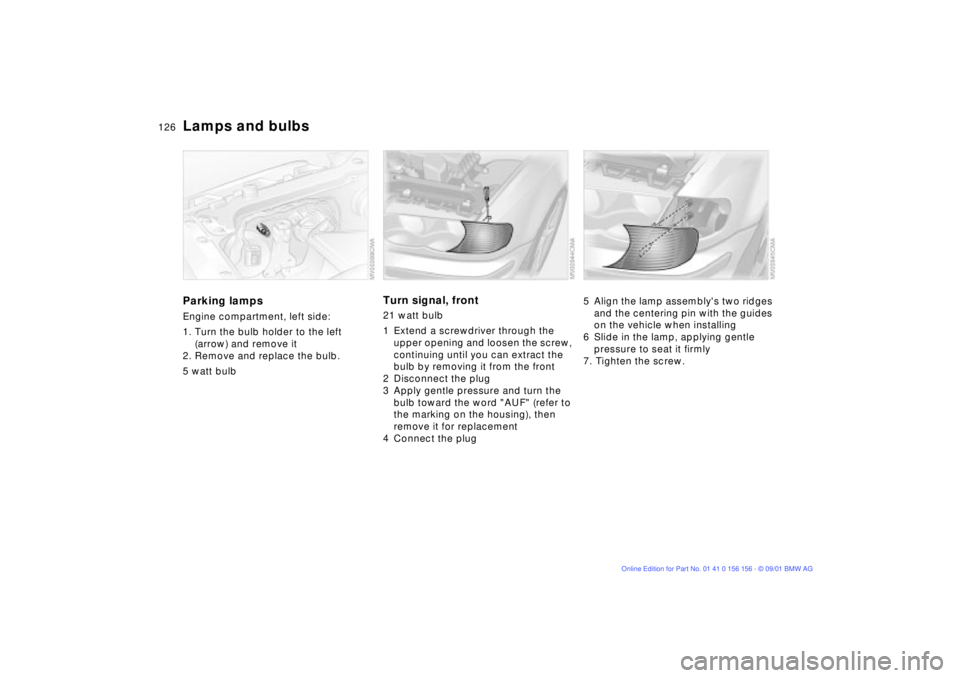
Lamps and bulbsParking lampsEngine compartment, left side:
1. Turn the bulb holder to the left
(arrow) and remove it
2. Remove and replace the bulb.
5 watt bulb
Turn signal, front 21 watt bulb
1 Extend a screwdriver through the
upper opening and loosen the screw,
continuing until you can extract the
bulb by removing it from the front
2 Disconnect the plug
3 Apply gentle pressure and turn the
bulb toward the word "AUF" (refer to
the marking on the housing), then
remove it for replacement
4 Connect the plug
5 Align the lamp assembly's two ridges
and the centering pin with the guides
on the vehicle when installing
6 Slide in the lamp, applying gentle
pressure to seat it firmly
7. Tighten the screw.