2002 BMW 325Ci COUPE height
[x] Cancel search: heightPage 41 of 147
41n
OverviewControlsMaintenanceRepairsDataIndex
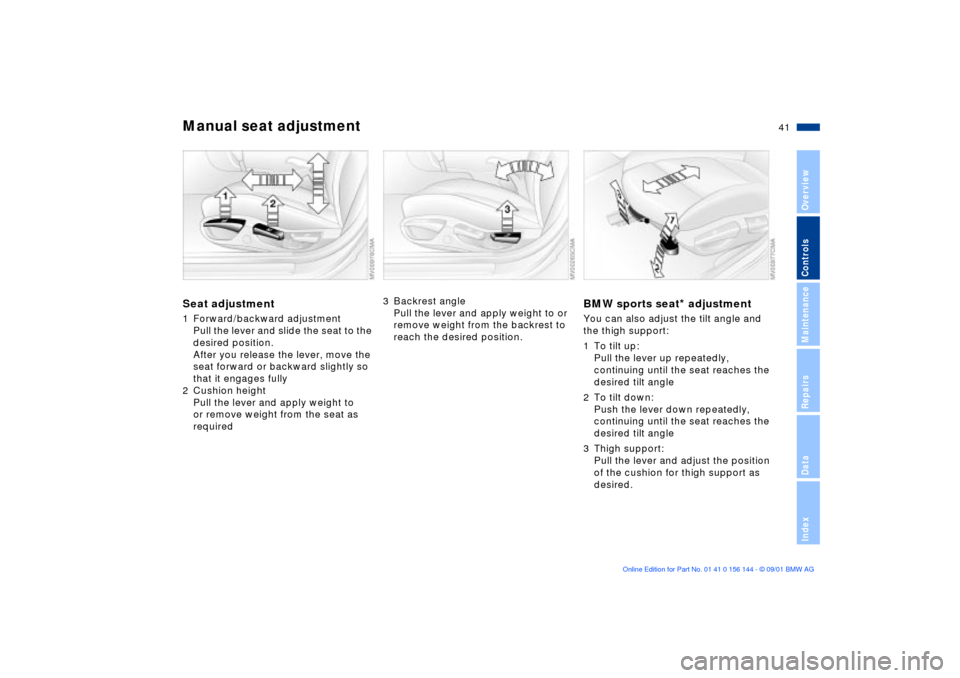
Manual seat adjustmentSeat adjustment1 Forward/backward adjustment
Pull the lever and slide the seat to the
desired position.
After you release the lever, move the
seat forward or backward slightly so
that it engages fully
2 Cushion height
Pull the lever and apply weight to
or remove weight from the seat as
required
3 Backrest angle
Pull the lever and apply weight to or
remove weight from the backrest to
reach the desired position.
BMW sports seat
* adjustment
You can also adjust the tilt angle and
the thigh support:
1 To tilt up:
Pull the lever up repeatedly,
continuing until the seat reaches the
desired tilt angle
2 To tilt down:
Push the lever down repeatedly,
continuing until the seat reaches the
desired tilt angle
3 Thigh support:
Pull the lever and adjust the position
of the cushion for thigh support as
desired.
Page 42 of 147
42n
Power seat adjustment
*
Lumbar support*
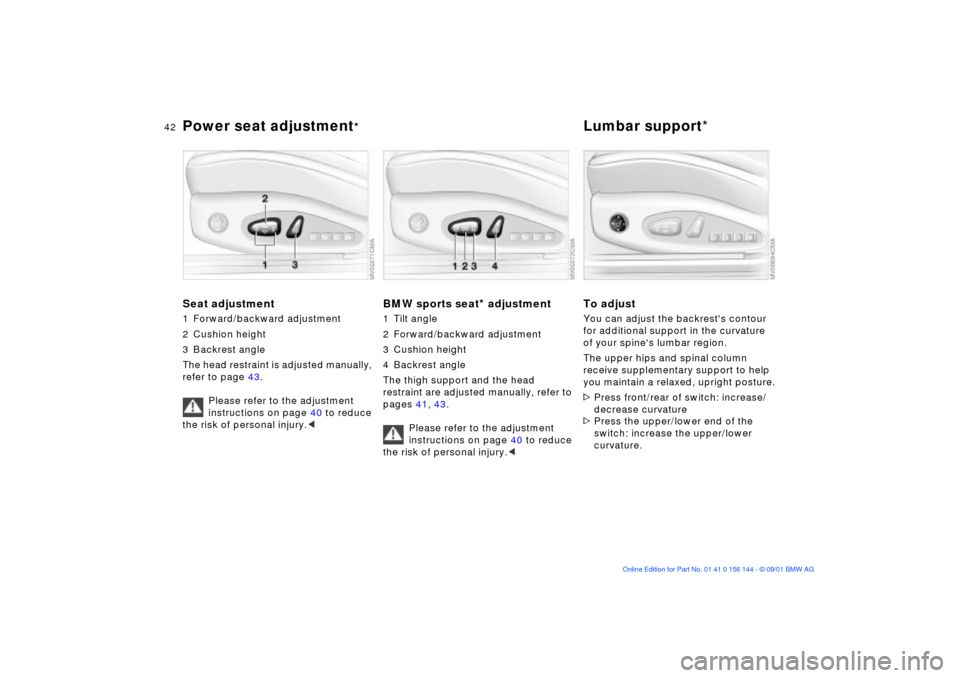
Seat adjustment1 Forward/backward adjustment
2 Cushion height
3 Backrest angle
The head restraint is adjusted manually,
refer to page 43.
Please refer to the adjustment
instructions on page 40 to reduce
the risk of personal injury.<
BMW sports seat
* adjustment
1 Tilt angle
2 Forward/backward adjustment
3 Cushion height
4 Backrest angle
The thigh support and the head
restraint are adjusted manually, refer to
pages 41, 43.
Please refer to the adjustment
instructions on page 40 to reduce
the risk of personal injury.<
To adjustYou can adjust the backrest's contour
for additional support in the curvature
of your spine's lumbar region.
The upper hips and spinal column
receive supplementary support to help
you maintain a relaxed, upright posture.
>Press front/rear of switch: increase/
decrease curvature
>Press the upper/lower end of the
switch: increase the upper/lower
curvature.
Page 43 of 147
43n
OverviewControlsMaintenanceRepairsDataIndex
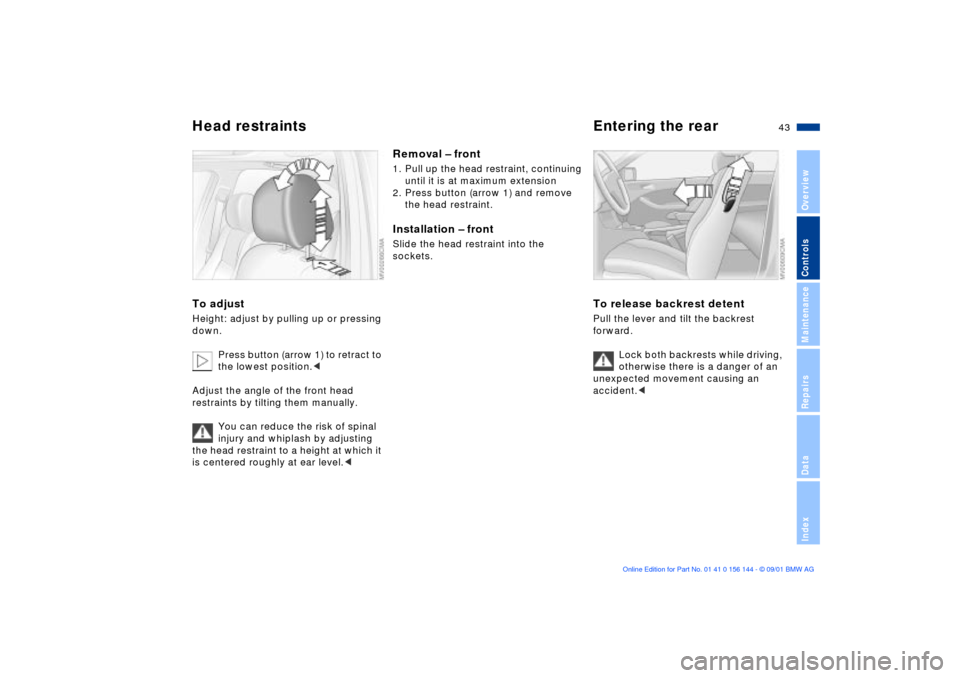
Head restraints Entering the rearTo adjust Height: adjust by pulling up or pressing
down.
Press button (arrow 1) to retract to
the lowest position.<
Adjust the angle of the front head
restraints by tilting them manually.
You can reduce the risk of spinal
injury and whiplash by adjusting
the head restraint to a height at which it
is centered roughly at ear level.<
Removal Ð front1. Pull up the head restraint, continuing
until it is at maximum extension
2. Press button (arrow 1) and remove
the head restraint.Installation Ð frontSlide the head restraint into the
sockets.
To release backrest detentPull the lever and tilt the backrest
forward.
Lock both backrests while driving,
otherwise there is a danger of an
unexpected movement causing an
accident.<
Page 44 of 147
44n
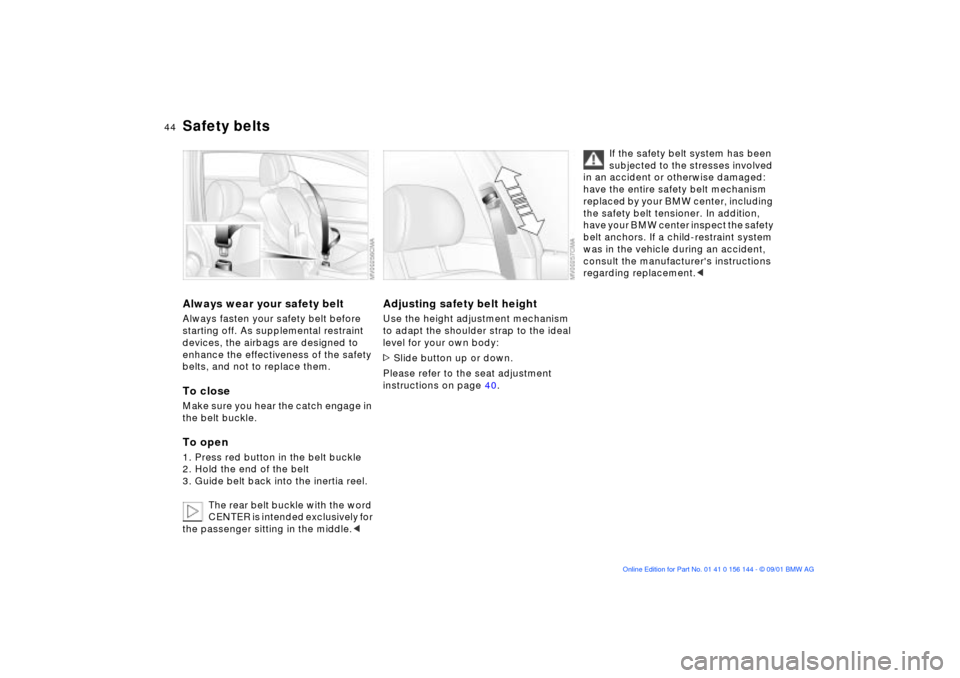
Safety beltsAlways wear your safety beltAlways fasten your safety belt before
starting off. As supplemental restraint
devices, the airbags are designed to
enhance the effectiveness of the safety
belts, and not to replace them.To closeMake sure you hear the catch engage in
the belt buckle.To open1. Press red button in the belt buckle
2. Hold the end of the belt
3. Guide belt back into the inertia reel.
The rear belt buckle with the word
CENTER is intended exclusively for
the passenger sitting in the middle.<
Adjusting safety belt heightUse the height adjustment mechanism
to adapt the shoulder strap to the ideal
level for your own body:
>Slide button up or down.
Please refer to the seat adjustment
instructions on page 40.
If the safety belt system has been
subjected to the stresses involved
in an accident or otherwise damaged:
have the entire safety belt mechanism
replaced by your BMW center, including
the safety belt tensioner. In addition,
have your BMW center inspect the safety
belt anchors. If a child-restraint system
was in the vehicle during an accident,
consult the manufacturer's instructions
regarding replacement.<
Page 106 of 147
106n
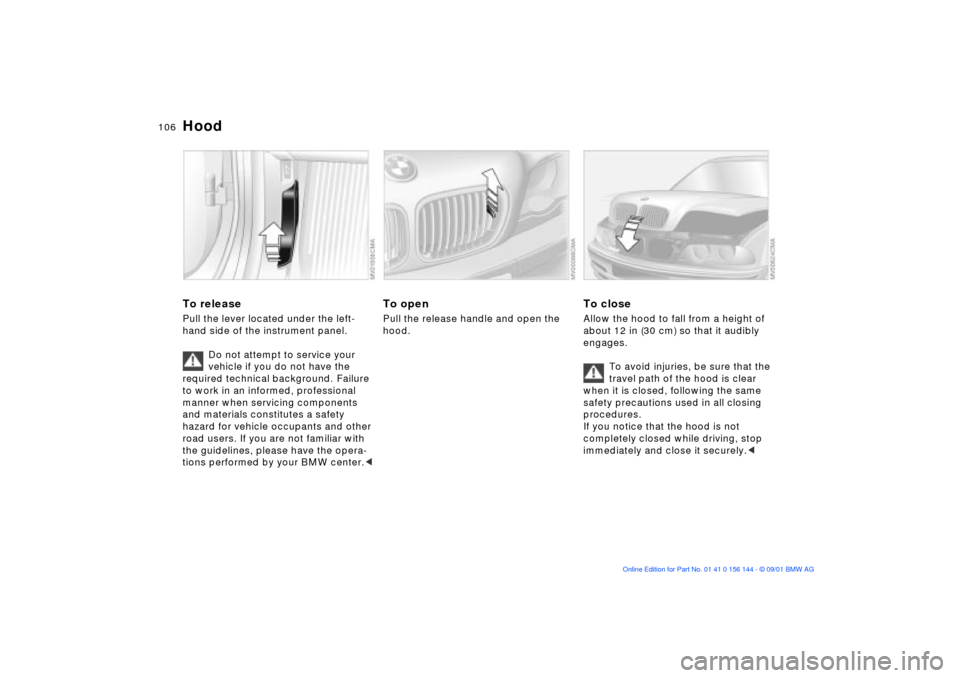
To releasePull the lever located under the left-
hand side of the instrument panel.
Do not attempt to service your
vehicle if you do not have the
required technical background. Failure
to work in an informed, professional
manner when servicing components
and materials constitutes a safety
hazard for vehicle occupants and other
road users. If you are not familiar with
the guidelines, please have the opera-
tions performed by your BMW center.<
To openPull the release handle and open the
hood.
To closeAllow the hood to fall from a height of
about 12 in (30 cm) so that it audibly
engages.
To avoid injuries, be sure that the
travel path of the hood is clear
when it is closed, following the same
safety precautions used in all closing
procedures.
If you notice that the hood is not
completely closed while driving, stop
immediately and close it securely.<
Hood
Page 123 of 147
123n
OverviewControlsMaintenanceRepairsDataIndex
Changing a wheel
Safety precautions in the event of
a flat tire or wheel change:
Stop the vehicle as far as possible from
passing traffic. Park on a firm support
surface. Switch on the hazard warning
flashers. Turn the steering wheel to the
straight-ahead position, remove the key
and engage the steering lock. Shift into
1st or reverse (selector lever in Park
with automatic transmission) and
engage the parking brake.
All passengers should be outside the
vehicle and well away from your imme-
diate working area (behind a guardrail,
for example).
If a warning triangle or portable hazard
warning lamp is available, set it up on
the roadside at an appropriate distance
from the rear of the vehicle. Comply
with all local safety guidelines and
regulations.
Change the wheel only on a level, firm
surface which is not slippery. Avoid
jacking the vehicle on a soft or slippery
support surface (snow, ice, loose
gravel, etc.), as either the vehicle or the
jack could slip sideways.
Position the jack on a firm support
surface.
Do not place wooden blocks or similar
objects under the jack. They could
prevent the jack from extending to its
full height and reduce its support
capacity.
Do not lie under the vehicle or start the
engine when the vehicle is supported
by the jack Ð risk of fatal injury.<
Your BMW is equipped with a spare tire
or a space-saver tire designed for
temporary use in maintaining the
vehicle's mobility in an emergency.
To remove the spare tire, lift the
floor panel in the luggage
compartment completely out, refer to
page 35.<
What you will needIn order to avoid rattling noises later,
note the position of the tools when you
remove them and return them to their
original position when you are done
using them.
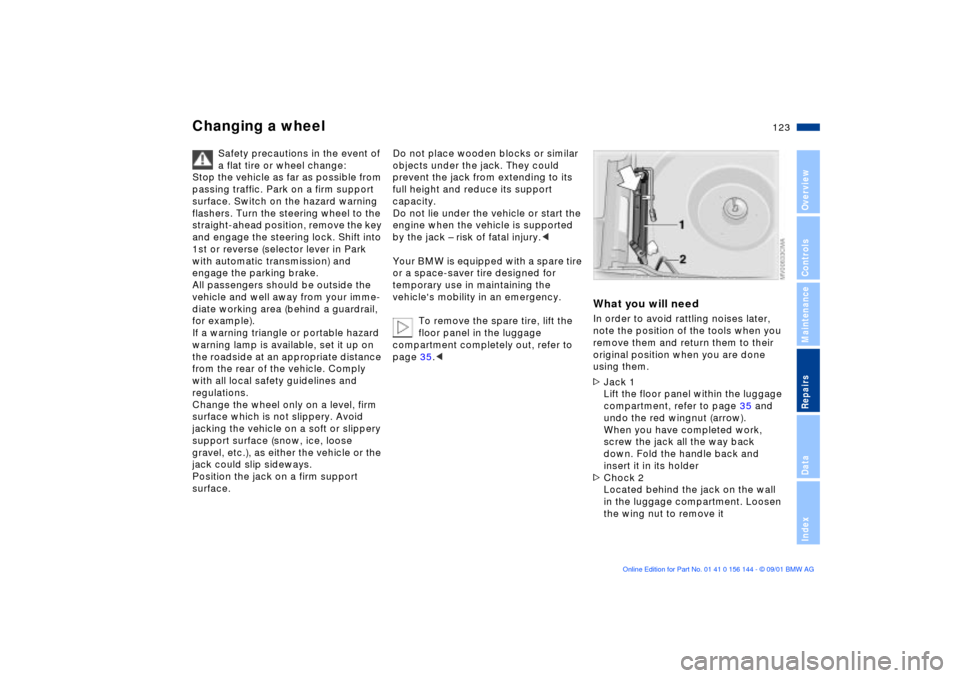
>Jack 1
Lift the floor panel within the luggage
compartment, refer to page 35 and
undo the red wingnut (arrow).
When you have completed work,
screw the jack all the way back
down. Fold the handle back and
insert it in its holder
>Chock 2
Located behind the jack on the wall
in the luggage compartment. Loosen
the wing nut to remove it
Page 140 of 147
Everything from A to ZDivided rear-seat
backrest91
Door keys28
Doors
electrical malfunction31
locking and unlocking29
manual operation31
DOT Quality Grades102
Draft-free ventilation82, 85
Driving notes99
DSC (Dynamic Stability
Control)19, 71
Dynamic Brake Control
(DBC)19, 72
Dynamic Stability Control
(DSC)19, 71 E
Electric power windows38
Electrical heating, exterior
mirror47
Electrical malfunction
doors31
fuel filler door22
luggage compartment
lid33
sliding/tilt sunroof39 Elements of operation14
Emergency release of
luggage compartment lid
from luggage
compartment's interior35
Energy control64
Engine compartment
essentials107
Engine coolant, refer to
coolant111
Engine data132
Engine oil
capacity135
consumption109
level19
level, check109
level, indicator lamp17
pressure17
pressure, indicator
lamp17
quality110
specifications110
viscosity110
Engine speed132
Engine, starting54
Engine, switching off55
Entering the rear43
Exterior mirrors47
electrical heating47
F
Failure messages66
Fault displays66
Filling capacities135
Finger guard38
Fittings, tow starting and
towing129
Flashlight87
Flat Tire
Monitor75, 103, 126
Flat tires101, 123, 126
Floor mat, luggage
compartment35
Floor panel, luggage
compartment35
Fog lamps78
Follow me home lamps77
Fuel consumption68
display65
Fuel filler door22
electrical malfunction22
manual operation22
Fuel gauge65
Fuel preparation132
Fuel reserve indicator
lamp65
Fuel specifications23
Fuel tank capacity135
Fuel tank gauge65
Fuses127
G
Gasoline gauge65
Glove compartment87
Grilles83
Gross vehicle weight134 H
Handbrake56
Hands-free system89
Hazard warning triangle22
Head restraints43
Headlamp cover, care119
Headlamp flasher78
Headlamp washer
system108
capacity135
Headlamps77
Headlight control77
Headrests43
Heated seats46
Heater and ventilation83
Heavy cargo93
Height133
High beams20, 59, 78
bulb replacement119
Holder for canned
beverages88
Hood release106
Horn14
Page 142 of 147

Everything from A to ZOil change intervals, see the
Service and Warranty
Information Booklet/
Warranty and Service
Guide Booklet
Oil dipstick109
Oil filter change135
OIL SERVICE65
Onboard computer66
refer to the "Onboard
Computer Owner's
Manual"
Onboard tool kit118
Opening and closing
from the inside32
via the door lock31
via the remote control29
Outlets, ventilation83
Outside temperature
display67
P
Paint care, refer to the
"Caring for your vehicle"
manual
Park assistant69
Park Distance Control
(PDC)69
Parking aid69
Parking brake56
Parking lamps77
bulb replacement119
PDC (Park Distance
Control)69
Performance132
Pocket light87
Power seat adjustment42
Power windows38
Premium sound system86
Protective function38 Q
Quality Grades102
R
Rain sensor60
RDC (Tire Pressure
Monitor)73
Reading lamps
front79
rear79
Rear center 3-point belt91
Rear fog lamps
bulb replacement121
Rear lamps121
Rear reading lamps79
Rear window
defroster81, 85
Rear-seat backrest,
removable91
Rearview mirror47
Recirculated-air mode81
Reclining seat40
Refueling22
Release backrest43
Releasing the fuel filler door
after an electrical
malfunction22
Remote control29
Removable rear-seat
backrest91 Remove window
condensation82, 84
Replace windshield wiper
blades118
Replacement keys28
Replacing lamps and
bulbs118
Reporting safety defects11
Reverse56
Roller sun blind86
Roof load capacity134
Roof-mounted luggage
rack94
S
Safety belts
correct use40
height adjustment44
Safety defects, reporting11
Safety tires103, 126
Seat adjustment40
Seat heating46
Seat memory45
Seats40
Securing cargo93
Securing child-restraint
system52