2002 BMW 325Ci COUPE clock
[x] Cancel search: clockPage 16 of 147

16n
Instrument cluster
7 Indicator and warning
lamps17 to 20
8 Reset trip odometer to zero
9 Indicator for Check Control6610 Display for
>
Trip odometer/odometer64
>
Clock66
>
Service Interval65
>
Computer6611 Selector lever and program display
for automatic transmission18, 59
12 Control button for the clock66
13 Indicator and warning
lamps17 to 20
Page 49 of 147

49n
OverviewControlsMaintenanceRepairsDataIndex
Airbags
The airbags do not deploy in
response to minor collisions, rear
impacts and certain kinds of vehicle
rollover.<
For your safety, comply with the
following instructions for the
airbags. If you do not, the airbags may
not be able to provide their maximum
protection. All passengers in the vehicle
should be aware of and comply with
these directions:
The airbags are supplemental restraint
devices designed to provide extra
protection; they are not a substitute for
safety belts. Wear your safety belt at all
times. The airbags will not be triggered
in the event of a minor accident, a
vehicle rollover, or collisions from the
rear. In these instances, the safety belt
provides optimal protection.
Airbags are located under cover panels
in the steering wheel, in the instrument
panel, in the side trim panels in the
front and rear
*, in the roof panels, and
in the sides of the inside roof lining.
Adjust your seat to a position that
provides maximum distance between
you and the steering wheel, the instru-
ment panel and the door while still
allowing comfortable and safe access
to all vehicle controls.
To avoid sustaining hand and arm inju-
ries, always grasp the steering wheel
on the rim with the hands at the 9 and
3 o'clock positions. Do not place your
hands on the center pad.
Never allow any objects to obstruct the
area between the airbag and an occu-
pant.
Do not use the cover panel above the
passenger-side airbag as a storage
area.
Do not apply adhesive materials to the
cover panels of the airbags, cover them
or modify them in any other way.
Do not install a rear-facing child-
restraint system in the front passenger
seat of this vehicle.
Children under 13 years of age and less
than 5 ft (150 cm) tall should ride only in
the rear seat. Infants or small children
should never be held on the lap of a
passenger.
If your vehicle is equipped with side
airbags in the rear passenger area
*, be
sure that child restraints are mounted
correctly, with the greatest-possible
distance between the airbags in the
side trim panels. Do not allow children
to lean out of the child's seat in the
direction of the side trim panels. If they
do so, serious injuries can occur if the
airbag is triggered.
restrained (infants and small children in
appropriate child-restraint systems;
larger children and adults using the
safety belts). Never let an occupant's
head rest near or on a side airbag: in
the event of deployment the airbag
could cause a serious or fatal injury.
Please note that the word Airbag
embossed on the door trim panel indi-
cates the airbag's location.
Accident research shows that the
safest place for children in an automo-
bile is in the rear seat. However, a child
sitting in the rear seat and not properly
restrained may place his or her head on
or near the airbag, if one is installed.
For example, a child Ñ even though
belted Ñ may fall asleep with his or her
head against the side airbag. It may be
difficult for a driver to ensure that chil-
dren in the rear seat will remain prop-
erly positioned at all times and do not
place their heads on or near the side
airbag.
Therefore, we recommend that the
rear-seat side airbags, if installed, be
deactivated if children will be riding in
the rear seat.
The rear-seat side airbags may already
have been deactivated, either at the
Page 66 of 147

66n
Check Control Computer The following information and/or condi-
tions are indicated using symbols,
starting with the ignition key in
position 2, until the condition has been
corrected.
1 Check the low beams and high
beams, as well as the parking lamps
2 Door open
3 Luggage compartment lid open
4 Check tail or brake lamps
When you open the driver's door after
parking, a signal sounds to remind you
if the headlamps have not been
switched off.
Mode selectionWith ignition key in position 1 or 2, you
can request information from the
computer using the button in the turn
signal lever. By pressing the button
briefly toward the steering column, you
can call up a new function for display.
The displays appear in the following
order:
Time, outside temperature, average fuel
consumption, cruising range, average
vehicle speed.
Starting with ignition key position 1,
the last active setting is displayed.
ClockIf you wish to have a permanent time
display, you can make this adjustment
in the radio display (refer to the Radio
Owner's Manual).
You can adjust the clock and the time
display in the car radio as follows.
Page 67 of 147

67n
OverviewControlsMaintenanceRepairsDataIndex
ComputerAdjustmentsWith the ignition key in position 1or 2
and time displayed in the instrument
cluster.
To set ahead: turn the button to the
right.
To set back: turn the button to the left.
The adjustment speed will increase the
longer you continue to hold the button.
To change the display mode: press the
button briefly.
Every time you press the button, the
clock display alternates between the
12-hour or 24-hour mode.
In ignition key position 0: the time is
displayed for a few seconds after you
press the left button, refer to Odometer
on page 64.
Outside temperatureYou can change the units of measure
(6/7) for the outside temperature
display by pressing the right-hand reset
button in the instrument cluster while
the temperature display is active.
Ice warningIf the outside temperature drops to
about 37.5 7 (+3 6), then the
computer will automatically switch to a
display of the outside temperature. In
addition, a signal sounds as a warning
and the display flashes for a brief
period.
The ice warning does not alter the
fact that surface ice can form at
temperatures above 37.5 7 (+3 6), on
bridges or shaded road surfaces, for
instance.<
Page 111 of 147

111n
OverviewControlsMaintenanceRepairsDataIndex
Coolant
Do not add coolant to the cooling
system when the engine is hot. If
you attempt to do so, escaping coolant
can cause burns.
To avoid the possibility of damage later
on, never use anything other than
factory-approved, nitrite and amino-
free extended-duty antifreeze with
corrosion inhibitor. Your BMW center is
familiar with the official specifications.
Antifreeze and anti-corrosion agents
are hazardous to health. You should
always store them in their original
container and in a location which is out
of reach of children.
Extended-duty antifreeze with corro-
sion inhibitor contains the flammable
substance ethylene glycol. For this
reason, do not spill extended-duty anti-
freeze with corrosion inhibitor on hot
engine parts. It could ignite and cause
serious burns.<
Checking coolant levelCorrect coolant level for cold engine
(approx. 68 7 or +20 6):
1. Open the cap for the expansion tank
by turning it slightly counterclock-
wise to allow accumulated pressure
to escape. Then open
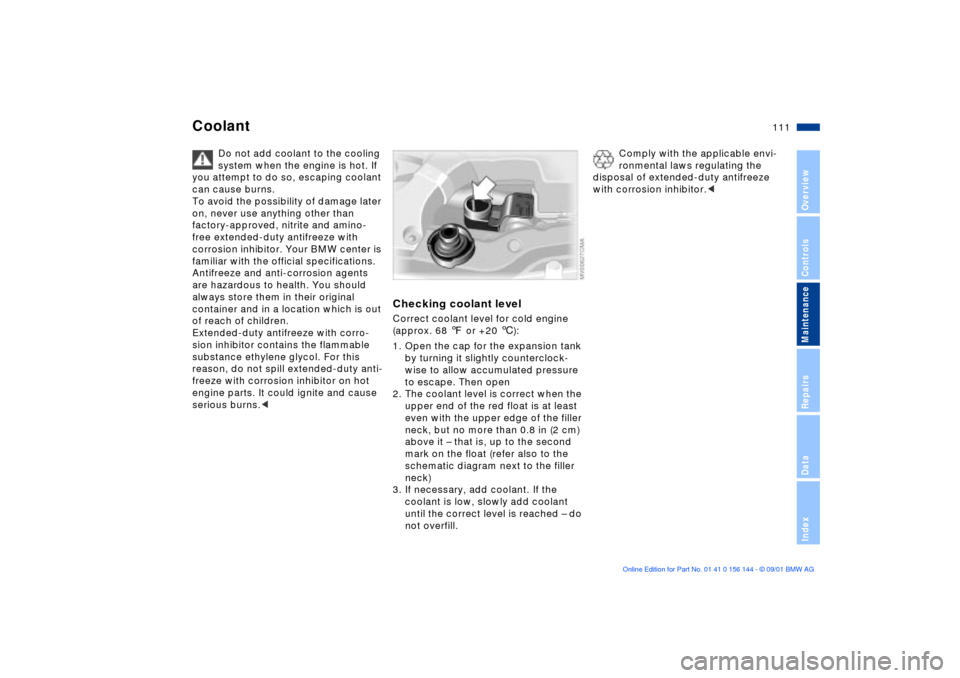
2. The coolant level is correct when the
upper end of the red float is at least
even with the upper edge of the filler
neck, but no more than 0.8 in (2 cm)
above it Ð that is, up to the second
mark on the float (refer also to the
schematic diagram next to the filler
neck)
3. If necessary, add coolant. If the
coolant is low, slowly add coolant
until the correct level is reached Ð do
not overfill.
Comply with the applicable envi-
ronmental laws regulating the
disposal of extended-duty antifreeze
with corrosion inhibitor.<
Page 139 of 147

Everything from A to Z
139n
OverviewControlsMaintenancRepairsDataIndex
C
California Proposition
65 Warning114
Canned beverage holder88
Capacities135
Car care, refer to the "Caring
for your vehicle" manual
Car keys28
Car wash systems, refer to
the "Caring for your
vehicle" manual
Care of upholstery materials,
refer to the "Caring for your
vehicle" manual
Cargo loading93
CBC (Cornering Brake
Control)18, 71
Cellular phone89
refer also to the separate
"Owner's Manual"
Center (high-mount) brake
lamp122
Center 3-point belt in the
rear91
Center armrest87
Central locking system28
button32 Changing a wheel123
Check Control66
Check engine oil level109
Checking tire inflation
pressure24
Child restraint
installation52
Child-restraint anchorage
points51
Clean the headlamps61
Cleaning windshield61
Clock66
refer also to the "Radio
Owner's Manual" or to the
"Onboard Computer
Owner's Manual"
Clothes hooks90
Cockpit14
Coin box88
Compartments87
Compression132
Computer refer also to the "Onboard
Computer Owner's
Manual"
Configuring individual
settings with Vehicle and
Key Memory53
Consumption68
display65
Convenience operation via
the door lock
sliding/tilt sunroof31
windows31
Coolant111
Coolant temperature
gauge65
Cooling system,
capacity135
Copyright4
Cornering Brake Control
(CBC)18, 71
Correct sitting posture40
Cover, sun blinds86
Cruise control62
Cruising range68
Cup holder, refer to
beverage holder88
Curb weight134 Current check indicator17
D
Dash lighting78
Dashboard14
Data
dimensions133
engine132
technical132
weights134
Daytime driving lamp77
DBC (Dynamic Brake
Control)19, 72
Deep water99
Defrost setting82, 84
Defrost windows82, 84
Defrostable rear
window81, 85
Digital clock66
Dimensions133
Dipstick, engine oil109
Displacement132
Display lighting78
Displays15
Distance warning69