2002 BMW 325Ci COUPE maintenance
[x] Cancel search: maintenancePage 111 of 147

111n
OverviewControlsMaintenanceRepairsDataIndex
Coolant
Do not add coolant to the cooling
system when the engine is hot. If
you attempt to do so, escaping coolant
can cause burns.
To avoid the possibility of damage later
on, never use anything other than
factory-approved, nitrite and amino-
free extended-duty antifreeze with
corrosion inhibitor. Your BMW center is
familiar with the official specifications.
Antifreeze and anti-corrosion agents
are hazardous to health. You should
always store them in their original
container and in a location which is out
of reach of children.
Extended-duty antifreeze with corro-
sion inhibitor contains the flammable
substance ethylene glycol. For this
reason, do not spill extended-duty anti-
freeze with corrosion inhibitor on hot
engine parts. It could ignite and cause
serious burns.<
Checking coolant levelCorrect coolant level for cold engine
(approx. 68 7 or +20 6):
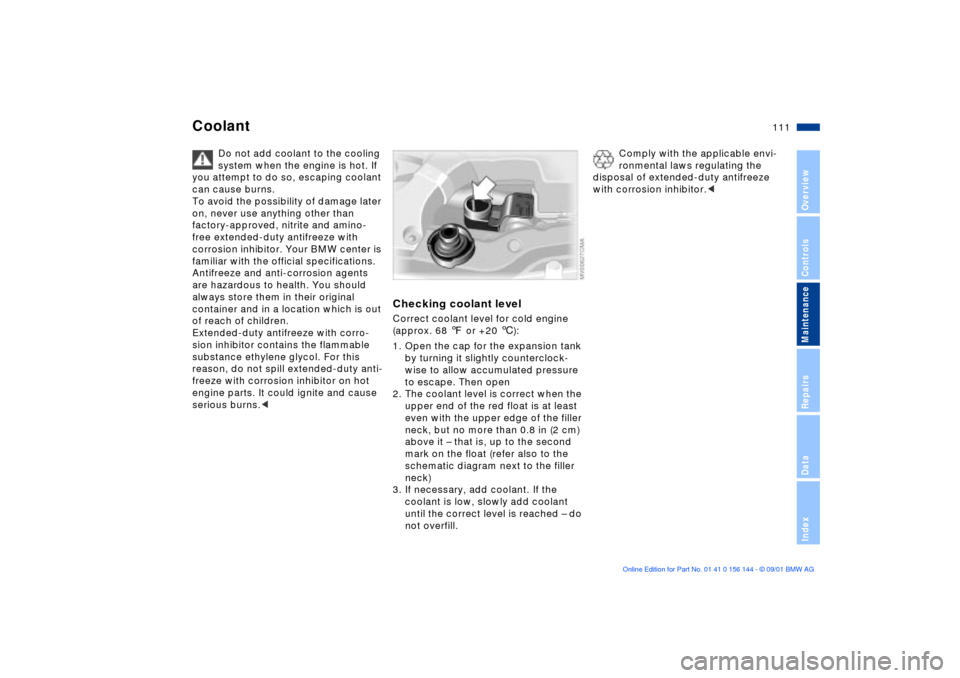
1. Open the cap for the expansion tank
by turning it slightly counterclock-
wise to allow accumulated pressure
to escape. Then open
2. The coolant level is correct when the
upper end of the red float is at least
even with the upper edge of the filler
neck, but no more than 0.8 in (2 cm)
above it Ð that is, up to the second
mark on the float (refer also to the
schematic diagram next to the filler
neck)
3. If necessary, add coolant. If the
coolant is low, slowly add coolant
until the correct level is reached Ð do
not overfill.
Comply with the applicable envi-
ronmental laws regulating the
disposal of extended-duty antifreeze
with corrosion inhibitor.<
Page 113 of 147

113n
OverviewControlsMaintenanceRepairsDataIndex
The BMW Maintenance System has
been designed as a reliable means of
providing maximum driving and oper-
ating safety Ð and as cost-effectively as
possible for you.
Please keep in mind that regular main-
tenance is not only necessary for the
safety of your vehicle, but also plays a
significant role in maintaining the resale
value of the vehicle.
Service Interval DisplayWhile conventional systems rely on
distance traveled alone to determine
when service is due, the BMW Mainte-
nance System has for years considered
the actual conditions under which the
vehicle operates, because miles can be
traveled in many different ways:
From a maintenance point of view,
62,000 miles (100,000 km) of short-
distance urban driving cannot be
compared with 62,000 miles
(100,000km) of long-distance highway
travel.
The BMW Maintenance System
includes the Engine Oil Service and
Inspections I and II.
Determining the maintenance intervals
according to the actual use of the
vehicle covers every kind of operating
situation. However, even those who
only drive a little bit Ð significantly fewer
than 6,200 miles (10,000 km) annually Ð
should have the engine oil changed at
least every 2 years since oil deterio-
rates over time, regardless of use.
Service and Warranty Information
Booklet (US models)/Warranty
and Service Guide Booklet (Cana-
dian models)For additional information on specified
maintenance intervals and procedures,
please refer to the Service and
Warranty Information Booklet (US
models), or the Warranty and Service
Guide Booklet (Canadian models).
As a precaution against rust, it is advis-
able to have the body checked for
damage from rocks or gravel at the
same time, depending upon operating
conditions.
Have your BMW center perform
maintenance and repair.
Be sure that all maintenance work is
confirmed in the Service and Warranty
Information Booklet (US models), or in
the Warranty and Service Guide
Booklet (Canadian models). These
entries are your verification of regular
maintenance on your vehicle and are
required for the performance of
warranty repairs.<
The BMW Maintenance System
Page 115 of 147

115n
OverviewControlsMaintenanceRepairsDataIndex
OBD interface socketThe interface socket for onboard diag-
nostics is located on the left-hand side
of the driver's side, on the underside of
the instrument panel and under a cover
panel. The cover has the letters OBD on
it.
This interface makes it possible to
access data on emissions-related
components using special equipment.
An illuminated indicator informs
you of the need for service, not
that you need to stop the
vehicle. However, the systems should
be checked by your BMW center at the
earliest possible opportunity.
If the indicator blinks or flashes, this
indicates a high level of engine misfire.
Reduce speed and contact the nearest
BMW center immediately. Severe
engine misfiring over even a short
period of time can seriously damage
emission control system components,
especially the catalytic converter.
Service Engine Soon warning
lamp for Canadian models.
If the fuel filler cap is not on tight
enough, the OBD system can
detect leaking vapor and the indicator
will light up. If the fuel filler cap is then
tightened, the indicator will usually go
out after a short period of time.<
Page 117 of 147

117n
Overview
Controls
Maintenance
Repairs
Data
Index
Overview
Controls and features
Operation, maintenance
Owner service procedures
Index
Technical data
Page 119 of 147

119n
OverviewControlsMaintenanceRepairsDataIndex
Lamps and bulbsLow beams and high beamsEngine compartment, left side:
1 Low beams
2 High beams
H7 bulb, 55 watt
The H7 bulb is pressurized. There-
fore, wear safety glasses and
protective gloves. Failure to comply
with these precautions could result in
physical injury if the bulb breaks.<
1. Press the two release catches at the
front while simultaneously turning
them to the left to remove the bulb
holder
2. Remove and replace the bulb.
When cleaning the headlamps,
please observe the following:
>Do not clean by wiping with a dry
cloth (scratches). Never use abra-
sives or strong solvents to clean the
covers
>Remove dirt and contamination (such
as insects) by soaking with BMW Car
Shampoo and then rinsing with plenty
of water
>Always use a deicer spray to remove
accumulated ice and snow Ð never
use a scraper.<
Xenon lamps
The service life of these bulbs is very
long and the probability of a failure is
very low, provided that they are not
switched on and off an unusual number
of times. If one of these bulbs should
nevertheless fail, it is possible to
continue driving with great caution
using the fog lamps, provided local
traffic laws do not prohibit this.
Because of the extremely high
voltages involved, any work on the
lighting system should be carried out by
technically-qualified personnel only.
Otherwise, there is a risk of fatal
injury.<
Parking lampsEngine compartment, left side:
1. Turn the bulb holder to the left and to
remove
2. Remove and replace the bulb.
5 watt bulb
Page 121 of 147

121n
OverviewControlsMaintenanceRepairsDataIndex
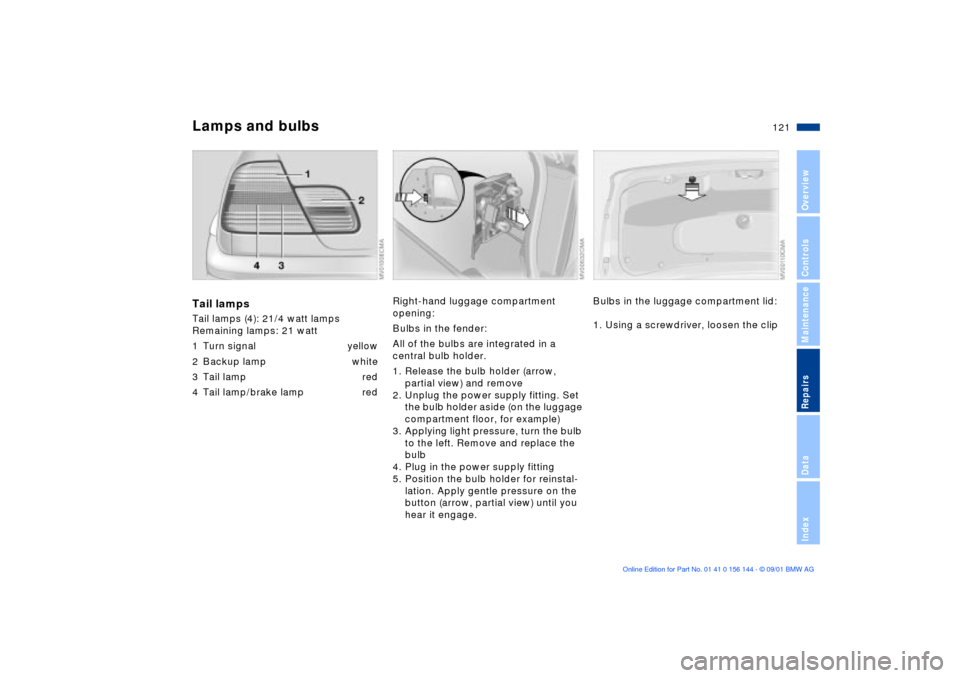
Lamps and bulbsTail lampsTail lamps (4): 21/4 watt lamps
Remaining lamps: 21 watt
1 Turn signal yellow
2 Backup lamp white
3 Tail lamp red
4 Tail lamp/brake lamp red
Right-hand luggage compartment
opening:
Bulbs in the fender:
All of the bulbs are integrated in a
central bulb holder.
1. Release the bulb holder (arrow,
partial view) and remove
2. Unplug the power supply fitting. Set
the bulb holder aside (on the luggage
compartment floor, for example)
3. Applying light pressure, turn the bulb
to the left. Remove and replace the
bulb
4. Plug in the power supply fitting
5. Position the bulb holder for reinstal-
lation. Apply gentle pressure on the
button (arrow, partial view) until you
hear it engage.
Bulbs in the luggage compartment lid:
1. Using a screwdriver, loosen the clip
Page 123 of 147

123n
OverviewControlsMaintenanceRepairsDataIndex
Changing a wheel
Safety precautions in the event of
a flat tire or wheel change:
Stop the vehicle as far as possible from
passing traffic. Park on a firm support
surface. Switch on the hazard warning
flashers. Turn the steering wheel to the
straight-ahead position, remove the key
and engage the steering lock. Shift into
1st or reverse (selector lever in Park
with automatic transmission) and
engage the parking brake.
All passengers should be outside the
vehicle and well away from your imme-
diate working area (behind a guardrail,
for example).
If a warning triangle or portable hazard
warning lamp is available, set it up on
the roadside at an appropriate distance
from the rear of the vehicle. Comply
with all local safety guidelines and
regulations.
Change the wheel only on a level, firm
surface which is not slippery. Avoid
jacking the vehicle on a soft or slippery
support surface (snow, ice, loose
gravel, etc.), as either the vehicle or the
jack could slip sideways.
Position the jack on a firm support
surface.
Do not place wooden blocks or similar
objects under the jack. They could
prevent the jack from extending to its
full height and reduce its support
capacity.
Do not lie under the vehicle or start the
engine when the vehicle is supported
by the jack Ð risk of fatal injury.<
Your BMW is equipped with a spare tire
or a space-saver tire designed for
temporary use in maintaining the
vehicle's mobility in an emergency.
To remove the spare tire, lift the
floor panel in the luggage
compartment completely out, refer to
page 35.<
What you will needIn order to avoid rattling noises later,
note the position of the tools when you
remove them and return them to their
original position when you are done
using them.
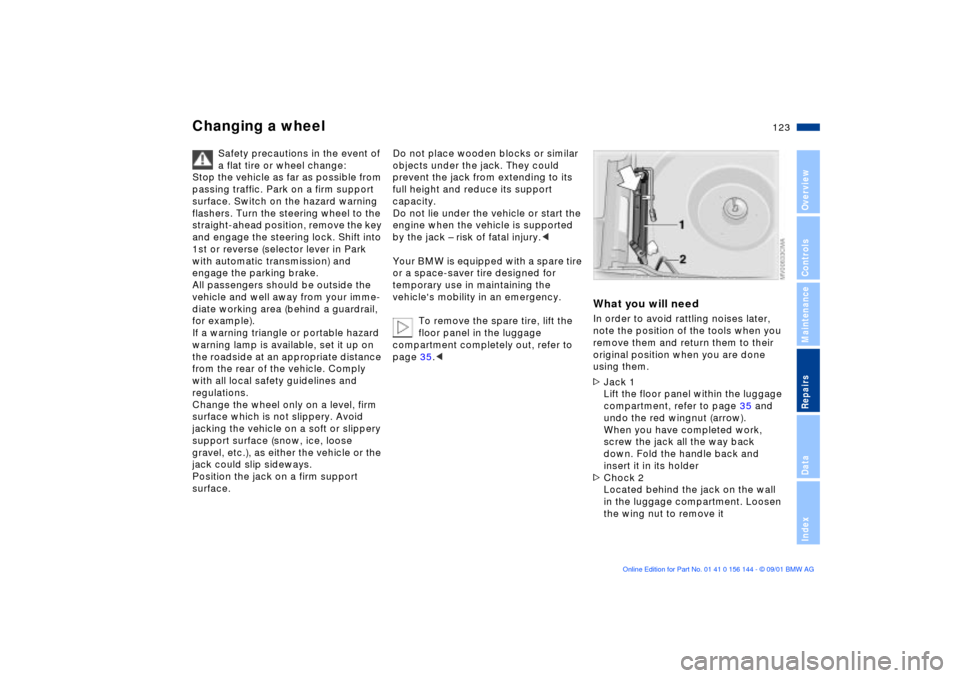
>Jack 1
Lift the floor panel within the luggage
compartment, refer to page 35 and
undo the red wingnut (arrow).
When you have completed work,
screw the jack all the way back
down. Fold the handle back and
insert it in its holder
>Chock 2
Located behind the jack on the wall
in the luggage compartment. Loosen
the wing nut to remove it
Page 125 of 147

125n
OverviewControlsMaintenanceRepairsDataIndex
Changing a wheel8. Remove accumulations of mud or
dirt from the mounting surfaces of
the wheel and hub. Clean the lug
bolts
9. Position the new wheel or the
space-saver spare tire on the hub
and screw at least two lug bolts
finger-tight into opposite bolt holes
10. Screw in the remaining lug bolts.
Screw in all the bolts in diagonal
pattern
11. Lower the jack and remove it from
beneath the vehicle
12. Tighten the lug bolts securely in a
diagonal pattern
13. Wheels with full wheel covers
*:
Place the wheel cover with the
valve opening (arrow) over the
valve. Use both hands to press the
cover securely onto the rim
14. Check and correct the tire inflation
pressure at the earliest opportunity.
Vehicles with Tire Pressure Monitor
(RDC)/Flat Tire Monitor:
After mounting the spare tire or
correcting the tire inflation pres-
sure, reactivate the system, refer to
pages 73, 75.
Protect valve stems and valves from dirt
using screw-on valve stem caps. Dirty
valve stems frequently lead to slow
pressure loss.
Only use original BMW full wheel
covers, otherwise, the trim piece
may not fit securely. The full wheel
cover may not be installed on the
space-saver spare tire, since this could
damage the cover.<
The vehicle jack is designed for
changing wheels only. Do not
attempt to raise another vehicle model
with it or to raise any load of any kind.
To do so could cause accidents and
personal injury.
To ensure continued safety, have the
tightness of the torque bolts checked
with a calibrated lug wrench [torque
specification: 72 lb ft (100 Nm)] at the
earliest opportunity.<
When storing a wheel in the spare tire
recess take care to avoid bending the
threaded rod.
If the original BMW light-alloy wheels
have been replaced with other light-
alloy wheels, different lug bolts may be
required.
Replace the defective tire as soon as
possible and have the new wheel/tire
balanced.