2002 BMW 325Ci COUPE steering
[x] Cancel search: steeringPage 54 of 147

54n
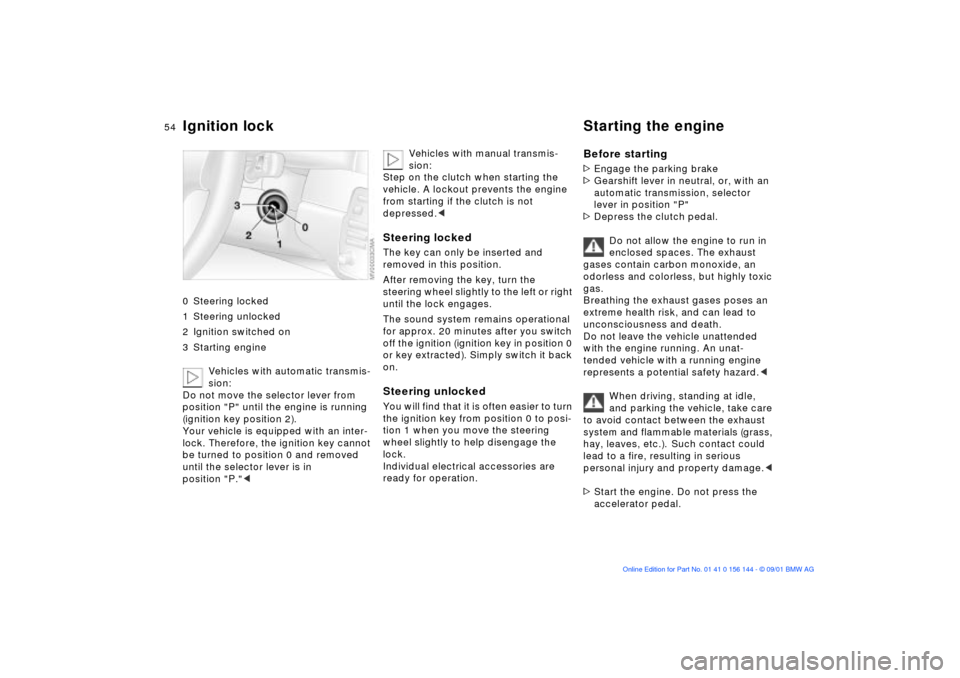
Ignition lock Starting the engine 0 Steering locked
1 Steering unlocked
2 Ignition switched on
3 Starting engine
Vehicles with automatic transmis-
sion:
Do not move the selector lever from
position "P" until the engine is running
(ignition key position 2).
Your vehicle is equipped with an inter-
lock. Therefore, the ignition key cannot
be turned to position 0 and removed
until the selector lever is in
position "P."<
Vehicles with manual transmis-
sion:
Step on the clutch when starting the
vehicle. A lockout prevents the engine
from starting if the clutch is not
depressed.<
Steering lockedThe key can only be inserted and
removed in this position.
After removing the key, turn the
steering wheel slightly to the left or right
until the lock engages.
The sound system remains operational
for approx. 20 minutes after you switch
off the ignition (ignition key in position 0
or key extracted). Simply switch it back
on.Steering unlocked You will find that it is often easier to turn
the ignition key from position 0 to posi-
tion 1 when you move the steering
wheel slightly to help disengage the
lock.
Individual electrical accessories are
ready for operation.
Before starting>Engage the parking brake
>Gearshift lever in neutral, or, with an
automatic transmission, selector
lever in position "P"
>Depress the clutch pedal.
Do not allow the engine to run in
enclosed spaces. The exhaust
gases contain carbon monoxide, an
odorless and colorless, but highly toxic
gas.
Breathing the exhaust gases poses an
extreme health risk, and can lead to
unconsciousness and death.
Do not leave the vehicle unattended
with the engine running. An unat-
tended vehicle with a running engine
represents a potential safety hazard.<
When driving, standing at idle,
and parking the vehicle, take care
to avoid contact between the exhaust
system and flammable materials (grass,
hay, leaves, etc.). Such contact could
lead to a fire, resulting in serious
personal injury and property damage.<
>Start the engine. Do not press the
accelerator pedal.
Page 55 of 147

55n
OverviewControlsMaintenanceRepairsDataIndex
Starting the engine Switching off the engine
Do not actuate the starter for too
short a time, but do not actuate it
for more than approx. 20 seconds.
Release the ignition key immediately
when the engine starts.
Do not allow the engine to warm up by
leaving it running while the vehicle
remains stationary. Instead, drive off
immediately at a moderate engine
speed.<
If the engine does not start on the first
attempt (if it is very hot or cold, for
instance):
>Press the accelerator pedal halfway
down while engaging the starter.
Cold starts at extremely low tempera-
tures of roughly +5 7 (Ð15 6) or below
and at altitudes of over 3,300 ft
(1,000 m):
>On the first start attempt, engage the
starter for a longer period (approx.
10 seconds)
>Press the accelerator pedal halfway
down while engaging the starter.
Engine idle speed is controlled by the
engine computer system. Increased
speeds at start-up are normal and
should decrease as the engine warms
up. If engine speed does not decrease,
service is required.
To prevent the battery from discharging,
always deactivate electrical devices
that are not in use. Switch the ignition
off when the vehicle is not being driven.
Extended starting attempts, char-
acterized by excessively frequent
or long periods with the starter
engaged, can lead to catalyst
damage.<
Turn the ignition key to position 1 or 0.
You should never remove the igni-
tion key when the vehicle is in
motion, as the steering lock could
engage.
When you leave the vehicle, always
remove the ignition key and engage the
steering lock.
Vehicles with manual transmission:
Always engage the parking brake when
parking on hills and slopes, as first gear
or reverse may not provide adequate
resistance to rolling.
Vehicles with automatic transmission:
Place the selector lever in "Park."<
Page 66 of 147

66n
Check Control Computer The following information and/or condi-
tions are indicated using symbols,
starting with the ignition key in
position 2, until the condition has been
corrected.
1 Check the low beams and high
beams, as well as the parking lamps
2 Door open
3 Luggage compartment lid open
4 Check tail or brake lamps
When you open the driver's door after
parking, a signal sounds to remind you
if the headlamps have not been
switched off.
Mode selectionWith ignition key in position 1 or 2, you
can request information from the
computer using the button in the turn
signal lever. By pressing the button
briefly toward the steering column, you
can call up a new function for display.
The displays appear in the following
order:
Time, outside temperature, average fuel
consumption, cruising range, average
vehicle speed.
Starting with ignition key position 1,
the last active setting is displayed.
ClockIf you wish to have a permanent time
display, you can make this adjustment
in the radio display (refer to the Radio
Owner's Manual).
You can adjust the clock and the time
display in the car radio as follows.
Page 71 of 147

71n
OverviewControlsMaintenanceRepairsDataIndex
ASC+T Dynamic Stability Control (DSC)
*
Reactivating the ASC+TPress the button again; the indicator
lamp goes out.
The laws of physics cannot be
repealed, even with ASC+T. It will
always be the driver's responsibility to
drive in a manner that matches road
conditions. This is why you should not
use the additional safety margin the
system provides as an excuse to take
risks.<
The conceptDSC maintains vehicle stability, even in
critical driving situations.
The system optimizes vehicle stability
during acceleration and when starting
from a full stop, as well as optimizing
traction. In addition, it recognizes
unstable vehicle conditions, such as
under- or oversteering, and, within
physically feasible limits, helps keeping
the vehicle on a steady course by
reducing the engine speed and brake
applications to the individual wheels.
The DSC is operational every time you
start the engine. DSC incorporates the
ADB and CBC (Cornering Brake
Control) functions.
The Automatic Differential Brake (ADB)
relies on selective braking applications
at the drive wheels to furnish the func-
tionality of a conventional limited-slip
differential for enhanced traction in crit-
ical driving conditions such as those
encountered on snow-covered road
surfaces, etc.
The ADB is operational when DSC is
switched off.
Indicator lamp
The indicator lamp on the instru-
ment cluster will go out shortly
after the ignition has been
switched on, refer to pages 18, 19.
The indicator lamp flashes:
DSC controls the drive and braking
forces.
The indicator lamp stays lit:
DSC has been switched off with the
button; ADB is operational.
ADB control intervention is not indi-
cated.
The indicator and the brake
warning lamps will remain on
continuously:
The DSC, ADB and DBC have
been switched off with the
button or are defective.
The vehicle will remain completely
operational, however, without DSC. In
the event of a fault, please consult your
BMW center, refer to pages 18, 19.
Indicator and warning lamps for
Canadian models.
Page 94 of 147

94n
Cargo loading Roof-mounted luggage rack
*
Always position and secure the
load correctly. If you do not, it can
endanger the passengers during
braking or evasive maneuvers.
Do not exceed the approved gross
weight or the approved maximum axle
loads, refer to page 134, otherwise the
vehicle's operating safety is no longer
assured and you are in violation of the
law.
Do not stow heavy or hard objects in
the passenger compartment without
securing them. Otherwise they would
be thrown around during braking and
evasive maneuvers and endanger the
passengers.<
A special roof-rack system is available
as an optional extra for your BMW.
Please observe the precautions
included with the installation instruc-
tions.AnchoragesAccess to the anchorages:
To fold up the cover (arrow), please use
the tool provided with the roof-rack
system.Loading and driving notesRoof-mounted luggage racks raise the
center of gravity of the vehicle when
they are loaded. For this reason, they
have a major effect on the vehicle's
handling and steering response.
You should therefore always remember
not to exceed the approved roof load
capacity, the approved gross vehicle
weight or the axle loads when loading
the rack. These weights are listed under
Technical Data on page 134.
Make sure that the load is not too bulky,
and attempt to distribute it evenly.
Always load the heaviest pieces first (on
the bottom). Be sure that adequate
clearance is maintained for raising the
sliding/tilt sunroof, and that objects do
not project into the opening path of the
luggage compartment lid.
Secure the roof luggage correctly and
securely to prevent it from shifting or
being lost during driving (danger to
following traffic).
Drive smoothly and avoid sudden
acceleration and braking. Do not corner
at high speeds.
The luggage rack and the roof load
increase aerodynamic resistance:
increased fuel consumption and addi-
tional stress on the vehicle's body are
the result.
Page 99 of 147

99n
OverviewControlsMaintenanceRepairsDataIndex
Driving notes Antilock Brake System
Brakes: do not drive with your foot
resting on the brake pedal. Even
light but consistent pressure on the
brake pedal can lead to high tempera-
tures, accelerated brake wear and
possibly even brake failure.
Aquaplaning: when driving on wet or
slushy roads, reduce your speed. If you
do not, a wedge of water may form
between tires and road surface. This
phenomenon can lead to partial or
complete loss of contact between the
tires and road surface, vehicle control
and braking ability.
Driving through water: do not drive
through water on the road if it is deeper
than 1 ft (30 cm), and then only at
walking speed. Otherwise, the vehicle's
engine, the electrical systems and the
transmission may be damaged.
Rear parcel tray: never use it to store
heavy or hard objects, as otherwise
occupants could be injured during
braking maneuvers.
Clothes hooks: when hanging clothing
from the hooks, be sure that they will
not obstruct the driver's vision. Do not
hang heavy objects on the hooks. If you
do so, they could cause personal injury
during braking or evasive maneuvers.<
The conceptThe Antilock Brake System (ABS) keeps
the wheels from locking during braking,
thereby enhancing active driving safety.Braking with ABSIf you are in a situation that requires full
braking, you will exploit the full benefits
of the ABS system if you apply
maximum pedal pressure (panic stop).
Since the vehicle maintains steering
responsiveness, you can avoid possible
obstacles with a minimum of steering
effort, despite the full brake application.
Pulsation at the brake pedal combined
with sounds from the hydraulic circuits
indicates to the driver that ABS is in its
active mode.
Page 100 of 147

100n
Brake systemBrake fluid level If the brake fluid level is too low and
brake pedal travel has become longer,
there may be a defect in one of the
brake system's hydraulic circuits.
Proceed to the nearest BMW
center. It may be necessary to
apply higher levels of pressure to the
pedal when stopping and braking
distances may also be longer. Please
remember to adapt your driving style
accordingly.
and operating conditions in which
braking is restricted to gentle, low-
pressure applications will all increase
the tendency for corrosion to form on
the rotors; this is often accompanied by
a simultaneous accumulation of
contamination on the brake pads. The
pads must exert a certain minimal level
of pressure against the rotors for the
disc brakes' inherent self-cleaning
effect to remain effective; the pressure
available under the above conditions
may not provide adequate cleansing.
If the brake rotors are corroded, they
will tend to respond to braking with a
pulsating effect that even extended
brake applications will fail to cure.
When driving in heavy rain and on wet
roads it is a good idea to apply light
pressure to the brake pedal every few
miles. Monitor traffic conditions to
ensure that this maneuver does not
pose a hazard to you or to other road
users. The heat generated in this
process helps dry the pads and rotors
to ensure that your brake system will
respond with undiminished efficiency
when you need it.
When descending steep hills and
extended grades, downshift to a gear
that will allow you to continue safely
with only a minimal amount of braking.
By minimizing the loads placed on the
brake system, this strategy helps
ensure that optimal brake system
response will remain available at all
times. Use care to avoid exceeding the
approved engine-speed range, refer to
page 64.Do not coast with the clutch
depressed or with the transmis-
sion or selector lever in Neutral. Do not
coast with the engine shut off. The
engine provides no braking effect when
the clutch is depressed and there is no
power-assist for braking or steering
when the engine is not running.
Never allow floor mats, carpets or any
other objects to protrude into the area
around the accelerator, clutch and
brake pedals and obstruct their move-
ment.<
Brake pads
For your own safety: use only
brake pads that the manufacturer
has released for your particular vehicle
model. The manufacturer cannot eval-
uate non-approved brake pads to
determine if they are suited for use, and
therefore cannot ensure the operating
safety of the vehicle if they are
installed.<
Page 101 of 147

101n
OverviewControlsMaintenanceRepairsDataIndex
Information for your safetyThe factory-approved radial tires are
matched to the vehicle and have been
selected to provide optimum safety and
driving comfort.
It is not merely the tire's service life, but
also driving comfort and Ð above all else
Ð driving safety that depend on the
condition of the tires and the mainte-
nance of the specified tire inflation
pressure.
Incorrect tire inflation pressure is
a frequent cause of tire damage. It
also significantly influences the road-
holding ability of your BMW.
Be sure to check the tire inflation pres-
sure, including the space-saver spare
tire or the spare tire, on a regular basis,
at least twice a month and before every
extended journey, refer to page 24. If
this is not done, incorrect tire pressures
can cause driving instability and tire
damage, ultimately resulting in acci-
dents.<
Tire tread Ð tire damageInspect your tires frequently for tread
wear, signs of damage and for foreign
objects lodged in the tread. Check the
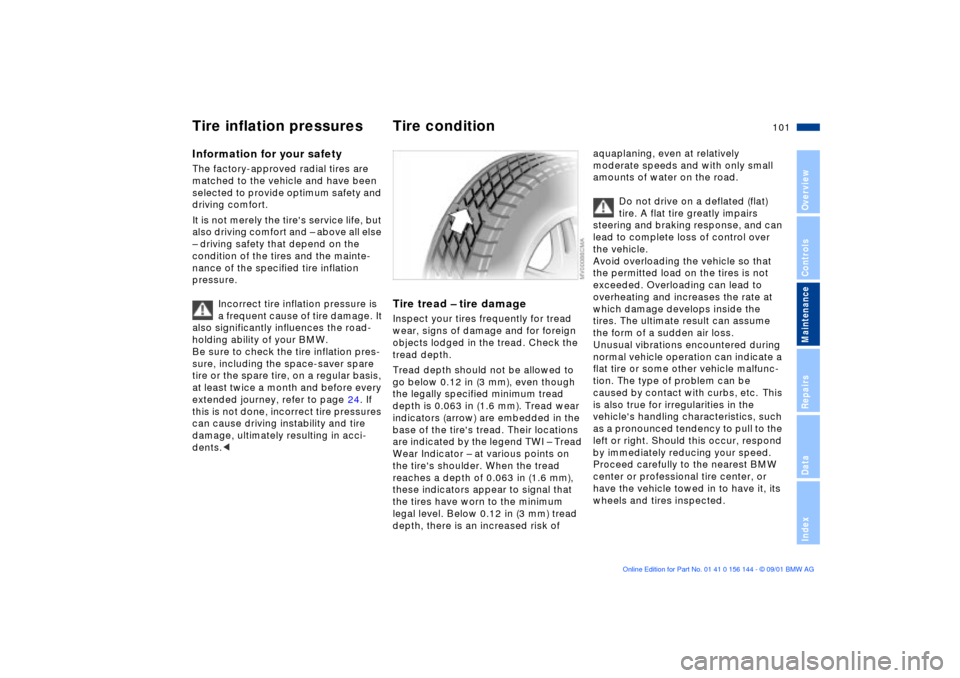
tread depth.
Tread depth should not be allowed to
go below 0.12 in (3 mm), even though
the legally specified minimum tread
depth is 0.063 in (1.6 mm). Tread wear
indicators (arrow) are embedded in the
base of the tire's tread. Their locations
are indicated by the legend TWI Ð Tread
Wear Indicator Ð at various points on
the tire's shoulder. When the tread
reaches a depth of 0.063 in (1.6 mm),
these indicators appear to signal that
the tires have worn to the minimum
legal level. Below 0.12 in (3 mm) tread
depth, there is an increased risk of
aquaplaning, even at relatively
moderate speeds and with only small
amounts of water on the road.
Do not drive on a deflated (flat)
tire. A flat tire greatly impairs
steering and braking response, and can
lead to complete loss of control over
the vehicle.
Avoid overloading the vehicle so that
the permitted load on the tires is not
exceeded. Overloading can lead to
overheating and increases the rate at
which damage develops inside the
tires. The ultimate result can assume
the form of a sudden air loss.
Unusual vibrations encountered during
normal vehicle operation can indicate a
flat tire or some other vehicle malfunc-
tion. The type of problem can be
caused by contact with curbs, etc. This
is also true for irregularities in the
vehicle's handling characteristics, such
as a pronounced tendency to pull to the
left or right. Should this occur, respond
by immediately reducing your speed.
Proceed carefully to the nearest BMW
center or professional tire center, or
have the vehicle towed in to have it, its
wheels and tires inspected.
Tire inflation pressures
Tire condition