2002 BMW 325Ci CONVERTIBLE hazard
[x] Cancel search: hazardPage 4 of 159

Contents
© 2001 Bayerische Motoren Werke
Aktiengesellschaft
Munich, Germany
Reprinting, including excerpts, only with the
written consent of BMW AG, Munich.
Order No. 01 41 0 156 190
US English VIII/01
Printed in Germany
Printed on environmentally friendly paper
(bleached without chlorine, suitable for recycling).
Overview
Controls and features
Cockpit14
Instrument cluster15
Indicator and warning lamps17
Multifunction steering wheel
(MFL)21
Hazard warning triangle22
Refueling22
Fuel specifications23
Tire inflation pressures24
Opening and closing:
Keys28
Central locking system28
Opening and closing
Ð via the remote control29
Ð via the door lock31
Ð from the inside32
Luggage compartment lid33
Luggage compartment35
Alarm system36
Electric power windows38
Manual convertible top39
Fully-automatic convertible
top42
Wind deflector46
Adjustments:
Correct sitting posture48
Seats48
Adjusting electric power
seats49
Lumbar support50
Head restraints50
Entering the rear51
Safety belts52
Seat and mirror memory53
Seat heating54
Steering wheel54
Mirrors55
Passenger safety systems:
Airbags56
Transporting children safely59Rollover protection system61
Vehicle Memory, Key
Memory63
Driving:
Ignition lock64
Starting the engine64
Switching off the engine65
Parking brake66
Manual transmission66
Automatic transmission with
Steptronic67
Indicator/Headlamp flasher69
Washer/Wiper system/
Rain sensor70
Cruise control72
Everything under control:
Odometer74
Tachometer74
Energy control74
Fuel gauge75
Temperature gauge75
Service Interval Display75
Check Control76
Computer76
Technology for safety and
driving convenience:
Park Distance Control (PDC)79
Automatic Stability Control plus
Traction (ASC+T)80
Contents
Page 14 of 159

14n
1 Parking lamps/Low beams87
2
>
Turn signal indicators69
>
Standing lamps88
>
High beams88
>
Headlamp flasher69
>
Computer763 Wiper/Washer system/Rain
sensor70
4 Hazard warning flashers
5 Central locking system286 Rear window defroster91, 95
7 Horn: the entire surface
8 Adjusting the steering wheel54
9 Fog lamps88
Cockpit
Page 22 of 159

22n
Hazard warning triangle
*
Refueling
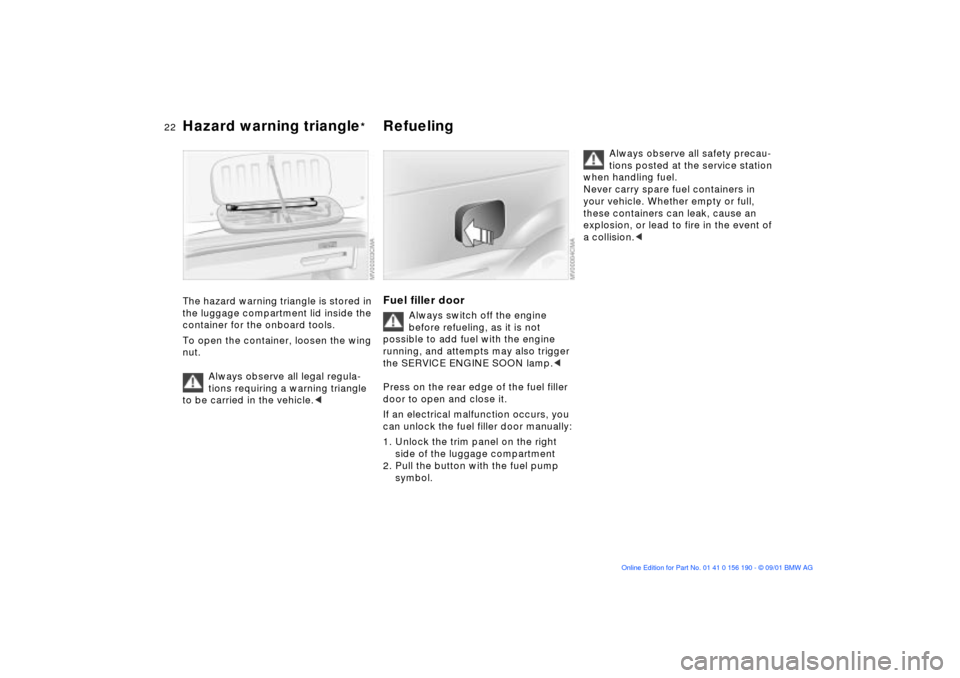
The hazard warning triangle is stored in
the luggage compartment lid inside the
container for the onboard tools.
To open the container, loosen the wing
nut.
Always observe all legal regula-
tions requiring a warning triangle
to be carried in the vehicle.
<
Fuel filler door
Always switch off the engine
before refueling, as it is not
possible to add fuel with the engine
running, and attempts may also trigger
the SERVICE ENGINE SOON lamp.
<
Press on the rear edge of the fuel filler
door to open and close it.
If an electrical malfunction occurs, you
can unlock the fuel filler door manually:
1. Unlock the trim panel on the right
side of the luggage compartment
2. Pull the button with the fuel pump
symbol.
Always observe all safety precau-
tions posted at the service station
when handling fuel.
Never carry spare fuel containers in
your vehicle. Whether empty or full,
these containers can leak, cause an
explosion, or lead to fire in the event of
a collision.
<
Page 28 of 159

28n
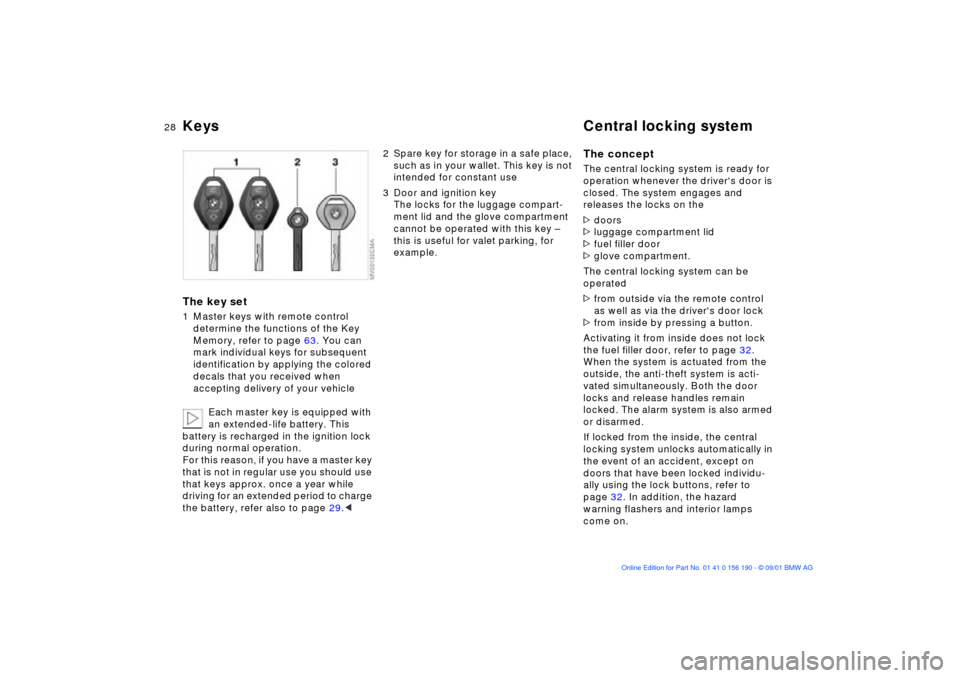
Keys Central locking systemThe key set1 Master keys with remote control
determine the functions of the Key
Memory, refer to page 63. You can
mark individual keys for subsequent
identification by applying the colored
decals that you received when
accepting delivery of your vehicle
Each master key is equipped with
an extended-life battery. This
battery is recharged in the ignition lock
during normal operation.
For this reason, if you have a master key
that is not in regular use you should use
that keys approx. once a year while
driving for an extended period to charge
the battery, refer also to page 29.<
2 Spare key for storage in a safe place,
such as in your wallet. This key is not
intended for constant use
3 Door and ignition key
The locks for the luggage compart-
ment lid and the glove compartment
cannot be operated with this key Ð
this is useful for valet parking, for
example.
The conceptThe central locking system is ready for
operation whenever the driver's door is
closed. The system engages and
releases the locks on the
>doors
>luggage compartment lid
>fuel filler door
>glove compartment.
The central locking system can be
operated
>from outside via the remote control
as well as via the driver's door lock
>from inside by pressing a button.
Activating it from inside does not lock
the fuel filler door, refer to page 32.
When the system is actuated from the
outside, the anti-theft system is acti-
vated simultaneously. Both the door
locks and release handles remain
locked. The alarm system is also armed
or disarmed.
If locked from the inside, the central
locking system unlocks automatically in
the event of an accident, except on
doors that have been locked individu-
ally using the lock buttons, refer to
page 32. In addition, the hazard
warning flashers and interior lamps
come on.
Page 36 of 159

36n
Luggage compartment Alarm system
*
The fittings at the corners of the
luggage compartment provide you with
a convenient means of attaching
luggage nets
* and flexible straps for
securing luggage.
Refer also to Cargo loading on
page 103.
The conceptThe vehicle alarm system responds:
>When a door, the hood or the
luggage compartment lid is opened
>To movements inside the vehicle
(interior motion sensor)
>To variations in the vehicle's tilt angle
such as those occurring during
attempts to steal the wheels or tow
the vehicle
>To interruption of battery voltage.
The system responds to unauthorized
vehicle entry and attempted theft by
simultaneously activating the following:
>The acoustic alarm sounds for
30 seconds
>The hazard warning flashers are acti-
vated for approx. five minutes
>The high beams flash on and off in
rhythm with the hazard warning
flashers.
To arm and disarm the alarm
systemWhen the vehicle is locked or unlocked
via the driver's door lock or with the
remote control, the alarm system is also
simultaneously armed or disarmed.
You can have different acknowl-
edgment signals set to confirm
arming and disarming.<
You can open the luggage compart-
ment lid even when the system is
armed by pressing the button on the
remote control, refer to page 30. When
it is closed, the lid is once again
secured.
Page 64 of 159

64n
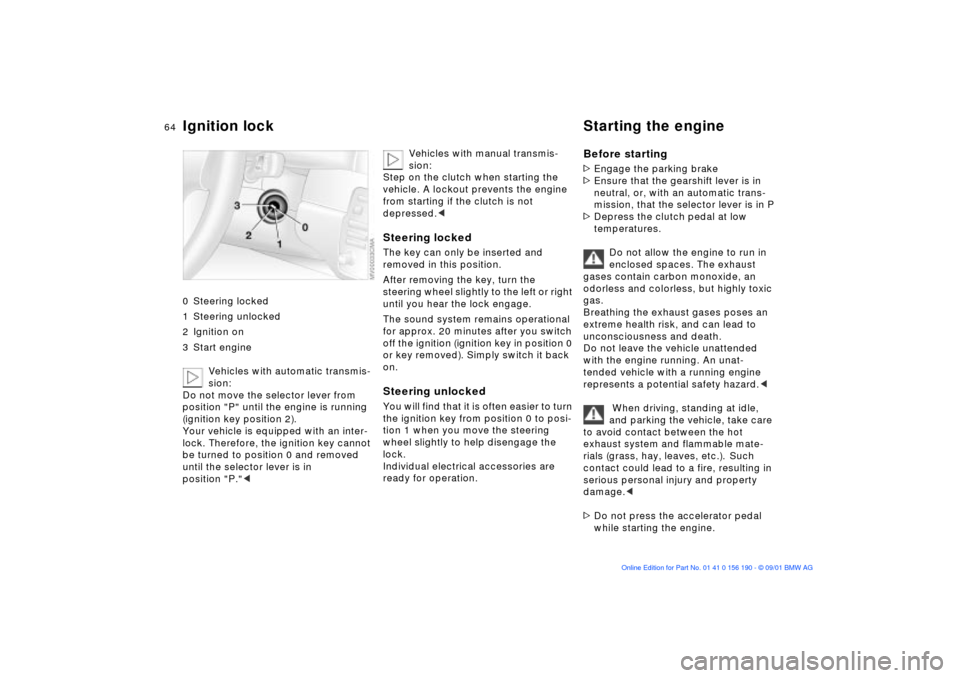
Ignition lock Starting the engine 0 Steering locked
1 Steering unlocked
2 Ignition on
3 Start engine
Vehicles with automatic transmis-
sion:
Do not move the selector lever from
position "P" until the engine is running
(ignition key position 2).
Your vehicle is equipped with an inter-
lock. Therefore, the ignition key cannot
be turned to position 0 and removed
until the selector lever is in
position "P."<
Vehicles with manual transmis-
sion:
Step on the clutch when starting the
vehicle. A lockout prevents the engine
from starting if the clutch is not
depressed.<
Steering lockedThe key can only be inserted and
removed in this position.
After removing the key, turn the
steering wheel slightly to the left or right
until you hear the lock engage.
The sound system remains operational
for approx. 20 minutes after you switch
off the ignition (ignition key in position 0
or key removed). Simply switch it back
on.Steering unlocked You will find that it is often easier to turn
the ignition key from position 0 to posi-
tion 1 when you move the steering
wheel slightly to help disengage the
lock.
Individual electrical accessories are
ready for operation.
Before starting>Engage the parking brake
>Ensure that the gearshift lever is in
neutral, or, with an automatic trans-
mission, that the selector lever is in P
>Depress the clutch pedal at low
temperatures.
Do not allow the engine to run in
enclosed spaces. The exhaust
gases contain carbon monoxide, an
odorless and colorless, but highly toxic
gas.
Breathing the exhaust gases poses an
extreme health risk, and can lead to
unconsciousness and death.
Do not leave the vehicle unattended
with the engine running. An unat-
tended vehicle with a running engine
represents a potential safety hazard.<
When driving, standing at idle,
and parking the vehicle, take care
to avoid contact between the hot
exhaust system and flammable mate-
rials (grass, hay, leaves, etc.). Such
contact could lead to a fire, resulting in
serious personal injury and property
damage.<
>Do not press the accelerator pedal
while starting the engine.
Page 67 of 159

67n
OverviewControlsMaintenanceRepairsDataIndex
Automatic transmission with Steptronic
*
You can drive as with a normal auto-
matic transmission. In addition, you can
also shift manually.
When you move the selector lever from
the "D" position to the left into the M/S
range, the performance-oriented shift
programs of the automatic transmission
are engaged. Steptronic enters the
manual selection mode and executes
the desired shift whenever you tap the
selector lever in the direction indicated
by "+" or "Ð." When you wish to use the
automatic transmission mode again,
move the selector lever to the right into
the "D" position.
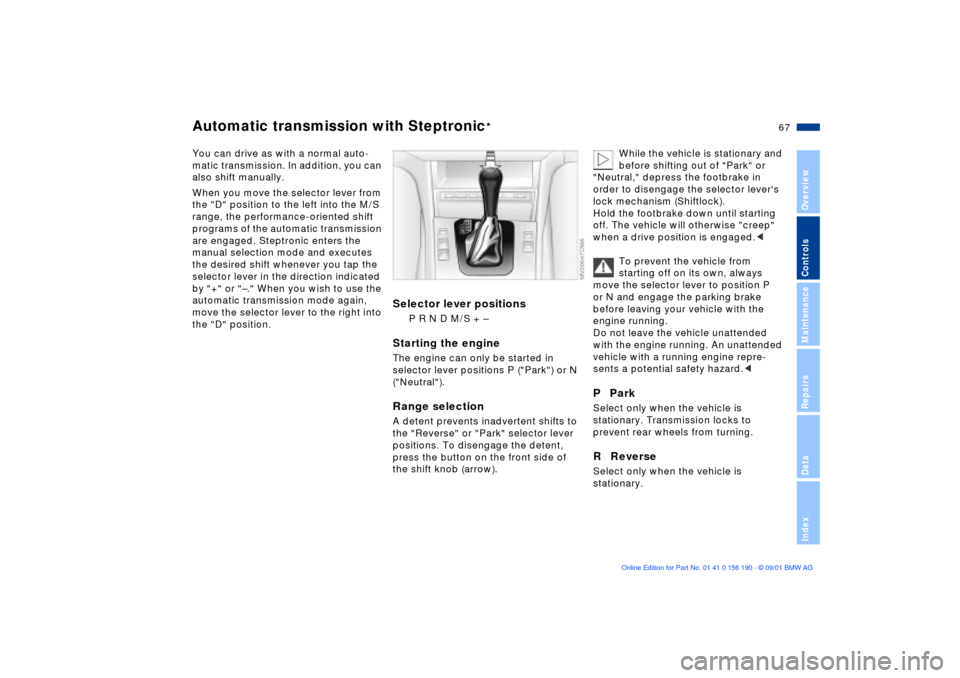
Selector lever positions
P R N D M/S + Ð
Starting the engineThe engine can only be started in
selector lever positions P ("Park") or N
("Neutral").Range selectionA detent prevents inadvertent shifts to
the "Reverse" or "Park" selector lever
positions. To disengage the detent,
press the button on the front side of
the shift knob (arrow).
While the vehicle is stationary and
before shifting out of "Park" or
"Neutral," depress the footbrake in
order to disengage the selector lever's
lock mechanism (Shiftlock).
Hold the footbrake down until starting
off. The vehicle will otherwise "creep"
when a drive position is engaged.<
To prevent the vehicle from
starting off on its own, always
move the selector lever to position P
or N and engage the parking brake
before leaving your vehicle with the
engine running.
Do not leave the vehicle unattended
with the engine running. An unattended
vehicle with a running engine repre-
sents a potential safety hazard.<
P ParkSelect only when the vehicle is
stationary. Transmission locks to
prevent rear wheels from turning.R ReverseSelect only when the vehicle is
stationary.
Page 110 of 159

110n
Brake system Hardtop
*
Disc brakesLimited vehicle use, extended periods
with the vehicle parked or in storage,
and operating conditions in which
braking is restricted to gentle, low-
pressure applications will all increase
the tendency for corrosion to form on
the rotors; this is often accompanied by
a simultaneous accumulation of
contamination on the brake pads. The
pads must exert a certain minimal level
of pressure against the rotors for the
disc brakes' inherent self-cleaning
effect to remain effective.
If the brake rotors are corroded, they
will tend to respond to braking with a
pulsating effect that even extended
brake applications will fail to cure.
When driving in heavy rain and on wet
roads it is useful to apply light pressure
to the brake pedal every few miles.
Monitor traffic conditions to ensure that
this maneuver does not pose a hazard
to you or to other road users. The heat
generated in this process helps dry the
pads and rotors to ensure that your
brake system will respond with undi-
minished efficiency when you need it.
When descending steep hills and
extended grades, downshift to a gear
that will allow you to continue safely with only a minimal amount of braking.
By minimizing the loads placed on the
brake system, this strategy helps
ensure that optimal brake system
response will remain available at all
times. Use care to avoid exceeding the
approved engine-speed range, refer to
page 74.
Do not coast with the clutch
depressed or with the transmission
or selector lever in neutral. Do not coast
with the engine shut off. The engine
provides no braking effect when the
clutch is depressed and there is no
power-assist for braking or steering
when the engine is not running.
Never allow floor mats, carpets or any
other objects to protrude into the area
around the accelerator, clutch and brake
pedals and obstruct their movement.<
Brake pads
For your own safety: use only
brake pads that the manufacturer
has released for your particular vehicle
model. The manufacturer cannot eval-
uate non-approved brake pads to
determine if they are suited for use, and
therefore cannot ensure the operating
safety of the vehicle if they are
installed.<
It is not necessary to remove the fabric
top even in the winter, when the
hardtop is generally in constant use.
But you can also remove it at any time
with no problem. Before the fabric top
is stored in the convertible top
compartment, it must be absolutely dry
in order to avoid water spots and
mildew from forming.
The hardtop offers reading lamps and
clothes hooks that can be used just by
pressing. In addition, a roof-rack can be
mounted, for more information, please
contact your BMW center.
When suspending articles of
clothing from the hooks, be sure
that they will not obstruct the driver's
vision. Do not hang heavy objects on
the hooks. If you do so, they could
cause personal injury during braking or
evasive maneuvers.<
Two people are required for installation
or removal. Work with extreme caution
in order to avoid paint damage and
damage to the body or hardtop.
To facilitate hardtop installation or
removal, you can obtain a specially
designed hardtop lift
* or hardtop rack
*
at your BMW center.