2002 BMW 320i SEDAN page 73
[x] Cancel search: page 73Page 40 of 155

40n
Sliding/tilt sunroof
*
Safety featureIf the sliding/tilt sunroof encounters
resistance
>when it is closing from the raised
position
>when it is closing from a point
roughly past the middle of its travel
the closing cycle is interrupted and the
sliding/tilt sunroof will open again
slightly.
Despite this safety feature, be
extremely careful that the travel
path of the sunroof is not obstructed
whenever it is closed. Remember that
the safety mechanism may not be able
to detect obstructions under all circum-
stances (with very thin objects, for
instance).
You can disable this safety feature by
pressing the switch beyond the pres-
sure point and holding it.<
Manual operationIn the event of an electrical malfunction,
you can also operate the sliding/tilt
sunroof manually:
1. Remove the interior lamp, then reach
into the exposed opening and press
out the cover
2. Use the Allen key from the onboard
tool kit (refer to page 124) to turn the
sliding/tilt sunroof in the desired
direction.
Page 41 of 155

41n
OverviewControlsMaintenanceRepairsDataIndex
Correct sitting posture SeatsFor relaxed and fatigue-free driving you
should select a sitting position that
reflects your personal requirements.
Correct posture combines with safety
belts and airbags to enhance occupant
safety in the event of an accident. To
ensure that the vehicle's safety systems
provide you with optimal protection, we
request that you direct your careful
attention to the following section.
For supplementary information on
transporting children, refer to page 52. Sitting correctly with airbags
Always maintain an adequate
distance between yourself and the
airbags. Always hold the steering wheel
by the rim to keep any chance of injury
to hands or arms to an absolute
minimum should the airbag be
deployed. Never allow any objects,
individuals or animals to obstruct the
areas between passengers and airbags.
Never use the front airbag's cover as a
storage tray or support for objects of
any kind. Never allow front passengers
to rest their feet or legs on the airbag
cover.<
For airbag locations and additional
information on airbags refer to page 49.
Safe with safety belts
Never allow more than one person
to wear a single safety belt. Never
allow infants or small children to ride in
a passenger's lap. Avoid twisting the
belt while routing it firmly across the
hips and shoulder, wear it as snugly
against your body as possible. Do not
allow the belt to rest against hard or
fragile objects. Do not route the belt
across your neck, or run it across sharp
edges. Be sure that the belt does not
become caught or jammed. Avoid
wearing bulky clothing and pull on the
lap belt periodically to retension it over
your shoulders. In the event of a frontal
impact, a loose lap belt could slide over
your hips, leading to abdominal
injury. In addition, the safety belt's
restraint effectiveness is reduced if it is
worn loosely. Expectant mothers
should always wear their safety belts,
taking care to position the lap belt
against the lower hips, where it will not
exert pressure against the abdominal
area.<
For information on using the safety
belts refer to page 45.
When adjusting your seat, always
observe the following precautions
Never try to adjust your seat while
operating the vehicle. The seat
could respond with unexpected move-
ment, and the ensuing loss of vehicle
control could lead to an accident. Never
ride with the backrest reclined to an
extreme horizontal angle (important for
front passengers to remember). Keep
the backrest relatively upright to mini-
mize the risk of sliding under the safety
belt and sustaining injury in an acci-
dent.<
Seat adjustment>Manual seat adjustment, refer to
page 42
>Power seat adjustment, refer to
page 43
>Head restraint, refer to page 44
Page 43 of 155

43n
OverviewControlsMaintenanceRepairsDataIndex
Power seat adjustment
*
Lumbar support*
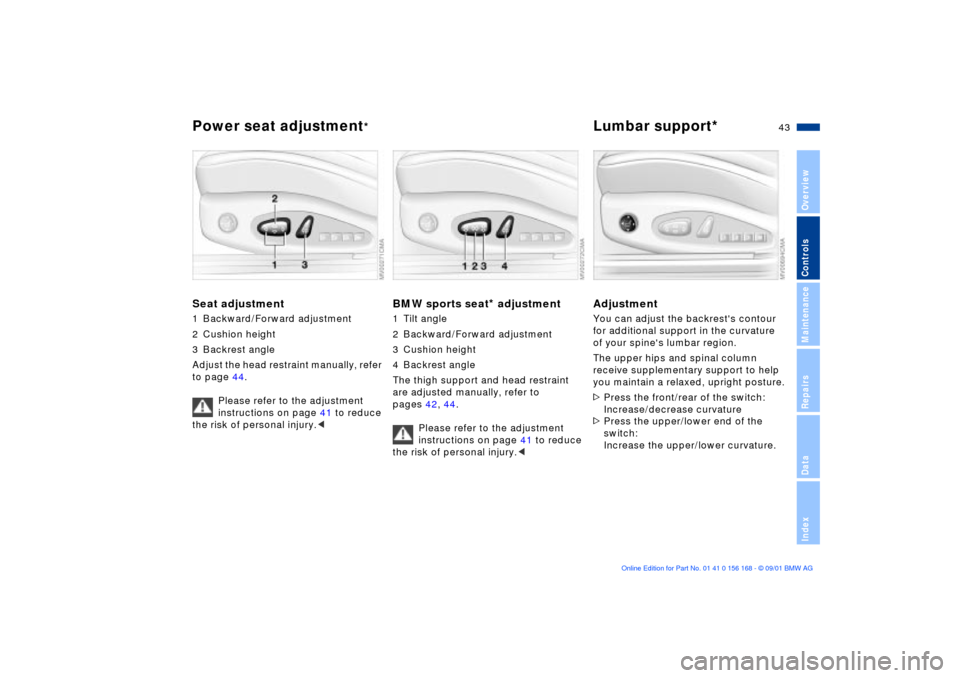
Seat adjustment1 Backward/Forward adjustment
2 Cushion height
3 Backrest angle
Adjust the head restraint manually, refer
to page 44.
Please refer to the adjustment
instructions on page 41 to reduce
the risk of personal injury.<
BMW sports seat
* adjustment
1 Tilt angle
2 Backward/Forward adjustment
3 Cushion height
4 Backrest angle
The thigh support and head restraint
are adjusted manually, refer to
pages 42, 44.
Please refer to the adjustment
instructions on page 41 to reduce
the risk of personal injury.<
AdjustmentYou can adjust the backrest's contour
for additional support in the curvature
of your spine's lumbar region.
The upper hips and spinal column
receive supplementary support to help
you maintain a relaxed, upright posture.
>Press the front/rear of the switch:
Increase/decrease curvature
>Press the upper/lower end of the
switch:
Increase the upper/lower curvature.
Page 45 of 155

45n
OverviewControlsMaintenanceRepairsDataIndex
Safety beltsAlways wear your safety beltAlways fasten your safety belt before
starting off. As supplemental restraint
devices, the airbags are designed to
enhance the effectiveness of the safety
belts, and not to replace them.To closeMake sure you hear the catch engage in
the belt buckle.To open1. Press red button in the belt buckle
2. Hold end of the belt
3. Guide belt back into the inertia reel.
The rear belt buckle with the word
CENTER is intended exclusively
for the passenger sitting in the middle.<
Adjusting safety belt heightUse the height adjustment mechanism
to adapt the shoulder strap to the ideal
level for your own body:
>Slide the button up or down.
Please refer to the seat adjustment
instructions on page 41.
If the safety belt system has been
subjected to the stresses involved
in an accident or otherwise damaged:
have the entire safety belt mechanism
replaced by your BMW center,
including the safety belt tensioner. In
addition, have your BMW center
inspect the safety belt anchors. If a
child-restraint system was in the
vehicle during an accident, consult the
manufacturer's instructions regarding
replacement.<
Page 48 of 155

48n
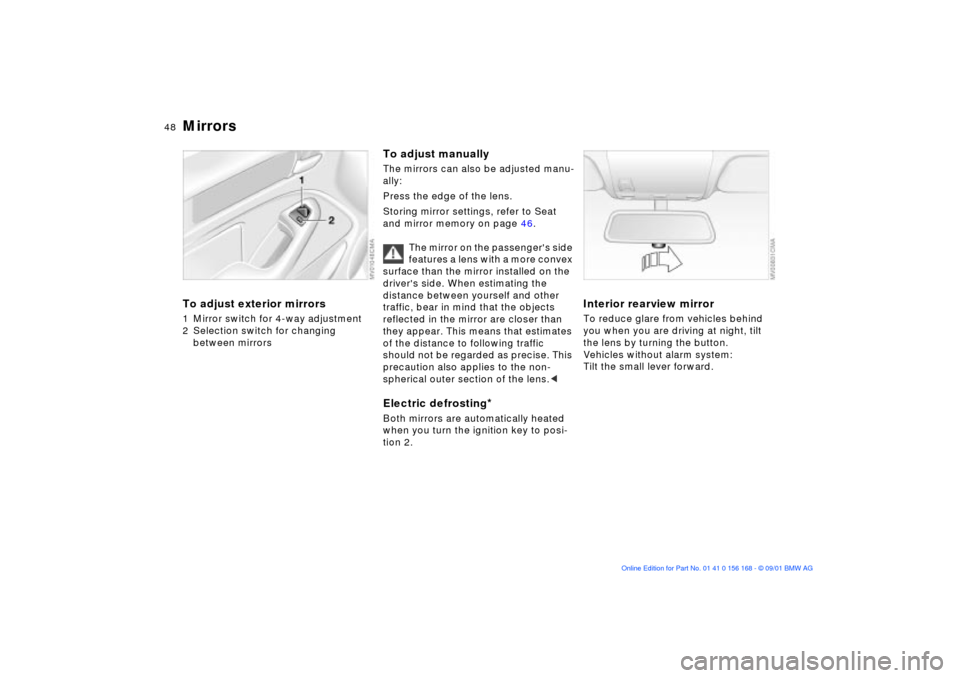
Mirrors To adjust exterior mirrors1 Mirror switch for 4-way adjustment
2 Selection switch for changing
between mirrors
To adjust manuallyThe mirrors can also be adjusted manu-
ally:
Press the edge of the lens.
Storing mirror settings, refer to Seat
and mirror memory on page 46.
The mirror on the passenger's side
features a lens with a more convex
surface than the mirror installed on the
driver's side. When estimating the
distance between yourself and other
traffic, bear in mind that the objects
reflected in the mirror are closer than
they appear. This means that estimates
of the distance to following traffic
should not be regarded as precise. This
precaution also applies to the non-
spherical outer section of the lens.
Both mirrors are automatically heated
when you turn the ignition key to posi-
tion 2.
Interior rearview mirror To reduce glare from vehicles behind
you when you are driving at night, tilt
the lens by turning the button.
Vehicles without alarm system:
Tilt the small lever forward.
Page 49 of 155

49n
OverviewControlsMaintenanceRepairsDataIndex
Mirrors AirbagsInterior rearview mirror with
automatic dimming feature
*
This mirror automatically dims through
an infinitely-variable range. It returns to
its clear, undimmed mode whenever
you engage reverse.
To ensure that the mirror continues to
operate efficiently, ensure that the
photocells remain clear and unob-
structed. One photocell is integrated in
the mirror's lens (arrow), while the other
is located at an offset position on the
rear of the mirror. Refrain from
attaching stickers to the windshield in
the area immediately in front of the
mirror.
1 Front airbags on the driver and
passenger sides
2 Side Impact Head Protection System
on the driver and passenger sides
(front)
3 Side airbags on the driver and
passenger sides (front and rear
*)
Protective effectThe front airbags supplement the three-
point safety belts by providing addi-
tional protection, in the event of a
severe frontal collision in which the
protection afforded by the belts alone
may no longer be sufficient. The Head
Protection System and side airbags
help provide protection in the event of a
collision from the side. Each of the side
airbags is designed to help support the
seat occupant's upper body.
For information on the correct sitting
posture, refer to page 41.Indicator lamp
The indicator lamp indicates the
operational status of the airbag
system from ignition key posi-
tion 1.
System operational:
>The indicator lamp comes on briefly
when you turn the ignition key to
position 1 or 2.
System malfunction:
>The indicator lamp fails to go out
after the engine has been started, or
comes on again during normal
driving.
Please respond to any malfunctions in
the system by immediately having it
inspected at your BMW center; other-
wise the airbag could fail to respond to
an accident in which both the angle and
the severity of the impact would
normally trigger airbag deployment.
Page 52 of 155

52n
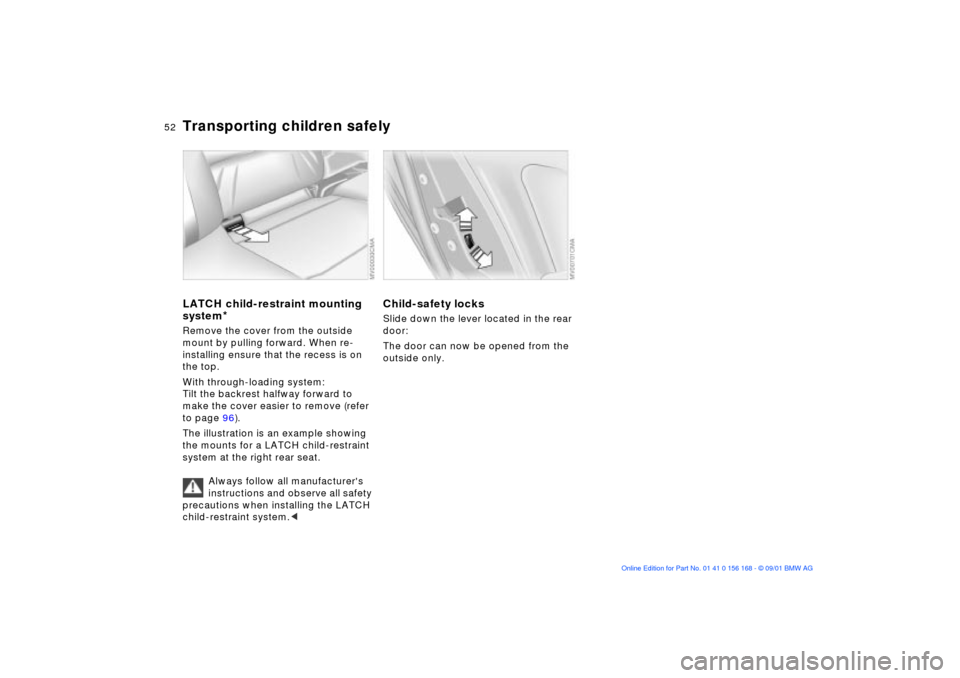
Transporting children safelyLATCH child-restraint mounting
system
*
Remove the cover from the outside
mount by pulling forward. When re-
installing ensure that the recess is on
the top.
With through-loading system:
Tilt the backrest halfway forward to
make the cover easier to remove (refer
to page 96).
The illustration is an example showing
the mounts for a LATCH child-restraint
system at the right rear seat.
Always follow all manufacturer's
instructions and observe all safety
precautions when installing the LATCH
child-restraint system.<
Child-safety locksSlide down the lever located in the rear
door:
The door can now be opened from the
outside only.
Page 55 of 155

55n
OverviewControlsMaintenanceRepairsDataIndex
Vehicle Memory, Key Memory How the system functionsNo doubt you have reflected at one
time or another on how great it would
be if you could permanently configure
your vehicle's various features and
adjustments to mirror your own indi-
vidual preferences. In engineering your
vehicle, BMW has incorporated a
number of options for personal adjust-
ment that can be programmed into your
vehicle at your BMW center.
The available configuration data fall into
two categories, according to whether
their primary orientation is the vehicle
(Vehicle Memory) or the individual (Key
Memory). Provided that each person
has a separate remote-control key, you
can have your BMW center enter
adjustment data for as many as four
different individuals into the system.
The system then relies on a bilateral
data exchange to identify the individual
user and dial in the selected settings
whenever the remote control unit is
used to disengage the door locks.
Color-coded decals have been
provided to help you distinguish indi-
vidual keys with different settings.What the system can doYour BMW center can provide you with
details on the capabilities of the Vehicle
Memory and Key Memory systems. A
few examples follow below:
Examples for Vehicle Memory:
>Various signals as acknowledgment
when locking or unlocking your
vehicle, refer to pages 29, 31
>Activates/deactivates the "Follow me
home" function, refer to page 82
>Activates/deactivates daytime driving
lamps, refer to page 82.Examples for Key Memory:
>Locks the vehicle when you start off,
refer to page 32
>Automatically adjusts the power seat
to your personal programmed
settings when you unlock the vehicle,
refer to page 46
>Unlocks driver's door first, then
proceeds to disengage the vehicle's
remaining locks, refer to page 29.
You will see this symbol through-
out the Owner's Manual. It is to
remind you at appropriate places of the
settings that are available to you.<