Page 131 of 320

�µIf you are
traveling far from home and can no
longer receive the stations you
preset, you can use the Auto Select
feature to find stations in the local
area.
If you are in a remote area, Auto
Select may not f ind six strong AM
stations or twelve strong FM stations.
If this happens, you will see a ‘‘0’’
displayed when you press any preset
button that does not have a station
stored. If you do not like the stations Auto
Select has stored, you can store
other f requencies in the preset
buttons. Use the TUNE, SEEK, or
SCAN f unction to f ind the desired
f requencies, then store them in the
selected preset buttons as described
previously.
Auto Select does not erase the
f requencies that you preset pre-
viously. When you return home, turn
of f Auto Select by pressing the
A. SEL button. The preset buttons
will then select the f requencies you
originally set.
To activate Auto Select, press the
A. SEL button. A. SEL will f lash in
the display, and the system will go
into scan mode f or several seconds.
It automatically scans both bands,
looking f or stations with strong
signals. It stores the f requencies of
six AM stations and twelve FM
stations in the preset buttons. You
can then use the preset buttons to
select those stations. AUTO SELECT
Comf ort and Convenience Feat ures
Audio System
128
A A
.
.SSE EL
L I
INND DI
ICCA A T
TO
OR R
A
A .
.SSE EL
L
B
BU UT TT
TO
ON N
S
SC CAA N
N B
BUUT TT
TO
ON N S
SE
EE
EK
K
B
BU UT TT
TO
ON NSS
P
P R
RE ES
SE ET
T B
BUUT TT
TO
ON NSS
Page 132 of 320

�µ�µ
Bass, Treble, Balance, and Fader are
each adjustable. You select which of
these you want to adjust by pressing
the TUNE knob. The mode changes
fromBAStoTREtoFADtoBAL,
and then back to the selected audio
mode, each time you press the
TUNE knob.
The system will automatically return
the display to the selected audio
mode about f ive seconds af ter you
stop adjusting a mode with the
TUNE knob.
Use these modes to
adjust the tone to your liking. Select
TRE or BAS by pressing the TUNE
knob. Adjust the desired mode by
turning the TUNE knob.
The displayed number shows you
the current setting.
When the adjustment level reaches
the center, you will see ‘‘ ’’.
These two
modes adjust the strength of the
sound coming f rom each speaker.
BAL adjusts the side-to-side strength,
while FAD adjusts the f ront-to-back
strength. Select BAL or FAD by pressing the
TUNE knob. Adjust the Balance or
Fader to your liking by turning the
TUNE knob.
The displayed number shows you
the current setting.
When the adjustment level reaches
the center, you will see ‘‘ ’’.
Audio System
Comf ort and Convenience Feat ures
Adjusting the Sound
Treble/Bass
Balance/Fader
129
L LE
E V
V E
EL
L I
INND DI
ICCA A T
TO
OR R T
TU
UN NEE K
KNNO OBB
Page 133 of 320
 or ON
(II). It shows the operation mode of
the radio, cassette player, or CD
changer when you operate them,")
The audio system display usually
shows the time when the ignition
switch is in ACCESSORY (I) or ON
(II). It shows the operation mode of
the radio, cassette player, or CD
changer when you operate them,
then goes back to the time display
af ter f ive seconds.
To set the hours, press and hold the
CLOCK button. Press and hold the
H (preset 4) button until the
numbers advance to the desired time. You can quickly set the time to thenearest hour. If the displayed time is
bef ore the half hour, pressing and
holding the clock button, then
pressing the RESET button (preset
6) sets the clock back to the previous
hour. If the displayed time is af ter
the half hour, the clock is set
f orward to the beginning of the next
hour.If your car’s battery is disconnected
or goes dead, the time setting will be
lost. To set the time again, f ollow the
setting procedure. For example:
1:06 will reset to 1:00
1:52 will reset to 2:00
To set the minutes, press and hold
the CLOCK button. Press and hold
the M (preset 5) button until the
numbers advance to the desired time. Digital Clock
Audio System
Comf ort and Convenience Feat ures130
Page 134 of 320
. The audio system
illuminates when the parking lights
are on, even if the radio is")
You can use the instrument panel
brightness control dial to adjust the il-
lumination of the audio system (see
page ). The audio system
illuminates when the parking lights
are on, even if the radio is turned of f .
Those bands cover these f requen-
cies:
AM band:
530 to 1,710 kilohertz
FM band:
87.7 to 107.9 megahertz
Radio stations on the AM band are
assigned f requencies at least ten
kilohertz apart (530, 540, 550).
Stations on the FM band are
assigned f requencies at least 0.2
megahertz apart (87.9, 88.1, 88.3).Stations must use these exact
f requencies. It is f airly common f or
stations to round-of f the f requency in
their advertising, so your radio could
display a f requency of 100.9 even
though the announcer may identif y
the station as ‘‘FM101.’’
A radio station’s signal gets weaker
as you get f arther away f rom its
transmitter. If you are listening to an
AM station, you will notice the sound
volume becoming weaker, and the
stationdriftinginandout.If youare
listening to an FM station, you will
see the stereo indicator f lickering of f
and on as the signal weakens.
Eventually, the stereo indicator willgo of f and the sound will f ade
completely as you get out of range of
the station’s signal.
Driving very near the transmitter of
a station that is broadcasting on a
f requency close to the f requency of
the station you are listening to can
also af f ect your radio’s reception.
You may temporarily hear both
stations,orhearonlythestationyou
are close to.
Your Honda’s radio can receive the
complete AM and FM bands.
How well your Acura’s radio receives
stations is dependent on many
f actors, such as the distance f rom
the station’s transmitter, nearby
large objects, and atmospheric
conditions.
70
A udio System L ighting
Radio Frequencies
Radio Reception
Audio System
Comf ort and Convenience Feat ures131
Page 136 of 320
 or ON (II).
Make sure the tape opening on the
cassette is facing to the right, then
insert the cassette most of the way
into the slot. The system will")
�Û
The ignition switch must be in
ACCESSORY (I) or ON (II).
Make sure the tape opening on the
cassette is facing to the right, then
insert the cassette most of the way
into the slot. The system will pull it
in the rest of the way, and begin to
play.
The tape direction indicator will light
to show you which side of the
cassette is playing. The indicates
thesideyouinsertedfacingupward
is now playing. If you want to play
the other side, press the PROG
button. If you turn the system of f while a
tape is playing, either with the PWR/
VOL knob or by turning of f the
ignition, the cassette will remain in
the drive. When you turn the system
back on, the tape will begin playing
where it lef t of f .
To switch to the radio or CD
changer while listening to a tape,
presstheAM,FMorCDbutton.To
change back to the cassette player,
press the TAPE button.
Dolby noise reduction turns on when
you insert a cassette. The indi-
cator will light in the display. If the
tape was not recorded with Dolby
noise reduction, turn it of f by
pressing the button.
Noise reduction remains of f until you
turn it on by pressing the button
again.
You can remove the cassette with
the ignition switch in any position,
even if the audio system is turned of f . When the system reaches the end of
the tape, it will automatically reverse
direction and play the other side. If
you want to remove the cassette
f rom the drive, press the EJECT
button.
Operating the Cassette Player
Audio System
Comf ort and Convenience Feat ures133
Page 137 of 320

�µ
CONT INUED
With a cassette playing, you can use
the FF, REW, SKIP, or REPEAT
f unction to f ind a desired program.Fast Forward and
Rewind move the tape rapidly. To
rewind the tape, push the REW
button. You will see REW in the
display. To f ast f orward the tape,
push the FF button. You will see FF
displayed. Press the FF, REW or
PLAY button to take the system out
of rewind or f ast f orward. When the
system reaches the end of the tape,
it reverses direction and begins to
play. T ape Search Functions
FF/REW
Audio System
Comf ort and Convenience Feat ures134
T T A
A P
PE
E E
EJ
JEE C
CT T
B
BU UT TT
TO
ON N
D
D O
OL LBBY Y B
BUUT TT
TO
ON N C
CD
D
B
BU UT TT
TO
ON N
A
A
M
M
B
BU UT TT
TO
ON N
P
PL
LAA Y
Y
B
BU UT TT
TO
ON N
P
P
W
WR R//V
V O
OL L K
KNNO OBB
F
FM M B
BUUT TT
TO
ON N R
REEW
W
B
BU UT TT
TO
ON N
P
P R
RO OG G B
BUUT TT
TO
ON N F
FFF B
BUUT TT
TO
ON N
T
T
A
A P
PE
E D
DI
IRRE EC
CT TI
IOON N
I
IN ND DI
ICCA A T
TO
OR R
C
CAA S
SSSEET
TT
TE
E S
SLLOOT T
D
D
O
OL LBBY Y I
INND DI
ICCA A T
TO
OR R
T
T A
A P
PE
E B
BUUT TT
TO
ON N
Page 138 of 320
�µ�Ó
�Ó
�Ó�Ó
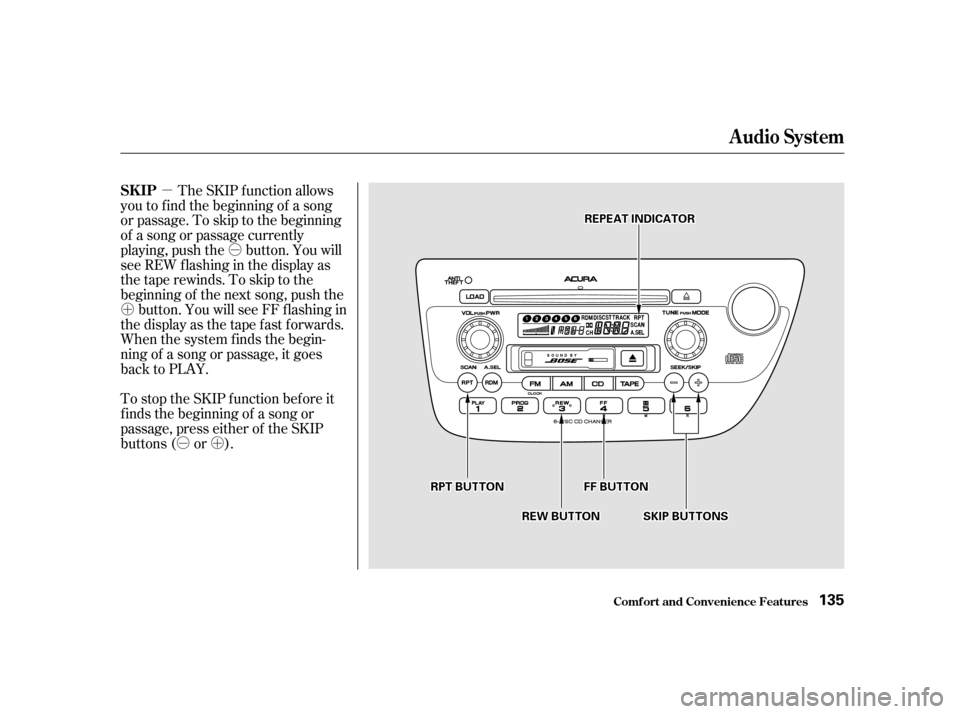
�µ
�´
�µ�´
The SKIP f unction allows
you to f ind the beginning of a song
or passage. To skip to the beginning
of a song or passage currently
playing, push the button. You will
see REW flashing in the display as
thetaperewinds.Toskiptothe
beginning of the next song, push the button. You will see FF f lashing in
the display as the tape fast forwards.
When the system f inds the begin-
ning of a song or passage, it goes
back to PLAY.
To stop the SKIP f unction bef ore it
f inds the beginning of a song or
passage, press either of the SKIP
buttons ( or ). SK IP
Audio System
Comf ort and Convenience Feat ures135
S SK KIIPP B
BUUT TT
TO
ON NSS
R
RE
EP
PE
EA
A T
T I
INND DI
ICCA A T
TO
OR R
R
RP PT
T B
BUUT TT
TO
ON N
R
REEW
W B
BUUT TT
TO
ON N
F
FF
F B
BUUT TT
TO
ON N
Page 139 of 320
�µThe Repeat f unction
continuously replays the current
song or passage. Press the RPT
button to activate it; you will see RPT
displayed as a reminder. When the
system reaches the end of the song
or passage currently playing, it will
automatically go into rewind. When
it senses the beginning of the same
song or passage, the system returns
to PLAY mode. It will continue to
repeat this same program until you
deactivate REPEAT by pressing the
button again.
Pressing the REW or FF button, or
either of the SKIP buttons, also turns
of f REPEAT. The SKIP and REPEAT f unctions
use silent periods on the tape to f ind
the end of a song or passage. These
f eatures may not work to your
satisfaction if there is almost no gap
between selections, a high noise
level between selections, or a silent
period in the middle of a selection.
REPEAT
Audio System
Comf ort and Convenience Feat ures136