Page 158 of 372
�µIf you are
traveling far from home and can no
longer receive the stations you
preset, you can use the Auto Select
feature to find stations in the local
area.
If you are in a remote area, Auto
Select may not f ind six strong AM
stations or twelve strong FM stations.
If this happens, you will see a ‘‘0’’
displayed when you press any preset
button that does not have a station
stored. To activate Auto Select, press the
A. SEL button. A. SEL will f lash in
the display, and the system will go
into scan mode f or several seconds.
It automatically scans both bands,
looking f or stations with strong
signals. It stores the f requencies of
six AM stations and twelve FM
stations in the preset buttons. You
can then use the preset buttons to
select those stations. AUTO SELECT
Audio System
Comf ort and Convenience Feat ures154
A A .
.S
SE EL
L I
INND DI
ICCA A T
TO
OR R
A
A .
.S
SE EL
L B
BUUT TT
TO
ON N
01/09/07 12:19:38 31S3V610_159
Page 159 of 372
If you do not like the stations Auto
Select has stored, you can store
other f requencies in the preset
buttons. Use the TUNE, SEEK, or
SCAN f unction to f ind the desired
f requencies, then store them in the
selected preset buttons as described
previously.
Auto Select does not erase the
f requencies that you preset pre-
viously. When you return home, turn
of f Auto Select by pressing the
A. SEL button. The preset buttons
will then select the f requencies you
originally set.
Comf ort and Convenience Feat ures
Audio System
155
T TU
UN NEE K
KNNO OBB
S
SE EE
EK
K B
BUUT TT
TO
ON NSS
P
P R
RE ES
SE ET
T B
BUUT TT
TO
ON NSS
S
SC CAA N
N B
BUUT TT
TO
ON N
01/09/07 12:19:44 31S3V610_160
Page 164 of 372

�µ
�Ó
�Ó �µ
�Ó �Ó
�´
�µ
�´�µ
You can use the SKIP buttons while
a disc is playing to select passages
and change tracks.
This feature,
when activated, plays the tracks on
the CD in random order, rather than
in the order they are recorded on the
CD. To activate Random Play, press
the RDM button. You will see RDM
in the display. The system will then
select and play tracks randomly.
This continues until you deactivate
RandomPlaybypressingtheRDM
button again.
To move rapidly within a track, press
and hold an appropriate SKIP button.
Press the button to move f orward,
or the button to move backward.
Release the button when the system
reaches the point you want.
To activate the Repeat
feature, press and release the Repeat
button. You will see REPEAT in the
display. The system continuously
replays the current track. Press the
Repeat button again to turn it off.
Each time you press the button
and release it, the system skips
f orward to the beginning of the next
track. Press and release the
buttontoskipbackwardtothe
beginning of the current track. Press
and release it again to skip to the
beginning of the previous track.
When the system reaches the end of
the disc, it will return to the begin-
ning and play that disc again.
You can switch to the radio while a
CD is playing by pressing the AM or
FM button. Press the CD button to
return to playing the CD. The CD
will begin playing where it lef t of f .
If you eject the disc, but do not
remove it from the slot, the system
will automatically reload the disc
af ter 15 seconds and put the CD
player in pause mode. To begin
playing the disc, press the CD button. Press the eject button to remove the
disc f rom the drive. If you turn the system of f while a CD
is playing, either with the PWR/VOL
knob or by turning off the ignition,
the disc will stay in the drive. When
youturnthesystembackon,theCD
will begin playing where it lef t of f .
RANDOM PLAY REPEAT
Audio System
Comf ort and Convenience Feat ures160
01/09/07 12:20:33 31S3V610_165
Page 173 of 372
ordown( ).
Press the proper button and hold it
until the desired volume is reached,
then release it.
The AUDIO/CH button has three
f unctions, de")
�Û�Ý
The top and bottom buttons adjust
thevolumeup( )ordown( ).
Press the proper button and hold it
until the desired volume is reached,
then release it.
The AUDIO/CH button has three
f unctions, depending on whether you
are listening to the radio, or playing a
cassette or CD.
If you are listening to the radio, use
the AUDIO/CH button to change
stations. Each time you press this
button, the system advances to the
next preset station on the band you
are listening to. You will see the
number of the selected Preset button
in the display. To change bands,
press the AM or FM button on the
audio system’s f ront panel. If you are playing a cassette, use the
AUDIO/CH button to advance to the
next selection. You will see ‘‘FF’’
blinking in the display when you
press the AUDIO/CH button. The
system f ast f orwards until it senses a
silent period, then goes back to
PLAY.
If youareplayingaCD,thesystem
skips to the beginning of the next
track each time you push the
AUDIO/CH button. You will see the
disc and track number in the display.
Two controls f or the audio system
are mounted in the steering wheel
hub. These let you control basic
f unctions without removing your
hand f rom the wheel. Remote Audio Controls
Audio System
Comf ort and Convenience Feat ures169
A A U
UD DI
IOO/ /C
CH H
B
BU UT TT
TO
ON N
01/09/07 12:22:00 31S3V610_174
Page 174 of 372

You will have to store your favorite
stations in the Preset buttons after
the system begins working. Your
original settings were lost when
power was disconnected.
If your vehicle’s battery is discon-
nected or goes dead, the audio
system will disable itself . If this
happens, you will see ‘‘Code’’ in the
frequencydisplaythenexttimeyou
turn on the system. Use the Preset
buttons to enter the five-digit code. If
it is entered correctly, the radio will
start playing.
If you make a mistake entering the
code, do not start over or try to
correct your mistake. Complete the
f ive-digit sequence, then enter the
correct code. You have ten tries to
enter the correct code. If you are
unsuccessful in ten attempts, you
must then leave the system on for
one hour bef ore trying again.
Your vehicle’s audio system will
disable itself if it is disconnected
f rom electrical power f or any reason.
To make it work again, the user
must enter a specif ic f ive-digit code
in the Preset buttons. Because there
are hundreds of number
combinations possible f rom f ive
digits, making the system work
without knowing the exact code is
nearly impossible.
Youshouldhavereceivedacardthat
lists your audio system’s code
number and serial number. It is best
tostorethiscardinasafeplaceat
home. In addition, you should write
the audio system’s serial number in
this Owner’s Manual. If you should
happen to lose the card, you must
obtain the code number f rom your
Acura dealer. To do this, you will
need the system’s serial number. Thef t Protection
Audio System
Comf ort and Convenience Feat ures170
01/09/07 12:22:09 31S3V610_175
Page 184 of 372
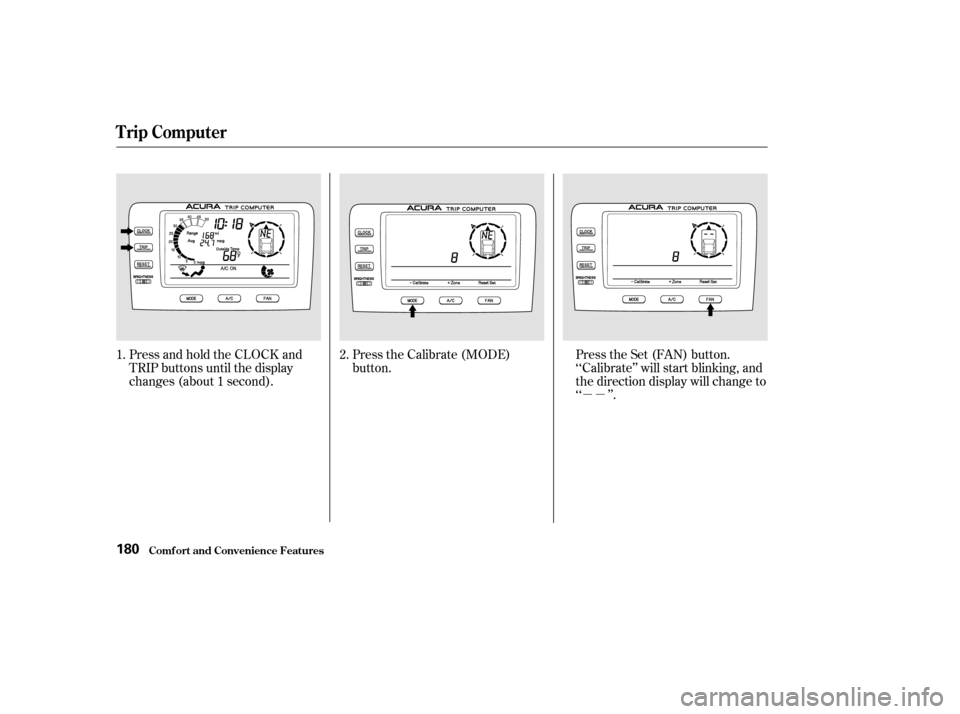
�µ�µ
Press and hold the CLOCK and
TRIP buttons until the display
changes (about 1 second).
Press the Calibrate (MODE)
button.
Press the Set (FAN) button.
‘‘Calibrate’’ will start blinking, and
the direction display will change to
‘‘ ’’.
1. 2.
Trip Computer
Comf ort and Convenience Feat ures180
01/09/07 12:23:47 31S3V610_185
Page 185 of 372
�µ�µ
Drivethevehicleslowlyintwo
complete circles. In most areas, there is a variation
between magnetic north and true
north. Zone selection is required so
the compass can compensate f or this
variation. To check and select the
zone set into the compass, do the
f ollowing.
Press and hold the CLOCK and
TRIP buttons until the display
changes (about 1 second).
When the display goes f rom
‘‘ ’’ to an actual heading, the
unit is calibrated.
Press the CLOCK, TRIP, or
RESET button to complete the
calibration and return the display
to normal. 1.
CONT INUED
Trip Computer
Comf ort and Convenience Feat ures
Compass Zone Select ion
181
01/09/07 12:23:56 31S3V610_186
Page 188 of 372
Always use a sof t cloth and mild
glass/plastic cleaner (such as
cleaners f or computer monitor
screens) to clean the display.
When you wipe the screen, some
black lines may appear because of
static electricity build-up. This is
normal. They will disappear in five to
ten minutes.
The Brightness control has seven
positions. In the middle f ive positions
the display will dim when you turn
on the parking lights or headlights.
Moving the control to the far left
position turns of f the display. It will
come back on f or several seconds if
you press any of the buttons.
In the f ar right (maximum
brightness) position, the display will
notdimwhenyouturnonthe
parking lights.
Trip Computer
Cleaning the Display
BRIGHT NESS control
Comf ort and Convenience Feat ures184
01/09/07 12:24:18 31S3V610_189


 to clean the display.
When you wipe the screen, some
black lines may appear because of
static e")