2001 YAMAHA YZ125LC brake
[x] Cancel search: brakePage 14 of 558

EC083000
MANUAL FORMAT
All of the procedures in this manual are organized in a sequential, step-by-step format. The informa-
tion has been complied to provide the mechanic with an easy to read, handy reference that contains
comprehensive explanations of all disassembly, repair, assembly, and inspection operations.
In this revised format, the condition of a faulty component will precede an arrow symbol and the
course of action required will follow the symbol, e.g.,
9Bearings
Pitting/DamageÕReplace.
EC084002
HOW TO READ DESCRIPTIONS
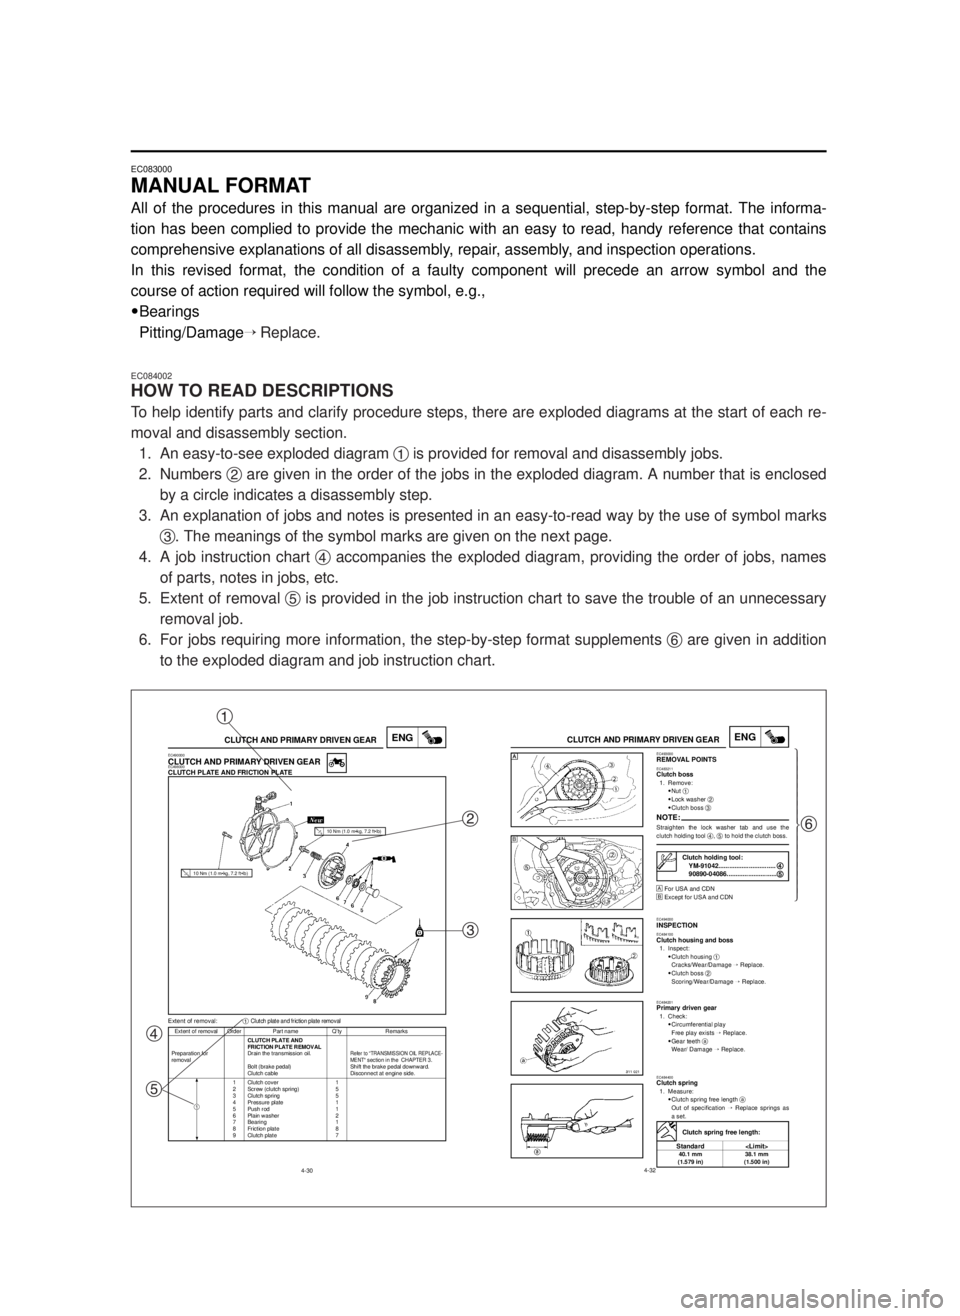
To help identify parts and clarify procedure steps, there are exploded diagrams at the start of each re-
moval and disassembly section.
1. An easy-to-see exploded diagram 1is provided for removal and disassembly jobs.
2. Numbers 2are given in the order of the jobs in the exploded diagram. A number that is enclosed
by a circle indicates a disassembly step.
3. An explanation of jobs and notes is presented in an easy-to-read way by the use of symbol marks
3. The meanings of the symbol marks are given on the next page.
4. A job instruction chart 4accompanies the exploded diagram, providing the order of jobs, names
of parts, notes in jobs, etc.
5. Extent of removal 5is provided in the job instruction chart to save the trouble of an unnecessary
removal job.
6. For jobs requiring more information, the step-by-step format supplements 6are given in addition
to the exploded diagram and job instruction chart.
4-30
ENGCLUTCH AND PRIMARY DRIVEN GEAR
Extent of removal Order Part name Q’ty Remarks
CLUTCH PLATE AND
FRICTION PLATE REMOVAL
Preparation for Drain the transmission oil.
Refer to “TRANSMISSION OIL REPLACE-removalMENT“ section in the CHAPTER 3.Bolt (brake pedal) Shift the brake pedal downward.
Clutch cable Disconnect at engine side.
1 Clutch cover 1
2 Screw (clutch spring) 5
3 Clutch spring 5
4 Pressure plate 1
5 Push rod 1
6 Plain washer 2
7 Bearing 1
8 Friction plate 8
9 Clutch plate 7
Extent of removal:1Clutch plate and friction plate removal
EC490000CLUTCH AND PRIMARY DRIVEN GEAREC498000CLUTCH PLATE AND FRICTION PLATE
1
10 Nm (1.0 m•kg, 7.2 ft•lb)
10 Nm (1.0 m•kg, 7.2 ft•lb)
4-32
ENGCLUTCH AND PRIMARY DRIVEN GEAREC493000REMOVAL POINTSEC483211Clutch boss1. Remove:
9Nut 1
9Lock washer 2
9Clutch boss 3
NOTE:Straighten the lock washer tab and use the
clutch holding tool 4, 5to hold the clutch boss.
Œ
For USA and CDN
º
Except for USA and CDN
EC494000INSPECTIONEC484100Clutch housing and boss1. Inspect:
9Clutch housing 1
Cracks/Wear/Damage Õ Replace.
9Clutch boss 2
Scoring/Wear/Damage ÕReplace.
EC484201Primary driven gear1. Check:
9Circumferential play
Free play exists ÕReplace.
9Gear teeth a
Wear/ Damage ÕReplace.
EC484400Clutch spring1. Measure:
9Clutch spring free length a
Out of specification ÕReplace springs as
a set.
Clutch holding tool:
YM-91042................................4 4
90890-04086............................5 5
Clutch spring free length:
Standard
40.1 mm 38.1 mm
(1.579 in) (1.500 in)
Œ
ºŒü
ï
ï
ï
ï
ï
ï
ï
ý
ï
ï
ï
ï
ï
ï
ï
þ
1
2
3
4
56
5MV-9-30-0 6/19/00 2:05 PM Page 12
Page 22 of 558

CHAPTER 4
ENGINE
SEAT, FUEL TANK AND SIDE
COVERS.....................................................4-1
EXHAUST PIPE AND SILENCER..............4-3
RADIATOR..................................................4-4
CARBURETOR AND REED VALVE...........4-7
CYLINDER HEAD , CYLINDER AND
PISTON.....................................................4-17
CLUTCH AND PRIMARY DRIVEN
GEAR.......................................................4-30
KICK AXLE, SHIFT SHAFT AND
PRIMARY DRIVE GEAR...........................4-38
YPVS GOVERNOR...................................4-46
WATER PUMP..........................................4-49
CDI MAGNETO.........................................4-53
ENGINE REMOVAL..................................4-57
CRANKCASE AND CRANKSHAFT.........4-62
TRANSMISSION, SHIFT CAM AND
SHIFT FORK.............................................4-69
CHAPTER 5
CAHSSIS
FRONT WHEEL AND REAR WHEEL........5-1
FRONT BRAKE AND REAR BRAKE.......5-10
FRONT FORK...........................................5-27
HANDLEBAR............................................5-40
STEERING................................................5-47
SWINGARM..............................................5-52
REAR SHOCK ABSORBER.....................5-59
5MV-9-30-0 6/19/00 2:05 PM Page 20
Page 26 of 558

1-1
GEN
INFO
DESCRIPTION
EC100000
GENERAL INFORMATION
EC110000
DESCRIPTION
1Clutch lever
2”ENGINE STOP” button
3Front brake lever
4Throttle grip
5Radiator cap
6Fuel tank cap
7Kick starter
8Fuel tank
9Radiator
0Coolant drain bolt
qCheck bolt (Transmission oil level)
wRear brake pedal
eValve joint
rFuel cock
tAir cleaner
yDrive chain
uShift pedal
iStarter knob
oFront fork
NOTE:
9The machine you have purchased may differ
slightly from those shown in the following.
9Designs and specifications are subject to
change without notice.
1
5MV-9-30-1A 6/19/00 1:11 PM Page 2
Page 48 of 558

1-10
GEN
INFO
CONTROL FUNCTIONS
EC156000
FRONT BRAKE LEVER
The front brake lever 1is located on the right
handlebar. Pull it toward the handlebar to acti-
vate the front brake.
EC157000
REAR BRAKE PEDAL
The rear brake pedal 1is located on the right
side of the machine. Press down on the brake
pedal to activate the rear brake.
EC158001
FUEL COCK
The fuel cock supplies fuel from the tank to car-
buretor while filtering the fuel. The fuel cock has
the two positions:
OFF: With the lever in this position, fuel will not
flow. Always return the lever to this posi-
tion when the engine is not running.
ON: With the lever in this position, fuel flows to
the carburetor. Normal riding is done with
the lever in this position.
EC159000
STARTER KNOB (CHOKE)
When cold, the engine requires a richer air-fuel
mixture for starting. A separate starter circuit,
which is controlled by the starter knob 1, sup-
plies this mixture. Pull the starter knob out to
open the circuit for starting. When the engine
has warmed up, push it in to close the circuit.
5MV-9-30-1A 6/19/00 1:12 PM Page 24
Page 60 of 558

1-16
GEN
INFO
TORQUE-CHECK POINTS
EC1A0012
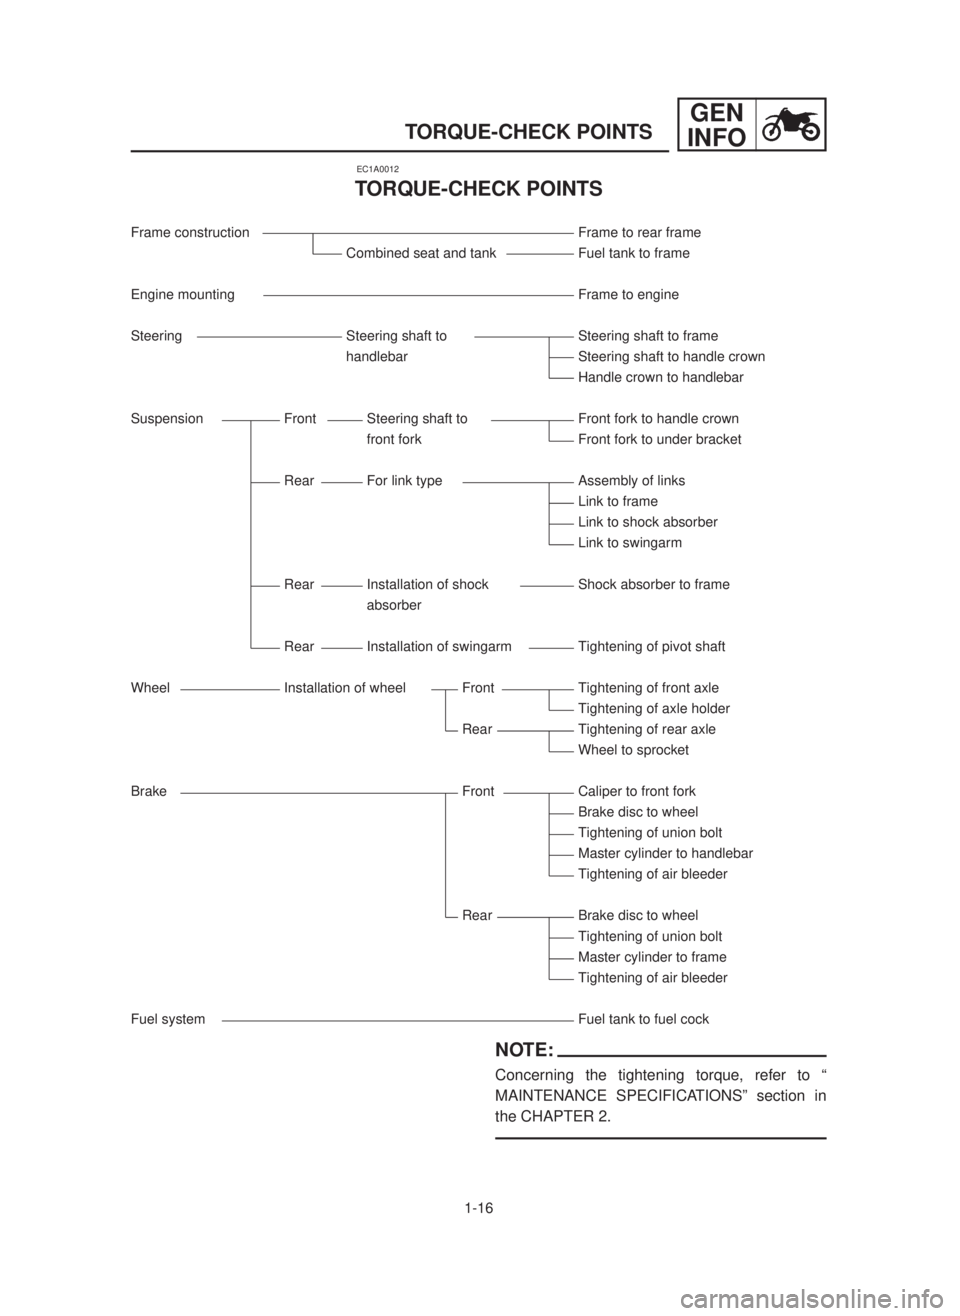
TORQUE-CHECK POINTS
Frame construction Frame to rear frame
Combined seat and tank Fuel tank to frame
Engine mounting Frame to engine
Steering Steering shaft to Steering shaft to frame
handlebar Steering shaft to handle crown
Handle crown to handlebar
Suspension Front Steering shaft to Front fork to handle crown
front fork Front fork to under bracket
Rear For link type Assembly of links
Link to frame
Link to shock absorber
Link to swingarm
Rear Installation of shock Shock absorber to frame
absorber
Rear Installation of swingarm Tightening of pivot shaft
Wheel Installation of wheel Front Tightening of front axle
Tightening of axle holder
Rear Tightening of rear axle
Wheel to sprocket
Brake Front Caliper to front fork
Brake disc to wheel
Tightening of union bolt
Master cylinder to handlebar
Tightening of air bleeder
Rear Brake disc to wheel
Tightening of union bolt
Master cylinder to frame
Tightening of air bleeder
Fuel system Fuel tank to fuel cock
NOTE:
Concerning the tightening torque, refer to “
MAINTENANCE SPECIFICATIONS” section in
the CHAPTER 2.
5MV-9-30-1B 6/20/0 5:12 PM Page 10
Page 64 of 558

1-17
GEN
INFO
CLEANING AND STORAGE
EC1B0000
CLEANING AND STORAGE
EC1B1000
CLEANING
Frequent cleaning of your machine will enhance
its appearance, maintain good overall perfor-
mance, and extend the life of many components.
1. Before washing the machine, block off the
end of the exhaust pipe to prevent water
from entering. A plastic bag secured with a
rubber band may be used for this purpose.
2. If the engine is excessively greasy, apply
some degreaser to it with a paint brush. Do
not apply degreaser to the chain, sprockets,
or wheel axles.
3. Rinse the dirt and degreaser off with a gar-
den hose; use only enough pressure to do
the job.
cC
Excessive hose pressure may cause water
seepage and contamination of wheel bear-
ings, front forks, brakes and transmission
seals. Many expensive repair bills have re-
sulted from improper high pressure deter-
gent applications such as those available
in coin-operated car washers.
4. After the majority of the dirt has been hosed
off, wash all surfaces with warm water and a
mild detergent. Use an old toothbrush to
clean hard-to-reach places.
5. Rinse the machine off immediately with
clean water, and dry all surfaces with a soft
towel or cloth.
6. Immediately after washing, remove excess
water from the chain with a paper towel and
lubricate the chain to prevent rust.
7. Clean the seat with a vinyl upholstery clean-
er to keep the cover pliable and glossy.
8. Automotive wax may be applied to all paint-
ed or chromed surfaces. Avoid combination
cleaner-waxes, as they may contain abra-
sives.
9. After completing the above, start the engine
and allow it to idle for several minutes.
5MV-9-30-1B 6/20/0 5:12 PM Page 14
Page 69 of 558

2-2
SPECGENERAL SPECIFICATIONS
Carburetor:
Type/Manufacturer TMXø
38SS/MIKUNI
Spark plug:
Type/Manufacturer BR9EG/NGK
Gap 0.5~0.6 mm (0.020~0.024 in)
Clutch type: Wet, multiple-disc
Transmission:
Primary reduction system Gear
Primary reduction ratio 64/19 (3.368)
Secondary reduction system Chain drive
Secondary reduction ratio 48/13 (3.692)
Transmission type Constant mesh, 6-speed
Operation Left foot operation
Gear ratio: 1st 30/13 (2.307)
2nd 28/15 (1.866)
3rd 26/17 (1.529)
4th 27/21 (1.285)
5th 26/23 (1.130)
6th 24/24 (1.000)
Chassis:USA, CDN, ZA, AUS, NZEUROPE
Frame type Semi double cradle¬
Caster angle 25.6° 25.4°
Trail 107 mm (4.21 in) 104 mm (4.09 in)
Tire:
Type With tube
Size (front) 80/100-21 51M
Size (rear) 100/90-19 57M
Tire pressure (front and rear) 100 kPa (1.0 kg/cm2, 15 psi)
Brake:
Front brake type Single disc brake
Operation Right hand operation
Rear brake type Single disc brake
Operation Right foot operation
Suspension:
Front suspension Telescopic fork
Rear suspension Swingarm (link type monocross suspension)
Shock absorber:
Front shock absorber Coil spring/oil damper
Rear shock absorber Coil spring/Gas, oil damper
Wheel travel:
Front wheel travel 300 mm (11.8 in)
Rear wheel travel 315 mm (12.4 in)
Electrical:
Ignition system CDI magneto
2
5MV-9-30-2A 6/19/00 1:15 PM Page 3
Page 75 of 558

2-8
SPECMAINTENANCE SPECIFICATIONS
Item Standard Limit
Wheel:
Front wheel type Spoke wheel…
Rear wheel type Spoke wheel…
Front rim size/Material 21 ´1.60/Aluminum…
Rear rim size/Material 19 ´1.85/Aluminum…
Rim runout limit:
Radial…
2.0 mm (0.08 in)
Lateral … 2.0 mm (0.08 in)
Drive chain:
Type/Manufacturer DID520DMA2 SDH/DAIDO …
Number of links 111 links+joint …
Chain slack 40~50 mm (1.6~2.0 in) …
Chain length (10 links) … 152.5 mm (6.004 in)
Front disc brake:
Disc outside dia. ´Thickness 250 ´3.0 mm (9.84 ´0.12 in)…
Pad thickness 4.4 mm (0.17 in) 1.0 mm (0.04 in)
Master cylinder inside dia. 11.0 mm (0.433 in)…
Caliper cylinder inside dia. 27.0 mm (1.063 in) ´2…
Brake fluid type DOT #4…
Rear disc brake:
Disc outside dia. ´Thickness 240 ´4.0 mm (9.45 ´0.16 in)…
Deflection limit…
0.15 mm (0.006 in)
Pad thickness 6.4 mm (0.25 in) 1.0 mm (0.04 in)
Master cylinder inside dia. 12.7 mm (0.500 in)…
Caliper cylinder insdie dia. 27.0 mm (1.063 in)…
Brake fluid type DOT #4…
Brake lever & brake pedal:
Brake lever position 95 mm (3.74 in)…
Brake pedal height 5 mm (0.20 in)…
(vertical height above footrest top)
Clutch lever free play (at lever pivot) 2~4 mm (0.08~0.16 in)…
Throttle grip free play 3~5 mm (0.12~0.20 in)…
5MV-9-30-2A 6/19/00 1:15 PM Page 9