2001 YAMAHA XVS250 service
[x] Cancel search: servicePage 33 of 88

6-1
6
EAU00462
6-PERIODIC MAINTENANCE AND MINOR REPAIR
EAU00464
Safety is an obligation of the owner.
Periodic inspection, adjustment and lu-
brication will keep your vehicle in the
safest and most efficient condition pos-
sible. The most important points of in-
spection, adjustment, and lubrication
are explained on the following pages.
The intervals given in the periodic main-
tenance and lubrication chart should be
simply considered as a general guide
under normal riding conditions. Howev-
er, DEPENDING ON THE WEATHER,
TERRAIN, GEOGRAPHICAL LOCA-
TION, AND INDIVIDUAL USE, THE
MAINTENANCE INTERVALS MAY
NEED TO BE SHORTENED.
EW000060
WARNING
_ If you are not familiar with motor-
cycle maintenance work, have a
Yamaha dealer do it for you. _
EAU01175
Owner’s tool kit The owner’s tool kit is located behind
panel A. (See page 6-5 for panel re-
moval and installation procedures.)
The service information included in this
manual and the tools provided in the
owner’s tool kit are intended to assist
you in the performance of preventive
maintenance and minor repairs. How-
ever, additional tools such as a torque
wrench may be necessary to perform
certain maintenance work correctly.
NOTE:_ If you do not have the tools or experi-
ence required for a particular job, have
a Yamaha dealer perform it for you. _
EW000063
WARNING
_ Modifications not approved by
Yamaha may cause loss of perfor-
mance and render the vehicle un-
safe for use. Consult a Yamaha
dealer before attempting any
changes. _
1. Owner’s tool kit
E_5kr.book Page 1 Tuesday, September 12, 2000 4:46 PM
Page 36 of 88

PERIODIC MAINTENANCE AND MINOR REPAIR
6-4
6
EAU03541
NOTE:_l
The air filter needs more frequent service if you are riding in unusually wet or dusty areas.
l
Hydraulic brake service
• Regularly check and, if necessary, correct the brake fluid level.
• Every two years replace the internal components of the brake master cylinder and caliper, and change the brake fluid.
• Replace the brake hoses every four years and if cracked or damaged.
_26
*Air induction system• Check the air cut valve and reed valve for damage.
• Replace the entire air induction system if necessary.ÖÖÖÖ Ö
27*Lights, signals and
switches• Check operation.
• Adjust headlight beam.ÖÖÖÖÖ Ö NO. ITEM CHECK OR MAINTENANCE JOBODOMETER READING (´1,000 km)
ANNUAL
CHECK
1 10203040
E_5kr.book Page 4 Tuesday, September 12, 2000 4:46 PM
Page 46 of 88

PERIODIC MAINTENANCE AND MINOR REPAIR
6-14
6
EC000082
CAUTION:_ l
Make sure that the air filter ele-
ment is properly seated in the
air filter case.
l
The engine should never be op-
erated without the air filter ele-
ment installed, otherwise the
piston(s) and/or cylinder(s) may
become excessively worn.
_6. Install the air filter case cover by
installing the screws. 7. Connect the hose.
8. Install the air filter case by insert-
ing the projection into the grom-
met, installing the bolts, then
tightening the clamp screw.
EAU00629
Adjusting the carburetor The carburetor is an important part of
the engine and requires very sophisti-
cated adjustment. Therefore, most car-
buretor adjustments should be left to a
Yamaha dealer, who has the neces-
sary professional knowledge and expe-
rience. The adjustment described in
the following section, however, may be
serviced by the owner as part of routine
maintenance.
EC000094
CAUTION:_ The carburetor has been set and ex-
tensively tested at the Yamaha fac-
tory. Changing these settings
without sufficient technical knowl-
edge may result in poor perfor-
mance of or damage to the engine. _
1. Projection
2. Grommet
3. Hose
E_5kr.book Page 14 Tuesday, September 12, 2000 4:46 PM
Page 58 of 88

PERIODIC MAINTENANCE AND MINOR REPAIR
6-26
6
EC000096
CAUTION:_ Improper drive chain slack will over-
load the engine as well as other vital
parts of the motorcycle and can lead
to chain slippage or breakage. To
prevent this from occurring, keep
the drive chain slack within the
specified limits. _3. Tighten both locknuts, and then
tighten the axle nut to the specified
torque.
4. Adjust the brake pedal free play.
(See page 6-21 for brake pedal
free play adjustment procedures.)
EW000103
WARNING
_ After adjusting the brake pedal free
play, check the operation of the
brake light. _
EAU03006
Lubricating the drive chain The drive chain must be cleaned and
lubricated at the intervals specified in
the periodic maintenance and lubrica-
tion chart, otherwise it will quickly wear
out, especially when riding in dusty or
wet areas. Service the drive chain as
follows.
EC000097
CAUTION:_ The drive chain must be lubricated
after washing the motorcycle or
riding in the rain. _1. Clean the drive chain with kero-
sene and a small soft brush.
ECA00053
CAUTION:_ To prevent damaging the O-rings,
do not clean the drive chain with
steam cleaners, high-pressure
washers or inappropriate solvents. _
2. Wipe the drive chain dry.
3. Thoroughly lubricate the drive
chain with a special O-ring chain
lubricant.
ECA00052
CAUTION:_ Do not use engine oil or any other
lubricants for the drive chain, as
they may contain substances that
could damage the O-rings. _
Tightening torque:
Axle nut:
104 Nm (10.4 m·kg)
E_5kr.book Page 26 Tuesday, September 12, 2000 4:46 PM
Page 68 of 88

PERIODIC MAINTENANCE AND MINOR REPAIR
6-36
6
EAU03218
Replacing a turn signal light
bulb 1. Remove the turn signal lens by re-
moving the screws.2. Remove the defective bulb by
pushing it in and turning it counter-
clockwise.
3. Insert a new bulb into the socket,
push it in, and then turn it clock-
wise until it stops.
4. Install the lens by installing the
screws.
EC000108
CAUTION:_ Do not overtighten the screws, oth-
erwise the lens may break. _
EAU01579
Supporting the motorcycle Since this model is not equipped with a
centerstand, follow these precautions
when removing the front and rear
wheel or performing other mainte-
nance requiring the motorcycle to
stand upright. Check that the motor-
cycle is in a stable and level position
before starting any maintenance. A
strong wooden box can be placed un-
der the engine for added stability.
To service the front wheel
1. Stabilize the rear of the motorcycle
by using a motorcycle stand or, if
an additional motorcycle stand is
not available, by placing a jack un-
der the frame in front of the rear
wheel.
2. Raise the front wheel off the
ground by using a motorcycle
stand.
1. Screw (´ 2)
1. Turn signal light bulb
E_5kr.book Page 36 Tuesday, September 12, 2000 4:46 PM
Page 69 of 88

PERIODIC MAINTENANCE AND MINOR REPAIR
6-37
6 To service the rear wheel
Raise the rear wheel off the ground by
using a motorcycle stand or, if a motor-
cycle stand is not available, by placing
a jack either under each side of the
frame in front of the rear wheel or under
each side of the swingarm.
EAU03737
Front wheel To remove the front wheel
EW000122
WARNING
_ l
It is advisable to have a Yamaha
dealer service the wheel.
l
Securely support the motor-
cycle so that there is no danger
of it falling over.
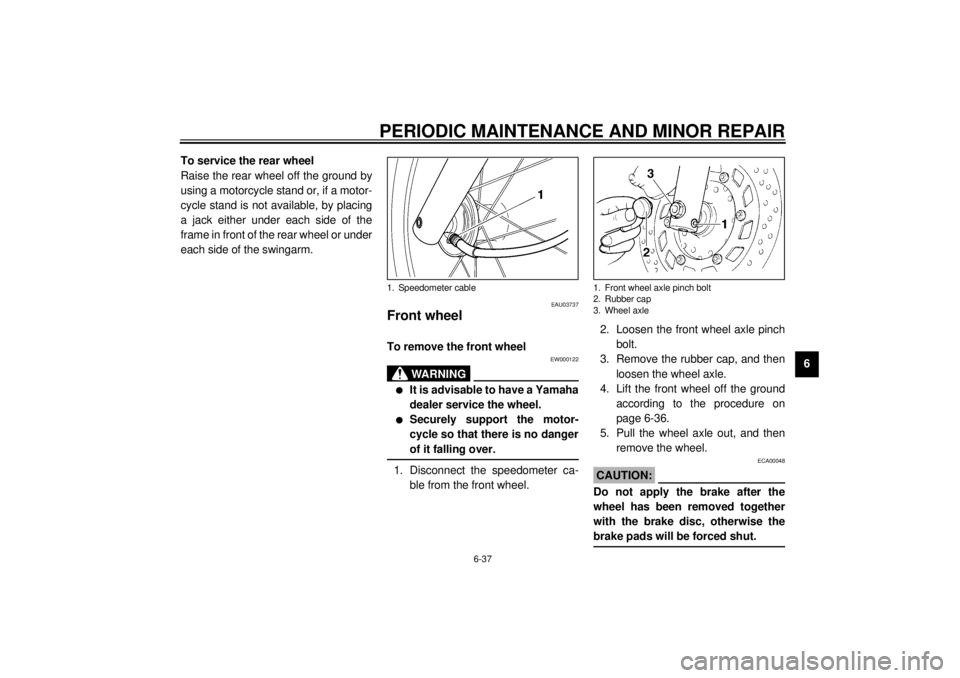
_1. Disconnect the speedometer ca-
ble from the front wheel.2. Loosen the front wheel axle pinch
bolt.
3. Remove the rubber cap, and then
loosen the wheel axle.
4. Lift the front wheel off the ground
according to the procedure on
page 6-36.
5. Pull the wheel axle out, and then
remove the wheel.
ECA00048
CAUTION:_ Do not apply the brake after the
wheel has been removed together
with the brake disc, otherwise the
brake pads will be forced shut. _
1. Speedometer cable
1. Front wheel axle pinch bolt
2. Rubber cap
3. Wheel axle
E_5kr.book Page 37 Tuesday, September 12, 2000 4:46 PM
Page 71 of 88

PERIODIC MAINTENANCE AND MINOR REPAIR
6-39
6
EAU03189
Rear wheel To remove the rear wheel
EW000122
WARNING
_ l
It is advisable to have a Yamaha
dealer service the wheel.
l
Securely support the motor-
cycle so that there is no danger
of it falling over.
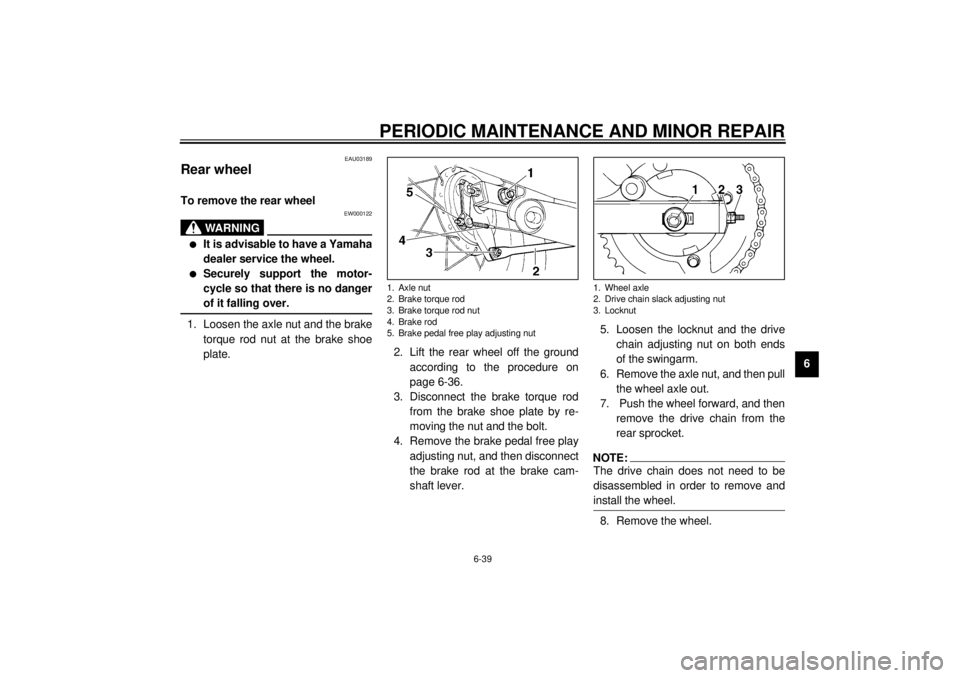
_1. Loosen the axle nut and the brake
torque rod nut at the brake shoe
plate.2. Lift the rear wheel off the ground
according to the procedure on
page 6-36.
3. Disconnect the brake torque rod
from the brake shoe plate by re-
moving the nut and the bolt.
4. Remove the brake pedal free play
adjusting nut, and then disconnect
the brake rod at the brake cam-
shaft lever.5. Loosen the locknut and the drive
chain adjusting nut on both ends
of the swingarm.
6. Remove the axle nut, and then pull
the wheel axle out.
7. Push the wheel forward, and then
remove the drive chain from the
rear sprocket.
NOTE:_ The drive chain does not need to be
disassembled in order to remove and
install the wheel. _8. Remove the wheel.
1. Axle nut
2. Brake torque rod
3. Brake torque rod nut
4. Brake rod
5. Brake pedal free play adjusting nut
1. Wheel axle
2. Drive chain slack adjusting nut
3. Locknut
E_5kr.book Page 39 Tuesday, September 12, 2000 4:46 PM
Page 72 of 88

PERIODIC MAINTENANCE AND MINOR REPAIR
6-40
6
EAU03190
To install the rear wheel
1. Insert the wheel axle from the left-
hand side, and then install the
drive chain onto the rear sprocket.
2. Install the axle nut, and then lower
the rear wheel so that it is on the
ground.
3. Install the brake rod onto the brake
camshaft lever, and then install
the brake pedal free play adjusting
nut onto the brake rod.
4. Connect the brake torque rod to
the brake shoe plate by installing
the bolt and the nut, and then tight-
en the bolt to the specified torque.
5. Adjust the drive chain slack. (See
page 6-25 for drive chain slack ad-
justment procedures.)6. Tighten the axle nut to the speci-
fied torque.
7. Adjust the brake pedal position
and free play. (See page 6-20 for
brake pedal position and free play
adjustment procedures.)
EW000103
WARNING
_ After adjusting the brake pedal free
play, check the operation of the
brake light. _
EAU01008
Troubleshooting Although Yamaha motorcycles receive
a thorough inspection before shipment
from the factory, trouble may occur dur-
ing operation. Any problem in the fuel,
compression, or ignition systems, for
example, can cause poor starting and
loss of power.
The following troubleshooting chart
represents a quick and easy procedure
for checking these vital systems your-
self. However, should your motorcycle
require any repair, take it to a Yamaha
dealer, whose skilled technicians have
the necessary tools, experience, and
know-how to service the motorcycle
properly.
Use only genuine Yamaha replace-
ment parts. Imitation parts may look
like Yamaha parts, but they are often
inferior, have a shorter service life and
can lead to expensive repair bills. Tightening torque:
Brake torque rod bolt:
23 Nm (2.3 m·kg)
Tightening torque:
Axle nut:
104 Nm (10.4 m·kg)
E_5kr.book Page 40 Tuesday, September 12, 2000 4:46 PM