2001 YAMAHA XVS1100A warning
[x] Cancel search: warningPage 4 of 104

EAU00005
IMPORTANT MANUAL INFORMATIONParticularly important information is distinguished in this manual by the following notations:
The Safety Alert Symbol means ATTENTION! BECOME ALERT! YOUR SAFETY IS
INVOLVED!
WARNING
Failure to follow WARNING instructions could result in severe injury or death
to the
motorcycle operator, a bystander, or a person inspecting or repairing the
motorcycle.
CAUTION:A CAUTION indicates special precautions that must be taken to avoid damage to the
motorcycle.NOTE:
A NOTE provides key information to make procedures easier or clearer.
NOTE:@ l
This manual should be considered a permanent part of this motorcycle and should remain
with it even if the motorcycle is subsequently sold.
l
Yamaha continually seeks advancements in product design and quality. Therefore, while
this manual contains the most current product information available at the time of printing,
there may be minor discrepancies between your motorcycle and this manual. If you have
any questions concerning this manual, please consult your Yamaha dealer.
@
E_5pb.book Page 1 Thursday, October 5, 2000 10:10 AM
Page 5 of 104

IMPORTANT MANUAL INFORMATION
EW000002
WARNING
@ PLEASE READ THIS MANUAL CAREFULLY AND COMPLETELY BEFORE OPERATING
THIS MOTORCYCLE. @
E_5pb.book Page 2 Thursday, October 5, 2000 10:10 AM
Page 17 of 104

INSTRUMENT AND CONTROL FUNCTIONS
3
Main switch/steering lock .................................................................. 3-1
Indicator and warning lights ............................................................. 3-2
Speedometer unit .............................................................................. 3-3
Anti-theft alarm (optional) .................................................................. 3-4
Handlebar switches ........................................................................... 3-4
Clutch lever ....................................................................................... 3-5
Shift pedal (XVS1100)........................................................................ 3-6
Shift pedal (XVS1100A) ..................................................................... 3-6
Brake lever ........................................................................................ 3-6
Brake pedal ....................................................................................... 3-7
Fuel tank cap ..................................................................................... 3-7
Fuel ................................................................................................... 3-8
Fuel cock ........................................................................................... 3-9
Starter (choke) lever ......................................................................... 3-10
Seats (XVS1100) ............................................................................ 3-11
Seats (XVS1100A) ........................................................................... 3-12
Helmet holder .................................................................................. 3-13
Storage compartment ..................................................................... 3-14
Adjusting the shock absorber assembly .......................................... 3-15
Luggage strap holders .................................................................... 3-18
Sidestand ........................................................................................ 3-18
Ignition circuit cut-off system ........................................................... 3-19
E_5pb.book Page 1 Thursday, October 5, 2000 10:10 AM
Page 18 of 104

3-1
3
EAU00027
3-INSTRUMENT AND CONTROL FUNCTIONS
EAU00029
Main switch/steering lock The main switch/steering lock controls
the ignition and lighting systems, and is
used to lock the steering. The various
positions are described below.
EAU00036
ON
All electrical systems are supplied with
power, and the engine can be started.
The key cannot be removed.
EAU00038
OFF
All electrical systems are off. The key
can be removed.
EAU00040
LOCK
The steering is locked, and all electrical
systems are off. The key can be re-
moved.
To lock the steering1. Turn the handlebars all the way to
the left.
2. Push the key in from the “OFF” po-
sition, and then turn it to “LOCK”
while still pushing it.
3. Remove the key.
To unlock the steeringPush the key in, and then turn it to
“OFF” while still pushing it.
EW000016
WARNING
@ Never turn the key to “OFF” or
“LOCK” while the motorcycle is
moving, otherwise the electrical
systems will be switched off, which
may result in loss of control or an
accident. Make sure that the motor-
cycle is stopped before turning the
key to “OFF” or “LOCK”. @1. Push.
2. Turn.
E_5pb.book Page 1 Thursday, October 5, 2000 10:10 AM
Page 19 of 104

INSTRUMENT AND CONTROL FUNCTIONS
3-2
3
EAU01590
(Parking)
The steering is locked, and the taillight
and auxiliary light are on, but all other
electrical systems are off. The key can
be removed.
The steering must be locked before the
key can be turned to “ ”.
ECA00043
CAUTION:@ Do not use the parking position for
an extended length of time, other-
wise the battery may discharge. @
EAU03034
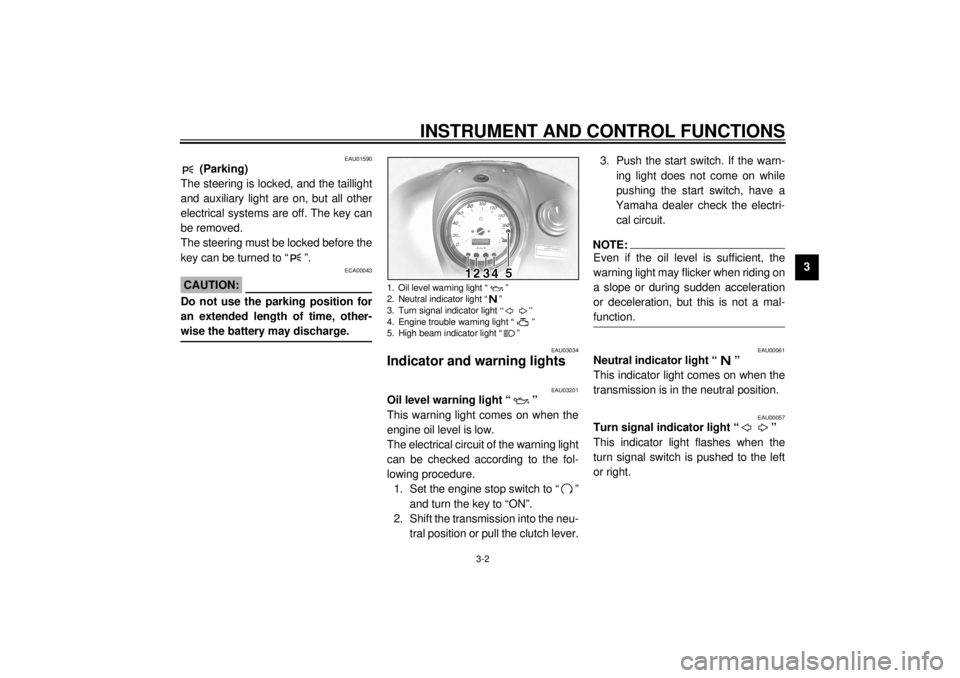
Indicator and warning lights
EAU03201
Oil level warning light “ ”
This warning light comes on when the
engine oil level is low.
The electrical circuit of the warning light
can be checked according to the fol-
lowing procedure.
1. Set the engine stop switch to “ ”
and turn the key to “ON”.
2. Shift the transmission into the neu-
tral position or pull the clutch lever.3. Push the start switch. If the warn-
ing light does not come on while
pushing the start switch, have a
Yamaha dealer check the electri-
cal circuit.
NOTE:@ Even if the oil level is sufficient, the
warning light may flicker when riding on
a slope or during sudden acceleration
or deceleration, but this is not a mal-
function. @
EAU00061
Neutral indicator light “ ”
This indicator light comes on when the
transmission is in the neutral position.
EAU00057
Turn signal indicator light “ ”
This indicator light flashes when the
turn signal switch is pushed to the left
or right.
1. Oil level warning light “ ”
2. Neutral indicator light “ ”
3. Turn signal indicator light “”
4. Engine trouble warning light “ ”
5. High beam indicator light “ ”
E_5pb_Functions.fm Page 2 Thursday, October 5, 2000 2:16 PM
Page 20 of 104

INSTRUMENT AND CONTROL FUNCTIONS
3-3
3
EAU03192
Engine trouble warning light “ ”
This warning light comes on or flashes
when an electrical circuit monitoring
the engine is defective. When this oc-
curs, have the Yamaha dealer check
the self-diagnosis system.
The electrical circuit of the warning light
can be checked according to the fol-
lowing procedure.
1. Set the engine stop switch to
“
”.
2. Turn the key to “ON”. If the warn-
ing light does not come on, have a
Yamaha dealer check the electri-
cal circuit.
EAU00063
High beam indicator light “ ”
This indicator light comes on when the
high beam of the headlight is switched
on.
EAU03193
Speedometer unit The speedometer unit is equipped with
a digital odometer and a tripmeter. The
speedometer shows riding speed. The
odometer shows the total distance trav-
eled. The tripmeter shows the distance
traveled since it was last set to zero.
Pushing the “TRIP” button switches the
display between the odometer mode
“ODO” and the tripmeter mode “TRIP”.To reset the tripmeter, select it by
pushing the “TRIP” button, and then
push the “TRIP” button again and hold
it down for at least one second. The
tripmeter can be used to estimate the
distance that can be traveled with a full
tank of fuel. This information will enable
you to plan future fuel stops.
NOTE:@ This motorcycle is not equipped with a
tachometer; however, it has a built-in
speed limiter, which prevents the en-
gine speed from exceeding approxi-
mately 6,800 r/min and the vehicle
speed from exceeding approximately
175 km/h. @
1. “TRIP” button
2. Odometer/tripmeter
E_5pb.book Page 3 Thursday, October 5, 2000 10:10 AM
Page 25 of 104

INSTRUMENT AND CONTROL FUNCTIONS
3-8
3 2. Turn the key counterclockwise to
the original position, remove it,
and then close the lock cover.
NOTE:@ The fuel tank cap cannot be installed
unless the key is in the lock. In addition,
the key cannot be removed if the cap is
not properly installed and locked. @
EW000024
WARNING
@ Make sure that the fuel tank cap is
properly installed before riding. @
EAU03753
Fuel Make sure that there is sufficient fuel in
the tank. Fill the fuel tank to the bottom
of the filler tube as shown.
EW000130
WARNING
_ l
Do not overfill the fuel tank, oth-
erwise it may overflow when the
fuel warms up and expands.
l
Avoid spilling fuel on the hot
engine.
_
EAU00185
CAUTION:@ Immediately wipe off spilled fuel
with a clean, dry, soft cloth, since
fuel may deteriorate painted surfac-
es or plastic parts. @
EAU00191
NOTE:@ If knocking (or pinging) occurs, use
gasoline of a different brand or with a
higher octane grade. @
1. Fuel tank filler tube
2. Fuel level
Recommended fuel:
Regular unleaded gasoline with a
research octane number of 91 or
higher
Fuel tank capacity:
Total amount:
17 L
Reserve amount:
4.5 L
E_5pb.book Page 8 Thursday, October 5, 2000 10:10 AM
Page 30 of 104

INSTRUMENT AND CONTROL FUNCTIONS
3-13
3
Rider seat
To remove the rider seat
1. Remove the passenger seat.
2. Remove the bolt, and then pull the
rider seat up.To install the rider seat
1. Insert the projections on the front
of the rider seat into the holders as
shown, place the seat in the origi-
nal position, and then install the
bolt.
2. Install the passenger seat.NOTE:@ Make sure that the seats are properly
secured before riding. @
EAU00260
Helmet holder To open the helmet holder, insert the
key into the lock, and then turn the key
as shown.
To lock the helmet holder, place it in
the original position, and then remove
the key.
EW000030
WARNING
@ Never ride with a helmet attached to
the helmet holder, since the helmet
may hit objects, causing loss of
control and possibly an accident. @
1. BoltXVS1100A
1. Projection (´ 2)
2. Seat holder (´ 2)XVS1100A
1. Helmet holder
E_5pb.book Page 13 Thursday, October 5, 2000 10:10 AM