Page 22 of 762

CHAPTER 3
REGULAR INSPECTION AND
ADJUSTMENTS
MAINTENANCE INTERVALS
................... 3-1
PRE-OPERATION INSPECTION
AND MAINTENANCE
............................... 3-4
ENGINE
..................................................... 3-5
CHASSIS
................................................. 3-26
ELECTRICAL
.......................................... 3-47
CHAPTER 4
ENGINE
SEAT, FUEL TANK
AND SIDE COVERS
................................. 4-1
EXHAUST PIPE AND SILENCER
............ 4-2
RADIATOR
................................................ 4-4
CARBURETOR
......................................... 4-8
CAMSHAFTS
.......................................... 4-21
CYLINDER HEAD
................................... 4-28
VALVES AND VALVE SPRINGS
........... 4-32
CYLINDER AND PISTON
....................... 4-41
CLUTCH (WR426F)
................................ 4-48
CLUTCH (WR400F)
................................ 4-55
OIL FILTER, WATER PUMP
AND CRANKCASE COVER (RIGHT)
.... 4-62
BALANCER
............................................ 4-69
OIL PUMP
............................................... 4-72
KICK AXLE AND SHIFT SHAFT
............ 4-76
CDI MAGNETO
....................................... 4-83
ENGINE REMOVAL
................................ 4-87
CRANKCASE AND CRANKSHAFT
....... 4-92
TRANSMISSION, SHIFT CAM
AND SHIFT FORK
................................ 4-101
Page 54 of 762

1 - 12
GEN
INFO
CONTROL FUNCTIONS
FUEL COCK
The fuel cock supplies fuel from the tank to
carburetor and also filters the fuel. The fuel
cock has three positions:
OFF:With the lever in this position fuel will not
flow. Always return the lever to this posi-
tion when the engine is not running.
ON: With the lever in this position fuel flows to
the carburetor. Normal riding is done with
the lever in this position.
RES:With the lever in this position fuel flows to
the carburetor from the reserve section of
the fuel tank after the main supply of the
fuel has been depleted. Normal riding is
possible with the lever is in this position,
but it is recommended to add fuel as
soon as possible.
COLD STARTER KNOB
When cold, the engine requires a richer air-fuel
mixture for starting. A separate starter circuit,
which is controlled by the cold starter knob 1,
supplies this mixture. Pull the cold starter knob
out to open the circuit for starting. When the
engine has warmed up, push it in to close the
circuit.
HOT STARTER KNOB (red)
The hot starter knob (red) 1 is used when
starting a warm engine.
Use the hot starter knob when starting the
engine again immediately after it was stopped
(the engine is still warm). Pulling out the hot
starter knob injects secondary air to thin the
air-fuel mixture temporarily, allowing the
engine to be started more easily.
CAUTION:
After the engine has started, be sure to
push the hot starter knob back in.
Page 227 of 762

3 - 2
INSP
ADJ
MAINTENANCE INTERVALS
SHIFT FORK, SHIFT CAM, GUIDE BAR
Inspect
c
Inspect wear
ROTOR NUT
Retighten
cc
MUFFLER
Inspect and retighten
Clean
Replace
cc
c
c
*Whichever comes first
*SPARK ARRESTER
Clean
(Every
six
months)
c
CRANK
Inspect and clean
cc
CARBURETOR
Inspect, adjust and clean
cc
When using a high-pres-
sure washer, make sure
that water does not enter
the accelerator pump.
SPARK PLUG
Inspect and clean
Replace
cc
c
DRIVE CHAIN
Lubricate, slack, alignment
Replace
cc
c
Use chain lube
Chain slack: 40 ~ 50 mm
(1.6 ~ 2.0 in)
COOLING SYSTEM
Check coolant level and leakage
Check radiator cap operation
Replace coolant
Inspect hoses
cc
cc
c
Every two years
OUTSIDE NUTS AND BOLTS
Retighten
cc
Refer to “STARTING AND
BREAK-IN” section in the
CHAPTER 1.
AIR FILTER
Clean and lubricate
Replace
cc
c
Use foam air-filter oil
OIL STRAINER (frame)
Clean
c
FRAME
Clean and inspect
cc
FUEL TANK, COCK
Clean and inspect
cc
BRAKES
Adjust lever position and pedal height
Lubricate pivot point
Check brake disc surface
Check fluid level and leakage
Retighten brake disc bolts, caliper
bolts, master cylinder bolts and union
bolts
Replace pads
Replace brake fluid
c
c
c
c
cc
c
c
c
c
c
c
Every one year ItemAfter
break-inEvery
race
Every
third
or
500 km
(300 mi)Every
fifth
or
1,000 km
(600 mi)
As re-
quiredRemarks
3
Page 268 of 762

3 - 18
INSP
ADJ
PILOT SCREW ADJUSTMENT
10. Install:
lOil filler plug
11. Inspect:
lEngine (for oil leaks)
lOil level
Refer to “ENGINE OIL LEVEL INSPEC-
TION”.
12. Check:
lOil pressure
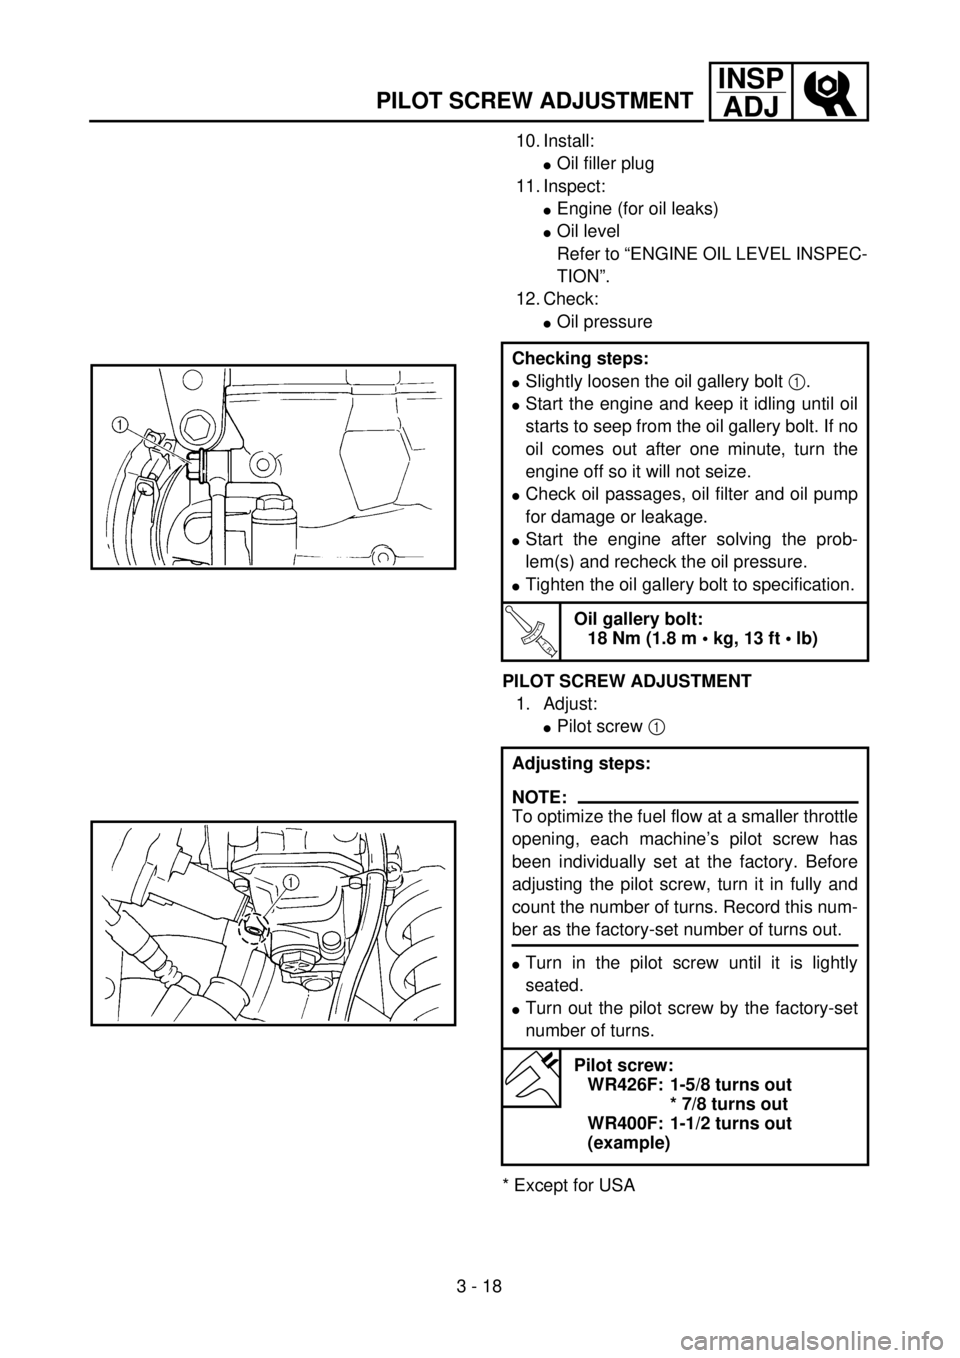
PILOT SCREW ADJUSTMENT
1. Adjust:
lPilot screw 1
* Except for USAChecking steps:
lSlightly loosen the oil gallery bolt 1.
lStart the engine and keep it idling until oil
starts to seep from the oil gallery bolt. If no
oil comes out after one minute, turn the
engine off so it will not seize.
lCheck oil passages, oil filter and oil pump
for damage or leakage.
lStart the engine after solving the prob-
lem(s) and recheck the oil pressure.
lTighten the oil gallery bolt to specification.
T R..
Oil gallery bolt:
18 Nm (1.8 m • kg, 13 ft • lb)
Adjusting steps:
NOTE:
To optimize the fuel flow at a smaller throttle
opening, each machine’s pilot screw has
been individually set at the factory. Before
adjusting the pilot screw, turn it in fully and
count the number of turns. Record this num-
ber as the factory-set number of turns out.
lTurn in the pilot screw until it is lightly
seated.
lTurn out the pilot screw by the factory-set
number of turns.
Pilot screw:
WR426F: 1-5/8 turns out
* 7/8 turns out
WR400F: 1-1/2 turns out
(example)