Page 20 of 100

3-4
INSTRUMENT AND CONTROL FUNCTIONS
1
23
4
5
6
7
8
9 the “TRIP” button for at least one
second. The tripmeter can be used
together with the fuel gauge to esti-
mate the distance that can be trav-
eled with a full tank of fuel. This infor-
mation will enable you to plan future
fuel stops.
12
EAU02950
Fuel gaugeThe fuel gauge indicates the amount
of fuel in the fuel tank. The needle
moves towards “E” (Empty) as the
fuel level decreases. When the nee-
dle reaches the red line, refuel as
soon as possible.NOTE:
Do not allow the fuel tank to empty
itself completely.1. Fuel gauge
2. Red line
2
1
1. Coolant temperature gauge
2. Red mark
EAU03124
Coolant temperature gaugeThis gauge indicates the coolant tem-
perature when the main switch is on.
The engine operating temperature
will vary with changes in weather and
engine load. If the needle points to
the red mark, stop your scooter and
let the engine cool. (See page
6-38 for details.)
EC000002
cCDo not operate the engine if it is
overheated.
5GJ-9-EV 5/26/01 11:04 AM Page 19
Page 23 of 100
3-7
INSTRUMENT AND CONTROL FUNCTIONS
1
23
4
5
6
7
8
9
123
EAU00138
Engine stop switch
Set this switch to “$” to stop the
engine in case of an emergency,
such as when the scooter overturns
or when the throttle cable is stuck.
EAU00134
Light switch
Set this switch to “
'
” to turn on
the auxiliary light, meter lighting and
taillight. Set the switch to “:” to turn
on the headlight also.
1. Engine stop switch
2. Light switch
3. Start switch “,”
EAU03801
Start switch “,”
With the sidestand up, push this
switch while applying the front or rear
brake to crank the engine with the
starter.
EC000005
cCSee page 5-1 for starting instruc-
tions prior to starting the engine.
1
1. Front brake lever
EAU03882
Front brake leverThe front brake lever is located on
the right handlebar grip. To apply the
front brake, pull this lever toward the
handlebar grip.
5GJ-9-EV 5/26/01 11:04 AM Page 22
Page 24 of 100
3-8
INSTRUMENT AND CONTROL FUNCTIONS
1
23
4
5
6
7
8
9
1
1. Rear brake lever
EAU00163
Rear brake leverThe rear brake lever is located on the
left handlebar grip. To apply the rear
brake, pull this lever toward the han-
dlebar grip.
1
EAU03881
Fuel tank capTo remove the fuel tank cap
1. Open the lid by pulling the lever
up.
2. Insert the key into the lock and
turn it clockwise. The lock will be
released and the fuel tank cap
can be removed.1. Lid
To install the fuel tank cap
1. Align the match marks, insert the
fuel tank cap into the tank open-
ing, and then push down on the
cap.
2. Turn the key counterclockwise to
the original position, and then
remove it.
3. Close the lid.
EWA00047
wMake sure that the fuel tank cap is
properly installed and locked in
place before riding the scooter.
1
1. Match marks
5GJ-9-EV 5/26/01 11:04 AM Page 23
Page 80 of 100

6-38
PERIODIC MAINTENANCE AND MINOR REPAIR
1
2
3
4
56
7
8
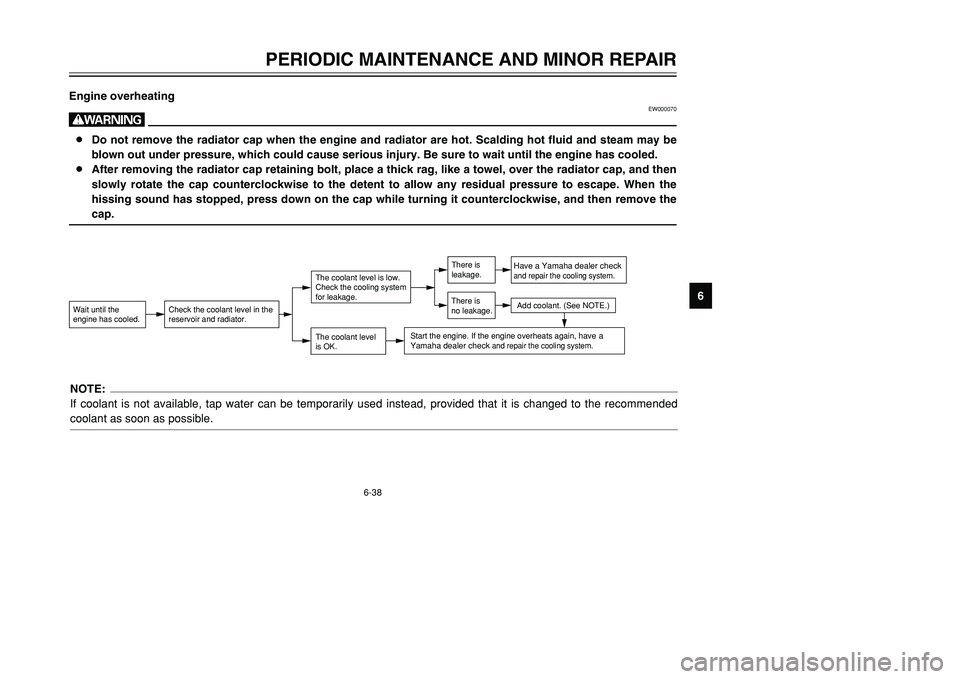
9 Engine overheating
EW000070
w8Do not remove the radiator cap when the engine and radiator are hot. Scalding hot fluid and steam may be
blown out under pressure, which could cause serious injury. Be sure to wait until the engine has cooled.
8After removing the radiator cap retaining bolt, place a thick rag, like a towel, over the radiator cap, and then
slowly rotate the cap counterclockwise to the detent to allow any residual pressure to escape. When the
hissing sound has stopped, press down on the cap while turning it counterclockwise, and then remove the
cap.Wait until the
engine has cooled.
Check the coolant level in the
reservoir and radiator.
The coolant level
is OK.The coolant level is low.
Check the cooling system
for leakage.
Have a Yamaha dealer checkand repair the cooling system.Add coolant. (See NOTE.)
Start the engine. If the engine overheats again,
have a
Yamaha dealer check
and repair the cooling system.
There is
leakage.
There is
no leakage.
NOTE:
If coolant is not available, tap water can be temporarily used instead, provided that it is changed to the recommended
coolant as soon as possible.
5GJ-9-EV 5/26/01 11:04 AM Page 79