Page 23 of 135

1-16
E
EJU00668a
Water-skiing
You can use the watercraft for water-ski-
ing if it has the seating capacity to carry the
operator, a rearward-facing spotter, and the
water-skier when he or she is not skiing.
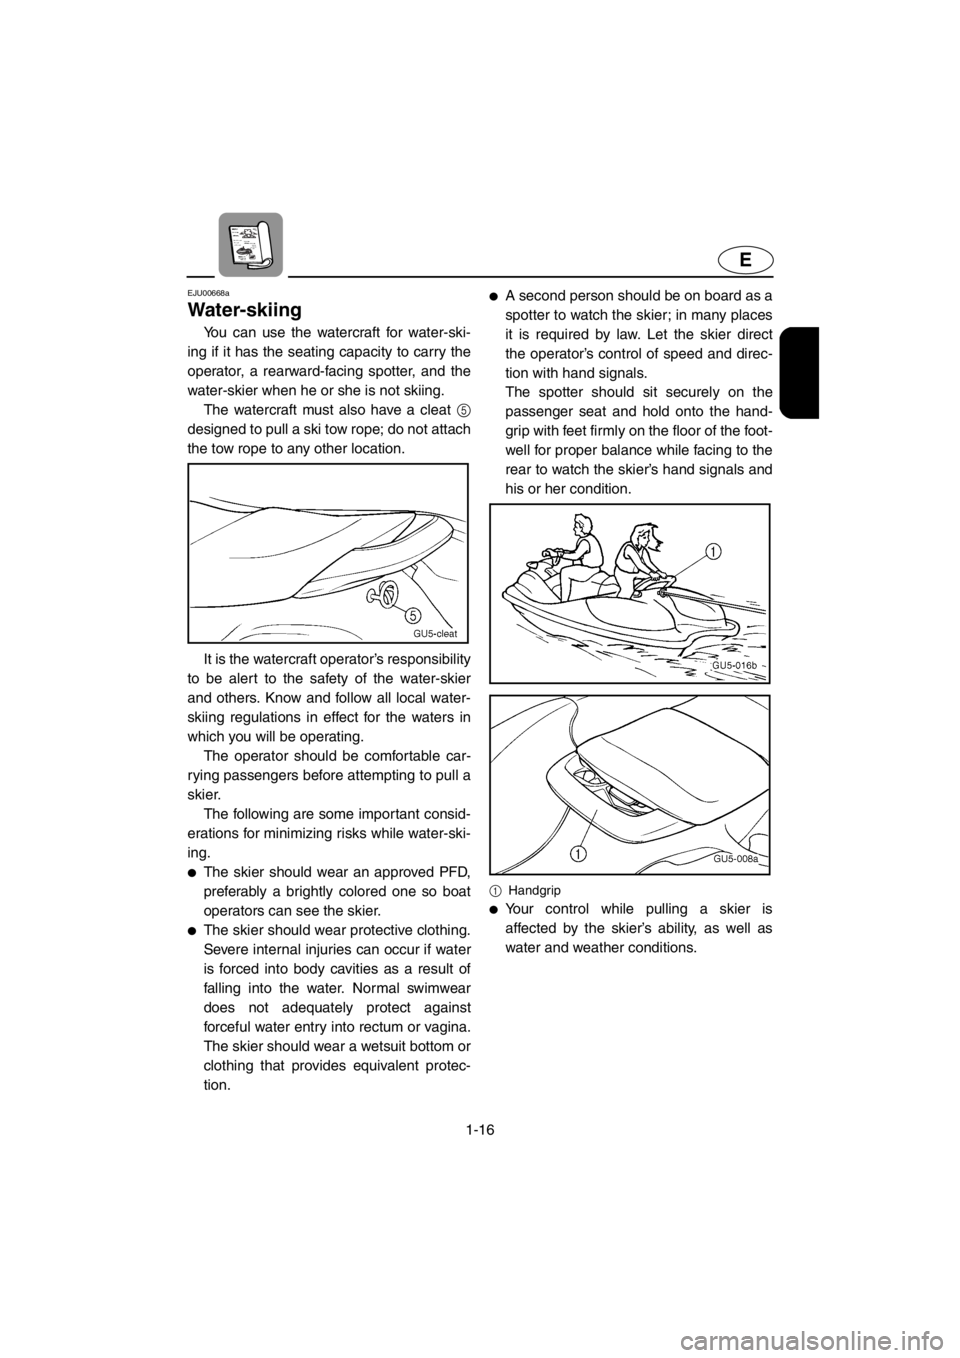
The watercraft must also have a cleat 5
designed to pull a ski tow rope; do not attach
the tow rope to any other location.
It is the watercraft operator’s responsibility
to be alert to the safety of the water-skier
and others. Know and follow all local water-
skiing regulations in effect for the waters in
which you will be operating.
The operator should be comfortable car-
rying passengers before attempting to pull a
skier.
The following are some important consid-
erations for minimizing risks while water-ski-
ing.
●The skier should wear an approved PFD,
preferably a brightly colored one so boat
operators can see the skier.
●The skier should wear protective clothing.
Severe internal injuries can occur if water
is forced into body cavities as a result of
falling into the water. Normal swimwear
does not adequately protect against
forceful water entry into rectum or vagina.
The skier should wear a wetsuit bottom or
clothing that provides equivalent protec-
tion.
●A second person should be on board as a
spotter to watch the skier; in many places
it is required by law. Let the skier direct
the operator’s control of speed and direc-
tion with hand signals.
The spotter should sit securely on the
passenger seat and hold onto the hand-
grip with feet firmly on the floor of the foot-
well for proper balance while facing to the
rear to watch the skier’s hand signals and
his or her condition.
1Handgrip
●Your control while pulling a skier is
affected by the skier’s ability, as well as
water and weather conditions.
E_GU5-71-1.fm Page 16 Thursday, July 13, 2000 8:53 PM
Page 31 of 135
2-4
E
EJU00328
Operation of controls and
other functions
EJU00335a
Rear seat
To remove the rear seat:
Pull the rear seat latch 1 up, and then
pull the seat off.
To install the rear seat:
Insert the projections on the front of the
seat into the stays on the deck, and then
push the rear of the seat down to lock it in
place securely.
E_GU5-71-2.fm Page 4 Thursday, July 13, 2000 7:48 PM
Page 32 of 135
2-5
E
EJU00714
Front seat
To remove the front seat:
1. Remove the rear seat.
2. Pull the front seat latch 2 up, and then
pull the seat off.
To install the front seat:
1. Insert the projections on the front of the
seat into the stays on the deck, and then
push the rear of the seat down to lock it
in place.
2. Install the rear seat.
NOTE:
Make sure that the seats are properly
secured before operating the watercraft.
E_GU5-71-2.fm Page 5 Thursday, July 13, 2000 7:48 PM
Page 33 of 135
2-6
E
EJU00703
Hood
To open the hood, pull the latch 1 up,
and then lift the hood up.
To close the hood, push the hood down to
lock it in place.
NOTE:
Make sure that the hood is properly secured
before operating the watercraft.
E_GU5-71-2.fm Page 6 Thursday, July 13, 2000 7:48 PM
Page 34 of 135
2-7
E
EJU00347
Fuel tank filler cap
To remove the fuel tank filler cap 1, turn it
counterclockwise.
NOTE:
Make sure that the fuel tank filler cap is
properly secured before operating the water-
craft.
EJU00001N
Oil tank filler cap
To remove the oil tank filler cap:
1. Remove the rear and front seats. (See
pages 2-4 to 2-5 for rear and front seat
installation and removal procedures.)
2. Turn the filler cap 2 counterclockwise.
To install the oil tank filler cap:
Install the filler cap, and then install the
seats.
NOTE:
Make sure that the oil tank filler cap is prop-
erly secured before operating the watercraft.
E_GU5-71-2.fm Page 7 Thursday, July 13, 2000 7:48 PM
Page 55 of 135

2-28
E
EJU00672a
Storage compartments
A front storage compartment, a glove
compartment, and rear storage compart-
ments are provided.
NOTE:
●Make sure that the storage compartments
are properly secured before operating the
watercraft.
●The storage compartments are not
designed to be waterproof. If you carry
objects that must be kept dry, such as the
manuals, put them in a waterproof bag.
Front storage compartment
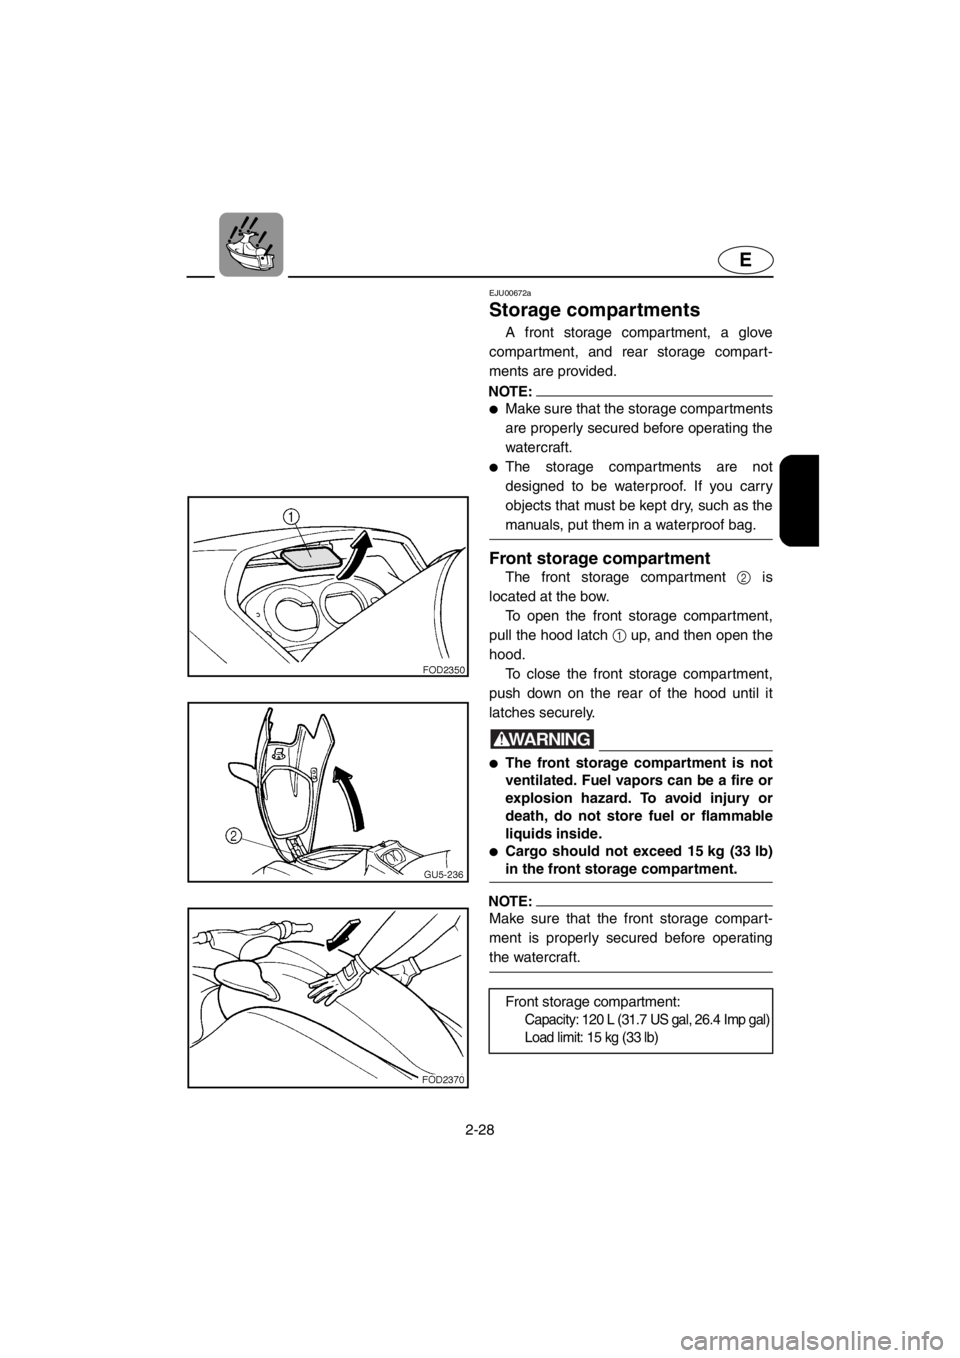
The front storage compartment 2 is
located at the bow.
To open the front storage compartment,
pull the hood latch 1 up, and then open the
hood.
To close the front storage compartment,
push down on the rear of the hood until it
latches securely.
WARNING
●The front storage compartment is not
ventilated. Fuel vapors can be a fire or
explosion hazard. To avoid injury or
death, do not store fuel or flammable
liquids inside.
●Cargo should not exceed 15 kg (33 lb)
in the front storage compartment.
NOTE:
Make sure that the front storage compart-
ment is properly secured before operating
the watercraft.
Front storage compartment:
Capacity: 120 L (31.7 US gal, 26.4 Imp gal)
Load limit: 15 kg (33 lb)
E_GU5-71-2.fm Page 28 Thursday, July 13, 2000 7:48 PM
Page 56 of 135
2-29
E
Glove compartment
A glove compartment 4 is located in front
of the seat.
To open the glove compartment, slide the
latch 3 toward you, and then lift up the lid.
To close the glove compartment, push the
lid down until it locks securely.
Glove compartment:
Capacity: 1.7 L (0.45 US gal, 0.37 Imp gal)
Load limit: 1 kg (2.2 lb)
E_GU5-71-2.fm Page 29 Thursday, July 13, 2000 7:48 PM
Page 57 of 135

2-30
E
Rear storage compartments
The rear storage compartments 6 are
located on both sides of the aft deck.
To open a rear storage compartment, pull
the latch 5 up, and then open the cover.
To close a rear storage compartment,
push down on the cover until it latches
securely.
NOTE:
Make sure that the rear storage compart-
ments are properly secured before operat-
ing the watercraft.
WARNING
●The rear storage compartments are
not ventilated. Fuel vapors can be a
fire or explosion hazard. To avoid
injury or death, do not store fuel or
flammable liquids here.
●Cargo should not exceed 22.5 kg
(50 lb) in either the port or starboard
storage compartment.
NOTE:
There is a drain plug 7 in each compart-
ment. To drain water in a rear storage com-
partment into the engine compartment,
remove the plug by turning it counterclock-
wise.
Rear storage compartments:
Capacity: 160 L (42.3 US gal, 35.2 Imp gal)
Load limit: 22.5 kg (50 lb)
E_GU5-71-2.fm Page 30 Thursday, July 13, 2000 7:48 PM