Page 113 of 306

’01 Tacoma U (L/O 0009)
1072001 TACOMA (OM35766U)
High−Low beams�For high beams, turn
the headlights on and push the lever away
from you (position 1). Pull the lever to-
ward you (position 2) f")
’01 Tacoma U (L/O 0009)
1072001 TACOMA (OM35766U)
High−Low beams�For high beams, turn
the headlights on and push the lever away
from you (position 1). Pull the lever to-
ward you (position 2) for low beams.
The headlight high beam indicator light
(blue light) on the instrument panel will
tell you that the high beams are on.
Flashing the high beam headlights
(position 3)�Pull the lever all the way
back. The high beam headlights turn off
when you release the lever.
You can flash the high beam headlights
with the knob turned to �OFF".
TURN SIGNALS
To signal a turn, push the headlight/
turn signal lever up or down to position
1.
The key must be in the �ON" position.
The lever automatically returns after you
make a turn, but you may have to return
it by hand after you change lanes.
To signal a lane change, move the lever
up or down to the pressure point (position
2) and hold it.
If the turn signal indicator lights (green
lights) on the instrument panel flash faster
than normal, a front or rear turn signal
bulb is burned out.
Emergency flashers
To turn on the emergency flashers,
push the switch.
All the turn signal lights will flash. To turn
them off, push the switch once again.
Turn on the emergency flashers to warn
other drivers if your vehicle must be
stopped where it might be a traffic hazard.
Always pull as far off the road as pos-
sible.
The turn signal light switch will not work
when the emergency flashers are operat-
ing.
Page 142 of 306
’01 Tacoma U (L/O 0009)
1362001 TACOMA (OM35766U)
To check the indicator bulb, turn the igni-
tion key to the �ON" position, but do not
start the engine.
CAUTION
Do not keep driving with the differen-
tial lock switch on.
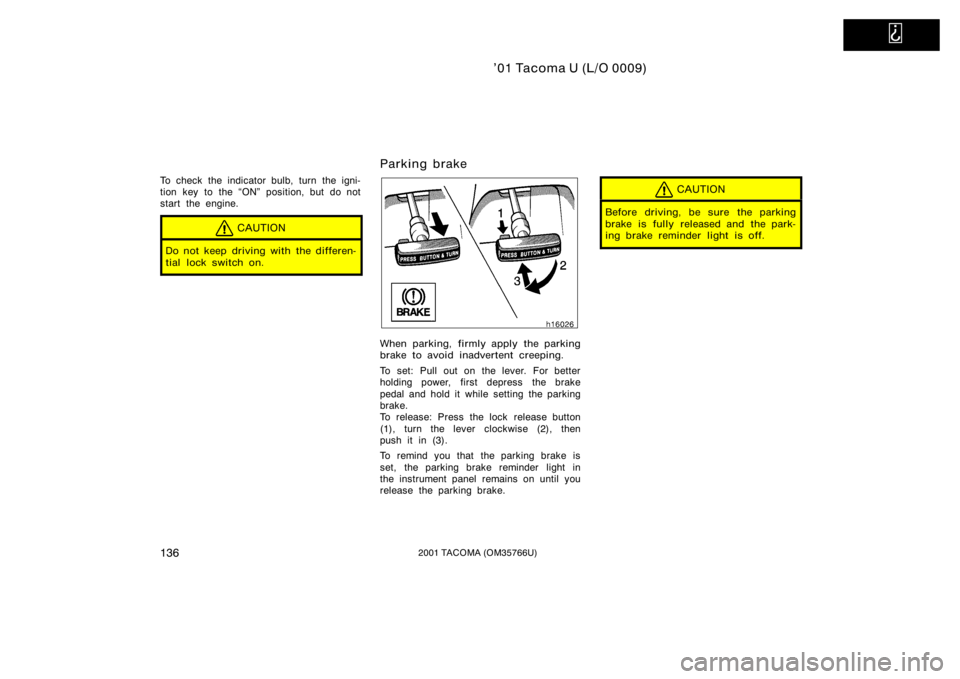
Parking brake
When parking, firmly apply the parking
brake to avoid inadvertent creeping.
To set: Pull out on the lever. For better
holding power, first depress the brake
pedal and hold it while setting the parking
brake.
To release: Press the lock release button
(1), turn the lever clockwise (2), then
push it in (3).
To remind you that the parking brake is
set, the parking brake reminder light in
the instrument panel remains on until you
release the parking brake.
CAUTION
Before driving, be sure the parking
brake is fully released and the park-
ing brake reminder light is off.
Page 263 of 306
’01 Tacoma U (L/O 0009)
2572001 TACOMA (OM35766U)
Checking and replacing fuses
Parts (if replacement is necessary):
�Fuse with same amperage rating as
original
Adding washer fluid
Parts:
�Water
�Washer fluid containing antifreeze
(for winter use)
Tools:
�Funnel
Replacing light bulbs
Parts:
�Bulb with same number and wattage
rating as original (See charts in �Re-
placing light bulbs" in Section 7−3.)
Tools:
�Screwdriver
Page 275 of 306
’01 Tacoma U (L/O 0009)
2692001 TACOMA (OM35766U)
DO−IT−YOURSELF MAINTENANCE
Electrical components
Checking battery condition270
. . . . . . . . . . . . . . . . . . . . . . . . . . . . . . . . . .
Battery recharging precautions 271
. . . . . . . . . . . . . . . . . . . . . . . . . . . . . . .
Checking and replacing fuses 272
. . . . . . . . . . . . . . . . . . . . . . . . . . . . . . . .
Adding washer fluid 273
. . . . . . . . . . . . . . . . . . . . . . . . . . . . . . . . . . . . \
. . . . .
Replacing light bulbs 273
. . . . . . . . . . . . . . . . . . . . . . . . . . . . . . . . . . . . \
. . . .
SECTION 7− 3
Page 279 of 306

’01 Tacoma U (L/O 0009)
2732001 TACOMA (OM35766U)
If the new fuse immediately blows out,
there is a problem with the electrical sys-
tem. Have your Toyota dealer correct it as
soon as possible.")
’01 Tacoma U (L/O 0009)
2732001 TACOMA (OM35766U)
If the new fuse immediately blows out,
there is a problem with the electrical sys-
tem. Have your Toyota dealer correct it as
soon as possible.
CAUTION
Never use a fuse with a higher am-
perage rating, or any other object, in
place of a fuse. This may cause ex-
tensive damage and possibly a fire.
Adding washer fluid
If any washer does not work, the wash-
er tank may be empty. Add washer
fluid.
You may use plain water as washer fluid.
However, in cold areas where tempera-
tures range below freezing point, use
washer fluid containing antifreeze. This
product is available at your Toyota dealer
and most auto parts stores. Follow the
manufacturer ’s directions for how much to
mix with water.
NOTICE
Do not use engine antifreeze or any
other substitute because it may dam-
age your vehicle’s paint.
Replacing light bulbs�
The following illustrations show how to
gain access to the bulbs. When replacing
a bulb, make sure the ignition switch and
light switch are off. Use bulbs with the
wattage ratings given in the table.
CAUTION
Halogen bulbs have pressurized gas
inside and require special handling.
They can burst or shatter if scratched
or dropped. Hold a bulb only by its
plastic or metal case. Do not touch
the glass part of a bulb with bare
hands.
NOTICE
Only use a bulb of the listed type.
Page 280 of 306
’01 Tacoma U (L/O 0009)
2742001 TACOMA (OM35766U)
The inside of the lens of exterior lights
such as headlights may temporarily fog up
when the lens becomes wet in the rain or
in a car wash. This is not a problem
because the fogging is caused by the
temperature difference between the outside
and inside of the lens, just like the
windshield fogged up in the rain. However,
if there is a large drop of water on the
inside of the lens, or if there is water
pooled inside the light, contact your
Toyota dealer.Light bulbsBulb
No.WTy p e
Headlights�60/55A
Parking lights1685B
Front turn signal
lights4157NAK27/8C
Rear turn signal
lights115627D
Stop/tail lights115727/8D
Back−up lights92118B
License plate
lights1943.8B
High mounted
stoplight1685B
Interior light Regular cab
Xtra−cab�
�
5
10E
E
Personal lights�5E
Door courtesy
lights�3E
Glove box light�1.4B
A: HB2 halogen bulbs
B: Wedge base bulbs (clear)
C: Wedge base bulbs (amber)
D: Single end bulbs
E: Double end bulbs
Page 281 of 306
’01 Tacoma U (L/O 0009)
2752001 TACOMA (OM35766U)
�Headlights
1. Open the hood. Unplug the connec-tor. Remove the rubber cover.
If the connector is tight, wiggle it.2. Release the bulb retaining spring and remove the bulb. Install a new
bulb and the bulb retaining spring.
To install a bulb, align the tabs of the
bulb with the cutouts of the mounting
hole.3. Install the rubber cover with the �TOP" mark upward and snuggle on
the boss. Then insert the connector.
Make sure the rubber cover fits snugly on
the connector and the headlight body.
Aiming is not necessary after replacing
the bulb. When aiming adjustment is nec-
essary, contact your Toyota dealer.


’01 Tacoma U (L/O 0009)
2692001 TACOMA (OM35766U)
DO−IT−YOURSELF MAINTENANCE
Electrical components
Checking battery condition270
. . . . . . . . . . . . . . . . . . . . . . . . . . . . . . .")

’01 Tacoma U (L/O 0009)
2742001 TACOMA (OM35766U)
The inside of the lens of exterior lights
such as headlights may temporarily fog up
when the lens becomes wet in the rain or
in a car wash. This")
