Page 59 of 240
’01MY CELICA U (L/O 0008)
552001 CELICA (20766U)
CAUTION
�After inserting the tab, make sure
the tab and buckle are locked and
that the lap and shoulder portions
of the belt is not twisted.
�Do not insert coins, clips, etc. in
the buckle as this may prevent you
from properly latching the tab and
buckle.
�If the seat belt does not function
normally, it cannot protect your
child from injury. Contact your
Toyota dealer immediately. Do not
use the seat until the seat belt is
fixed.
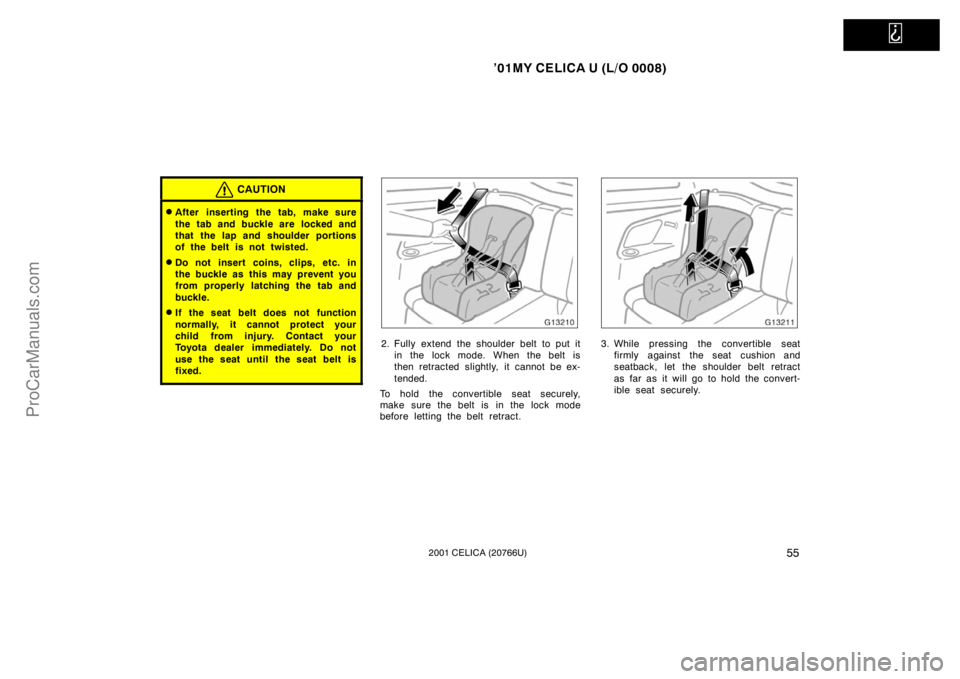
2. Fully extend the shoulder belt to put itin the lock mode. When the belt is
then retracted slightly, it cannot be ex-
tended.
To hold the convertible seat securely,
make sure the belt is in the lock mode
before letting the belt retract.3. While pressing the convertible seat firmly against the seat cushion and
seatback, let the shoulder belt retract
as far as it will go to hold the convert-
ible seat securely.
ProCarManuals.com
Page 62 of 240

582001 CELICA (20766U)
CAUTION
�Always make sure the shoulder belt
is positioned across the center of
child’s shoulder. The belt should be
kept away from child’s nec")
’01MY CELICA U (L/O 0008)
582001 CELICA (20766U)
CAUTION
�Always make sure the shoulder belt
is positioned across the center of
child’s shoulder. The belt should be
kept away from child’s neck, but
not falling off child’s shoulder. Fail-
ure to do so could reduce the
amount of protection in an accident
and increase the chance of injury.
�Both high−positioned lap belts and
loose −fitting belts could cause seri-
ous injuries due to sliding under
the lap belt during a collision or
other unintended result. Keep the
lap belt positioned as low on a
child’s hips as possible.
�For child’s safety, do not place the
shoulder belt under child’s arm.
�After inserting the tab, make sure
the tab and buckle are locked and
that the lap and shoulder portions
of the belt are not twisted.
�Do not insert coins, clips, etc. in
the buckle as this may prevent you
from properly latching the tab and
buckle.
�If the seat belt does not function
normally, it cannot protect your
child from injury. Contact your
Toyota dealer immediately. Do not
use the seat until the seat belt is
fixed.
2. To remove the child restraint system, press the buckle −release button and al-
low the belt to retract.
ProCarManuals.com
Page 65 of 240

612001 CELICA (20766U)
Tilt steering wheel
To change the steering wheel angle,
hold the steering wheel, push the lock
release lever, tilt the steering wheel to
the desir")
’01MY CELICA U (L/O 0008)
612001 CELICA (20766U)
Tilt steering wheel
To change the steering wheel angle,
hold the steering wheel, push the lock
release lever, tilt the steering wheel to
the desired angle and return the lever
to its original position.
CAUTION
�Do not adjust the steering wheel
while the vehicle is moving. It may
cause the driver to mishandle the
vehicle and an accident may occur
resulting in death or serious inju-
ries.
�After adjusting the steering wheel,
try moving it up and down to make
sure it is locked in position.
Outside rear view mirrors—
Adjust the mirror so that you can see
the side of your vehicle in the mirror.
Be careful when judging the size or dis-
tance of any object seen in the outside
rear view mirror on the passenger ’s side.
It is a convex mirror with a curved sur-
face. Any object seen in a convex mirror
will look smaller and farther away than
when seen in a flat mirror.
CAUTION
Do not adjust the mirror while the
vehicle is moving. It may cause the
driver to mishandle the vehicle and
an accident may occur resulting in
death or serious injuries.
—Power rear view mirror control
To adjust a mirror, use the switches.1. Master switch—To select the mirror to be adjusted
Push the “L” (left) or “R” (right) switch.
2. Control switch—To move the mirror Push the switch in the desired direc-
tion.
Mirror can be adjusted when key is in the
“ACC” or “ON” position.
NOTICE
If ice should jam the mirror, do not
operate the control or scrape the mir-
ror face. Use a spray de −icer to free
the mirror.
ProCarManuals.com
Page 71 of 240

672001 CELICA (20766U)
The daytime running light control sensor
is on the top of the driver’s side instru-
ment panel.
Do not place anything on the instrument
pane")
’01MY CELICA U (L/O 0008)
672001 CELICA (20766U)
The daytime running light control sensor
is on the top of the driver’s side instru-
ment panel.
Do not place anything on the instrument
panel, and/or do not affix anything on the
windshield to block this sensor.High−low beams— For high beams, turn
the headlights on and push the lever away
from you (position 1). Pull the lever to-
ward you (position 2) for low beams.
The headlight high beam indicator light
(blue light) on the instrument panel will
tell you that the high beams are on.
Flashing the high beam headlights
(position 3)—Pull the lever all the way
back. The high beam headlights turn off
when you release the lever.
You can flash the high beam headlights
with the knob turned to “OFF”.TURN SIGNALS
To signal a turn, push the headlight/
turn signal lever up or down to position
1.
The key must be in the “ON” position.
The lever automatically returns after you
make a turn, but you may have to return
it by hand after you change lanes.
To signal a lane change, move the lever
up or down to the pressure point (position
2) and hold it.
If the turn signal indicator lights (green
lights) on the instrument panel flash faster
than normal, a front or rear turn signal
bulb is burned out.
ProCarManuals.com
Page 73 of 240

692001 CELICA (20766U)
Front fog lights
To turn on the front fog lights, twist
the band of the headlight and turn sig-
nal switch lever. They will come on
only when the")
’01MY CELICA U (L/O 0008)
692001 CELICA (20766U)
Front fog lights
To turn on the front fog lights, twist
the band of the headlight and turn sig-
nal switch lever. They will come on
only when the headlights are on low
beam.
Interior light (with moon roof)
To turn the interior light on, push the
“ON” or “DOOR” side switch. To turn
the light off, push the switch lightly on
the opposite side.
The interior light switch has the following
positions:
“ON”—The light stays on all the time.
“DOOR”—Turns the light on when any of
the side doors and back is opened. The
light fades out when both side doors and
back door are closed.ILLUMINATED ENTRY SYSTEM
(vehicles with power door lock system)
With the switch in “DOOR” position, the
light comes on when any of the side
doors and back door is opened. After both
side doors and back door are closed, the
light remains on for about 15 seconds and
fades out.
However, in the following cases, the light
fades out immediately.
�Both side doors and back door are
closed when the ignition key is in
“ACC” or “ON” position.
�Both side doors and back door are
closed and both side doors are locked.
When both side doors and back door are
unlocked simultaneously with a key or
wireless remote control transmitter, the in-
terior light comes on for about 15 seconds
and then fades out, even if the door is
not opened.
To prevent the battery being discharged,
the lights will automatically turn off when
the key is removed and the door is left
opened with the switch at “DOOR” position
for 20 minutes or more.
ProCarManuals.com
Page 74 of 240

702001 CELICA (20766U)
To turn on the interior light, slide the
switch.
The interior light switch has the following
positions:
“ON”—The light stays on all the time")
’01MY CELICA U (L/O 0008)
702001 CELICA (20766U)
To turn on the interior light, slide the
switch.
The interior light switch has the following
positions:
“ON”—The light stays on all the time.
“OFF”—Turns the light off.
“DOOR”—Turns the light on when any of
the side doors and back door is opened.
The light fades out when both side doors
and back door are closed.ILLUMINATED ENTRY SYSTEM
(vehicles with power door lock system)
With the switch in “DOOR” position, the
light comes on when any of the side
doors and back door is opened. After both
side doors and back door are closed, the
light remains on for about 15 seconds and
fades out.
However, in the following cases, the light
fades out immediately.
�Both side doors and back door are
closed when the ignition key is in
“ACC” or “ON” position.
�Both side doors and back door are
closed and both side doors are locked.
When both side doors and back door are
unlocked simultaneously with a key or
wireless remote control transmitter, the in-
terior light comes on for about 15 seconds
and then fades out, even if the door is
not opened.
To prevent the battery being discharged,
the lights will automatically turn off when
the key is removed and the door is left
opened with the switch at “DOOR” position
for 20 minutes or more.
Luggage compartment light
To turn the luggage compartment light
on, open the back door and push the
switch. Closing the back door will turn
the light off.
Interior light
(without moon roof)
ProCarManuals.com
Page 75 of 240

712001 CELICA (20766U)
Windshield wipers and washer
To turn on the windshield wipers, move
the lever to the desired setting.
The key must be in the “ON” position.Lev")
’01MY CELICA U (L/O 0008)
712001 CELICA (20766U)
Windshield wipers and washer
To turn on the windshield wipers, move
the lever to the desired setting.
The key must be in the “ON” position.Lever position
Speed setting
Position 1Intermittent
Position 2Slow
Position 3Fast
For a single sweep of the windshield,
push the lever up and release it. With interval adjuster: The “INT TIME”
band lets you adjust the wiping time inter-
val when the wiper lever is in the intermit-
tent position (position 1). Twist the band
upward to increase the time between
sweeps, and downward to decrease it.
To squirt washer fluid, pull the lever
toward you.
If the windshield wipers are off, they will
operate a couple of times after the washer
squirts.
For instructions on adding washer fluid,
see “Adding washer fluid” in Section 7
−3.
In freezing weather, warm the windshield
with the defroster before using the washer.
This will help prevent the washer fluid
from freezing on your windshield, which
can block your vision.
NOTICE
Do not operate the wipers if the wind-
shield is dry. It may scratch the
glass.
Rear window wiper and washer
To turn on the rear window wiper, twist
the lever knob upward.
The key must be in the “ON” position.
Lever position
Speed setting
Position 1Intermittent
Position 2Normal
To squirt washer fluid on the rear window,
twist the knob upward or downward as far
as it will go (position 3 or 4). The knob
automatically returns from these positions
after you release it.
For instructions on adding washer fluid,
see “Adding washer fluid” in Section 7 −3.
ProCarManuals.com
Page 81 of 240

772001 CELICA (20766U)
(h)Take vehicle to
Toyota dealer.
If the brake
system warning
light is also on,
stop immediately
and contact
Toyota dealer.
(g)
Fill up tank.")
’01MY CELICA U (L/O 0008)
772001 CELICA (20766U)
(h)Take vehicle to
Toyota dealer.
If the brake
system warning
light is also on,
stop immediately
and contact
Toyota dealer.
(g)
Fill up tank.
If the indicator Do this.
or buzzer
comes on...
or
(f) Take vehicle to
Toyota dealer.
(i)Close both side
doors and back
door.
(j) Take vehicle to
Toyota dealer
immediately.
If the indicator Do this.
or buzzer
comes on...
(k)
Stop and check.
(l) Remove key.
Key reminder
buzzer
(m) Turn off lights.
Light reminder
buzzer (a) Brake System Warning Light
This light comes on in the following cases
when the ignition key is in the “ON” posi-
tion.
�When the parking brake is applied...
Vehicles with anti −lock brake system—
This light comes on for a few seconds
when the ignition key is turned to the
“ON” position even after the parking brake
is released.
�When the brake fluid level is low...
CAUTION
It is dangerous to continue driving
normally when the brake fluid level is
low.
Have your vehicle checked at your
Toyota dealer in the following cases:
�The light does not come on even if the
parking brake is applied when the igni-
tion key is in the “ON” position.
Vehicles with anti −lock brake system—
�The light does not come on even if the
ignition key is turned on with the park-
ing brake released.
ProCarManuals.com