2001 SUZUKI GRAND VITARA warning
[x] Cancel search: warningPage 449 of 656

7B1-40 AUTOMATIC TRANSMISSION (4 A/T)
TROUBLESHOOTING
Road Test
This test is to check if upshift and downshift take place at specified speed while actually driving vehicle on a
level road.
1) Warm up engine.
2) With engine running at idle, shift select lever “D”.
3) Accelerate vehicle speed by depressing accelerator pedal gradually.
4) While driving in “D” range, check if gear shift occurs properly as shown in “GEAR SHIFT DIAGRAM” in this
section.
TROUBLESHOOTING
Condition Possible cause
Line pressure higher than standard level in each
range•Malfunctioning regulator valve
•Malfunctioning throttle valve
•Maladjusted A/T throttle cable
Line pressure lower than standard level in each
range•Defective O/D clutch
•Defective oil pump
•Malfunctioning throttle valve
•Malfunctioning regulator value
•Maladjusted A/T throttle cable
Line pressure lower than standard level only in
“D” range•Fluid leakage from forward clutch
•Defective O/D clutch
•Leakage from “D” range fluid pressure circuit
Line pressure lower than standard level only in
“R” range•Fluid leakage from direct clutch
•Defective O/D clutch
•Fluid leakage from reverse brake
•Fluid leakage from “R” range fluid circuit
WARNING:
Carry out test in very little traffic area to prevent an accident.
Test requires 2 persons, a driver and a tester.
Condition Possible cause
When 1 → 2 upshift fails to occur 1–2 shift valve stuck
When 2 → 3 upshift fails to occur 2–3 shift valve stuck
When 3 → O/D upshift fails to occur 3–4 shift valve stuck
When gear shift point is incorrect•Maladjusted throttle cable
•Defective shift solenoid valve -A or -B
•1–2, 2–3 or 3–4 shift valve not operating properly
Page 450 of 656

AUTOMATIC TRANSMISSION (4 A/T) 7B1-41
Manual Road Test
This test check the gear being used in “L”, “2” or “D” range when
driven with unoperated gear shift control system. Test drive vehi-
cle on a level road.
1) Disconnect shift solenoid coupler (1) valves on transmission.
2) With select lever in “P”, start engine and warm it up.
3) With select lever in “L” range, start vehicle and accelerate to
20 km/h (12.5 mile/h). Check in this state that 1st gear is
being used.
4) At 20 km/h (12.5 mile/h), shift select lever to “2” range and
accelerate to 40 km/h (25 mile/h). Check in this state that 3rd
gear is being used.
5) At 40 km/h (25 mile/h), shift select lever to “D” range and
check that O/D gear is used when speed is higher than 40
km/h (25 mile/h).
6) After above checks, stop vehicle then engine, and connect
shift solenoids coupler (1) with ignition switch OFF.
7) Clear DTC with scan tool.
Time Lag Test
This test is to check conditions of clutch, reverse brake and fluid pressure. “Time lag” means time elapsed since
select lever is shifted with engine idling till shock is felt.
1) With chocks placed before and behind front and rear wheels respectively, depress brake pedal.
2) Start engine.
3) With stop watch ready, shift select lever from “N” to “D” range and measure time from that moment till shock
is felt.
4) Similarly measure time lag by shifting select lever from “N“ to “R” range.
Specification for time lag :NOTE:
Before this test, check diagnostic trouble code (DTC).
WARNING:
To avoid the danger of being burned, do not touch the hot
exhaust system when disconnecting shift solenoid cou-
pler (1).
WARNING:
To avoid the danger of being burned, do not touch the hot
exhaust system when connecting shift solenoid coupler
(1).
“N” →
→→ → “D”Less than 1.2 sec.
“N” →
→→ → “R”Less than 1.5 sec.
Page 451 of 656

7B1-42 AUTOMATIC TRANSMISSION (4 A/T)
TROUBLESHOOTING
Engine Brake Test
1) While driving vehicle in 3rd gear of “D” range, shift select lever down to “2” range and check if engine brake
operates.
2) In the same way as in step 1, check engine brake for operation when select lever is shifted down to “L”
range.
3) If engine brake fails to operate in above tests, possible causes for such failure are as follows. Check each
part which is suspected to be the cause.
TROUBLESHOOTING
“P” Range Test
1) Stop vehicle on a slope, shift select lever to “P” range and at the same time apply parking brake.
2) After stopping engine, depress brake pedal and release paring brake.
3) Then, release brake pedal gradually and check that vehicle remains stationary.
4) Depress brake pedal and shift select lever to “N” range.
5) Then, release brake pedal gradually and check that vehicle moves.NOTE:
When repeating this test, be sure to wait at least minute after select lever is shifted back to “N”
range.
Engine should be warmed up fully for this test.
Condition Possible cause
When “N” → “D” time lag exceeds specification•Low line pressure
•Worn forward clutch
When “N” → “R” time lag exceeds specification•Low line pressure
•Worn direct clutch
•Worn reverse brake
WARNING:
Before test, make sure that there is no vehicle behind so as to prevent rear-end collision.
Condition Possible cause
Fails to operate when shifted down to “2” range Second coast brake defective
Fails to operate when shifted down to “L” range Reverse brake defective
WARNING:
Before test, check to make sure no one is around vehicle or down on a slope and keep watchful for
safety during test.
Page 510 of 656

BODY ELECTRICAL SYSTEM 8-1
6F1
6F2
6G
6H
6K
7A
8
6K
7C1
7D
7E
7F
8A
8D
8E
9
10
10A
10B
SECTION 8
BODY ELECTRICAL SYSTEM
Wiring System
(Harnesses, Connectors, Fuses, Relay, Switches, Grounds, System Circuit Diagram) .......... Section 8A
Lighting System .............................................................................................................................. Section 8B
Instrumententation and Driver Information .................................................................................. Section 8C
Windows, Mirrors, Security and Locks ......................................................................................... Section 8D
Immobilizer Control System............................................................................................................Section 8F
CONTENTS
General Description .......................................... 8-3
WARNING:
For vehicles equipped with Supplemental Restraint (Air Bag) System:
Service on and around the air bag system components or wiring must be performed only by an
authorized SUZUKI dealer. Refer to “Air Bag System Components and Wiring Location View” under
“General Description” in air bag system section in order to confirm whether you are performing ser-
vice on or near the air bag system components or wiring. Please observe all WARNINGS and “Ser-
vice Precautions” under “On-Vehicle Service” in air bag system section before performing service
on or around the air bag system components or wiring. Failure to follow WARNINGS could result in
unintentional activation of the system or could render the system inoperative. Either of these two
conditions may result in severe injury.
Technical service work must be started at least 90 seconds after the ignition switch is turned to the
“LOCK” position and the negative cable is disconnected from the battery. Otherwise, the system
may be activated by reserve energy in the Sensing and Diagnostic Module (SDM).
NOTE:
For the descriptions (items) not found in this section, refer to the same section of the Service Manual
mentioned in FOREWORD of this manual.
Page 512 of 656

INSTRUMENTATION/DRIVER INFORMATION 8C-1
8C
SECTION 8C
INSTRUMENTATION/DRIVER INFORMATION
CONTENTS
General Description ........................................8C-2
Combination Meter ........................................8C-2
On-vehicle Service ..........................................8C-4
Fuel Meter/Fuel Gauge Unit ..........................8C-4
Fuel level sensor (sender gauge) ..............8C-4
Engine Coolant Temperature (ECT) Meter
and Sensor ....................................................8C-5Engine coolant temperature sensor .......... 8C-5
Oil Pressure Light ......................................... 8C-5
Oil pressure switch .................................... 8C-5
Brake Warning Light ..................................... 8C-5
Brake fluid level switch .............................. 8C-5
WARNING:
For vehicles equipped with Supplemental Restraint (Air Bag) System:
Service on and around the air bag system components or wiring must be performed only by an
authorized SUZUKI dealer. Refer to “Air Bag System Components and Wiring Location View” under
“General Description” in air bag system section in order to confirm whether you are performing ser-
vice on or near the air bag system components or wiring. Please observe all WARNINGS and “Ser-
vice Precautions” under “On-Vehicle Service” in air bag system section before performing service
on or around the air bag system components or wiring. Failure to follow WARNINGS could result in
unintentional activation of the system or could render the system inoperative. Either of these two
conditions may result in severe injury.
Technical service work must be started at least 90 seconds after the ignition switch is turned to the
“LOCK” position and the negative cable is disconnected from the battery. Otherwise, the system
may be activated by reserve energy in the Sensing and Diagnostic Module (SDM).
NOTE:
For the descriptions (items) not found in this section, refer to the same section of the Service Manual
mentioned in the FOREWORD of this manual.
Page 513 of 656

8C-2 INSTRUMENTATION/DRIVER INFORMATION
General Description
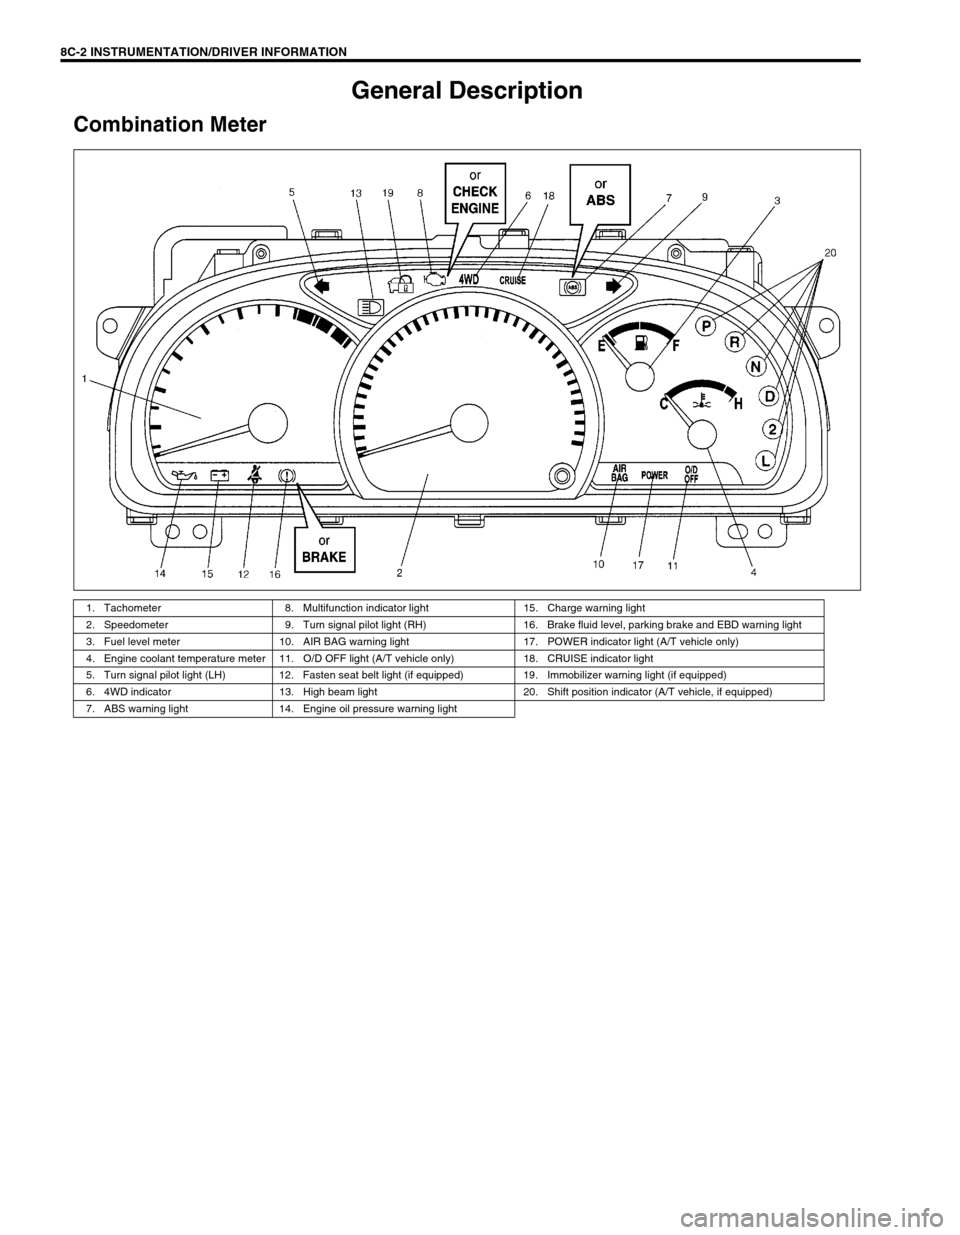
Combination Meter
1. Tachometer 8. Multifunction indicator light 15. Charge warning light
2. Speedometer 9. Turn signal pilot light (RH) 16. Brake fluid level, parking brake and EBD warning light
3. Fuel level meter 10. AIR BAG warning light 17. POWER indicator light (A/T vehicle only)
4. Engine coolant temperature meter 11. O/D OFF light (A/T vehicle only) 18. CRUISE indicator light
5. Turn signal pilot light (LH) 12. Fasten seat belt light (if equipped) 19. Immobilizer warning light (if equipped)
6. 4WD indicator 13. High beam light 20. Shift position indicator (A/T vehicle, if equipped)
7. ABS warning light 14. Engine oil pressure warning light
Page 516 of 656

INSTRUMENTATION/DRIVER INFORMATION 8C-5
Engine Coolant Temperature (ECT) Meter and
Sensor
Engine coolant temperature sensor
REMOVAL AND INSTALLATION
Refer to “ECT SENSOR” in Section 6E2.
Oil Pressure Light
Oil pressure switch
REMOVAL AND INSTALLATION
Refer to “OIL PRESSURE CHECK” in Section 6A2.
Brake Warning Light
Brake fluid level switch
INSPECTION
Use an ohmmeter to check switch for continuity.
If found defective, replace switch (reservoir).
Brake fluid level switch specification
OFF position (float up) : No continuity
ON position (float down) : Continuity
Page 518 of 656

WINDOWS, MIRRORS, SECURITY AND LOCKS 8D-1
8D
SECTION 8D
WINDOWS, MIRRORS, SECURITY AND LOCKS
CONTENTS
General Description ....................................... 8D-2
Rear Wiper and Washer (If Equipped) ......... 8D-2
On-Vehicle Service......................................... 8D-3
Windshield Wipers ....................................... 8D-3
Front wiper and washer ............................ 8D-3Rear Window Wiper and Washer
(For Vehicle with Cruise Control System) .... 8D-4
Rear Wiper and Washer Switch ............... 8D-4
Rear Window Wiper and Washer
(For Vehicle without Cruise Control
System) ........................................................ 8D-4
Rear Wiper Intermittent Relay...................... 8D-4
WARNING:
For vehicles equipped with Supplemental Restraint (Air Bag) System:
Service on and around the air bag system components or wiring must be performed only by an
authorized SUZUKI dealer. Refer to “Air Bag System Components and Wiring Location View” under
“General Description” in air bag system section in order to confirm whether you are performing ser-
vice on or near the air bag system components or wiring. Please observe all WARNINGS and “Ser-
vice Precautions” under “On-Vehicle Service” in air bag system section before performing service
on or around the air bag system components or wiring. Failure to follow WARNINGS could result in
unintentional activation of the system or could render the system inoperative. Either of these two
conditions may result in severe injury.
Technical service work must be started at least 90 seconds after the ignition switch is turned to the
“LOCK” position and the negative cable is disconnected from the battery. Otherwise, the system
may be activated by reserve energy in the Sensing and Diagnostic Module (SDM).
NOTE:
For the descriptions (items) not found in this section, refer to the same section of the Service Manual
mentioned in FOREWORD of this manual.