2001 SAAB 9-5 key
[x] Cancel search: keyPage 159 of 272

159 Starting and driving
Automatic transmission
The electronic control module for the auto-
matic transmission receives information on
engine torque and road speed, and also
controls the hydraulic pressure in the trans-
mission to ensure that gear changing is as
smooth as possible.
The position of the selector lever is shown
by the symbols adjacent to the lever and
also by an indicator on the main instrument
panel.
The ignition key can only be removed when
the selector lever is in the P position. When the car is stationary, the engine must
be at idling speed when the selector lever is
moved. You must have your foot on the
brake pedal to move the lever out of park.
If the accelerator is depressed while the
lever is moved, this will result in abnormal
wear in the transmission.
WARNING
Make it a habit to keep your foot on the
brake when selecting a drive position,
to prevent the car creeping forward (or
backward if reverse is selected).
The car must be at a standstill before
P, R or N is selected. You have to have
your foot on the brake pedal to move
the lever out of P. If the car is still
moving when a drive position is subse-
quently selected, this could cause an
accident or damage the automatic
transmission.
Never park the car with the selector
lever in a drive position, even if the
parking brake is on.
Always select "P" position and apply
the parking brake when leaving the
vehicle unattended.
NOTEAfter selecting a drive position, pause to
allow the gear to engage before you
accelerate.
IB472
Selector lever
IB1280
Selector-lever indicator on main instru-
ment panel
ProCarManuals.com
Page 161 of 272

161 Starting and driving
Park Brake Shift lockThe transmission has a security function
known as Park Brake Shift Lock. To move
the gear selector out of the P position, the
brake pedal must be depressed at the same
time as the gear selector catch (detente) is
pressed in.
Shift Lock override1 Apply the parking brake
2 Make sure the key is in position ON
3 Use a small tool such as a screwdriver
and push the lever (see picture) down-
wards so that the detent button can be
pressed approx. 10 mm
4 Move the selector out of position P to N
5 Remove the tool
6 Release the parking brake if the car is to
be moved immediately; otherwise keep
it applied
Check fuse No. 1 (see page 217). If the fuse
is OK, check the battery regarding the volt-
age.
If the problem was cured by changing the
fuse or battery, you do not have to contact a
Saab dealer.
If the fuse blows again as soon as the Shift
Lock feature is activated you should contact
your Saab dealer.
Automatic transmission,
fault indicator
If ”Automatic transmission, fault indicator”
indicator appears on the main instrument
panel, the system has detected a fault in the
automatic transmission or its control
module (see page 53).
This also means that the Limp-home mode
has been selected, to guard against further
damage being done to the transmission. In
this mode, the automatic transmission
starts in 4th gear, and gear changes (if nec-
essary) will have to be made manually.
It is not possible to select the SPORT or
WINTER mode when the Limp-home mode
is active.
You should have the automatic transmis-
sion checked as soon as possible by an
authorized Saab dealer.
The following gears will be engaged in the
respective selector positions when the auto-
matic transmission is in the Limp-home
mode:
NOTEDue to electrical problems it may not be
possible to move the selector out of the
park position, even if the ignition is ON. If
for some reason the selector has to be
moved out of the park position (i.e. to tow
the car a short distance) do as described
below.
Position R D 3 2 1
Gear Reverse 4th 4th 3rd 3rd
IB1122
ProCarManuals.com
Page 163 of 272

163 Starting and driving
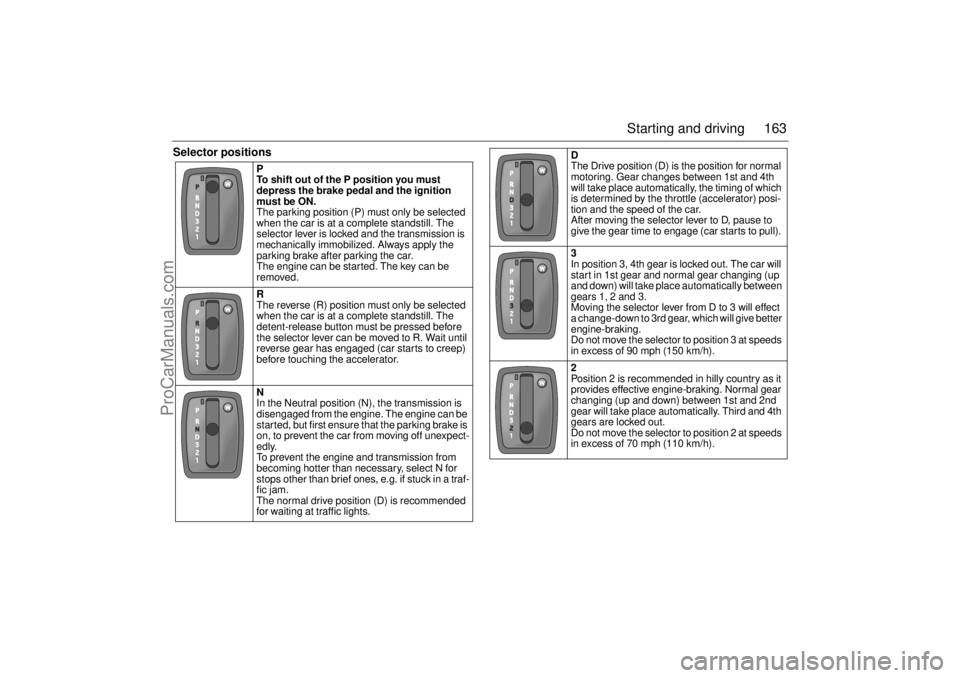
Selector positions
P
To shift out of the P position you must
depress the brake pedal and the ignition
must be ON.
The parking position (P) must only be selected
when the car is at a complete standstill. The
selector lever is locked and the transmission is
mechanically immobilized. Always apply the
parking brake after parking the car.
The engine can be started. The key can be
removed.
R
The reverse (R) position must only be selected
when the car is at a complete standstill. The
detent-release button must be pressed before
the selector lever can be moved to R. Wait until
reverse gear has engaged (car starts to creep)
before touching the accelerator.
N
In the Neutral position (N), the transmission is
disengaged from the engine. The engine can be
started, but first ensure that the parking brake is
on, to prevent the car from moving off unexpect-
edly.
To prevent the engine and transmission from
becoming hotter than necessary, select N for
stops other than brief ones, e.g. if stuck in a traf-
fic jam.
The normal drive position (D) is recommended
for waiting at traffic lights.
D
The Drive position (D) is the position for normal
motoring. Gear changes between 1st and 4th
will take place automatically, the timing of which
is determined by the throttle (accelerator) posi-
tion and the speed of the car.
After moving the selector lever to D, pause to
give the gear time to engage (car starts to pull).
3
In position 3, 4th gear is locked out. The car will
start in 1st gear and normal gear changing (up
and down) will take place automatically between
gears 1, 2 and 3.
Moving the selector lever from D to 3 will effect
a change-down to 3rd gear, which will give better
engine-braking.
Do not move the selector to position 3 at speeds
in excess of 90 mph (150 km/h).
2
Position 2 is recommended in hilly country as it
provides effective engine-braking. Normal gear
changing (up and down) between 1st and 2nd
gear will take place automatically. Third and 4th
gears are locked out.
Do not move the selector to position 2 at speeds
in excess of 70 mph (110 km/h).
ProCarManuals.com
Page 169 of 272

169 Starting and driving
Traction Control SystemHow the system works The traction control system (TCS) is
designed to prevent wheelspin. This
enables the car to achieve the best possible
grip and, hence, maximum tractive effort,
together with greater stability.
The TCS system uses information from the
ABS system’s wheel sensors to detect
when the front (driving) wheels are rotating
faster then the rear wheels. It then monitors
whether one driving wheel is rotating faster
than the other. If so, the faster wheel is
retarded until both wheels are rotating at the
same speed.
If the two front wheels are rotating at the
same speed but are turning faster than the
rear wheels, the torque from the engine is
reduced to eliminate the difference.
The process continues until all the wheels
are rotating at the same speed.
The advantages of the TCS system become
most apparent when the cohesion between
the front wheels and the road surface is so
low that one or both of the wheels would
lose their grip were the car not equipped
with the TCS, e.g.: When the car is pulling away or accelerat-
ing with the front wheels on different sur-
faces (e.g. one slippery and one dry). The
TCS then functions like an electronic dif-
ferential lock.
When the car is pulling away or accelerat-
ing on a slippery road, in which case the
TCS eliminates wheelspin. The same
applies when the car is reversing.
On cornering, if there is a tendency for the
inner front wheel to rotate faster than the
other wheels.
On overtaking.
TCS OFF The TCS OFF indicator on the main instru-
ment panel will come on:
If a fault has been detected and the
system has therefore been switched off.
If there is a fault in the ABS system.
If the system has been switched off man-
ually.
The indicator light will also come on for
4 seconds when the ignition key is turned to
ON, while an internal system check is per-
formed. TCS indicator The indicator light will come on for
4 seconds when the ignition key is turned to
ON, while an internal system check is per-
formed.
The TCS light in the tachometer comes on
when the system is operative, i.e. when the
wheels are not rotating at the same speed.
The fact that the TCS system is operative
indicates that the limit for grip has been
exceeded and that the driver must exert
greater care.
WARNING
In normal driving, the TCS system
enhances the safety of the car, but it does
not mean that the car can be driven faster.
The same care and prudence normally
applied should be displayed on cornering
and when driving on slippery roads.
ProCarManuals.com
Page 172 of 272

172 Starting and drivingDriving in cold weatherBefore starting a journey in cold weather
you should check the following:
That the wiper blades have not become
frozen to the windshield/glass.
Brush any snow away from the air intake
for the heater system (opening between
hood and windshield).
It may be advisable to lubricate the
door-lock cylinder (use molybdenum
disulphide, MoS
2) to prevent its freezing.
If the lock has frozen, take care not to
break the key (or use the remote control)
– heat it first or spray it with de-icer.
Periodically during the winter, add gaso-
line anti-freeze to the fuel to dispel any
condensation in the fuel tank which could
freeze and cause problems in the system.
Keep the tank well filled to reduce the risk
of condensation forming.
If the car is parked outside in freezing
weather, fuel additives (gasoline
anti-freeze) will not do any good as it
cannot remove water that has already fro-
zen. Park the car in a warm place so that
any ice that may have built up melts, then
add gasoline anti-freeze when filling up
the tank. Condensation is caused by
changes in the outdoor temperature or by
the car being parked alternately in a
garage and outside.
It is particularly important when the roads
are slippery that the brakes and tires be in
good condition. Check the anti-freeze in the engine cool-
ant, see page 196.
The car´s trip computer will warn you when
there is a risk of slippery conditions. For fur-
ther information on this function, see page
58.
The car is equipped with tires designed to
provide optimum grip on both wet and dry
roads, although this has been achieved at
the expense of somewhat reduced grip on
snow and ice. For regular driving on snow
and ice, we therefore recommend that
winter (snow) tires be fitted.
Winter (snow) tires, particularly studded
tires (where use is legally permitted), gener-
ally make driving safer on snow and ice.
Acquaint yourself with the legal provi-
sions governing the use of different
types of winter tires and snow chains.
Studded tires are not allowed in some
countries.If winter tires are fitted, the same type must
be fitted on all wheels. Your Saab dealer will
be pleased to advise you on the best tires for
your car.
Remember that tires age. It may therefore
be necessary to change them before they
reach the legal wear limit, as they gradually
lose their friction properties.
The best response if the car gets into a
front-wheel skid is to freewheel (manual
gearbox only), i.e. disengage the clutch (so
that the wheels are neither driven or
retarded by the engine.
If the car has automatic transmission, ease
up on the accelerator and steer carefully in
the desired direction.
In a rear-wheel skid, steer in the same direc-
tion that the rear of the car is moving.
ProCarManuals.com
Page 185 of 272

185 Starting and driving
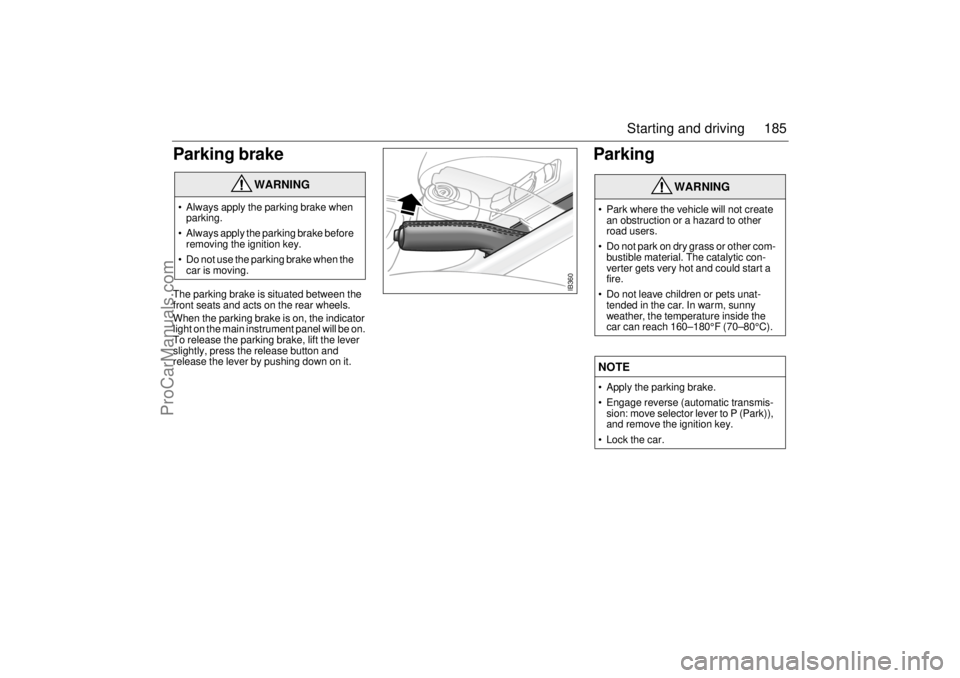
Parking brake The parking brake is situated between the
front seats and acts on the rear wheels.
When the parking brake is on, the indicator
light on the main instrument panel will be on.
To release the parking brake, lift the lever
slightly, press the release button and
release the lever by pushing down on it.
Parking
WARNING
Always apply the parking brake when
parking.
Always apply the parking brake before
removing the ignition key.
Do not use the parking brake when the
car is moving.
WARNING
Park where the vehicle will not create
an obstruction or a hazard to other
road users.
Do not park on dry grass or other com-
bustible material. The catalytic con-
verter gets very hot and could start a
fire.
Do not leave children or pets unat-
tended in the car. In warm, sunny
weather, the temperature inside the
car can reach 160–180°F (70–80°C). NOTE Apply the parking brake.
Engage reverse (automatic transmis-
sion: move selector lever to P (Park)),
and remove the ignition key.
Lock the car.
IB360
ProCarManuals.com
Page 210 of 272

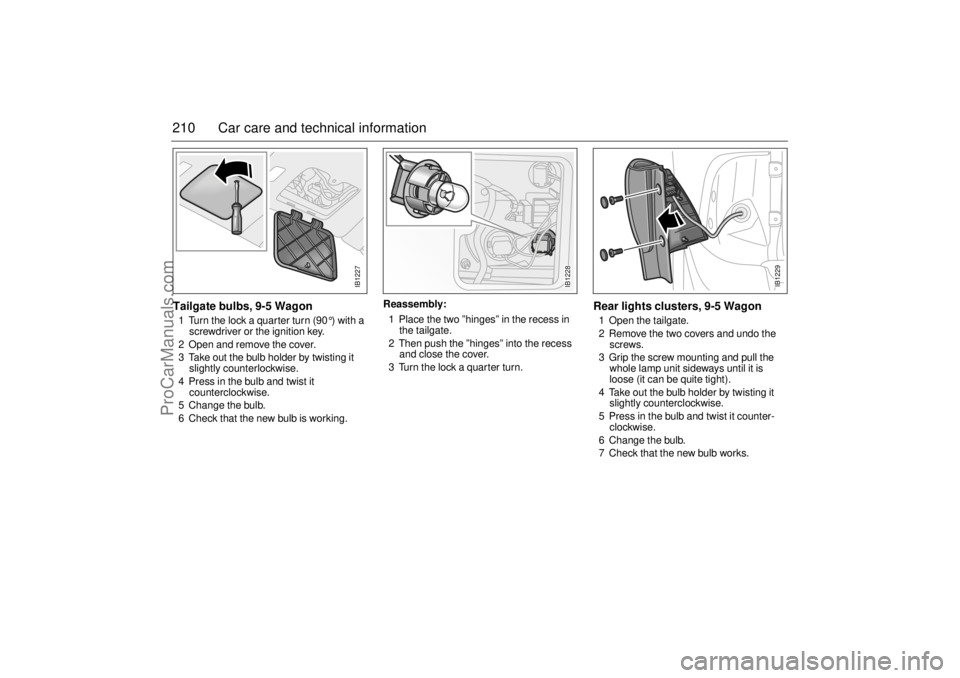
210 Car care and technical informationTailgate bulbs, 9-5 Wagon1 Turn the lock a quarter turn (90 °) with a
screwdriver or the ignition key.
2 Open and remove the cover.
3 Take out the bulb holder by twisting it
slightly counterlockwise.
4 Press in the bulb and twist it
counterclockwise.
5 Change the bulb.
6 Check that the new bulb is working.Reassembly:
1 Place the two ”hinges” in the recess in
the tailgate.
2 Then push the ”hinges” into the recess
and close the cover.
3 Turn the lock a quarter turn.
Rear lights clusters, 9-5 Wagon1 Open the tailgate.
2 Remove the two covers and undo the
screws.
3 Grip the screw mounting and pull the
whole lamp unit sideways until it is
loose (it can be quite tight).
4 Take out the bulb holder by twisting it
slightly counterclockwise.
5 Press in the bulb and twist it counter-
clockwise.
6 Change the bulb.
7 Check that the new bulb works.
IB1227
IB1228
IB1229
ProCarManuals.com
Page 221 of 272

221 Car care and technical information
Wheels Alternative wheels and tiresIf you wish to fit other tires or wheels than
those supplied with the car, consult your
Saab dealer first as to the possibilities avail-
able.
Wheels/tires combinations that are not
approved by Saab can negatively affect the
car´s directional stability, steering and brak-
ing in both wet and dry conditions.
Do not assume that a wheel/tire combina-
tion will function properly just because it will
bolt on.The wheels and tires have been carefully
matched to the characteristics of the car and
play a key role in its outstanding roadhold-
ing and handling.
Tire pressureTires need to be inflated to suit the load car-
ried and the maximum speed the car will be
driven (see the recommended tire pres-
sures on the back cover). Note that all
values apply to cold tires. For tires with an
aspect ratio less than /60, increase the tire
pressure by 3 psi (20 kPa) for rough roads
with potholes to minimize the risk of rim
damage.Never reduce the pressure of a hot tire. If the
tires are hot when you check them, only
increase the pressure, if necessary.
Soft tires will cause faster wear than
over-pressurized tires. They also increase
fuel consumption.
If a valve is leaking, simply unscrew it and fit
a new one.
Important! Remember to adjust the tire
pressures if you change the load in the car
or intend to cruise at a substantially higher
or lower speed than normal.
NOTEFor wide wheels and/or low-profile tires,
bear in mind the following:
Tires and wheels can be damaged in
potholes etc.
Springs, shock absorbers and wheel
bearings can be overloaded.
The wheels can come into contact with
chassis and body components.
The speed and load limits for the tires
must not be exceeded; see page 222.
Wheels larger than 17” must not be fit-
ted. The maximum permissible offset
is 49 mm.
NOTECheck the tire pressures at least once
per month.
Underinflation is the main cause of:
Tires wearing out prematurely.
Damage to the sidewalls.
Damage to the wheels.
ProCarManuals.com