Page 116 of 373

2-47
Turn Signal/Multifunction Lever
The lever on the left side of the steering column
includes the following:
�Turn and Lane Change Signals
�Headlamp High/Low
-Beam Changer
�Flash
-to-Pass Feature
�Windshield Wipers
�Windshield Washer
�Cruise Control (If Equipped)
Turn and Lane Change Signals
The turn signal has two upward (for right) and
two downward (for left) positions. These positions
allow you to signal a turn or a lane change.
To signal a turn, move the lever all the way up or down.
When the turn is finished, the lever will return to its
original position automatically.
An arrow on the instrument
panel cluster will flash in
the direction of the turn or
lane change.
To signal a lane change, just raise or lower the lever
until the arrow starts to flash. Hold it there until you
complete your lane change. The lever will return to its
original position when you release it.
As you signal a turn or a lane change, if the arrow
flashes faster than normal, a signal bulb may be burned
out and other drivers won't see your turn signal.
Page 117 of 373

2-48
If a bulb is burned out, replace it to help avoid an
accident. If the arrows don't go on at all when you
signal a turn, check for burned
-out bulbs and then check
the fuse (see ªFuses and Circuit Breakersº in the Index).
A chime will sound if you leave the turn signal on for
more than 3/4 mile (1.2 km).
Headlamp High/Low-Beam Changer
To change the headlamps from low beam to high beam,
or high to low, pull the multifunction lever all the way
toward you. Then release it.
When the high beams
are on, a light on the
instrument panel cluster
also will be on. While
the high
-beam headlamps
are on, the fog lamps will
not be illuminated.
Flash-to-Pass Feature
When the headlamps are off, pull the lever toward you
to momentarily turn on the high beams (to signal that
you are going to pass). When you release the lever,
they will turn off and stay off.
Windshield Wipers
You control the windshield wipers by turning the band
marked WIPER on the turn signal/multifunction lever.
For a single wiping cycle, turn the band to MIST. Hold
it there until the wipers start, then let go. The wipers will
stop after one cycle. If you want more cycles, hold the
band on MIST longer.
For steady wiping at low speed, turn the band to LOW.
For high
-speed wiping, turn the band further, to HIGH.
To stop the wipers, turn the band to OFF.
You can set the wiper speed for a long or short delay
between wipes. This can be very useful in light rain or
snow. Turn the band to choose the delay time. The
closer to LOW, the shorter the delay.
Be sure to clear ice and snow from the wiper blades
before using them. If they're frozen to the windshield,
carefully loosen or thaw them. If the blades do become
damaged, get new blades or blade inserts.
Heavy snow or ice can overload the wipers. A circuit
breaker will stop them until the motor cools. Clear away
snow or ice to prevent an overload.
Page 224 of 373

4-38 Backing Up
Hold the bottom of the steering wheel with one hand.
Then, to move the trailer to the left, just move that hand
to the left. To move the trailer to the right, move your
hand to the right. Always back up slowly and, if
possible, have someone guide you.
Making Turns
NOTICE:
Making very sharp turns while trailering could
cause the trailer to come in contact with the
vehicle. Your vehicle could be damaged. Avoid
making very sharp turns while trailering.
When you're turning with a trailer, make wider turns than
normal. Do this so your trailer won't strike soft shoulders,
curbs, road signs, trees or other objects. Avoid jerky or
sudden maneuvers. Signal well in advance.
Turn Signals When Towing a Trailer
When you tow a trailer, your vehicle may need a different
turn signal flasher and/or extra wiring. Check with your
dealer. The arrows on your instrument panel will flash
whenever you signal a turn or lane change. Properly
hooked up, the trailer lamps will also flash, telling other
drivers you're about to turn, change lanes or stop.
When towing a trailer, the arrows on your instrument
panel will flash for turns even if the bulbs on the trailer
are burned out. Thus, you may think drivers behind you
are seeing your signal when they are not. It's important
to check occasionally to be sure the trailer bulbs are
still working.
Your vehicle has bulb warning lights. When you plug a
trailer lighting system into your vehicle's lighting
system, its bulb warning lights may not let you know if
one of your lamps goes out. So, when you have a trailer
lighting system plugged in, be sure to check your
vehicle and trailer lamps from time to time to be sure
they're all working. Once you disconnect the trailer
lamps, the bulb warning lights again can tell you if
one of your vehicle lamps is out.
Page 303 of 373
6-41 Front Turn Signal and Front Sidemarker
1. Open the hood, and support it properly.
2. Remove the two bolts from the top of the
headlamp assembly.
3. Remove the headlamp assembly from the vehicle.
Be careful to avoid scratching or chipping the paint
on the vehicle while removing it.
4. Turn the front sidemarker bulb socket a quarter turn
counterclockwise to remove.
5. Remove the old bulb from the socket.
6. Place the new bulb into the socket.
7. Turn the bulb socket a quarter turn clockwise to
reinstall it.
8. Carefully reinstall the headlamp assembly.
Be careful to avoid scratching or chipping the
paint on the vehicle.
9. Reinstall the two bolts on the top of the
headlamp assembly.
10. Close the hood.
Page 332 of 373

6-70
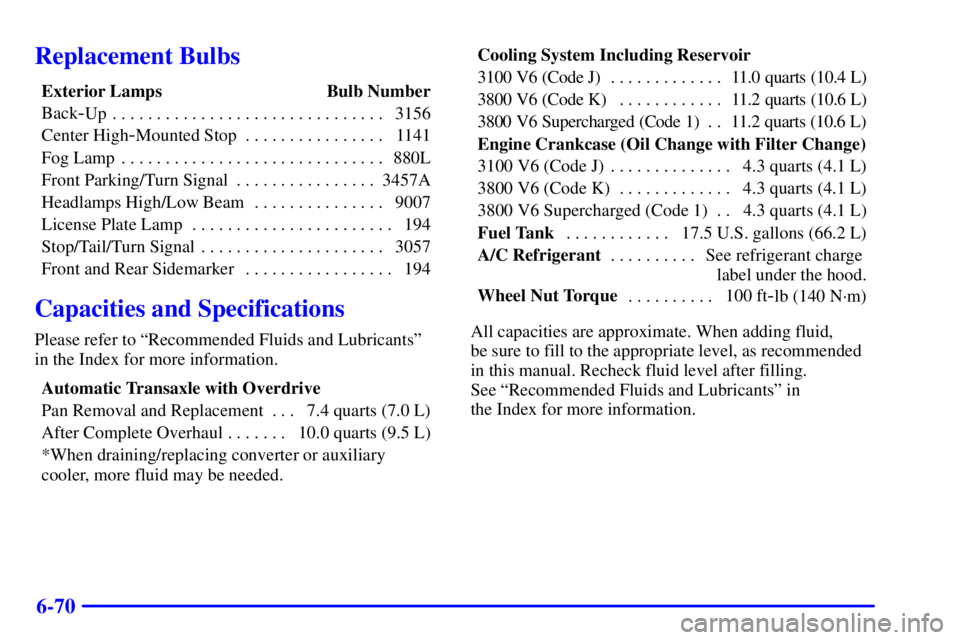
Replacement Bulbs
Exterior Lamps Bulb Number
Back
-Up 3156. . . . . . . . . . . . . . . . . . . . . . . . . . . . . . .
Center High
-Mounted Stop 1141. . . . . . . . . . . . . . . .
Fog Lamp 880L. . . . . . . . . . . . . . . . . . . . . . . . . . . . . .
Front Parking/Turn Signal 3457A. . . . . . . . . . . . . . . .
Headlamps High/Low Beam 9007. . . . . . . . . . . . . . .
License Plate Lamp 194. . . . . . . . . . . . . . . . . . . . . . .
Stop/Tail/Turn Signal 3057. . . . . . . . . . . . . . . . . . . . .
Front and Rear Sidemarker 194. . . . . . . . . . . . . . . . .
Capacities and Specifications
Please refer to ªRecommended Fluids and Lubricantsº
in the Index for more information.
Automatic Transaxle with Overdrive
Pan Removal and Replacement 7.4 quarts (7.0 L). . .
After Complete Overhaul 10.0 quarts (9.5 L). . . . . . .
*When draining/replacing converter or auxiliary
cooler, more fluid may be needed.Cooling System Including Reservoir
3100 V6 (Code J) 11.0 quarts (10.4 L). . . . . . . . . . . . .
3800 V6 (Code K) 11.2 quarts (10.6 L). . . . . . . . . . . .
3800 V6 Supercharged (Code 1) 11.2 quarts (10.6 L). .
Engine Crankcase (Oil Change with Filter Change)
3100 V6 (Code J) 4.3 quarts (4.1 L). . . . . . . . . . . . . .
3800 V6 (Code K) 4.3 quarts (4.1 L). . . . . . . . . . . . .
3800 V6 Supercharged (Code 1) 4.3 quarts (4.1 L). .
Fuel Tank17.5 U.S. gallons (66.2 L) . . . . . . . . . . . .
A/C RefrigerantSee refrigerant charge . . . . . . . . . .
label under the hood.
Wheel Nut Torque100 ft
-lb (140 N´m) . . . . . . . . . .
All capacities are approximate. When adding fluid,
be sure to fill to the appropriate level, as recommended
in this manual. Recheck fluid level after filling.
See ªRecommended Fluids and Lubricantsº in
the Index for more information.