Page 106 of 341

2-36
Turn Signal/Multifunction Lever
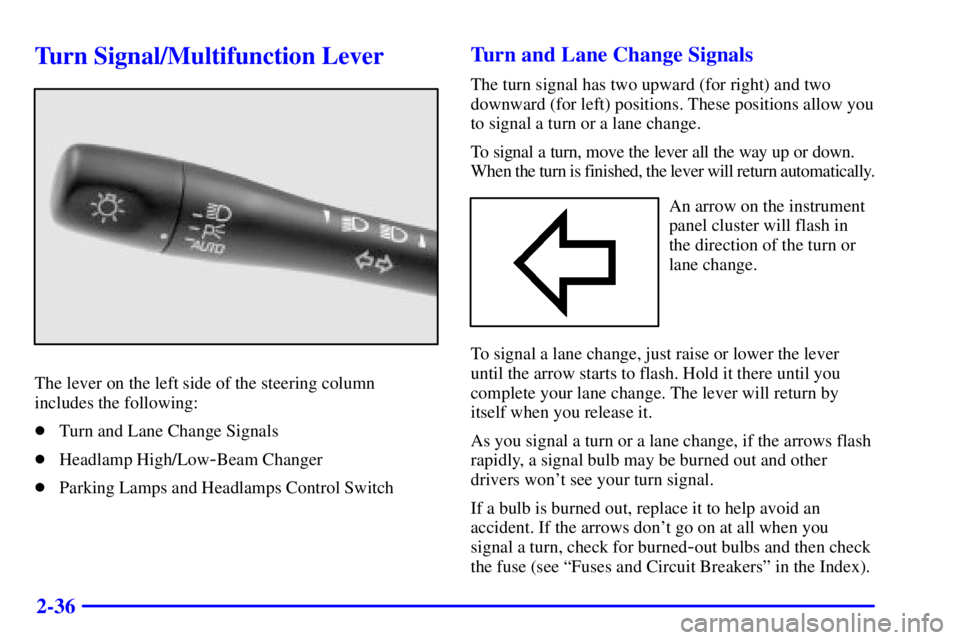
The lever on the left side of the steering column
includes the following:
�Turn and Lane Change Signals
�Headlamp High/Low
-Beam Changer
�Parking Lamps and Headlamps Control Switch
Turn and Lane Change Signals
The turn signal has two upward (for right) and two
downward (for left) positions. These positions allow you
to signal a turn or a lane change.
To signal a turn, move the lever all the way up or down.
When the turn is finished, the lever will return automatically.
An arrow on the instrument
panel cluster will flash in
the direction of the turn or
lane change.
To signal a lane change, just raise or lower the lever
until the arrow starts to flash. Hold it there until you
complete your lane change. The lever will return by
itself when you release it.
As you signal a turn or a lane change, if the arrows flash
rapidly, a signal bulb may be burned out and other
drivers won't see your turn signal.
If a bulb is burned out, replace it to help avoid an
accident. If the arrows don't go on at all when you
signal a turn, check for burned
-out bulbs and then check
the fuse (see ªFuses and Circuit Breakersº in the Index).
Page 212 of 341

4-39 Turn Signals When Towing a Trailer
When you tow a trailer, your vehicle may need a
different turn signal flasher and/or extra wiring. Check
with your dealer. The arrows on your instrument panel
will flash whenever you signal a turn or lane change.
Properly hooked up, the trailer lamps will also flash,
telling other drivers you're about to turn, change lanes
or stop.
When towing a trailer, the arrows on your instrument
panel will flash for turns even if the bulbs on the trailer
are burned out. Thus, you may think drivers behind you
are seeing your signal when they are not. It's important
to check occasionally to be sure the trailer bulbs are
still working.
Driving On Grades
Reduce speed and shift to a lower gear before you start
down a long or steep downgrade. If you don't shift
down, you might have to use your brakes so much that
they would get hot and no longer work well.
On a long uphill grade, shift down and reduce your
speed to around 45 mph (70 km/h) to reduce the
possibility of engine and transaxle overheating.
Parking on Hills
CAUTION:
You really should not park your vehicle, with a
trailer attached, on a hill. If something goes
wrong, your rig could start to move. People can
be injured, and both your vehicle and the trailer
can be damaged.
But if you ever have to park your rig on a hill, here's
how to do it:
1. Apply your regular brakes, but don't shift into
PARK (P) for an automatic transaxle or into gear for
a manual transaxle, yet. When parking uphill, turn
your wheels away from the curb. When parking
downhill, turn your wheels into the curb.
2. Have someone place chocks under the trailer wheels.
3. When the chocks are in place, release the regular
brakes until the chocks absorb the load.
Page 274 of 341
6-33 Front Turn Signal and Parking Lamp
Bulb Replacement
1. Remove the headlamp assembly. Refer to the
removal procedure earlier in this section.
2. Turn the bulb assembly retainer and pull out
the bulb.
3. Unclip the bulb assembly from the wiring harness.
4. When replacing the bulb, be sure to properly align
the bulb with the locating feature in the assembly.
5. Reverse Steps 1 through 2 to reinstall the
bulb assembly.
Center High-Mounted Stoplamp
1. Open the trunk lid and locate the center
high
-mounted stoplamp on the inside of the lid.
2. Use a T15 Torx
� screwdriver to remove the
three screws.
3. Gently remove and replace the bulb (s).
4. Reverse Steps 1 and 2 to reassemble the lamp.
Page 275 of 341
6-34 Rear Turn Signal and Stop/Taillamp
Bulb Replacement
1. Disconnect the cargo net in the trunk.
2. Pull back the trunk trim.
3. Remove the four wing nut bolts which fasten the
taillamp lens to the vehicle.
4. Carefully remove the taillamp lens from the body
and avoid scratching the paint or dropping it.
5. Press the five tabs to release the plate from the lamp.
6. To remove a bulb, gently pull the bulb out from
the socket.
7. Install a new bulb.
8. Reverse Steps 3 through 6 to reassemble
the taillamp.
Page 300 of 341

6-59
Minifuses Usage
42 Back
-Up Lamps, Brake Transaxle
Shift Interlock
43 Horn
44 Powertrain Control Module
45 Parking Lamps
46 Climate Control System,
Air Conditioning
47 Canister Vent Valve, Exhaust
Oxygen Sensors
48 Fuel Pump, Injectors
49 Generator
50 Right Headlamp
51 Left Headlamp
52 Cooling Fan #2
53 HVAC Blower (Climate Control )
54 Not Used
55 Cooling Fan #2 Ground
56 Fuse Puller for Mini Fuses
57 Not Used
Replacement Bulbs
Exterior Lamps Bulb
Back
-Up Lamps 3156. . . . . . . . . . . . . . . . . . . . . . . . .
Center High
-Mounted Stoplamp 912. . . . . . . . . . . . .
Turn Signal lamps 3156. . . . . . . . . . . . . . . . . . . . . . .
Stop/Taillamps 3157. . . . . . . . . . . . . . . . . . . . . . . . . .
Halogen Headlamps 9007. . . . . . . . . . . . . . . . . . . . . .
Parking/Turn Signal Lamps 3157NA or 3157A. . . . .
Sidemarker Lamps 194NA. . . . . . . . . . . . . . . . . . . . . .
For service information on other bulbs, contact your
dealer's service department.