Page 168 of 341

3-29
Radio Calibration
Your audio system has been calibrated for your vehicle
from the factory. If CALIBRATE appears on the display
it means that your radio has not been configured
properly for your vehicle and must be returned to the
dealership for service.
Personal Choice Radio Controls
(If Equipped)
With this feature, your vehicle will recall the latest radio
settings as adjusted the last time your vehicle was
operated. This feature allows two different drivers to
store and recall their own radio settings for AM and FM
presets, last tuned station, volume, tone and audio
source (radio, cassette or CD). The settings recalled by
the radio are determined by which transmitter was used
to enter the vehicle. After the UNLOCK button is
pressed on the transmitter and the ignition is in ON, the
radio settings will automatically adjust to where they
were last set by the identified driver. All vehicles are
shipped with this feature on. This feature can be
disabled by your dealer if desired.
Theft-Deterrent Feature Non-RDS Radios
(If Equipped)
THEFTLOCK� is designed to discourage theft of your
radio. The feature works automatically by learning a
portion of the Vehicle Identification Number (VIN).
If the radio is moved to a different vehicle, it will not
operate and LOC will be displayed.
With THEFTLOCK activated, your radio will not
operate if stolen.
Theft-Deterrent Feature RDS Radios
(If Equipped)
THEFTLOCK� is designed to discourage theft of your
radio. The feature works automatically by learning a
portion of the Vehicle Identification Number (VIN).
If the radio is moved to a different vehicle, it will not
operate and LOCKED will be displayed.
When the radio and vehicle are turned off, the blinking
red light indicates that THEFTLOCK is armed.
With THEFTLOCK activated, your radio will not
operate if stolen.
Page 169 of 341

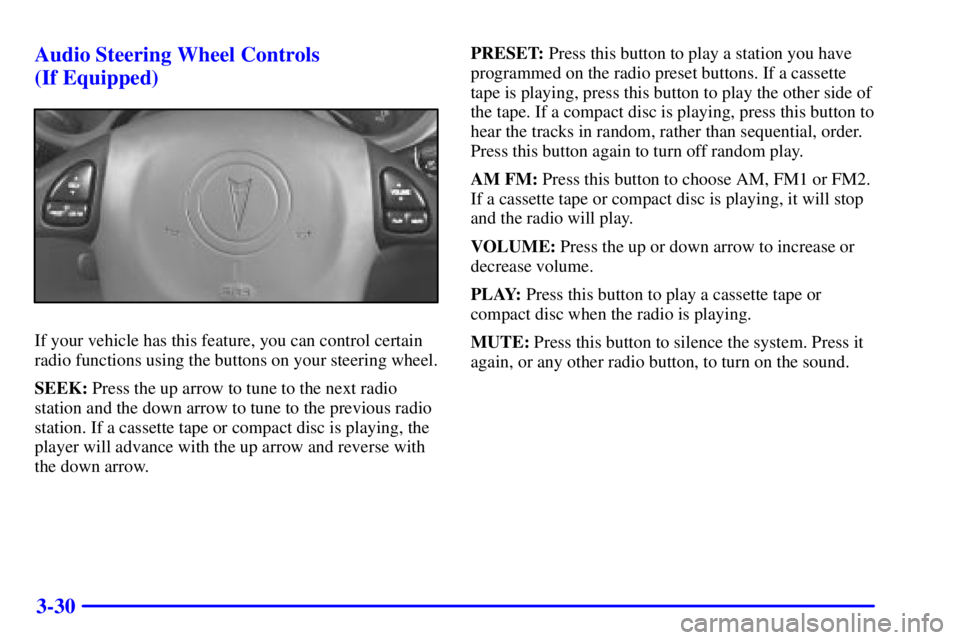
3-30 Audio Steering Wheel Controls
(If Equipped)
If your vehicle has this feature, you can control certain
radio functions using the buttons on your steering wheel.
SEEK: Press the up arrow to tune to the next radio
station and the down arrow to tune to the previous radio
station. If a cassette tape or compact disc is playing, the
player will advance with the up arrow and reverse with
the down arrow.PRESET: Press this button to play a station you have
programmed on the radio preset buttons. If a cassette
tape is playing, press this button to play the other side of
the tape. If a compact disc is playing, press this button to
hear the tracks in random, rather than sequential, order.
Press this button again to turn off random play.
AM FM: Press this button to choose AM, FM1 or FM2.
If a cassette tape or compact disc is playing, it will stop
and the radio will play.
VOLUME: Press the up or down arrow to increase or
decrease volume.
PLAY: Press this button to play a cassette tape or
compact disc when the radio is playing.
MUTE: Press this button to silence the system. Press it
again, or any other radio button, to turn on the sound.
Page 170 of 341

3-31 Understanding Radio Reception
AM
The range for most AM stations is greater than for FM,
especially at night. The longer range, however, can
cause stations to interfere with each other. AM can pick
up noise from things like storms and power lines. Try
reducing the treble to reduce this noise if you ever get it.
FM Stereo
FM stereo will give you the best sound, but FM signals
will reach only about 10 to 40 miles (16 to 65 km). Tall
buildings or hills can interfere with FM signals, causing
the sound to come and go.
Tips About Your Audio System
Hearing damage from loud noise is almost undetectable
until it is too late. Your hearing can adapt to higher
volumes of sound. Sound that seems normal can be loud
and harmful to your hearing. Take precautions by
adjusting the volume control on your radio to a safe
sound level before your hearing adapts to it.To help avoid hearing loss or damage:
�Adjust the volume control to the lowest setting.
�Increase volume slowly until you hear comfortably
and clearly.
NOTICE:
Before you add any sound equipment to your
vehicle
-- like a tape player, CB radio, mobile
telephone or two
-way radio -- be sure you can
add what you want. If you can, it's very
important to do it properly. Added sound
equipment may interfere with the operation of
your vehicle's engine, Delphi Delco Electronics
radio or other systems, and even damage them.
Your vehicle's systems may interfere with the
operation of sound equipment that has been
added improperly.
So, before adding sound equipment, check with
your dealer and be sure to check Federal rules
covering mobile radio and telephone units.
Page 173 of 341

3-34 Care of Your Compact Discs
Handle discs carefully. Store them in their original cases
or other protective cases and away from direct sunlight
and dust. If the surface of a disc is soiled, dampen a
clean, soft cloth in a mild, neutral detergent solution and
clean it, wiping from the center to the edge.
Be sure never to touch the side without writing when
handling discs. Pick up discs by grasping the outer edges
or the edge of the hole and the outer edge.
Care of Your Compact Disc Player
The use of CD lens cleaner discs is not advised, due to
the risk of contaminating the lens of the CD optics with
lubricants internal to the CD mechanism.
Fixed Mast Antenna
The fixed mast antenna can withstand most car washes
without being damaged. If the mast should ever become
slightly bent, you can straighten it out by hand. If the
mast is badly bent, as it might be by vandals, you should
replace it.
Check every once in a while to be sure the mast is still
tightened to the fender. If tightening is required, tighten
by hand, then with a wrench one quarter turn.
Chime Level Adjustment
The volume level of the vehicle's chime can be
controlled by the radio. To change the volume level,
press and hold pushbutton 6 with the ignition in ON and
the radio power off. The chime volume level will change
from the normal level to loud, and LOUD will be
displayed on the radio. To change back to the default or
normal setting, press and hold pushbutton 6 again. The
chime level will change from the loud level to normal,
and NORMAL will be displayed.
Page 174 of 341
4-
4-1
Section 4 Your Driving and the Road
Here you'll find information about driving on different kinds of roads and in varying weather conditions. We've also
included many other useful tips on driving.
4
-2 Defensive Driving
4
-3 Drunken Driving
4
-6 Control of a Vehicle
4
-6 Braking
4
-9 Enhanced Traction System
4
-11 Steering
4
-13 Off-Road Recovery
4
-13 Passing
4
-15 Loss of Control
4
-16 Driving at Night
4
-17 Driving in Rain and on Wet Roads4
-20 City Driving
4
-21 Freeway Driving
4
-22 Before Leaving on a Long Trip
4
-23 Highway Hypnosis
4
-24 Hill and Mountain Roads
4
-25 Winter Driving
4
-29 Recreational Vehicle Towing
4
-32 Loading Your Vehicle
4
-34 Towing a Trailer
4
-40 Towing a Trailer (2.4L L4 Engine)
Page 179 of 341

4-6
Control of a Vehicle
You have three systems that make your vehicle go where
you want it to go. They are the brakes, the steering and
the accelerator. All three systems have to do their work
at the places where the tires meet the road.
Sometimes, as when you're driving on snow or ice, it's
easy to ask more of those control systems than the tires
and road can provide. That means you can lose control
of your vehicle. Also see ªEnhanced Traction Systemº
in the Index.
Braking
Braking action involves perception time and
reaction time.
First, you have to decide to push on the brake pedal.
That's perception time. Then you have to bring up your
foot and do it. That's reaction time.
Average reaction time is about 3/4 of a second. But
that's only an average. It might be less with one driver
and as long as two or three seconds or more with
another. Age, physical condition, alertness, coordination
and eyesight all play a part. So do alcohol, drugs and
frustration. But even in 3/4 of a second, a vehicle
moving at 60 mph (100 km/h) travels 66 feet (20 m).
That could be a lot of distance in an emergency, so
keeping enough space between your vehicle and others
is important.
And, of course, actual stopping distances vary greatly
with the surface of the road (whether it's pavement or
gravel); the condition of the road (wet, dry, icy); tire
tread; the condition of your brakes; the weight of the
vehicle and the amount of brake force applied.
Page 181 of 341
4-8
Here's how anti-lock works. Let's say the road is wet.
You're driving safely. Suddenly an animal jumps out in
front of you.
You slam on the brakes and continue braking.
Here's what happens with ABS.
A computer senses that wheels are slowing down. If one
of the wheels is about to stop rolling, the computer will
separately work the brakes at each front wheel and at
both rear wheels.The anti
-lock system can change the brake pressure
faster than any driver could. The computer is
programmed to make the most of available tire and road
conditions. This can help you steer around the obstacle
while braking hard.
As you brake, your computer keeps receiving updates on
wheel speed and controls braking pressure accordingly.
Page 182 of 341

4-9
Remember: Anti-lock doesn't change the time you need
to get your foot up to the brake pedal or always decrease
stopping distance. If you get too close to the vehicle in
front of you, you won't have time to apply your brakes
if that vehicle suddenly slows or stops. Always leave
enough room up ahead to stop, even though you have
anti
-lock brakes.
Using Anti
-Lock
Don't pump the brakes. Just hold the brake pedal down
firmly and let anti
-lock work for you. You may feel a
slight brake pedal pulsation or notice some noise, but
this is normal.
Braking in Emergencies
With anti-lock, you can steer and brake at the same
time. In many emergencies, steering can help you more
than even the very best braking.
Enhanced Traction System
Your vehicle is equipped with an Enhanced Traction
System (ETS) that limits wheel spin. This is especially
useful in slippery road conditions. The system operates
only if it senses that one or both of the front wheels are
spinning or beginning to lose traction. When this
happens, the system reduces engine power and may also
upshift the transaxle to limit wheel spin.
This light will come on
when your Enhanced
Traction System is limiting
wheel spin. See ªEnhanced
Traction System Active
Lightº in the Index.
You may feel or hear the system working, but this is
normal. This light will also come on when the anti
-lock
brake system is working.
If your vehicle is in cruise control when the enhanced
traction system begins to limit wheel spin, the cruise
control will automatically disengage. When road
conditions allow you to safely use it again, you may
reengage the cruise control. See ªCruise Controlº in
the Index.