Page 23 of 133
12 3 4 56789 10 11 1 2
24 23 22 21 20 19 18 17 16 15
13 14
88
YOUR 306 CABRIOLET IN DETAIL
1Low coolant level.
2 Headlight main beam.
3 Headlight dipped beam.
4 Speedometer.
5 Left indicator.
6 Low oil pressure warning light.
7 Handbrake, brake fluid low level and electronic brake force distribution.
8 Battery charge.
9 Right indicator. 10
Rev counter.
11 Front fog lamps.
12 Brake pad wear warning light*.
13 Rear fog lamp.
14 ABS: anti-lock braking system*.
15 Fuel gauge.
16 Low fuel level.
17 STOP warning.
18 Seat belt not fastened warninglight*. 19
Side airbags warning light*.
20 Front airbags warning light* anddisarming of passenger airbag*
21 Autodiagnostics*.
22 Trip recorder and service indicator.
23 Trip zero reset and clock setting.
24 Coolant temperature gauge.
* According to specification or country.
INSTRUMENT PANEL
Page 24 of 133
4 5 6 7 8 9 10 11 12 13 14
3 2 1
25 24 23 22 21 20 19 18 17 16 15
89
YOUR 306 CABRIOLET IN DETAIL
1Low coolant level*.
2 Headlight main beam.
3 Headlight dipped beam.
4 Speedometer.
5 Left indicator.
6 Low oil pressure warning light.
7 Gear indicator (automatic gear- box).
8 Handbrake, brake fluid low leveland electronic brake force distrib-ution.
9 Battery charge. 10
Right indicator.
11 Rev counter.
12 Front fog lamps*.
13 Rear fog lamp.
14 ABS: anti-lock braking system*.
15 Fuel gauge.
16 Low fuel level.
17 Oil level.
18 STOP warning. 19
Seat belt not fastened warning light*.
20 Side airbags warning light*.
21 Front airbags warning light* and disarming of passenger airbag*
22 Autodiagnostics*.
23 Trip recorder and service
indicator.
24 Trip zero reset and clock setting.
25 Coolant temperature gauge.
* According to specification.
INSTRUMENT PANEL
Page 31 of 133
- From inside the vehicle, using thecentre handle and a side handle, fold down the front of the hood,position the side handle hooks intheir housings and secure the twohandles.
If the fault persists, contact your
PEUGEOT dealer.
A
B
1
If an electrical fault occurs while the hood is open, it is possible to close it manually.
Using the side handle 1, close the
hood and unfold it to the point of resistance.
- Close the rear of the hood.
- Close the hood cover and secure it by turning the wheelbrace Ba
quarter turn anti-clockwise.
- Fold down the rear of the hood on the hood cover.
Y OUR 306 CABRIOLET IN DETAIL
48
ELECTRIC HOOD:
MANUAL CLOSING Open the boot, remove the cap A.
Using the wheelbrace B, turn a quar-
ter turn clockwise in order to release the hood cover and open it.
Page 34 of 133

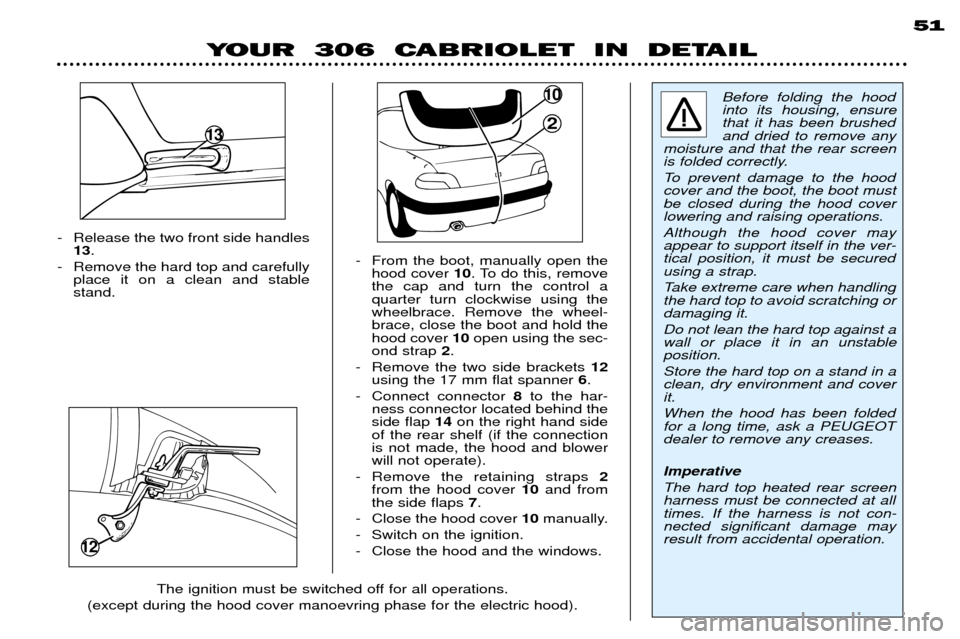
- Release the two front side handles13 .
- Remove the hard top and carefully place it on a clean and stable stand. - From the boot, manually open the
hood cover 10. To do this, remove
the cap and turn the control aquarter turn clockwise using thewheelbrace. Remove the wheel-brace, close the boot and hold thehood cover 10open using the sec-
ond strap 2.
- Remove the two side brackets 12
using the 17 mm flat spanner 6.
- Connect connector 8to the har-
ness connector located behind theside flap 14on the right hand side
of the rear shelf (if the connectionis not made, the hood and blowerwill not operate).
- Remove the retaining straps 2
from the hood cover 10and from
the side flaps 7.
- Close the hood cover 10manually.
- Switch on the ignition.
- Close the hood and the windows.
12
13
10
2 Before folding the hood into its housing, ensurethat it has been brushedand dried to remove any
moisture and that the rear screen
is folded correctly.
To prevent damage to the hood cover and the boot, the boot mustbe closed during the hood coverlowering and raising operations. Although the hood cover may appear to support itself in the ver-tical position, it must be securedusing a strap.
Take extreme care when handling the hard top to avoid scratching ordamaging it. Do not lean the hard top against a wall or place it in an unstableposition. Store the hard top on a stand in a clean, dry environment and coverit. When the hood has been folded for a long time, ask a PEUGEOTdealer to remove any creases. Imperative The hard top heated rear screen harness must be connected at alltimes. If the harness is not con-nected significant damage mayresult from accidental operation.
The ignition must be switched off for all operations.
(except during the hood cover manoevring phase for the electric hood).
Y OUR 306 CABRIOLET IN DETAIL 51
Page 35 of 133

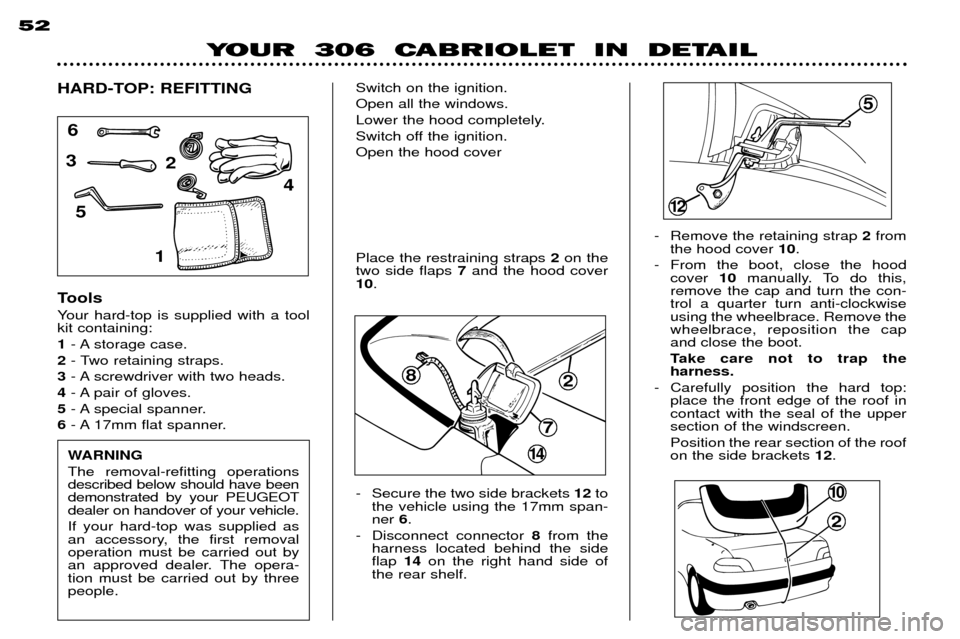
- Secure the two side brackets 12to
the vehicle using the 17mm span- ner 6.
- Disconnect connector 8from the
harness located behind the sideflap 14on the right hand side of
the rear shelf. - Remove the retaining strap
2from
the hood cover 10.
- From the boot, close the hood cover 10manually. To do this,
remove the cap and turn the con-trol a quarter turn anti-clockwiseusing the wheelbrace. Remove thewheelbrace, reposition the capand close the boot.
Take care not to trap the harness.
- Carefully position the hard top: place the front edge of the roof incontact with the seal of the uppersection of the windscreen. Position the rear section of the roof on the side brackets 12.
Place the restraining straps
2on the
two side flaps 7and the hood cover
10 .
HARD-TOP: REFITTING
Tools
Your hard-top is supplied with a tool kit containing: 1
- A storage case.
2 - Two retaining straps.
3 - A screwdriver with two heads.
4 - A pair of gloves.
5 - A special spanner.
6 - A 17mm flat spanner.
6
3
5 1 4
2
10
14
2
82
7
5
12
Switch on the ignition. Open all the windows.
Lower the hood completely.
Switch off the ignition.Open the hood cover
WARNING The removal-refitting operations described below should have beendemonstrated by your PEUGEOTdealer on handover of your vehicle. If your hard-top was supplied as
an accessory, the first removaloperation must be carried out by
an approved dealer. The opera-tion must be carried out by threepeople.
Y OUR 306 CABRIOLET IN DETAIL
52
Page 75 of 133
Digital clock* Setting: 1- Adjusting of hours.
2 - Adjusting of minutes.
Outside temperature display* This indicates the outside temperature. When the temperature is betweenminus 3 ¡C and + 5 ¡C, the ¡C symbolflashes indicating a risk of ice.
1
2
YOUR 306 CABRIOLET IN DETAIL 97
Rear screen demisting Rear screen (and mirrors)* electric demisting control. Goes out automatically after
approximately 12 minutes to avoid excessive power consumption. Pressing the button again will operate the demisting for another 12 minutes.
* According to specification.
Hazard warning lights The switch and the direction indicators flash. This controls the indicator
lights simultaneously and continu-
ously.
Only use in case of danger, in an emergency stop or for driving inunusual conditions.
They can operate with the ignition off.
Page 122 of 133

MAINTENANCE OF YOUR 306 CABRIOLET
36
* According to specification.
Fascia fuse box 28-fuse box
Fuse No. Rating* Functions*
1 Ñ Not used
2 7.5A Automatic gearbox or excess speed buzzer control unit
3 5A ABS control unit
4 5A Instrument panel Ð Passenger compartment protection unit Ð Coolant temperature unit Ð Automatic gearbox lever lighting Ð Automatic gearbox relay Ð Passenger airbag disarming switch
5 25A Reversing lights switch Ð Automatic gearbox relay Ð Stop lights switch Ð Daylight running lights relay Ð Fan assembly relay Ð Pressostat control Ð Compressor relay
6 5A Instrument panel - Passenger compartment protection unit Ð Alarm warning light Ð Boot lighting Ð Radio aerial
7 30A Heated rear screen and mirrors
8 20A Passenger compartment protection unit - Radio
9 20A Injection control unit - Thermostat
10 20A Hazard warnings - courtesy light
11 10A Instrument panel lighting - lights-on buzzer - Clock - lighting rheostat
12 10A Rear fog lamp
13 30A Electric hood relay
14 30A Rear windows and heated seats relay
Page 123 of 133
37
MAINTENANCE OF YOUR 306 CABRIOLET
* According to specification.
Fascia fuse box
Fuse No. Rating* Functions*
15 20A Tow-bar socket
16 30A Front windows relay
17 20A Horn
18 10A Front fog lamps
19 10A Right tail light
20 30A Blower
21 10A Left tail light - Number plate light - Front sidelights
22 10A Blower relay - Heated rear screen and mirrors
23 20A Lighter
24 10A Radio
25 10A Electric hood Ð Central air conditioning and switch
26 30A Windscreen wiper and screen-wash pump control - Windscreen wiper motor - Windscreen wiper timer
27 15A Glove box lighting - Direction indicators Ð Electric mirrors control Ð Map reader light Ð Vanity mirror Ð Passenger compartment temperature sensor
28 15A Instrument panel - Clock - Electric windows relay and heated seats