Page 7 of 107
1 - Air flow adjustment
2 - Air distribution
To the central and
side vents
Footwells
Windscreens, side screens and footwells Windscreen and side windows 3
-T emperature control
4 - Air conditioning on/off
5 - Interior air recirculation
YOUR 106 AT A GLANCE8
EXTERIOR MIRRORS
Manual adjustment -
Adjust the position using the lever 1.
Electric adjustment: - Using the two-way switch 2,
select the left-hand or right-hand
mirror, then adjust its positionusing button 3.
- Return the two-way switch 2to
the central position.
Demisting of the mirrors islinked to the rear screendemisting control.
HEATING/AIR CONDITIONING6547
3
24
11
2
3
5
06-05-2002
Page 47 of 107

YOUR 106 IN DETAIL48
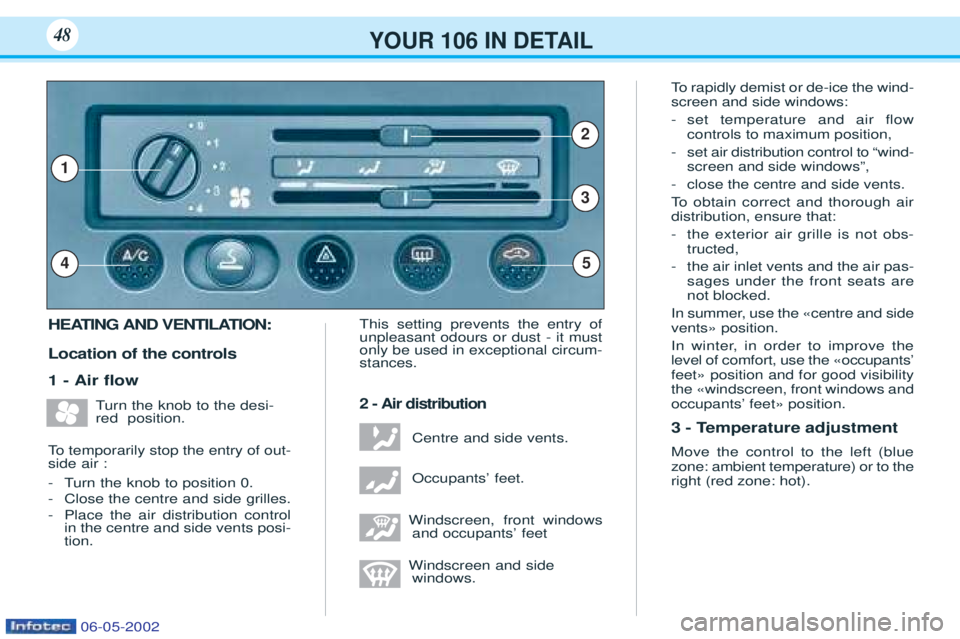
HEATING AND VENTILATION: Location of the controls 1 - Air flow
T urn the knob to the desi-
red position.
To temporarily stop the entry of out-
side air : -T urn the knob to position 0.
- Close the centre and side grilles.
- Place the air distribution control in the centre and side vents posi-tion. This setting prevents the entry ofunpleasant odours or dust - it mustonly be used in exceptional circum-stances.
2 - Air distribution
Centre and side vents. OccupantsÕ feet.
Windscreen, front windows and occupantsÕ feet
Windscreen and side windows. To
rapidly demist or de-ice the wind-
screen and side windows: - set temperature and air flow controls to maximum position,
- set air distribution control to Òwind-screen and side windowsÓ,
- close the centre and side vents.
To obtain correct and thorough air
distribution, ensure that: - the exterior air grille is not obs- tructed,
- the air inlet vents and the air pas-sages under the front seats arenot blocked.
In summer, use the Çcentre and sideventsÈ position.
In winter, in order to improve the level of comfort, use the ÇoccupantsÕfeetÈ position and for good visibilitythe Çwindscreen, front windows andoccupantsÕ feetÈ position.
3 - Temperature adjustment Move the control to the left (blue zone: ambient temperature) or to theright (red zone: hot).
54
1
3
2
06-05-2002
Page 63 of 107
YOUR 106 IN DETAIL68
Athermic windscreen* The windscreen has a non- reßective zone above the interior
rear-view mirror.
This zone is intended for afÞxing toll cards or parking passes. Note:the athermic glass of the
windscreen limits the heating of the passenger compartment by reßec-
ting more of the sunÕs rays.Sliding sun roof*
To open or partly open the roof:
- Open the concealing panel.
- Pull handle 1to open out.
-T urn handle 1the desired
amount.
T ilting sun roof*
-T ilt and push the handle.
1
Tilting window*
(3 door version)
To open the rear windows:
-T ilt lever 2then push the window.
* According to speciÞcation
2
06-05-2002
Page 69 of 107
YOUR 106 IN DETAIL66
5
78
10
9
1
6
1112
432
CENTRAL PANEL1- Radio cassette player.
2- Central adjustable vents for heating,
ventilation and air ßow.
3- Heating and ventilation controls.
4- Passenger airbag disarming switch.
5- Interior air recirculation or left-hand heated seat control*.
6- Ashtray. 7-
Demisting control for rear screen and mirrors*.
8- Hazard warning switch.
9- Lighter.
10 - Air conditioning* or right-hand heated seat control*
11 - Headlamps height adjustment.
12 - Lighting rheostat.
* According to speciÞcation
06-05-2002
Page 70 of 107

Heated seats*
Press the switch to operate the seat heating. Pressing it again stops the opera- tion. * According to speciÞcation
Lighting rheostat Adjustment can only be done with the engine running and the side-lights on, by pressing button
12on
the instrument panel, to increase ordecrease the instrument panel ligh-ting level.
Adjusting the headlamps
Depending on the load in your vehicle, it is recommended that theheadlamp beam is adjusted. 0- 1 or 2 people in the front seats.
–- 3 people.
1- 5 people.
2- 5 people + maximum authori- sed load.
3- Driver + maximum authorised load.
This adjustment can only be carriedout when the lighting control is inthe dipped/main beam position. Initial setting is position 0.
Hazard warning lights
The switch and the direction indica- tors ßash. Controls the direction indicators
simultaneously and continuously.
Use only in cases of danger, for an emergency stop or for driving inunusual conditions. Can operate with the ignition swit-
ched off.
Rear screen demister
Control for demisting the rearscreen (and exterior mirrors)*. Goes out automatically after approximately twelve minutes inorder to avoid excessive currentconsumption. Pushing it again restarts the opera- tion for twelve minutes.
YOUR 106 IN DETAIL67
06-05-2002