Page 363 of 436
6-34 Headlamps
To replace the headlamp bulb(s) do the following:
1. Open the hood.
2. Remove the front turn signal/parking lamp assembly.
See ªFront Turn Signal/Parking Lampsº later in
this section.
3. Remove the two wing nuts located on top of the
headlamp assembly.
4. Unscrew the black retainer ring that holds the
bulb assembly in place.
5. Pull the bulb assembly straight up from the
lamp housing.
6. Unhook the electrical connector by lifting up the
blue tabs. Pull the bulb out.
Page 364 of 436
6-35
7. Install the new bulb through the black retainer ring
and into the electrical connector. Tighten the black
retainer ring in place. Push the bulb firmly enough so
that the blue tabs hook over the tab on the bulb.8. Carefully put the bulb assembly back into the lamp
housing. Be careful not to damage the bulb on the
headlamp aiming bar.
Page 365 of 436
6-36
9. Align the pins on the bottom of the headlamp
assembly with the holes in the lamp support bracket
while placing the holes in the assembly over the
bolts where the wing nuts attach.
10. Reinstall and tighten the wing nuts.
11. Reinstall the front turn signal/parking lamp assembly
by lining up the tabs at the back of the assembly with
the holes in the fender and tighten the thumbscrew.
Be sure the tab from the front turn signal/parking
lamp assembly is inboard of the tab from the
headlamp assembly.
Front Turn Signal/Parking Lamps
To replace the front turn signal/parking lamp bulb(s)
do the following:
1. Open the hood.
2. Remove the thumb screw attaching the front
turn signal/parking lamp assembly to the
headlamp assembly.
3. Pull the front turn signal/parking lamp assembly
away from the vehicle.
Page 366 of 436
6-37
4. Unscrew the bulb socket from the lamp assembly by
pressing the tab while turning it counterclockwise.
5. Replace the bulb by pulling the old one out and
gently pushing the new one into the lamp socket.
6. Line up the tabs on the sockets with the gaps in the
socket holes and screw the bulb socket back into the
lamp housing until a click is heard (the tab popping
back out).
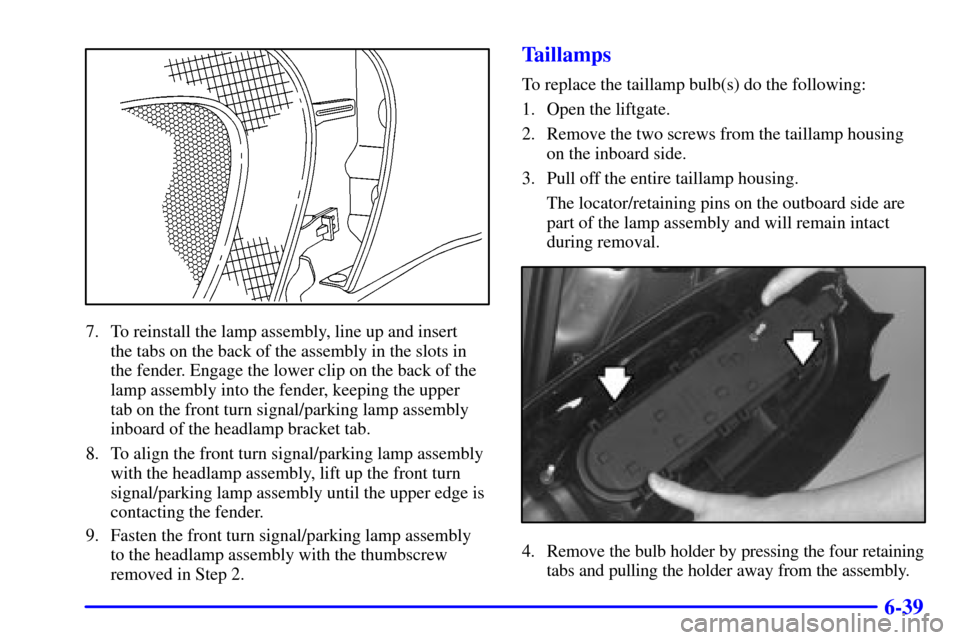
7. To reinstall the lamp assembly, line up and insert
the tabs on the back of the assembly in the slots in
the fender. Engage the lower clip on the back of the
lamp assembly into the fender, keeping the upper
tab on the front turn signal/parking lamp assembly
inboard of the headlamp bracket tab.
8. To align the front turn signal/parking lamp assembly
with the headlamp assembly, lift up the front turn
signal/parking lamp assembly until the upper edge
is contacting the fender.
9. Fasten the front turn signal/parking lamp assembly
to the headlamp assembly with the thumbscrew
removed in Step 2.
Page 367 of 436
6-38 Front Sidemarker
To replace the front sidemarker bulb(s) do the following:
1. Open the hood.
2. Remove the thumbscrew attaching the front
turn signal/parking lamp assembly to the
headlamp assembly.
3. Pull the front turn signal/parking lamp assembly
away from the vehicle.4. Unscrew the bulb socket from the lamp assembly by
turning it counterclockwise.
5. Replace the bulb by pulling the old one out and
gently pushing the new one into the lamp socket.
6. Line up the tabs on the sockets with the gaps in the
socket holes and screw the bulb socket back into the
lamp housing.
Page 368 of 436

6-39
7. To reinstall the lamp assembly, line up and insert
the tabs on the back of the assembly in the slots in
the fender. Engage the lower clip on the back of the
lamp assembly into the fender, keeping the upper
tab on the front turn signal/parking lamp assembly
inboard of the headlamp bracket tab.
8. To align the front turn signal/parking lamp assembly
with the headlamp assembly, lift up the front turn
signal/parking lamp assembly until the upper edge is
contacting the fender.
9. Fasten the front turn signal/parking lamp assembly
to the headlamp assembly with the thumbscrew
removed in Step 2.
Taillamps
To replace the taillamp bulb(s) do the following:
1. Open the liftgate.
2. Remove the two screws from the taillamp housing
on the inboard side.
3. Pull off the entire taillamp housing.
The locator/retaining pins on the outboard side are
part of the lamp assembly and will remain intact
during removal.
4. Remove the bulb holder by pressing the four retaining
tabs and pulling the holder away from the assembly.
Page 378 of 436

6-49
Each new wheel should have the same load-carrying
capacity, diameter, width, offset and be mounted the
same way as the one it replaces.
If you need to replace any of your wheels, wheel bolts
or wheel nuts, replace them only with new GM original
equipment parts. This way, you will be sure to have the
right wheel, wheel bolts and wheel nuts for your vehicle.
CAUTION:
Using the wrong replacement wheels, wheel bolts
or wheel nuts on your vehicle can be dangerous.
It could affect the braking and handling of your
vehicle, make your tires lose air and make you
lose control. You could have a collision in which
you or others could be injured. Always use the
correct wheel, wheel bolts and wheel nuts
for replacement.
NOTICE:
The wrong wheel can also cause problems with
bearing life, brake cooling, speedometer or
odometer calibration, headlamp aim, bumper
height, vehicle ground clearance and tire or tire
chain clearance to the body and chassis.
See ªChanging a Flat Tireº in the Index for
more information.
Used Replacement Wheels
CAUTION:
Putting a used wheel on your vehicle is
dangerous. You can't know how it's been used or
how far it's been driven. It could fail suddenly
and cause an accident. If you have to replace a
wheel, use a new GM original equipment wheel.
Page 390 of 436

6-61
Electrical System
Add-On Electrical Equipment
NOTICE:
Don't add anything electrical to your vehicle
unless you check with your dealer first. Some
electrical equipment can damage your vehicle
and the damage wouldn't be covered by your
warranty. Some add
-on electrical equipment
can keep other components from working as
they should.
Your vehicle has an air bag system. Before attempting to
add anything electrical to your vehicle, see ªServicing
Your Air Bag
-Equipped Vehicleº in the Index.
Headlamp Wiring
The headlamp wiring is protected by an internal circuit
breaker in the instrument panel fuse panel. An electrical
overload will cause the lamps to go on and off, or in
some cases to remain off. If this happens, have your
headlamp wiring checked right away.
Windshield Wipers
The windshield wiper motor is protected by an internal
circuit breaker and a fuse. If the motor overheats due
to heavy snow, etc., the wiper will stop until the motor
cools. If the overload is caused by some electrical
problem, be sure to get it fixed.
Power Windows and Other Power Options
Circuit breakers in the instrument panel fuse panel
protect the power windows and other power accessories.
When the current load is too heavy, the circuit breaker
opens and closes, protecting the circuit until the
problem is fixed.