Page 237 of 346
5-26
8. Lower the vehicle by turning the jack handle
counterclockwise. Lower the jack completely.
9. Tighten the wheel nuts
firmly in a crisscross
sequence as shown.
CAUTION:
Incorrect wheel nuts or improperly tightened
wheel nuts can cause the wheel to become loose
and even come off. This could lead to an accident.
Be sure to use the correct wheel nuts. If you have
to replace them, be sure to get new GM original
equipment wheel nuts.
Stop somewhere as soon as you can and have
the nuts tightened with a torque wrench to
100 lb
-ft (140 N´m).
NOTICE:
Improperly tightened wheel nuts can lead to
brake pulsation and rotor damage. To avoid
expensive brake repairs, evenly tighten the wheel
nuts in the proper sequence and to the proper
torque specification.
10. Reinstall the plastic nut caps tightly by hand.
Using the wheel wrench, tighten caps an additional
one quarter turn.
Page 239 of 346
5-28 Storing the Spare Tire and Tools
CAUTION:
Storing a jack, a tire or other equipment in the
passenger compartment of the vehicle could
cause injury. In a sudden stop or collision, loose
equipment could strike someone. Store all these
in the proper place.
The compact spare is for temporary use only. Replace
the compact spare tire with a full
-size tire as soon as
you can. See ªCompact Spare Tireº in the Index.
See the storage instructions label to replace your
compact spare into your trunk properly.
A. Retainer
B. Cover
C. Compact Spare Tire
D. Nut
E. Jack
F. Wrench
G. Lock Nut Tool
H. Foam Holder
I. Extension and
Protective Guide
J. Bolt Screw
Page 247 of 346
6-6
While refueling, let the cap hang by the tether below the
fuel fill opening.
To remove the cap, turn it slowly to the left
(counterclockwise). The cap has a spring in it; if you let
go of the cap too soon, it will spring back to the right.
CAUTION:
If you get gasoline on yourself and then
something ignites it, you could be badly burned.
Gasoline can spray out on you if you open the
fuel filler cap too quickly. This spray can happen
if your tank is nearly full, and is more likely in
hot weather. Open the fuel filler cap slowly and
wait for any ªhissº noise to stop. Then unscrew
the cap all the way.
Page 248 of 346
6-7
Be careful not to spill gasoline. Clean gasoline from
painted surfaces as soon as possible. See ªCleaning the
Outside of Your Vehicleº in the Index.
When you put the cap back on, turn it to the right
(clockwise) until you hear a clicking sound. Make sure
you fully install the cap. The diagnostic system can
determine if the fuel cap has been left off or improperly
installed. This would allow fuel to evaporate into the
atmosphere. See ªMalfunction Indicator Lampº in
the Index.
NOTICE:
If you need a new cap, be sure to get the right
type. Your dealer can get one for you. If you get
the wrong type, it may not fit properly. This may
cause your malfunction indicator lamp to light
and your fuel tank and emissions system may be
damaged. See ªMalfunction Indicator Lampº in
the Index.
Page 251 of 346
6-10 Engine Compartment Overview
When you open the hood of the 3.5L V6 engine, you'll see:
A. Windshield Washer
Fluid Reservoir
B. Accessory Wiring Junction
Fuse Block
C. BatteryD. Remote Positive (+) Terminal
E. Engine Coolant Surge Tank
F. Power Steering Fluid Reservoir
G. Engine Oil Fill Cap
H. Engine Oil DipstickI. Automatic Transaxle
Fluid Dipstick
J. Brake Fluid Reservoir
K. Engine Air Cleaner/Filter
Page 275 of 346
6-34
3. Slide the lamp assembly toward you.4. Remove the rubber access cover from behind the
bulb you are replacing.
5. Turn the bulb socket counterclockwise and remove it
from the lamp.
Page 278 of 346
6-37
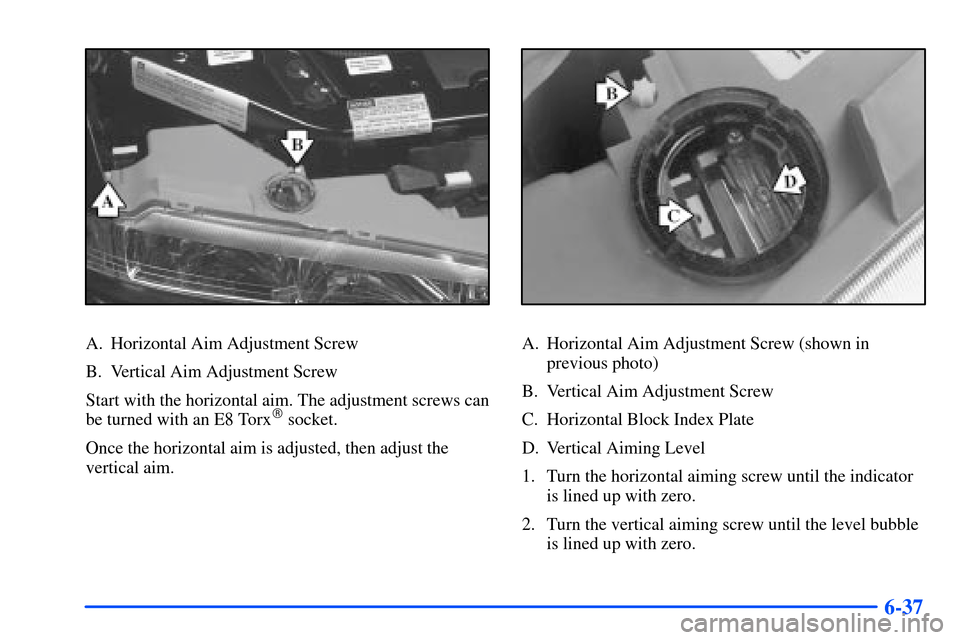
A. Horizontal Aim Adjustment Screw
B. Vertical Aim Adjustment Screw
Start with the horizontal aim. The adjustment screws can
be turned with an E8 Torx
� socket.
Once the horizontal aim is adjusted, then adjust the
vertical aim.
A. Horizontal Aim Adjustment Screw (shown in
previous photo)
B. Vertical Aim Adjustment Screw
C. Horizontal Block Index Plate
D. Vertical Aiming Level
1. Turn the horizontal aiming screw until the indicator
is lined up with zero.
2. Turn the vertical aiming screw until the level bubble
is lined up with zero.
Page 279 of 346
6-38 Front Parking, Sidemarker and Turn Signal
Cornering Lamps
1. Remove the headlamp assembly. Refer to the
removal procedure listed under ªHeadlampsº earlier
in this section.
2. Remove the rubber access cover.
3. Twist and pull the bulb socket from the
headlamp assembly.
4. Holding the base of the bulb, pull the old bulb from
the socket.
5. Push the new bulb into the socket.
6. Put the bulb socket back into the headlamp assembly
and turn it clockwise until it is secure.
7. Reinstall the rubber access cover.
Fog Lamps
1. Remove the deflector located below the front fascia
by removing the two bolts.
2. Reach up from underneath the front of the
vehicle and remove the electrical connector from
the bulb assembly.
3. Turn the bulb socket a quarter turn counterclockwise
to remove.
4. Remove the old bulb from the socket.
5. Place the new bulb into the socket.
6. Reverse Steps 1 through 3 to reinstall.


. The cap has a spring in it; if you let
go of the cap")