2001 NISSAN XTERRA wiper
[x] Cancel search: wiperPage 44 of 263

2 Instruments and controls
Meters and gauges ................................................2-2
Speedometer and odometer .............................2-3
Tachometer ........................................................2-5
Engine coolant temperature gauge ...................2-5
Fuel gauge ........................................................2-6
Warning/indicator lights and chimes ......................2-7
Checking bulbs ..................................................2-7
Warning lights ....................................................2-8
Indicator lights .................................................2-10
Chimes............................................................. 2-11
Security system ....................................................2-12
Vehicle security system (if so equipped).........2-12
Windshield wiper and washer switch ...................2-15
Switch operation ..............................................2-15
Rear window wiper and washer switch
(if so equipped) ....................................................2-16
Rear window defogger switch ..............................2-17
Headlight and turn signal switch ..........................2-17
Headlight switch ..............................................2-17
Turn signal switch............................................2-18
Front fog light switch (if so equipped)..................2-19Hazard warning flasher switch .............................2-19
Horn ......................................................................2-20
Cigarette lighter (accessory) and ash tray ...........2-20
Power point (if so equipped) ...........................2-21
Storage .................................................................2-22
Map pocket ......................................................2-22
Cup holders .....................................................2-22
Glove box ........................................................2-23
Luggage hooks ................................................2-24
Tonneau cover .................................................2-25
Windows .............................................................2-25
Power windows (if so equipped) .....................2-25
Manual windows ..............................................2-27
Skyroof (if so equipped) .......................................2-27
Tilting the skyroof ............................................2-27
Removing/installing..........................................2-28
Interior light...........................................................2-29
Map lights (if so equippped).................................2-30
Illuminated entry system ......................................2-30
Battery saver ...................................................2-30
ZX
Page 58 of 263

The hazard lights will quickly flash once and
the horn will sound once to confirm that the
horn beep feature has been reactivated.
Deactivating the horn beep feature does not
silence the horn if the alarm is triggered.
If the system does not operate as de-
scribed above, have it checked by an
authorized NISSAN dealer.SWITCH OPERATION
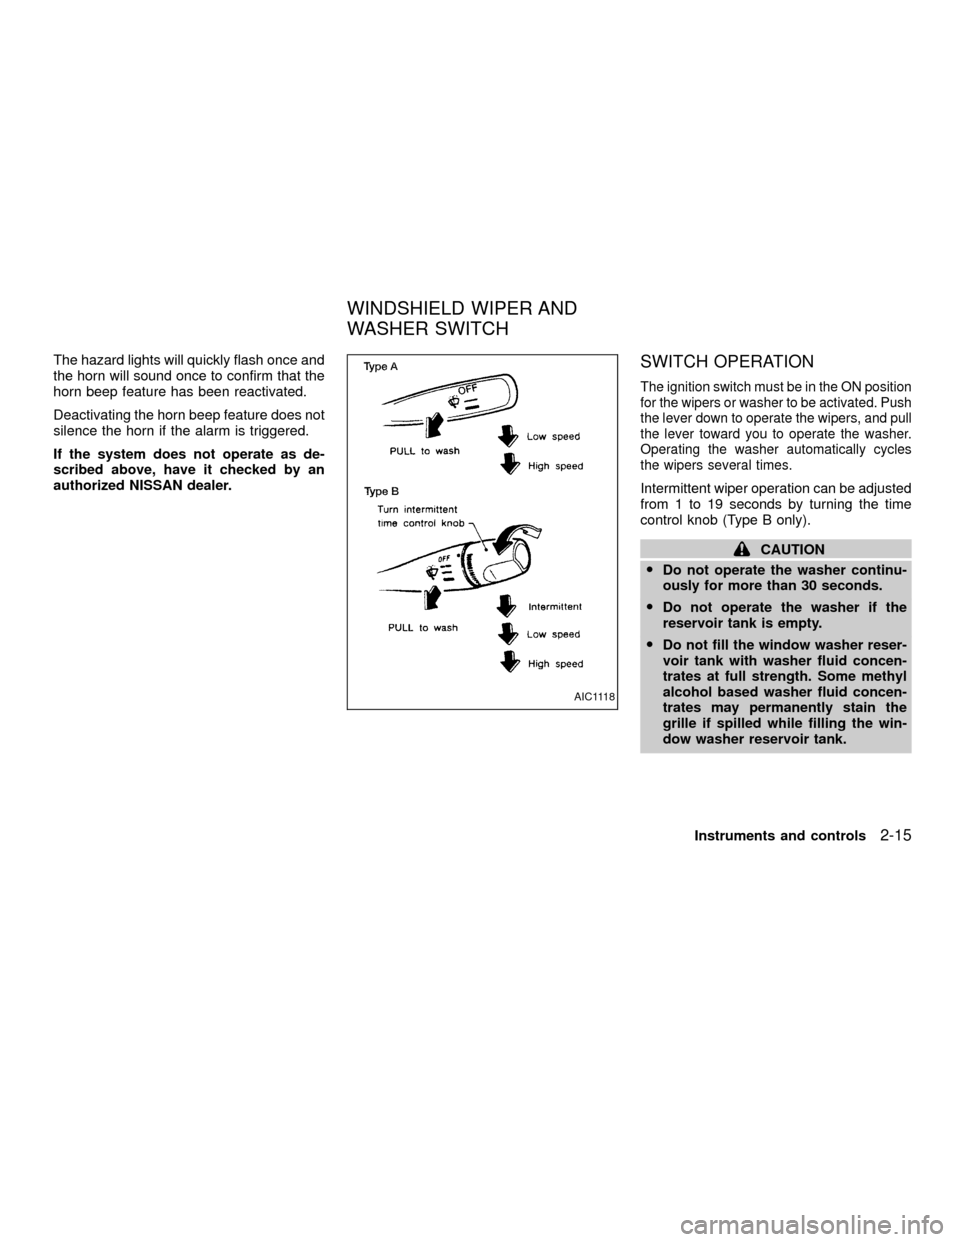
The ignition switch must be in the ON position
for the wipers or washer to be activated. Push
the lever down to operate the wipers, and pull
the lever toward you to operate the washer.
Operating the washer automatically cycles
the wipers several times.
Intermittent wiper operation can be adjusted
from 1 to 19 seconds by turning the time
control knob (Type B only).
CAUTION
ODo not operate the washer continu-
ously for more than 30 seconds.
ODo not operate the washer if the
reservoir tank is empty.
ODo not fill the window washer reser-
voir tank with washer fluid concen-
trates at full strength. Some methyl
alcohol based washer fluid concen-
trates may permanently stain the
grille if spilled while filling the win-
dow washer reservoir tank.
AIC1118
WINDSHIELD WIPER AND
WASHER SWITCH
Instruments and controls2-15
ZX
Page 59 of 263

OPre-mix washer fluid concentrates
with water to the manufacturer's rec-
ommended levels before pouring the
fluid into the window washer reser-
voir tank. Do not use the window
washer reservoir tank to mix the
washer fluid concentrate and water.
WARNING
In freezing temperatures the washer
solution may freeze on the windshield
and obscure your vision which may
lead to an accident. Warm the wind-
shield with the defroster before you
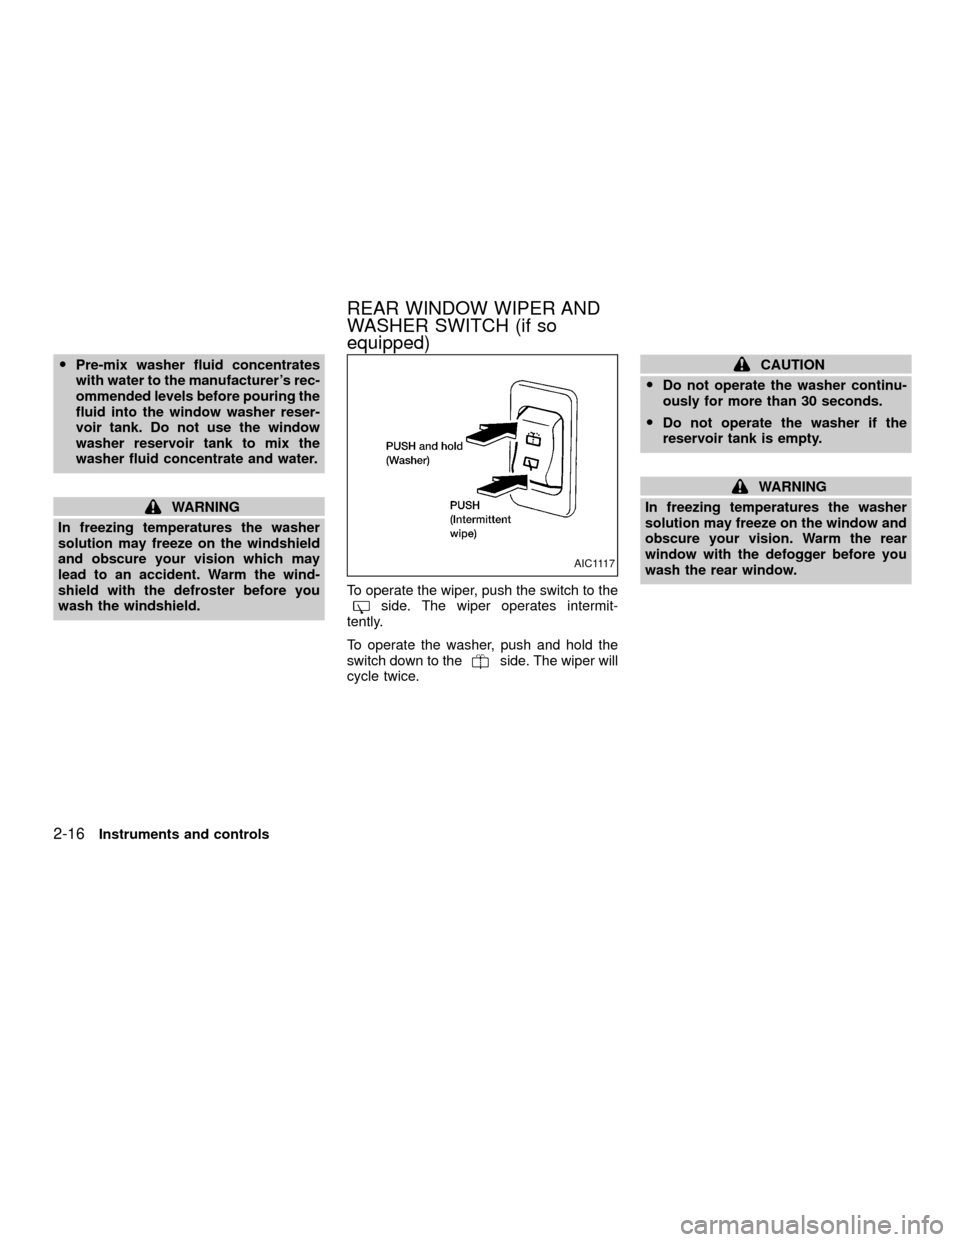
wash the windshield.To operate the wiper, push the switch to the
side. The wiper operates intermit-
tently.
To operate the washer, push and hold the
switch down to the
side. The wiper will
cycle twice.
CAUTION
ODo not operate the washer continu-
ously for more than 30 seconds.
ODo not operate the washer if the
reservoir tank is empty.
WARNING
In freezing temperatures the washer
solution may freeze on the window and
obscure your vision. Warm the rear
window with the defogger before you
wash the rear window.
AIC1117
REAR WINDOW WIPER AND
WASHER SWITCH (if so
equipped)
2-16Instruments and controls
ZX
Page 94 of 263

Bi-level heating
The bi-level mode directs warmed air to the
side and center vents and to the front and
rear floor outlets.
1. Push the
button (if so equipped) to
the off position.
2. Turn the air control dial to the
posi-
tion.
3. Turn the fan control dial to the desired
position.
4. Turn the temperature control dial to the
the desired position.
Heating and defogging
This mode directs a portion of the air to the
defrost outlets to defrost/defog the win-
dows, and also directs air to the front and
rear floor outlets to heat the cabin.
1. Turn the air control dial to the
posi-
tion.
2. Turn the fan control dial to the desired
position.
3. Turn the temperature control dial to the
desired position between the middle and
the hot position.When the
position is selected, the air
conditioner automatically turns on (however
the indicator light will not illuminate) if the
outside temperature is more than 45ÉF
(7ÉC). This dehumidifies the air which helps
defog the windshield. The
mode auto-
maticallly turns off, allowing outside air to be
drawn into the passenger compartment to
further improve the defogging performance.
Operating tips
Clear snow and ice from the wiper
blades and air inlet in front of the wind-
shield. This improves heater operation.
AIR CONDITIONER OPERATION
(if so equipped)
Start the engine, move the fan control dial to
the desired (one to four) position, and push
in the air conditioner button to activate the
air conditioner. When the air conditioner is
on, cooling and dehumidifying functions are
added to the heater operation.
The air conditioner cooling function op-
erates only when the engine is running.
Cooling
This mode directs cooled and dryed air to
the side and center vents to cool and dehu-
midify the cabin.
1. Push the
button to the off position.
2. Turn the air control dial to the
posi-
tion.
3. Turn the fan control dial to the desired
position.
4. Push on the air conditioner button. The
indicator light comes on.
5. Turn the temperature control dial to the
desired position.
For quick cooling when the outside tem-
perature is high, push the
button to
the ON position. Be sure to return the air
recirculation button to the OFF position for
normal cooling.
Dehumidified heating
This mode directs warmed and dryed air to
the front and rear floor outlets to heat and
dehumidify the cabin.
1. Push the
button to the off position.
Heater, air conditioner and audio systems
4-5
ZX
Page 153 of 263

and on the engine block. Refill before operat-
ing the vehicle. For details, see ``Changing
engine coolant'' in the ``Do-it-yourself'' section
of this manual.
TIRE EQUIPMENT
1. SUMMER tires have a tread designed to
provide superior performance on dry
pavement. However, the performance of
these tires will be substantially reduced
in snowy and icy conditions. If you oper-
ate your vehicle on snowy or icy roads,
NISSAN recommends the use on all four
wheels of MUD & SNOW or ALL SEA-
SON tires. Please consult your NISSAN
dealer for the tire type, size, speed rating
and availability information.
2. For additional traction on icy roads, stud-
ded tires may be used. However, some
U.S. states and Canadian provinces pro-
hibit their use. Check local, state and pro-
vincial laws before installing studded tires.
Skid and traction capabilities of studded
snow tires on wet or dry surfaces may be
poorer than that of non-studded snow
tires.
3. Tire chains may be used. Use of tire
chains may be prohibited according tolocation. Check the local laws before
installing tire chains. When installing tire
chains, make sure they are of proper size
for the tires on your vehicle and are
installed according to the chain manufac-
turer's suggestions.Use only SAE
Class ``S'' chains.Other types may
damage your vehicle. Use chain tension-
ers when recommended by the tire chain
manufacturer to ensure a tight fit. Loose
end links of the tire chain must be se-
cured or removed to prevent the possi-
bility of whipping action damage to the
fenders or undercarriage. If possible,
avoid fully loading your vehicle when
using tire chains. In addition, drive at a
reduced speed, otherwise, your vehicle
may be damaged and/or vehicle handling
and performance may be adversely af-
fected. Never install tire chains on a
TEMPORARY USE ONLY spare tire. Do
not use tire chains on dry roads.SPECIAL WINTER EQUIPMENT
It is recommended that the following items
be carried in the vehicle during winter:
1. A scraper and stiff-bristled brush to re-
move ice and snow from the windows
and wiper blades.2. A sturdy, flat board to be placed under
the jack to give it firm support.
3. A shovel to dig the vehicle out of snow-
drifts.
4. Extra window washer fluid to refill the
reservoir tank.
DRIVING ON SNOW OR ICE
WARNING
OWet ice (32ÉF, 0ÉC and freezing rain),
very cold snow, or ice can be slick
and very hard to drive on. The ve-
hicle will have much less traction or
``grip'' under these conditions. Try to
avoid driving on wet ice until the
road is salted or sanded.
OWhatever the condition, drive with
caution. Accelerate and slow down
with care. If accelerating or down-
shifting too fast, the drive wheels
will lose even more traction.
O
Allow more stopping distance under
these conditions. Braking should be
started sooner than on dry pavement.
OAllow greater following distances on
slippery roads.
5-26Starting and driving
ZX
Page 176 of 263

8 Do-it-yourself
Maintenance precautions .......................................8-2
Engine compartment check locations ....................8-3
Engine cooling system ...........................................8-5
Checking engine coolant level ..........................8-5
Changing engine coolant ..................................8-6
Engine oil ...............................................................8-9
Checking engine oil level ..................................8-9
Changing engine oil ........................................8-10
Changing engine oil filter.................................8-12
Automatic transmission fluid ................................8-13
Temperature conditions for checking ..............8-13
Power steering fluid..............................................8-14
Brake and clutch fluid...........................................8-15
Window washer fluid ............................................8-16
Window washer fluid reservoir ........................8-16
Battery ..................................................................8-16
Jump starting ...................................................8-17
Drive belts ............................................................8-18
Spark plugs ..........................................................8-19
Replacing spark plugs .....................................8-19
Air cleaner ............................................................8-20Windshield wiper blades ......................................8-22
Cleaning ..........................................................8-22
Replacing .........................................................8-22
Parking brake and brake pedal ............................8-24
Checking parking brake...................................8-24
Checking brake pedal .....................................8-24
Brake booster ..................................................8-25
Clutch pedal .........................................................8-26
Checking clutch pedal .....................................8-26
Fuses ....................................................................8-27
Passenger compartment .................................8-27
Multi-remote controller battery replacement ........8-28
Lights ....................................................................8-29
Headlights ........................................................8-29
Fog lights (if so equipped)...............................8-31
Exterior and interior lights ...............................8-32
Wheels and tires ..................................................8-34
Tire pressure ...................................................8-34
Types of tires ...................................................8-34
Tire chains .......................................................8-35
Changing wheels and tires ..............................8-36
ZX
Page 197 of 263

CAUTION
O
After wiper blade replacement, return
the wiper arm to its original position;
otherwise it may be damaged when
the hood is opened.
OMake sure the wiper blades contact
the glass; otherwise the arms may
be damaged from wind pressure.
CLEANING
If your windshield is not clear after using the
windshield washer or if a wiper blade chat-ters when running, wax or another material
may be on the blade or windshield.
Clean the outside of the windshield with a
washer solution or a mild detergent. Your
windshield is clean if beads do not form
when rinsing with clear water.
Clean the blade by wiping it with a cloth
soaked in a washer solution or a mild deter-
gent. Then rinse the blade with clear water.
If your windshield is still not clear after
cleaning the blades and using the wiper,
replace the blades.
REPLACING
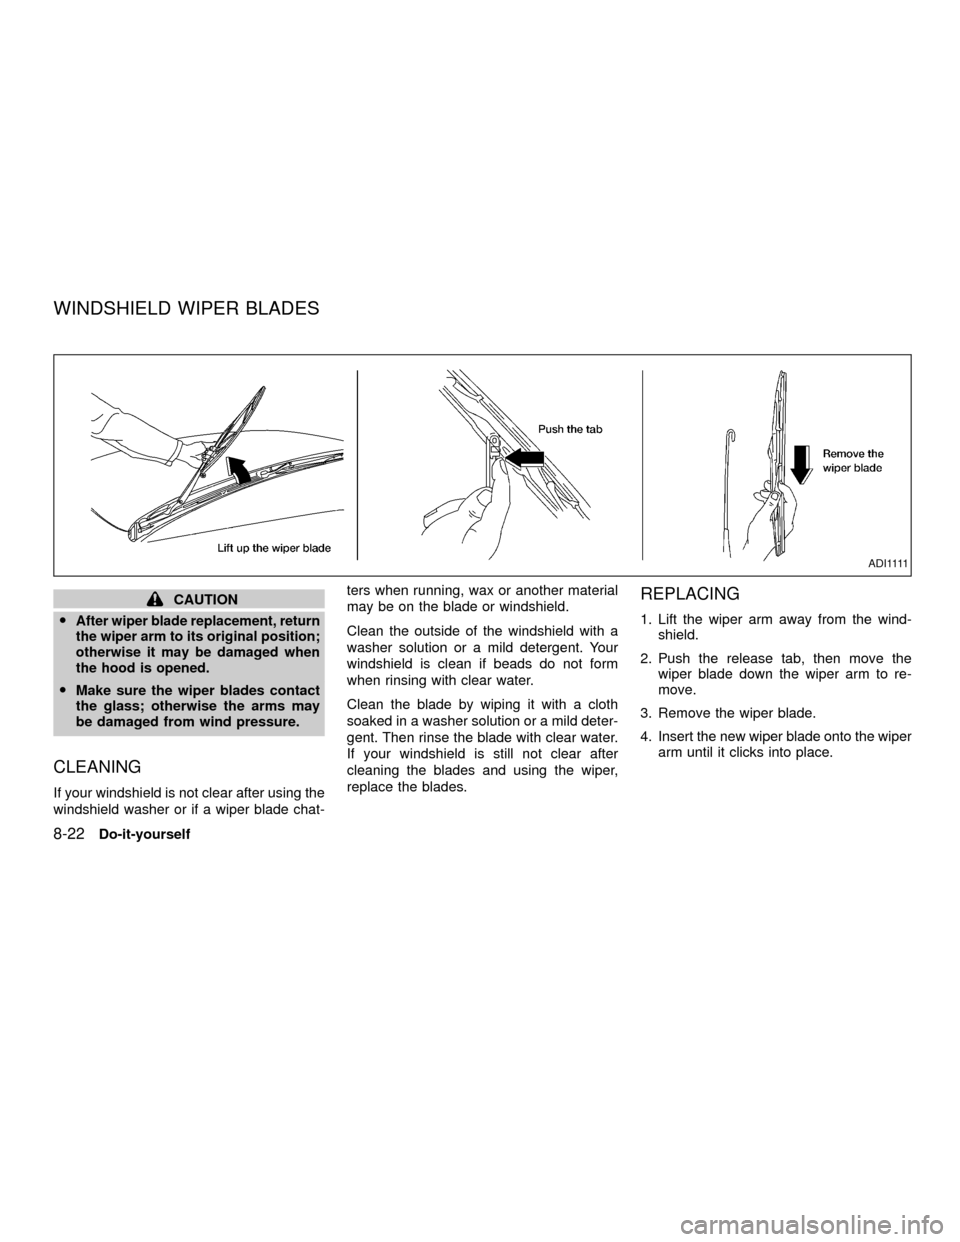
1. Lift the wiper arm away from the wind-
shield.
2. Push the release tab, then move the
wiper blade down the wiper arm to re-
move.
3. Remove the wiper blade.
4. Insert the new wiper blade onto the wiper
arm until it clicks into place.
A D I 1111
WINDSHIELD WIPER BLADES
8-22Do-it-yourself
ZX
Page 198 of 263

Rear window wiper blade
1. Lift the wiper arm away from the wind-
shield.
2. Push the tab, then slide the wiper blade
down the wiper arm to remove.
3. Insert a new wiper blade onto the wiper
arm and press down until the blade clicks
into place.
ADI1126
Do-it-yourself8-23
ZX