2001 NISSAN SENTRA recommended
[x] Cancel search: recommendedPage 31 of 240
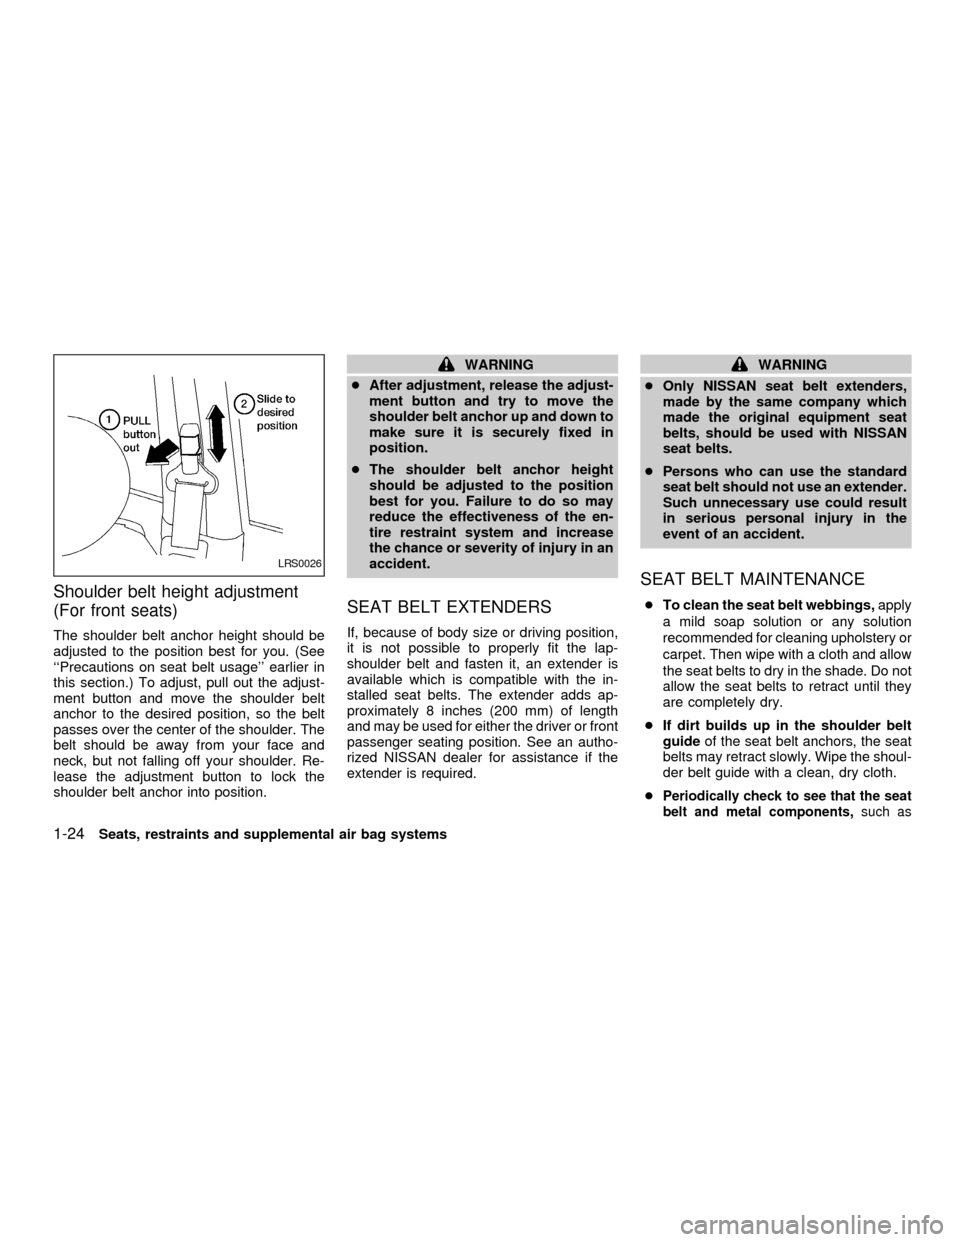
Shoulder belt height adjustment
(For front seats)
The shoulder belt anchor height should be
adjusted to the position best for you. (See
``Precautions on seat belt usage'' earlier in
this section.) To adjust, pull out the adjust-
ment button and move the shoulder belt
anchor to the desired position, so the belt
passes over the center of the shoulder. The
belt should be away from your face and
neck, but not falling off your shoulder. Re-
lease the adjustment button to lock the
shoulder belt anchor into position.
WARNING
cAfter adjustment, release the adjust-
ment button and try to move the
shoulder belt anchor up and down to
make sure it is securely fixed in
position.
cThe shoulder belt anchor height
should be adjusted to the position
best for you. Failure to do so may
reduce the effectiveness of the en-
tire restraint system and increase
the chance or severity of injury in an
accident.
SEAT BELT EXTENDERS
If, because of body size or driving position,
it is not possible to properly fit the lap-
shoulder belt and fasten it, an extender is
available which is compatible with the in-
stalled seat belts. The extender adds ap-
proximately 8 inches (200 mm) of length
and may be used for either the driver or front
passenger seating position. See an autho-
rized NISSAN dealer for assistance if the
extender is required.
WARNING
cOnly NISSAN seat belt extenders,
made by the same company which
made the original equipment seat
belts, should be used with NISSAN
seat belts.
cPersons who can use the standard
seat belt should not use an extender.
Such unnecessary use could result
in serious personal injury in the
event of an accident.
SEAT BELT MAINTENANCE
cTo clean the seat belt webbings,apply
a mild soap solution or any solution
recommended for cleaning upholstery or
carpet. Then wipe with a cloth and allow
the seat belts to dry in the shade. Do not
allow the seat belts to retract until they
are completely dry.
cIf dirt builds up in the shoulder belt
guideof the seat belt anchors, the seat
belts may retract slowly. Wipe the shoul-
der belt guide with a clean, dry cloth.
c
Periodically check to see that the seat
belt and metal components,such as
LRS0026
1-24Seats, restraints and supplemental air bag systems
ZX
Page 33 of 240
to be sure it is compatible with the vehi-
cle's seat and seat belt system. Choose
a child restraint that meets the guidelines
of the Society of Automotive Engineers
recommended practice J1819 for child
restraint installation.
3) If the child restraint is compatible with
your vehicle, place your child in the child
restraint and check the various adjust-
ments to be sure the child restraint is
compatible with your child. Always follow
all recommended procedures.
All U.S. states and Canadian provinces
or territories require that infants and
small children be restrained in approved
child restraints at all times while the
vehicle is being operated.
WARNING
cImproper use of a child restraint can
result in increased injuries for both
the infant or child and other occu-
pants in the vehicle.
cFollow all of the child restraint manu-
facturer's instructions for installa-
tion and use. When purchasing a
child restraint, be sure to select onewhich will fit your child and vehicle.
It may not be possible to properly
install some types of child restraints
in your vehicle.
cIf the child restraint is not anchored
properly, the risk of a child being
injured in a collision or a sudden
stop greatly increases.
cAdjustable seatbacks should be po-
sitioned to fit the child restraint, but
as upright as possible.
c
After attaching the child restraint,
test it before you place the child in it.
Tilt it from side to side. Try to tug it
forward and check to see if the belt
holds the restraint in place. If the
restraint is not secure, tighten the
belt as necessary, or put the restraint
in another seat and test it again.
cFor a front-facing child restraint, if
the seat position where it is installed
has a three-point type lap/shoulder
belt, check to make sure the shoulder
belt does not go in front of the child's
face or neck. If it does, put the shoul-
der belt behind the child restraint. If
you must install a front-facing childrestraint in the front seat, see ``Instal-
lation on front passenger seat'' later
in this section for details.
cWhen your child restraint is not in
use, keep it secured with a seat belt
to prevent it from being thrown
around in case of a sudden stop or
accident.
CAUTION
Remember that a child restraint left in a
closed vehicle can become very hot.
Check the seating surface and buckles
before placing your child in the child
restraint.
INSTALLATION ON REAR SEAT
CENTER OR OUTBOARD POSI-
TIONS
WARNING
cThe three-point belt in your vehicle
is equipped with a locking mode re-
tractor which must be used when
installing a child restraint.
1-26Seats, restraints and supplemental air bag systems
ZX
Page 65 of 240
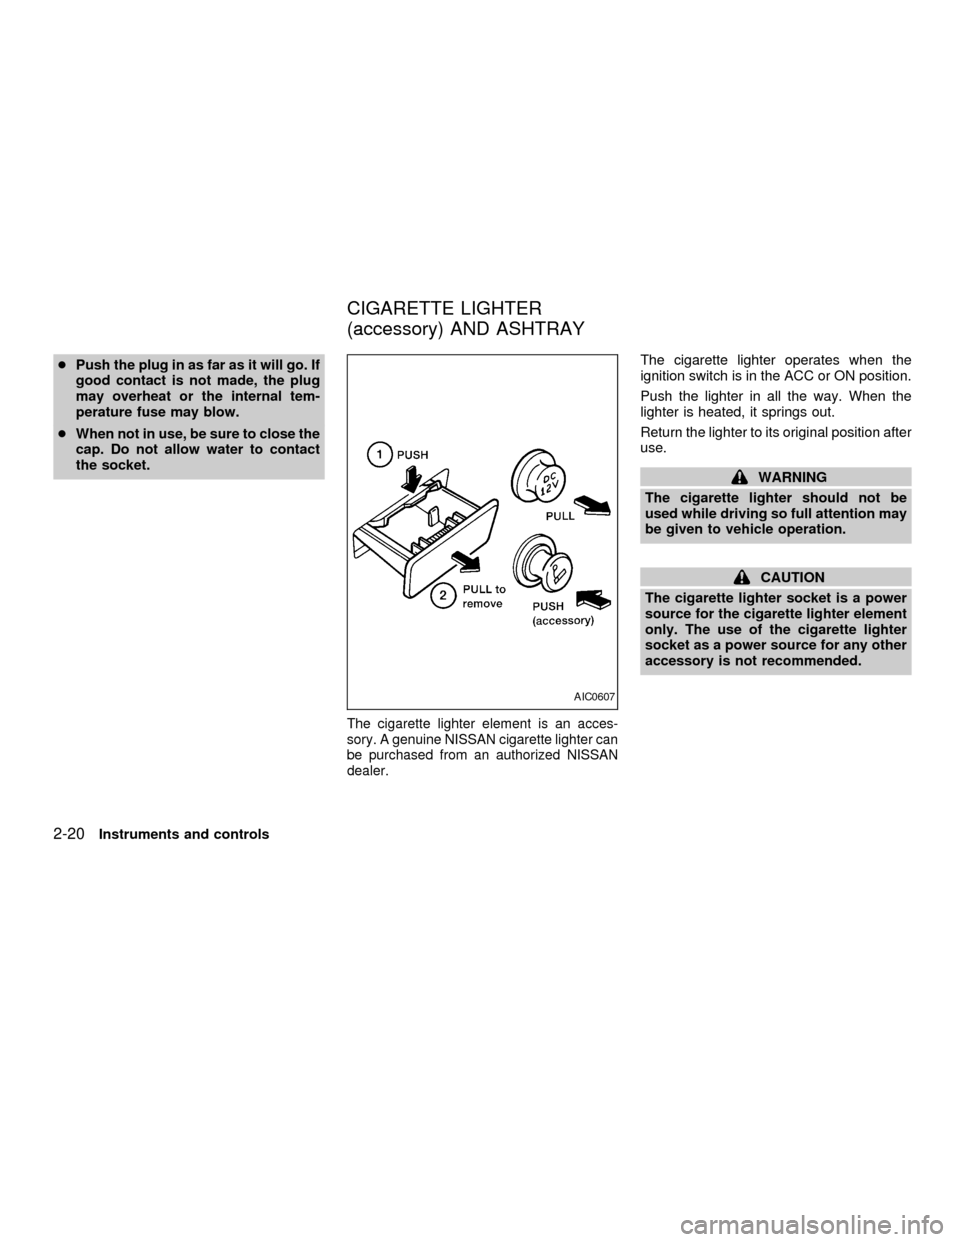
cPush the plug in as far as it will go. If
good contact is not made, the plug
may overheat or the internal tem-
perature fuse may blow.
cWhen not in use, be sure to close the
cap. Do not allow water to contact
the socket.
The cigarette lighter element is an acces-
sory. A genuine NISSAN cigarette lighter can
be purchased from an authorized NISSAN
dealer.
The cigarette lighter operates when the
ignition switch is in the ACC or ON position.
Push the lighter in all the way. When the
lighter is heated, it springs out.
Return the lighter to its original position after
use.
WARNING
The cigarette lighter should not be
used while driving so full attention may
be given to vehicle operation.
CAUTION
The cigarette lighter socket is a power
source for the cigarette lighter element
only. The use of the cigarette lighter
socket as a power source for any other
accessory is not recommended.
AIC0607
CIGARETTE LIGHTER
(accessory) AND ASHTRAY
2-20Instruments and controls
ZX
Page 81 of 240

BATTERY REPLACEMENT
Replace the battery in the multi-remote con-
troller as follows:
1. Open the lid using a coin.
2. Remove the battery.3. Install a new battery.
Recommended battery: Sanyo CR2025
or equivalent.
4.
Close the lid securely.
5. Press the LOCK button, then the UN-
LOCK button two or three times to checkthe multi-remote controller operation.
If the battery is removed for any reason
other than replacement, perform step five.
cAn improperly disposed battery can
hurt the environment. Always confirm
local regulations for battery disposal.
cThe multi-remote controller is water-
resistant; however, if it does get wet,
immediately wipe completely dry.
cThe operational range of the multi-
remote controller extends to approxi-
mately 49 ft (15 m) from the vehicle.
This range may vary with conditions.
FCC Notice:
Changes or modifications not expressly
approved by the manufacturer for com-
pliance could void the user's authority to
operate the equipment.
This device complies with Part 15 of the
FCC Rules and RSS-210 of Industry
Canada.
Operation is subject to the following two
conditions: (1) This device may not
cause harmful interference, and (2) this
device must accept any interference re-
ceived, including interference that may
cause undesired operation of the device.
WPD0023
3-8Pre-driving checks and adjustments
ZX
Page 112 of 240
ANTENNA
The antenna cannot be shortened, but can
be removed. When you need to remove the
antenna, turn the antenna rod counterclock-
wise.
To install the antenna rod, turn the antenna
clockwise. Tighten the antenna rod to speci-
fication using a suitable tool such as an
open-end wrench. The antenna rod tighten-
ing specification is 3.4 - 3.6 Nzm(30-32
in-lb). Do not use pliers to tighten the an-
tenna as they can leave marks on the
antenna surface. The antenna rod cannot
be hand tightened to the proper specifica-
tion.
CAUTION
Always properly tighten the antenna
rod during installation or the antenna
rod may break during vehicle opera-
tion.When installing a CB ham radio or a car
phone in your NISSAN, be sure to observe
the following cautions, otherwise the new
equipment may adversely affect the Multi-
port Fuel Injection (MFI) system and other
electronic parts.
WARNING
cA cellular telephone should not be
used while driving so full attention
may be given to vehicle operation.
Some jurisdictions prohibit the use
of cellular telephones while driving.
cIf you must make a call while your
vehicle is in motion, the hands free
cellular phone operational mode (if
so equipped) is highly recom-
mended. Exercise extreme caution
at all times so full attention may be
given to vehicle operation.
cIf a conversation in a moving vehicle
requires you to take notes, pull off
the road to a safe location and stop
your vehicle before doing so.
CAUTION
cKeep the antenna as far away as
possible from the Engine Control
Module (ECM).
c
Keep the antenna wire more than 8 in.
(20 cm) away from the Multiport Fuel
Injection harness. Do not route the
antenna wire next to any harness.
cAdjust the antenna standing-wave
ratio as recommended by the manu-
facturer.
cConnect the ground wire from the
CB radio chassis to the body.
cFor details, consult an authorized
NISSAN dealer.
CAR PHONE OR CB RADIO
Heater, air conditioner and audio systems4-23
ZX
Page 120 of 240
1. Apply the parking brake.
2.Automatic transmission:
Move the shift selector lever to P (Park)
or N (Neutral). (P is recommended.)
The shift selector lever cannot be
moved out of P (Park) and into any of
the other gear positions if the ignition
key is turned to LOCK or if the key is
removed.
The starter is designed not to operate
if the shift selector lever is in one of
the driving positions.
Manual transmission:
Move the selector lever to N (Neutral),
and depress the clutch pedal to the floor.
The starter is designed to operate
only when the clutch pedal is fully
depressed.
3. Crank the enginewith your foot off the
accelerator pedalby turning the ignition
key to START. Release the key when the
engine starts. If the engine starts, but
fails to run, repeat the above procedure.
Ð If the engine is very hard to start in
extremely cold or hot weather, de-press and hold the accelerator pedal
to help start the engine.
Ð In the summer, when restarting the
engine within 30 minutes after it has
been stopped, keep the accelerator
pedal fully depressed while starting.
CAUTION
Do not operate the starter for more than
15 seconds at a time. If the engine does
not start, turn the key off and wait 10
seconds before cranking again, other-
wise the starter could be damaged.
4.Warm-up
Allow the engine to idle for at least 30
seconds after starting. Drive at moderate
speed for a short distance first, especially
in cold weather.
AUTOMATIC TRANSMISSION
(if so equipped)
WARNING
cDo not depress the accelerator pedal
while shifting from P (Park) or N
(Neutral) to R (Reverse), D (Drive), 2
or 1. Always depress the brake pedal
until shifting is completed. Failure to
do so could cause you to lose con-
trol and have an accident.
cCold engine idle speed is high, so
use caution when shifting into a for-
ward or reverse gear before the en-
gine has warmed up.
cNever shift to P (Park) or R (Reverse)
while the vehicle is moving. This
could cause an accident.
CAUTION
cWhen stopping the vehicle on an
uphill grade, do not hold the vehicle
by depressing the accelerator pedal.
The foot brake should be used for
this purpose.
STARTING THE ENGINE DRIVING THE VEHICLE
Starting and driving5-7
ZX
Page 121 of 240
cDo not downshift abruptly on slip-
pery roads. This may cause a loss of
control.
The automatic transmission in your vehicle
is electronically controlled to produce maxi-
mum power and smooth operation.
The recommended operating procedures for
this transmission are shown on the following
pages. Follow these procedures for maximum
vehicle performance and driving enjoyment.
Starting the vehicle
cAfter starting the engine, fully depress
the foot brake pedal before shifting the
shift selector lever to the D (Drive), R
(Reverse), 2 or 1 position. Be sure the
vehicle is at a complete stop before
attempting to shift the shift selector lever.
cKeep the foot brake pedal depressed
and shift into a driving gear.
c
Release the foot brake, then gradually
start the vehicle in motion.
The automatic transmission is designed so
the foot brake pedal MUST be depressed
before shifting from P (Park) to any drive
position while the ignition switch is ON.
The shift selector lever cannot be moved
out of P (Park) and into any of the other
gear positions if the ignition key is
turned to LOCK or if the key is removed.
The shift selector lever can be moved if
the ignition switch is in the ON position
and the foot brake pedal is depressed.
Shifting
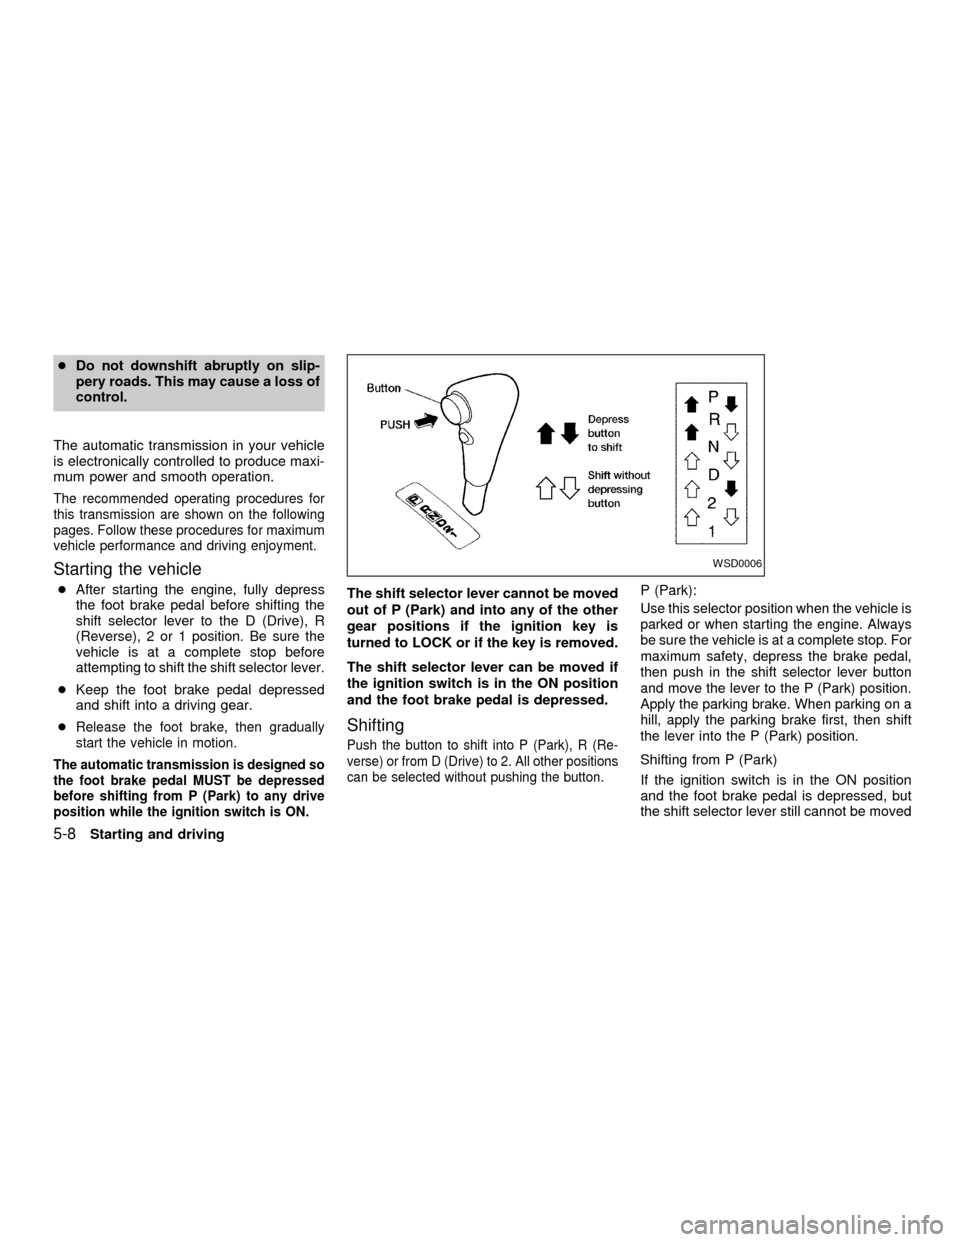
Push the button to shift into P (Park), R (Re-
verse) or from D (Drive) to 2. All other positions
can be selected without pushing the button.
P (Park):
Use this selector position when the vehicle is
parked or when starting the engine. Always
be sure the vehicle is at a complete stop. For
maximum safety, depress the brake pedal,
then push in the shift selector lever button
and move the lever to the P (Park) position.
Apply the parking brake. When parking on a
hill, apply the parking brake first, then shift
the lever into the P (Park) position.
Shifting from P (Park)
If the ignition switch is in the ON position
and the foot brake pedal is depressed, but
the shift selector lever still cannot be moved
WSD0006
5-8Starting and driving
ZX
Page 129 of 240

During the first 1,000 miles (1,600 km),
follow these recommendations for the future
reliability and economy of your new vehicle.
Failure to follow these recommendations
may result in vehicle damage or shortened
engine life.
cDo not drive over the legal speed limit
and do not run the engine over 4,000
rpm. Avoid driving for long periods at
constant speed, either fast or slow.
cDo not accelerate at full throttle in any
gear.
cAvoid quick starts.
cAvoid hard braking as much as possible.
cDo not tow a trailer for the first 500 miles
(800 km).cAccelerate slowly and smoothly. Main-
tain cruising speeds with a constant ac-
celerator position.
cDrive at moderate speeds on the high-
way. Driving at high speed lowers fuel
economy.
cAvoid unnecessary stopping and brak-
ing. Maintain a safe distance behind
other vehicles.
cUse a proper gear range which suits road
conditions. On level roads, shift into high
gear as soon as possible.
cAvoid unnecessary engine idling.cKeep your engine tuned up.
cFollow the recommended periodic main-
tenance schedule.
cKeep the tires inflated to the correct
pressure. Low tire pressure increases
tire wear and wastes fuel.
cKeep the front wheels in correct align-
ment. Improper alignment increases tire
wear and lowers fuel economy.
cAir conditioner operation lowers fuel
economy. Use the air conditioner only
when necessary.
cWhen cruising at highway speeds, it is
more economical to use the air condi-
tioner and leave the windows closed to
reduce drag.
SD1001M
BREAK-IN SCHEDULE INCREASING FUEL
ECONOMY
5-16Starting and driving
ZX