2001 NISSAN QUEST fog light
[x] Cancel search: fog lightPage 89 of 304

2 Instruments and controls
Meters and gauges ................................................2-3
Speedometer and odometer .............................2-4
Tachometer........................................................2-4
Engine coolant temperature gauge ...................2-5
Fuel gauge ........................................................2-5
Message center (if so equipped) ...........................2-6
Warning/indicator lights and chimes ......................2-7
Checking bulbs ..................................................2-7
Warning lights ....................................................2-7
Indicator lights ...................................................2-9
Audible reminders............................................2-11
Vehicle security system (if so equipped) .............2-11
Windshield wiper and washer switch ...................2-14
Rear window wiper and washer switches ............2-15
Rear window defogger switch ..............................2-15
Headlight and turn signal switch ..........................2-15
Headlight control switch ..................................2-15
Autolamp switch (if so equipped) ....................2-17
Turn signal switch ........................................2-18
Cornering light .................................................2-18
Hazard warning flasher switch .............................2-18
Horn ......................................................................2-19Heated seats (if so equipped) ..............................2-19
Rear power socket ...............................................2-21
Cigarette lighter and ashtray (accessory) ............2-22
Storage .................................................................2-23
Map pockets ....................................................2-23
Conversation mirror .........................................2-23
Cup holders .....................................................2-24
Glove box ........................................................2-25
Cargo net .........................................................2-26
Parcel shelf (if so equipped) ...........................2-27
Luggage rack ...................................................2-29
Windows ...............................................................2-29
Power windows................................................2-29
Power vent windows (if so equipped) .............2-31
Manual vent windows ......................................2-31
Sunroof (if so equipped).......................................2-32
Interior lights .........................................................2-33
Luggage ...........................................................2-33
Personal reading light ..........................................2-33
Map lights .............................................................2-34
Illuminated entry system ......................................2-34
ZX
Page 104 of 304

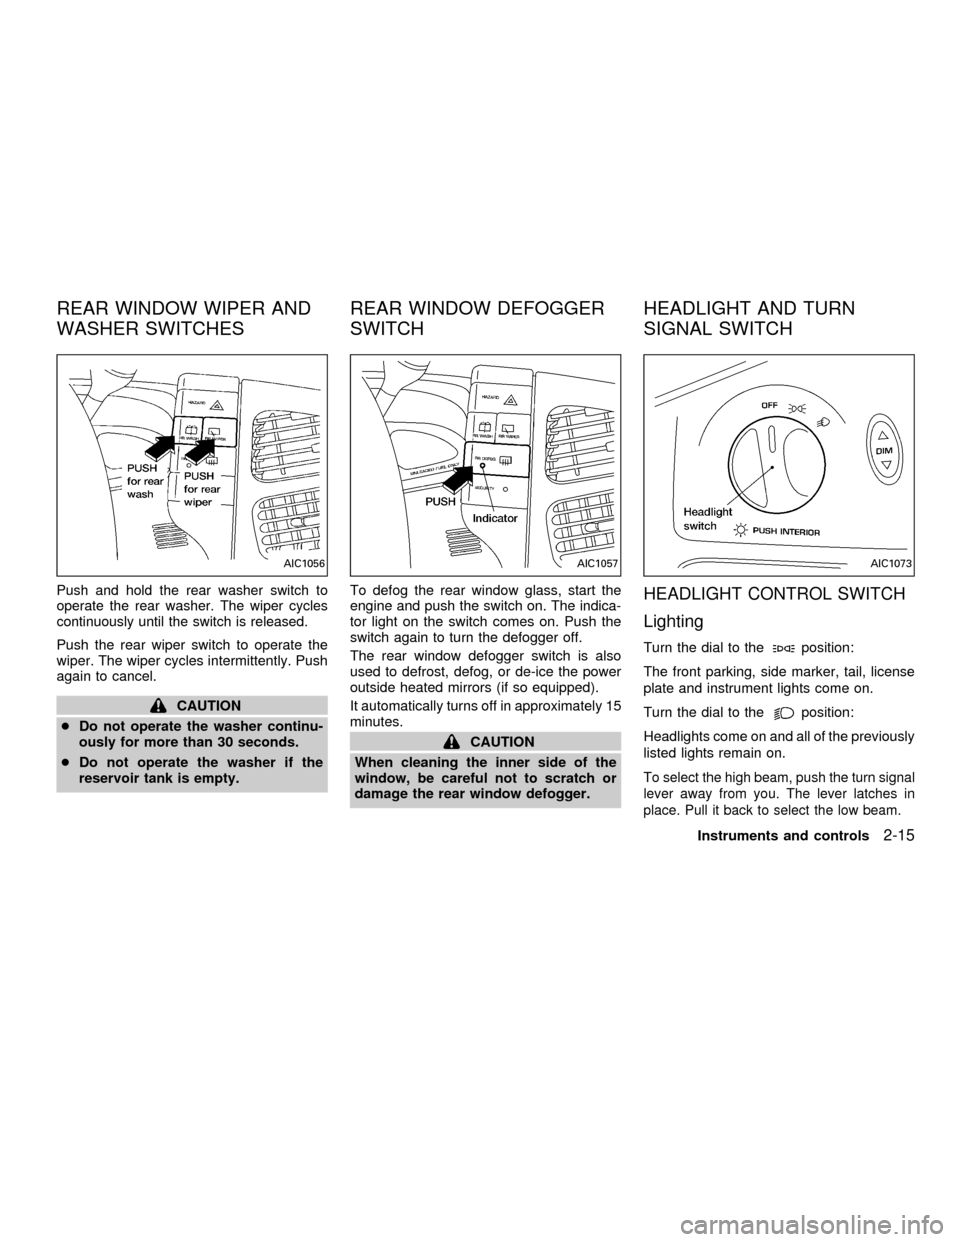
Push and hold the rear washer switch to
operate the rear washer. The wiper cycles
continuously until the switch is released.
Push the rear wiper switch to operate the
wiper. The wiper cycles intermittently. Push
again to cancel.
CAUTION
cDo not operate the washer continu-
ously for more than 30 seconds.
cDo not operate the washer if the
reservoir tank is empty.To defog the rear window glass, start the
engine and push the switch on. The indica-
tor light on the switch comes on. Push the
switch again to turn the defogger off.
The rear window defogger switch is also
used to defrost, defog, or de-ice the power
outside heated mirrors (if so equipped).
It automatically turns off in approximately 15
minutes.
CAUTION
When cleaning the inner side of the
window, be careful not to scratch or
damage the rear window defogger.
HEADLIGHT CONTROL SWITCH
Lighting
Turn the dial to theposition:
The front parking, side marker, tail, license
plate and instrument lights come on.
Turn the dial to the
position:
Headlights come on and all of the previously
listed lights remain on.
To select the high beam, push the turn signal
lever away from you. The lever latches in
place. Pull it back to select the low beam.
AIC1056AIC1057AIC1073
REAR WINDOW WIPER AND
WASHER SWITCHESREAR WINDOW DEFOGGER
SWITCHHEADLIGHT AND TURN
SIGNAL SWITCH
Instruments and controls2-15
ZX
Page 141 of 304

INSIDE MIRROR
The night position reduces glare from the
headlights of vehicles behind you at night.
WARNING
Use the night position only when nec-
essary, because it reduces rear view
clarity.
OUTSIDE MIRRORS
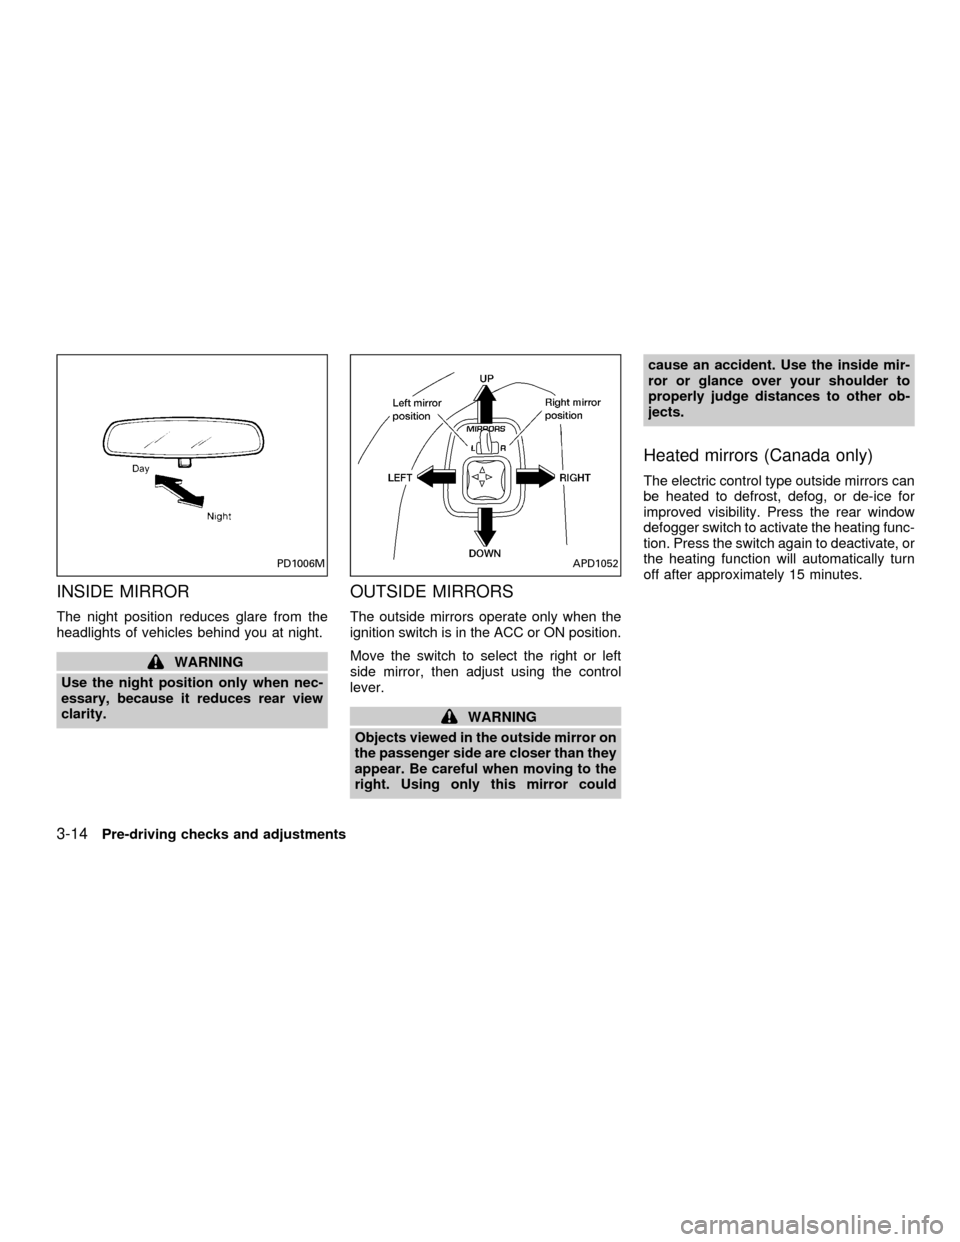
The outside mirrors operate only when the
ignition switch is in the ACC or ON position.
Move the switch to select the right or left
side mirror, then adjust using the control
lever.
WARNING
Objects viewed in the outside mirror on
the passenger side are closer than they
appear. Be careful when moving to the
right. Using only this mirror couldcause an accident. Use the inside mir-
ror or glance over your shoulder to
properly judge distances to other ob-
jects.
Heated mirrors (Canada only)
The electric control type outside mirrors can
be heated to defrost, defog, or de-ice for
improved visibility. Press the rear window
defogger switch to activate the heating func-
tion. Press the switch again to deactivate, or
the heating function will automatically turn
off after approximately 15 minutes.
PD1006MAPD1052
3-14Pre-driving checks and adjustments
ZX
Page 147 of 304

OFF position
The OFF position shuts off the air supply to
all outlets and stops all fan operations. Use
the OFF position to prevent cold air from
entering the passenger compartment under
cold outside conditions before the engine is
warmed up.
MAX A/C Position
Interior air is recirculated inside the vehicle.
Turn the air control dial to the MAX A/C
position when driving on a dusty road or
to help keep out traffic fumes.
Turn the air control dial to the MAX A/C
position for improved air conditioner perfor-
mance under high temperature and high hu-
midity conditions.
CAUTION
Do not use the recirculation mode for
long periods as it may cause the inte-
rior air to become stale and the win-
dows to fog up.
Temperature control dial
This dial allows you to adjust the tempera-
ture of the outlet air.
Air conditioning button
Start the engine, turn the fan control dial to
the desired (one to four) position, select an
air control position and push the air condi-
tioner button to turn on the air conditioner.
The indicator light comes on when the air
conditioner is operating. To stop the air con-
ditioner, push the button again; the indicator
light goes off.
The air conditioner cooling function op-
erates only when the engine is running.
HEATER OPERATION
Heating
This mode is used to direct most of the hot
air to the front and rear floor outlets. Rear
passenger heat is provided by the front
system through floor outlets located under
both front seats.
1. Move the air control dial to the
po-
sition.
2. Turn the fan control dial to select speed.
3. Move the temperature control dial to the
desired position.
Ventilation
This mode directs air to the side and center
vents.
1. Move the air control dial to the
po-
sition.
2. Turn the fan control dial to select speed.
3. Move the temperature control dial to the
desired position.
Defrosting or defogging
This mode is used to defrost/defog the
windows.
1. Move the air control dial to the
po-
sition.
2. Turn the fan control dial to select speed.
3. Move the temperature control dial to the
desired position.
When the
position is selected, the
air conditioner automatically turns on
(however, the indicator light will not illu-
minate) if the outside temperature is
more than 45ÉF (7ÉC). This dehumidifies
the air which helps defog the windshield.
The air recirculation mode automatically
turns off, allowing outside air to be drawn
4-4Heater, air conditioner and audio systems
ZX
Page 148 of 304

into the passenger compartment which
helps defog the windshield.
Bi-level heating/cooling
The bi-level mode directs air to the side and
center vents and to the front and rear floor
outlets.
Bi-level is also a cooling mode when high
sun load conditions are present with cool
temperatures.
With the A/C system in operation, this mode
can be used to cool the passenger's or
driver's feet under high temperature condi-
tions.
With the A/C system in operation under high
temperature conditions, improved cooling
can be obtained by moving the air control
dial to the MAX A/C position.
1. Move the air control dial to the
po-
sition.
2. Turn the fan control dial to the desired
position.
3. Move the temperature control dial to the
desired position.
Heating and defogging
This mode heats the interior and defogs the
windshield. This mode directs air to the
defroster and the front and rear floor outlets.
Rear passenger heat is provided by the
front system through floor outlets located
under both front seats.
1. Move the air control dial to the
po-
sition.
2. Turn the fan control dial to the desired
position.
3. Move the temperature control dial to the
desired position.
When the
position is selected, the
air conditioner automatically turns on
(however, the indicator light will not illu-
minate) if the outside temperature is
more than 45ÉF (7ÉC). This dehumidifies
the air which helps defog the windshield.
The air recirculation mode automatically
turns off, allowing outside air to be drawn
into the passenger compartment which
helps defog the windshield.
Operating tips
cClear snow and ice from the wiper
blades and air inlet in front of thewindshield. This improves heater op-
eration.
cTo defog the side windows more effec-
tively when in bi-level or ventilation
mode, close the center vent and direct
the side vents toward the side windows.
cA slight delay may be experienced when
changing air control buttons. The system
is not malfunctioning. It is only the sys-
tem motors and solenoids switching from
one outlet to another.
AIR CONDITIONER OPERATION
Start the engine, move the fan control dial to
the desired (one to four) position, and select
an air control position before pushing in the
air conditioner button to activate the air
conditioner. When the air conditioner is on,
cooling and dehumidifying functions are
added to the heater operation.
WARNING
The air conditioner cooling function op-
erates only when the engine is running.
Heater, air conditioner and audio systems4-5
ZX
Page 149 of 304

NOTE: When switching air flow outlets, the
A/C system remains activated unless the
A/C button is pressed to the OFF position.
The indicator light on the A/C button re-
mains illuminated unless the button is
pressed to the OFF position, or the OFF air
control position is selected.
Cooling
This mode is used to cool and dehumidify.
1. Move the air control dial to the
po-
sition.
2. Turn the fan control dial to select speed.
3. Push the air conditioner button. The indi-
cator light comes on.
4. Move the temperature control dial to the
desired position.
cFor quick cooling when the outside tem-
perature is high, move the air control dial
to the MAX A/C position. Be sure to
return the air control dial to the
po-
sition for normal cooling.
cOpening the windows helps to vent heat
buildup when parked in the sun.
Dehumidified heating
This mode is used to heat and dehumidify.
1. Move the air control dial to the
po-
sition.
2. Turn the fan control dial to select speed.
3. Push the air conditioner button. The indi-
cator light comes on.
4. Move the temperature control dial to the
desired position.
Dehumidified defogging
This mode is used to defog the windows
and dehumidify.
1. Move the air control dial to the
po-
sition.
2. Turn the fan control dial to the desired
speed.
3. Move the temperature control dial to the
desired position.
When the
position is selected, the
air conditioner automatically turns on
(however, the indicator light will not illu-
minate) if the outside temperature is
more than 45ÉF (7ÉC). This dehumidifies
the air which helps defog the windshield.The air recirculation mode automatically
turns off, allowing outside air to be drawn
into the passenger compartment which
helps defog the windshield.
Operating tips
cKeep windows and sun roof closed while
the air conditioner is in operation.
cAfter parking in the sun, drive for two or
three minutes with the windows open to
vent hot air from the passenger compart-
ment. Then, close the windows. This
allows the air conditioner to cool the
interior more quickly.
cThe air conditioning system should be
operated for about ten minutes at
least once a month. This helps pre-
vent damage to the system due to lack
of lubrication.
cIf the engine coolant temperature gauge
exceeds the H (hot) position, turn the air
conditioner off. See ``If your vehicle over-
heats'' in the ``In case of emergency''
section for additional information.
4-6Heater, air conditioner and audio systems
ZX
Page 155 of 304

AUTOMATIC OPERATION
Push the AUTOMATIC button and select the
desired temperature. The selected tempera-
ture and AUTO show in the display window.
The EATC heats or cools to achieve the set
temperature.
When in AUTOMATIC and weather conditions
require heat, air is sent to the floor. However,
a feature is included in the EATC to prevent
blowing cold air to the floor if the engine
coolant is not warm enough to allow heating.
In three or four minutes the fan speed gradu-
ally increases and airflow changes to the floor.
If unique conditions exist, such as window
fogging, the five override buttons allow spe-
cific airflow selection. The thumbwheel al-
lows you to adjust the fan speed to suit your
needs.
Temperature selection
TheTEMPbutton on the left side of
the control panel is for temperature selec-
tion. The
side lowers the set tempera-
ture, and theside raises the set tem-
perature. Press and hold either side of the
button to rapidly change the temperature
setting in one degree increments to either
65ÉF (18ÉC) or 85ÉF (29ÉC). If you wantcontinuous maximum cooling, push the
side of the TEMP button until 60ÉF
(16ÉC) shows in the display window. The
EATC cools at maximum and disregards the
60ÉF (16ÉC) setting until a warmer tempera-
ture is selected. If you want continuous
maximum heating, push the
side of the
TEMP button until 90ÉF (32ÉC) shows in the
display window. The EATC provides maxi-
mum heat regardless of the 90ÉF (32ÉC)
setting until a cooler temperature is se-
lected.
Fan speed and thumbwheel
Your EATC automatically adjusts the fan
speed to the existing conditions. To control
the fan speed yourself, use the thumbwheel
located at the extreme right side of the
EATC control panel. Using the thumbwheel
cancels the automatic fan speed control,
and causes a
to appear in the display
window. Rotate the thumbwheel up for HI
speeds and down for LO speeds.
To return to auto fan control, press the
AUTOMATIC button.
Air flow control
Your EATC has five buttons which allow you
to make special selections. The buttons aregrouped in the middle of the EATC panel
and allow you to determine airflow location.
Pressing any of the air control buttons
changes airflow location only, and does not
affect the ability of the system to control
temperature or fan speed. Return to fully
automatic operation by pushing the AUTO-
MATIC button.
Push this button for airflow to the front and
rear floor outlets and windshield at the same
time. The
indicator light comes on,
and the display window shows the set tem-
perature.
Push this button to obtain maximum airflow
to the windshield. Adjust the temperature
setting as required for defrosting. The
indicator light comes on, and the
display window shows the set temperature.
When the outside temperature is about
45ÉF (7ÉC) or above, the air is dehumidified
to prevent window fogging.
Push this button to select airflow through
4-12Heater, air conditioner and audio systems
ZX
Page 228 of 304

8 Do-it-yourself
Maintenance precautions .......................................8-2
Engine compartment check locations ....................8-3
Engine cooling system ...........................................8-4
Checking engine coolant level ..........................8-4
Changing engine coolant ..................................8-5
Engine oil ...............................................................8-5
Checking engine oil level ..................................8-5
Changing engine oil ..........................................8-6
Changing engine oil filter...................................8-7
Automatic transmission fluid ..................................8-8
Temperature conditions for checking ................8-8
Power steering fluid................................................8-9
Brake fluid ..............................................................8-9
Window washer fluid ............................................8-10
Battery ..................................................................8-10
Jump starting ...................................................8-11
Drive belts ............................................................8-12
Spark plugs ..........................................................8-12
Replacing spark plugs .....................................8-12
Air cleaner ............................................................8-13
Cabin air filter ..................................................8-14Windshield wiper blades ......................................8-17
Cleaning ..........................................................8-17
Replacing .........................................................8-17
Parking brake and brake pedal ............................8-19
Checking parking brake...................................8-19
Checking brake pedal .....................................8-19
Brake booster ..................................................8-20
Fuses ....................................................................8-20
Engine compartment .......................................8-20
Passenger compartment .................................8-21
Multi-remote controller battery replacement ........8-22
Lights ....................................................................8-23
Headlights ........................................................8-23
Fog lights .........................................................8-24
Exterior and interior lights ...............................8-25
Wheels and tires ..................................................8-29
Tire pressure ...................................................8-29
Types of tires ...................................................8-30
Tire chains .......................................................8-31
Changing tires and wheels ..............................8-31
ZX