2001 NISSAN QUEST check engine
[x] Cancel search: check enginePage 109 of 304
CAUTION
Do not use the seat heater for extended
periods or when no one is using the
seat.
cDo not put anything on the seat
which insulates heat, such as a blan-
ket, cushion, seat cover, etc. Other-
wise, the seat may become over-
heated.
cDo not place anything hard or heavy
on the seat or pierce it with a pin or
similar object. This may result in
damage to the heater.
cAny liquid spilled on the heated seat
should be removed immediately with
a dry cloth.
cWhen cleaning the seat, never use
gasoline, thinner, or any similar ma-
terials.
cIf any abnormalities are found or the
heated seat does not operate, turn
the switch off and have the system
checked by your NISSAN dealer.cThe battery could run down if the
seat heater is operated while the
engine is not running.
2-20Instruments and controls
ZX
Page 136 of 304
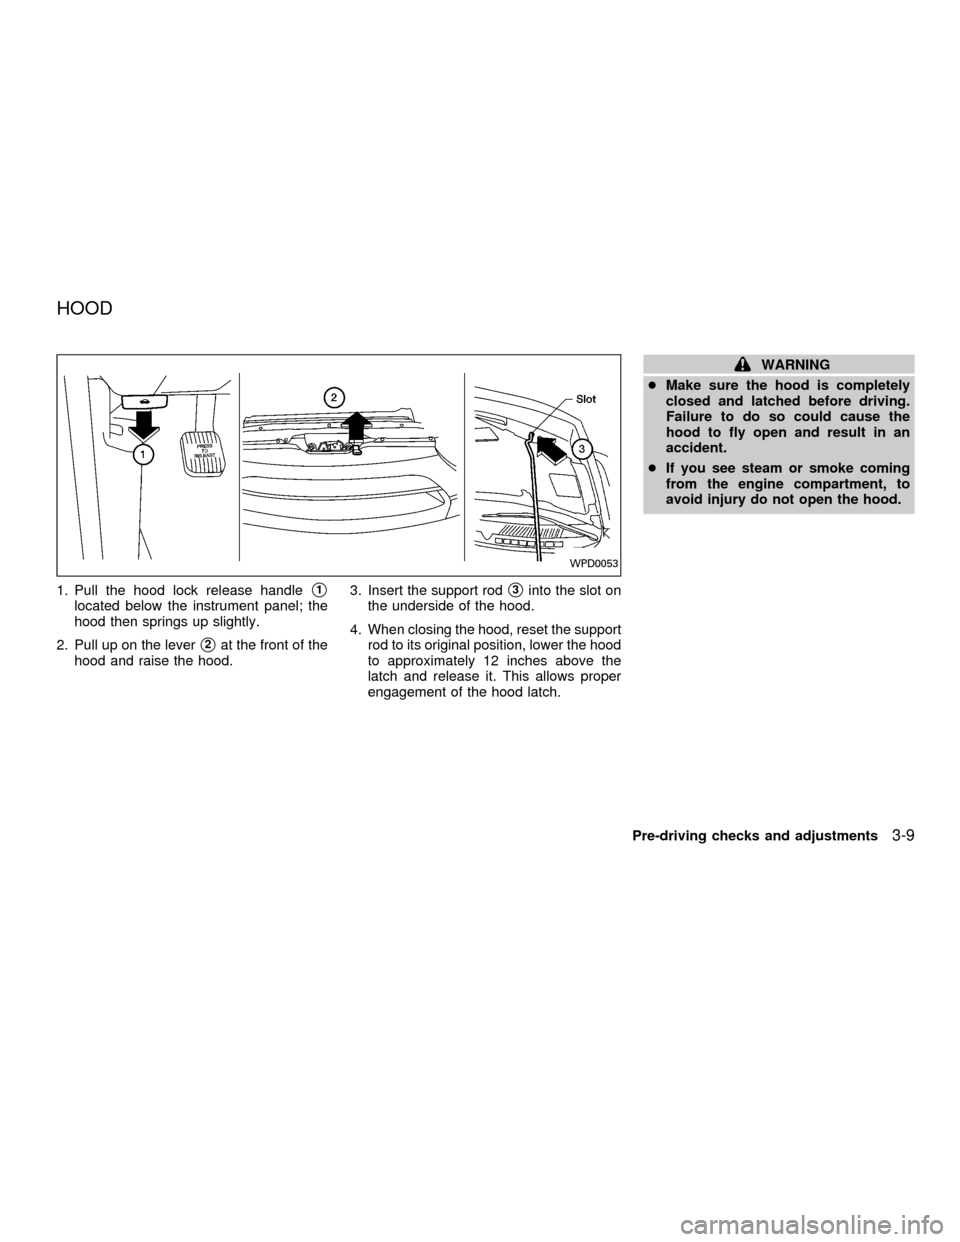
1. Pull the hood lock release handles1
located below the instrument panel; the
hood then springs up slightly.
2. Pull up on the lever
s2at the front of the
hood and raise the hood.3. Insert the support rod
s3into the slot on
the underside of the hood.
4. When closing the hood, reset the support
rod to its original position, lower the hood
to approximately 12 inches above the
latch and release it. This allows proper
engagement of the hood latch.
WARNING
cMake sure the hood is completely
closed and latched before driving.
Failure to do so could cause the
hood to fly open and result in an
accident.
cIf you see steam or smoke coming
from the engine compartment, to
avoid injury do not open the hood.
WPD0053
HOOD
Pre-driving checks and adjustments3-9
ZX
Page 138 of 304
completely closed before opening the
fuel door.
WARNING
cGasoline is extremely flammable and
highly explosive under certain con-
ditions. You could be burned or se-
riously injured if it is misused or
mishandled. Always stop the engine
and do not smoke or allow open
flames or sparks near the vehicle
when refueling.
c
Fuel may be under pressure. Turn the
cap one-half turn, and wait for any
``hissing'' sound to stop to prevent
fuel from spraying out and possibly
causing personal injury. Then re-
move the cap.
cDo not attempt to top off the fuel
tank after the fuel pump nozzle shuts
off automatically. Continued refuel-
ing may cause fuel overflow, result-
ing in fuel spray and possibly a fire.
cUse only an original equipment type
fuel filler cap as a replacement. It has
a built-in safety valve needed for
proper operation of the fuel system
and emission control system. Anincorrect cap can result in a serious
malfunction and possible injury.
cNever pour fuel into the throttle body
to attempt to start your vehicle.
CAUTION
cIf fuel is spilled on the vehicle body,
flush it away with water to avoid
paint damage.
cTighten until the fuel filler cap clicks.
Failure to tighten the fuel filler cap
properly may cause the
mal-
function indicator lamp (MIL) to illu-
minate. If the
lamp illuminates
because the fuel filler cap is loose or
missing, tighten or install the cap
and continue to drive the vehicle.
The
lamp should turn off after
a few driving trips. If thelamp
does not turn off after a few driving
trips, have the vehicle inspected by
an authorized NISSAN dealer.
cFor additional information, see the
``Malfunction indicator lamp (MIL)''
in the ``Instrument and controls''
section earlier in this manual.
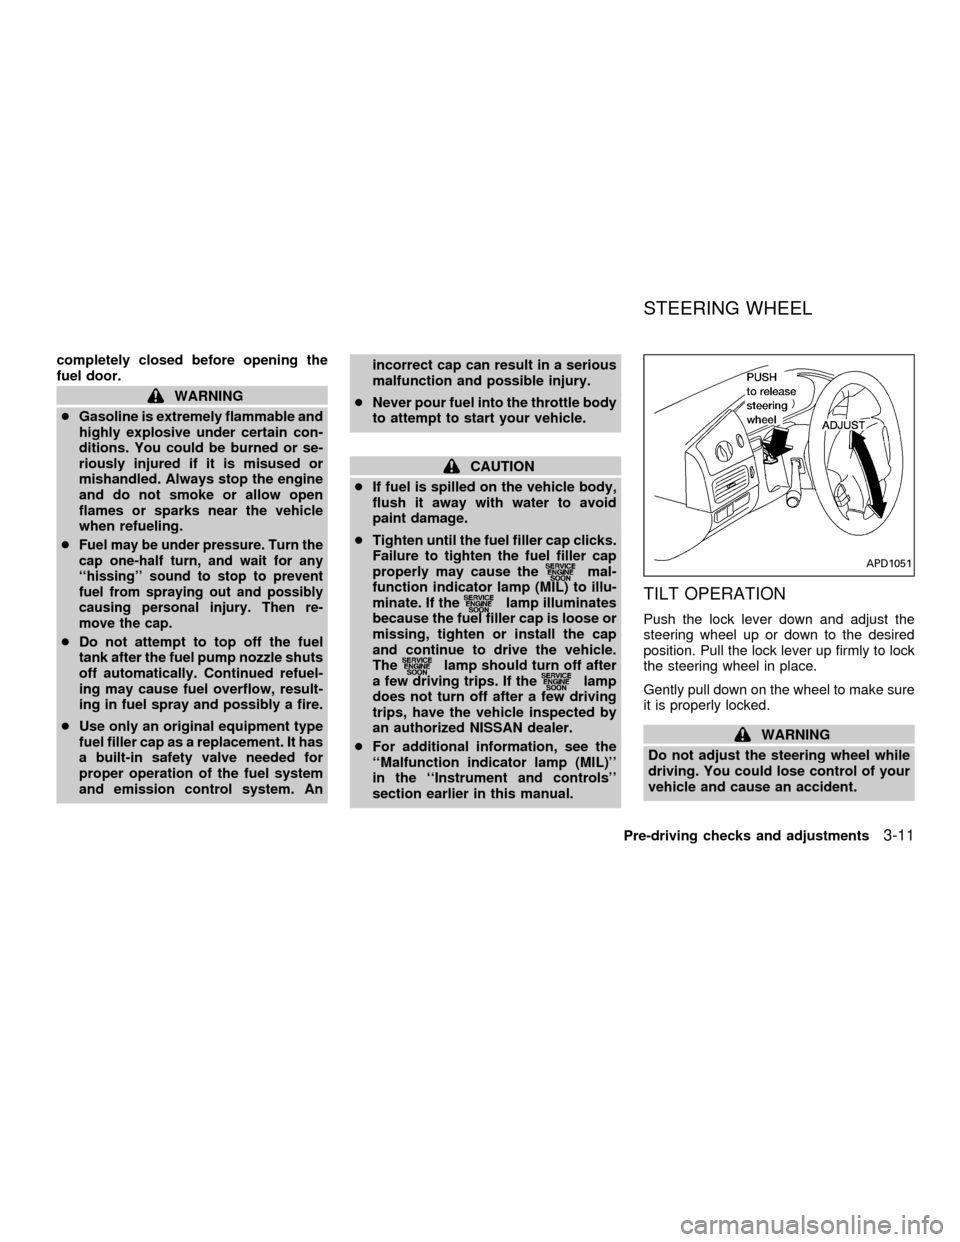
TILT OPERATION
Push the lock lever down and adjust the
steering wheel up or down to the desired
position. Pull the lock lever up firmly to lock
the steering wheel in place.
Gently pull down on the wheel to make sure
it is properly locked.
WARNING
Do not adjust the steering wheel while
driving. You could lose control of your
vehicle and cause an accident.
APD1051
STEERING WHEEL
Pre-driving checks and adjustments3-11
ZX
Page 194 of 304

ACC (Accessories)
This position activates electrical accesso-
ries such as the radio when the engine is
not running.
ON (Normal operating position)
This position turns on the ignition system
and the electrical accessories.
START
This position activates the starter motor,
which starts the engine.cMake sure the area around the vehicle is
clear.
cMaintenance items listed here should be
checked periodically (for example, each
time you check engine oil).
cCheck that all windows and lights are
clean.
cVisually inspect tires for their appearance
and condition. Also check tires for proper
inflation.
cLock all doors.
cPosition seat and adjust head restraints.
cAdjust inside and outside mirrors.
cFasten seat belts and ask all passengers
to do likewise.
cCheck the operation of warning lights
when key is turned to the ON position.
See ``Warning/Indicator lights and chimes''
in the ``Instrument and controls'' section.
1. Apply the parking brake.
2. Move the selector lever to P (Park) or N
(Neutral) (P is recommended).
The shift selector lever cannot be
moved out of P and into any of the
other gear positions under the follow-
ing conditions:
cThe ignition key is turned to the
LOCK position.
cThe ignition key is turned to the ON
position without depressing the
foot brake pedal.
The starter will not operate if the shift
selector lever is in one of the driving
positions.
3. Crank the enginewith your foot off the
accelerator pedalby turning the ignition
key to START. Release the key when the
engine starts. If the engine starts, but
fails to run, repeat the above procedure.
Ð If the engine is very hard to start in
extremely cold or hot weather, de-
press the accelerator pedal to the
floor and hold it to help start the
engine.
BEFORE STARTING THE
ENGINESTARTING THE ENGINE
Starting and driving5-5
ZX
Page 197 of 304

N (Neutral):
Neither forward nor reverse gear is en-
gaged. The engine can be started in this
position. You may shift to N (Neutral) and
restart a stalled engine while the vehicle is
moving.
D (Drive):
Use this position for all normal forward
driving.
2 (Second gear):
Use for hill climbing or engine braking on
downhill grades.
Do not downshift into 2 at speeds above 63
MPH (100 km/h). Do not exceed 63 MPH
(100 km/h) in 2.
1 (Low gear):
Use 1 when climbing steep hills slowly or
driving slowly through deep snow, sand or
mud, or for maximum engine braking on
steep downhill grades.
Do not exceed 38 MPH (60 km/h) in 1.
Do not downshift into 1 at speeds above 38
MPH (60 km/h).Accelerator downshift--
In D position--
For rapid passing or hill climbing, fully depress
the accelerator pedal to the floor. This shifts the
transmission down into third gear, second gear
or first gear, depending on the vehicle speed.
Fail-safe
When the Fail-safe operation occurs, the
next time the key is turned to the ON
position, the O/D OFF light blinks for ap-
proximately 8 seconds after coming on for 2
seconds. While the vehicle can be driven
under these circumstances, please note
that the transmission will remain in 3rd gear.
NOTE: If the vehicle is driven under extreme
conditions, such as excessive wheel spinning
and subsequent hard braking, the Fail-safe
system may be activated. This will occur even
if all electrical circuits are functioning properly.
In this case, turn the ignition key OFF and wait
for 3 seconds. Then turn the key back to the
ON position. The vehicle should return to its
normal operating condition. If it does not re-
turn to its normal operating condition, have an
authorized NISSAN dealer check the trans-
mission and repair, if necessary.
Overdrive switch
Each time your vehicle is started, the trans-
mission is automatically ``reset'' to overdrive
ON.
ON: For normal driving the overdrive
switch is engaged. The transmission
is upshifted into overdrive as the
vehicle speed increases.
The overdrive does not engage until the
engine has reached operating tempera-
ture.
OFF: For driving up and down long slopes
ASD0561
5-8Starting and driving
ZX
Page 205 of 304
cWhen installing a spare tire, make
sure it is the proper size and type as
specified on the tire placard. For tire
placard location information, refer to
``Tire placard'' in the ªTechnical and
consumer informationº section of
this manual.
cFor additional information, refer to
``Wheels and tires'' in the ``Do-it-
yourself'' section of this manual.FREEING A FROZEN DOOR
LOCK
To prevent a door lock from freezing, apply
de-icer or glycerin through the key hole. If
the lock becomes frozen, heat the key be-
fore inserting it in the key hole.
ANTI-FREEZE
In the winter, when it is anticipated that the
temperature will drop below 32ÉF (0ÉC),
check the anti-freeze (ethylene glycol base)
to assure proper winter protection. For de-
tails, see ``Engine cooling system'' in the
``Do-it-yourself'' section of this manual.
BATTERY
If the battery is not fully charged during
extremely cold weather conditions, the bat-
tery fluid may freeze and damage the bat-
tery. To maintain maximum efficiency, the
battery should be checked regularly. For
details, see ``Battery'' in the ``Do-it-yourself''
section of this manual.
DRAINING OF COOLANT WATER
If the vehicle is to be left outside without
anti-freeze, drain the cooling system by
opening the drain valves located under theradiator and on the engine block. Refill
before operating the vehicle. See ``Chang-
ing engine coolant'' in the ``Do-it-yourself''
section of this manual.
TIRE EQUIPMENT
1. SUMMER tires are of a tread design to
provide superior performance on dry
pavement. However, the performance of
these tires is substantially reduced in
snowy and icy conditions. If you operate
your vehicle on snowy or icy roads, NIS-
SAN recommends using MUD & SNOW
or ALL SEASON tires on all four wheels.
Please consult your NISSAN dealer for
the tire type, size, speed rating and avail-
ability information.
2.
For additional traction on icy roads, stud-
ded tires may be used. However, some
Canadian provinces and U.S. states pro-
hibit their use. Check local, state and pro-
vincial laws before installing studded tires.
Skid and traction capabilities of studded
snow tires, on wet or dry surfaces, may
be poorer than that of non-studded snow
tires.
3. Tire chains may be used. Make sure they
are of proper size for the tires on your
COLD WEATHER DRIVING
5-16Starting and driving
ZX
Page 215 of 304
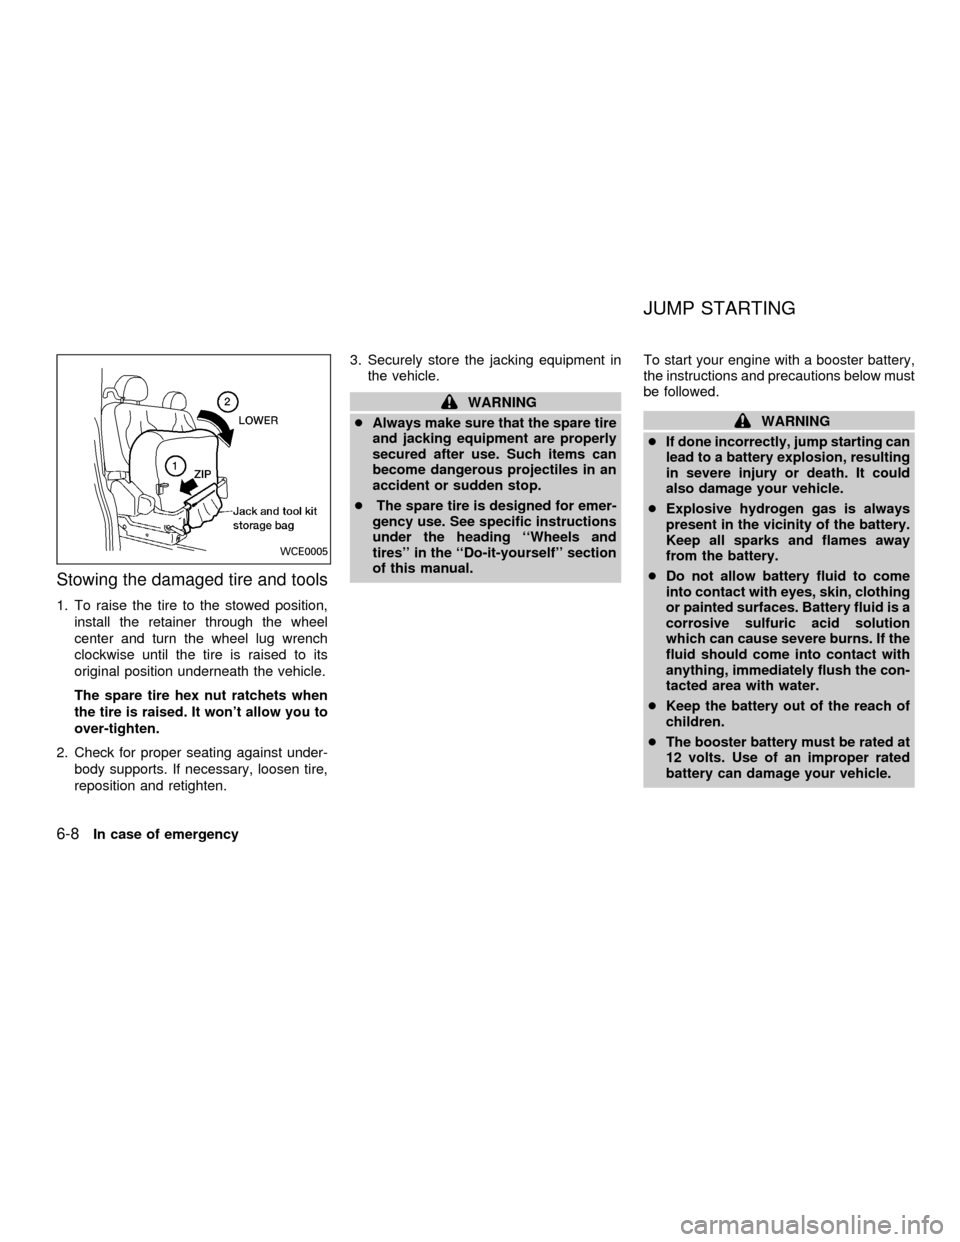
Stowing the damaged tire and tools
1. To raise the tire to the stowed position,
install the retainer through the wheel
center and turn the wheel lug wrench
clockwise until the tire is raised to its
original position underneath the vehicle.
The spare tire hex nut ratchets when
the tire is raised. It won't allow you to
over-tighten.
2. Check for proper seating against under-
body supports. If necessary, loosen tire,
reposition and retighten.3. Securely store the jacking equipment in
the vehicle.
WARNING
cAlways make sure that the spare tire
and jacking equipment are properly
secured after use. Such items can
become dangerous projectiles in an
accident or sudden stop.
cThe spare tire is designed for emer-
gency use. See specific instructions
under the heading ``Wheels and
tires'' in the ``Do-it-yourself'' section
of this manual.To start your engine with a booster battery,
the instructions and precautions below must
be followed.
WARNING
cIf done incorrectly, jump starting can
lead to a battery explosion, resulting
in severe injury or death. It could
also damage your vehicle.
cExplosive hydrogen gas is always
present in the vicinity of the battery.
Keep all sparks and flames away
from the battery.
cDo not allow battery fluid to come
into contact with eyes, skin, clothing
or painted surfaces. Battery fluid is a
corrosive sulfuric acid solution
which can cause severe burns. If the
fluid should come into contact with
anything, immediately flush the con-
tacted area with water.
cKeep the battery out of the reach of
children.
cThe booster battery must be rated at
12 volts. Use of an improper rated
battery can damage your vehicle.
WCE0005
JUMP STARTING
6-8In case of emergency
ZX
Page 218 of 304
3. Get out of the vehicle. Look and listen for
steam or coolant escaping from the ra-
diator before opening the hood. Wait until
no steam or coolant can be seen before
proceeding.
4. Open the hood.
WARNING
If steam or water is coming from the
engine, stand clear to prevent getting
burned.
5. Visually check if the cooling fan is run-
ning. The radiator hoses and radiator
should not leak water. If coolant is leak-
ing or the cooling fan does not run, stop
the engine.
WARNING
Be careful not to allow your hands, hair
or clothing to come into contact with,
or get caught in, engine belts or the
engine cooling fan. The engine cooling
fan can start at any time when the
coolant temperature is high.
6. After the engine cools down completely,
check the coolant level in the reservoir
tank with the engine running. Add coolant
to the reservoir tank, if necessary. Have
your vehicle repaired at an authorized
NISSAN dealer.
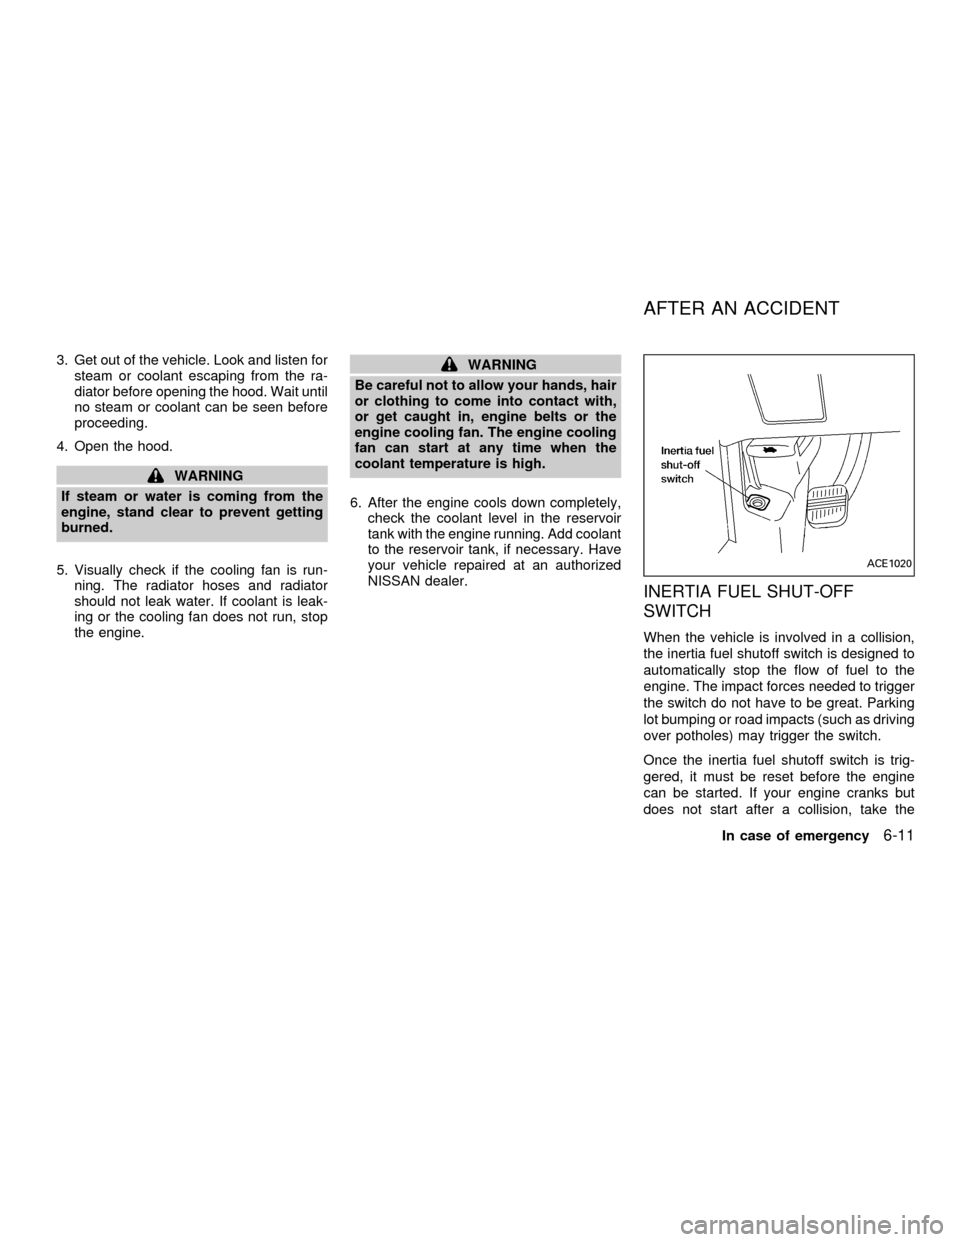
INERTIA FUEL SHUT-OFF
SWITCH
When the vehicle is involved in a collision,
the inertia fuel shutoff switch is designed to
automatically stop the flow of fuel to the
engine. The impact forces needed to trigger
the switch do not have to be great. Parking
lot bumping or road impacts (such as driving
over potholes) may trigger the switch.
Once the inertia fuel shutoff switch is trig-
gered, it must be reset before the engine
can be started. If your engine cranks but
does not start after a collision, take the
ACE1020
AFTER AN ACCIDENT
In case of emergency6-11
ZX