Page 216 of 289
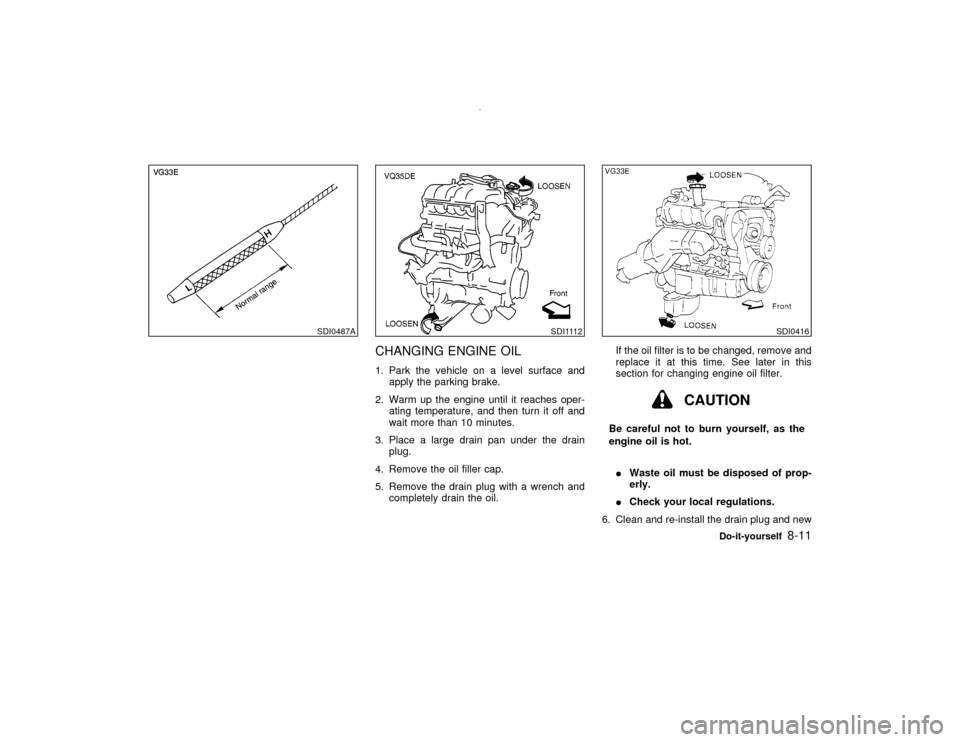
CHANGING ENGINE OIL1. Park the vehicle on a level surface and
apply the parking brake.
2. Warm up the engine until it reaches oper-
ating temperature, and then turn it off and
wait more than 10 minutes.
3. Place a large drain pan under the drain
plug.
4. Remove the oil filler cap.
5. Remove the drain plug with a wrench and
completely drain the oil.If the oil filter is to be changed, remove and
replace it at this time. See later in this
section for changing engine oil filter.
CAUTION
Be careful not to burn yourself, as the
engine oil is hot.
IWaste oil must be disposed of prop-
erly.
ICheck your local regulations.
6. Clean and re-install the drain plug and new
SDI0487A
SDI1112
SDI0416
Do-it-yourself
8-11
Z
00.1.10/R50-D/V5
X
Page 217 of 289

washer. Securely tighten the drain plug with
a wrench. Do not use excessive force.
Drain plug tightening torque:
22 to 29 ft-lb (29 to 39 N×m)
7. Refill engine with recommended oil through
the oil filler opening, then install the oil filler
cap securely.
See ªCapacities and recommended
fuel/lubricantsº in the ª10. Technical and
consumer informationº section for drain and
refill capacity.
The drain and refill capacity depends on the
oil temperature and drain time. Use these
specifications for reference only. Always
use the dipstick to determine when the
proper amount of oil is in the engine.
8. Start the engine.
Check for leakage around the drain plug.
Correct as required.
9. Turn the engine off and wait more than 10
minutes. Check the oil level with the dip-
stick. Add engine oil if necessary.
WARNING
IProlonged and repeated contact withused engine oil may cause skin can-
cer.
ITry to avoid direct skin contact with
used oil. If skin contact is made, wash
thoroughly with soap or hand cleaner
as soon as possible.
IKeep used engine oil out of reach of
children.
CHANGING ENGINE OIL FILTER1. Park the vehicle on a level surface and
apply the parking brake.
2. Turn the engine off.
3. Loosen the oil filter with an oil filter wrench.
(Depending on the engine model, a special
cap-type wrench may be required. See your
NISSAN dealer.) Then remove the oil filter
by turning it by hand.
SDI1113
8-12
Do-it-yourself
Z
00.1.10/R50-D/V5
X
Page 219 of 289

TEMPERATURE CONDITIONS
FOR CHECKINGThe fluid level should be checked using the
HOT range (L & H marks) on the dipstick at
fluid temperatures between 122 and 176ÉF (50
and 80ÉC) after the vehicle has been driven
approximately 5 minutes in urban areas after
the engine is warmed up. The level can be
checked at fluid temperatures between 86 and
122ÉF (30 and 50ÉC) using the COLD range on
the dipstick for reference, after the engine is
warmed up but before driving. However, the
fluid level must be rechecked using the HOT
range.1. Park the vehicle on a level surface and set
the parking brake.
2. Start the engine and then move the selector
lever through each gear range, ending in P.
3. Check the fluid level with the engine idling.
If the vehicle has been driven for a long
time at high speeds, or in city traffic in hot
weather, or if it is being used to pull a
trailer, the fluid level cannot be read accu-
rately. You should wait until the fluid has
cooled down (about 30 minutes).
4. Expand the spring stopper and remove the
dipstick. Wipe it clean with lint-free paper.
5. Re-insert the dipstick into the charging pipe
as far as it will go.
6. Remove the dipstick and note the reading.
If the level is on the low side of either range,
add fluid to the charging pipe.
7. When inserting the dipstick, set it so that
the spring stopper presses the upper part of
the dipstick rubber to lock the dipstick.
CAUTION
IDo not overfill.IUse only Nissan Matic D (Continental
U.S. and Alaska) or Canada Nissan
automatic transmission fluid.
Dexron
TMIII/Mercon
TM
or equivalent
may also be used. Outside the conti-
nental US and Alaska contact a
NISSAN dealer for more information
regarding suitable fluids, including
recommended brand(s) of Dexron
TM
III/Mercon
TM
automatic transmission
fluid.
SDI0488
8-14
Do-it-yourself
Z
00.1.10/R50-D/V5
X
Page 220 of 289
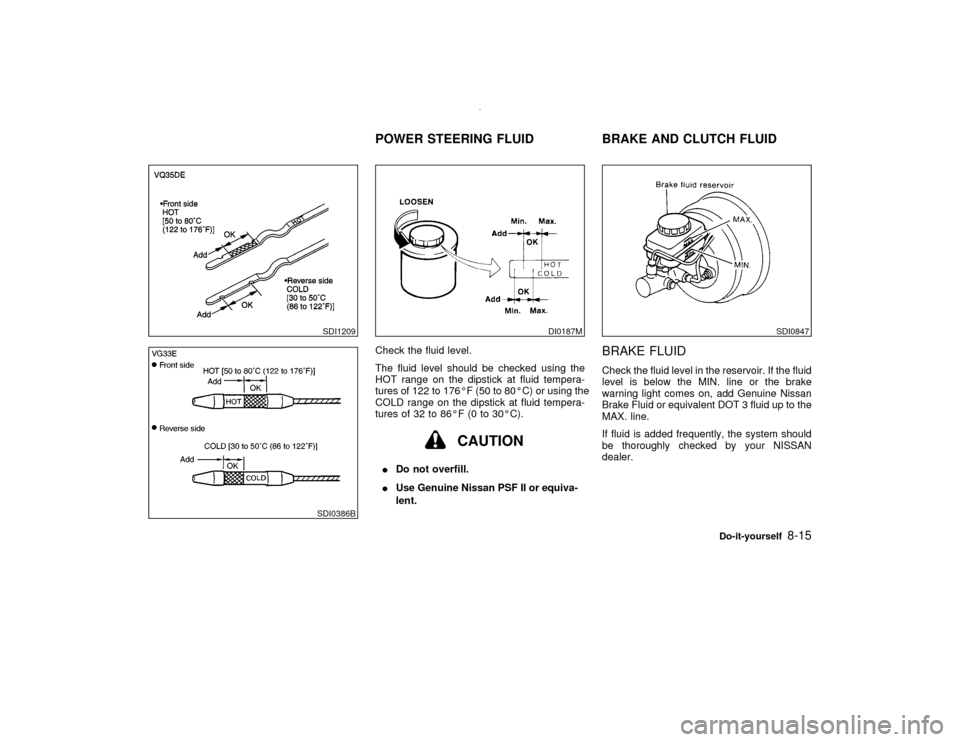
Check the fluid level.
The fluid level should be checked using the
HOT range on the dipstick at fluid tempera-
tures of 122 to 176ÉF (50 to 80ÉC) or using the
COLD range on the dipstick at fluid tempera-
tures of 32 to 86ÉF (0 to 30ÉC).
CAUTION
IDo not overfill.
IUse Genuine Nissan PSF II or equiva-
lent.
BRAKE FLUIDCheck the fluid level in the reservoir. If the fluid
level is below the MIN. line or the brake
warning light comes on, add Genuine Nissan
Brake Fluid or equivalent DOT 3 fluid up to the
MAX. line.
If fluid is added frequently, the system should
be thoroughly checked by your NISSAN
dealer.
SDI1209SDI0386B
DI0187M
SDI0847
POWER STEERING FLUID BRAKE AND CLUTCH FLUID
Do-it-yourself
8-15
Z
00.1.10/R50-D/V5
X
Page 221 of 289

WARNING
Use only new fluid from a sealed con-
tainer. Old, inferior or contaminated fluid
may damage the brake and clutch sys-
tems. The use of improper fluids can
affect the vehicle's stopping ability.
CAUTION
Do not spill the fluid on painted sur-
faces. This will damage the paint. If fluid
is spilled, wash the surface with water.
CLUTCH FLUIDCheck the fluid level in the reservoir. If the fluid
level is below the MIN. line or the brake
warning light comes on, add Genuine Nissan
Brake Fluid or equivalent DOT 3 fluid up to the
MAX. line.
If fluid is added frequently, the system should
be thoroughly checked by your NISSAN
dealer.
WARNING
Use only new fluid from a sealed con-
tainer. Old, inferior or contaminated fluid
may damage the brake and clutch sys-
tems. The use of improper fluids can
affect the vehicle's stopping ability.
CAUTION
Do not spill the fluid on painted sur-
faces. This will damage the paint. If fluid
is spilled, wash the surface with water.
SDI0844
8-16
Do-it-yourself
Z
00.1.10/R50-D/V5
X
Page 224 of 289
WARNING
Be sure the ignition key is in the OFF or
LOCK position. The engine could rotate
unexpectedly.
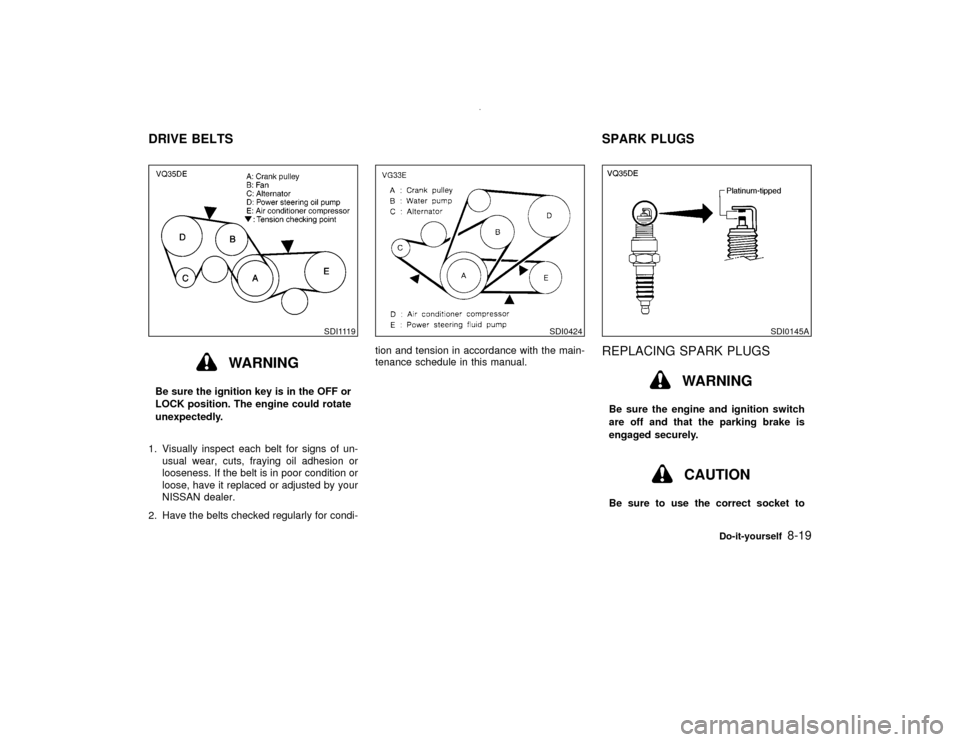
1. Visually inspect each belt for signs of un-
usual wear, cuts, fraying oil adhesion or
looseness. If the belt is in poor condition or
loose, have it replaced or adjusted by your
NISSAN dealer.
2. Have the belts checked regularly for condi-tion and tension in accordance with the main-
tenance schedule in this manual.
REPLACING SPARK PLUGS
WARNING
Be sure the engine and ignition switch
are off and that the parking brake is
engaged securely.
CAUTION
Be sure to use the correct socket to
SDI1119
SDI0424
SDI0145A
DRIVE BELTS SPARK PLUGS
Do-it-yourself
8-19
Z
00.1.10/R50-D/V5
X
Page 227 of 289
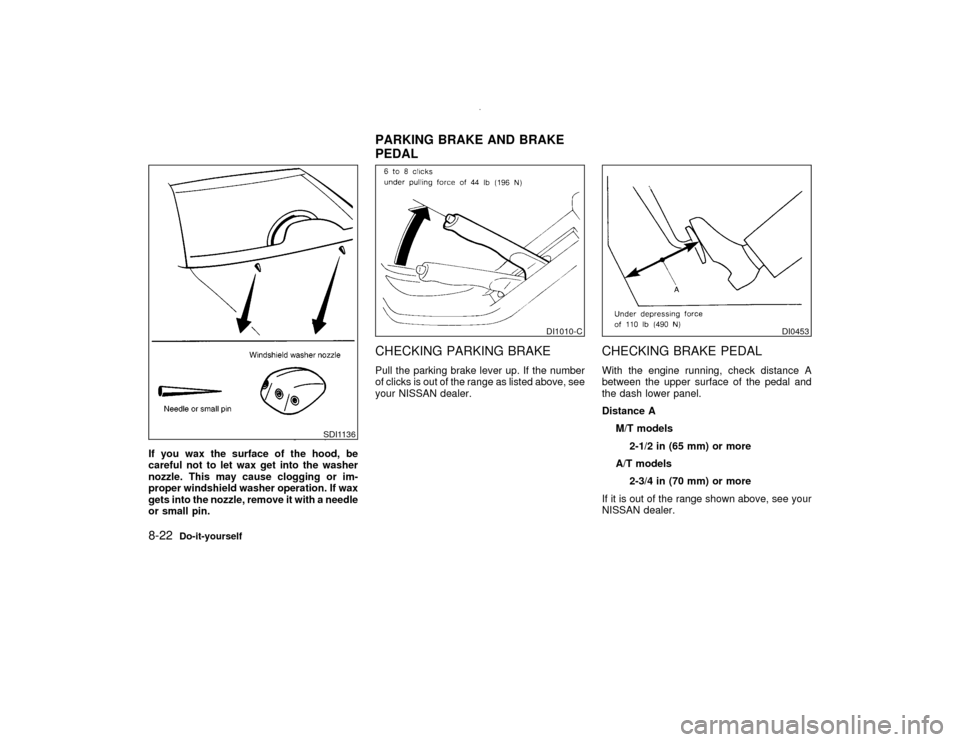
If you wax the surface of the hood, be
careful not to let wax get into the washer
nozzle. This may cause clogging or im-
proper windshield washer operation. If wax
gets into the nozzle, remove it with a needle
or small pin.
CHECKING PARKING BRAKEPull the parking brake lever up. If the number
of clicks is out of the range as listed above, see
your NISSAN dealer.
CHECKING BRAKE PEDALWith the engine running, check distance A
between the upper surface of the pedal and
the dash lower panel.
Distance A
M/T models
2-1/2 in (65 mm) or more
A/T models
2-3/4 in (70 mm) or more
If it is out of the range shown above, see your
NISSAN dealer.
SDI1136
DI1010-C
DI0453
PARKING BRAKE AND BRAKE
PEDAL
8-22
Do-it-yourself
Z
00.1.10/R50-D/V5
X
Page 228 of 289

Self-adjusting brakesYour vehicle is equipped with self-adjusting
brakes.
The front and rear brakes self-adjust every
time the brake pedal is applied.
WARNING
See your NISSAN dealer and have it
checked if the brake pedal height does
not return to normal.Brake pad wear indicatorsThe disc brake pads on your vehicle have
audible wear indicators. When a brake pad
requires replacement, it will make a high
pitched scraping or screeching sound when
the vehicle is in motion whether or not the
brake pedal is depressed. Have the brakes
checked as soon as possible if the wear indi-
cator sound is heard.
Under some driving or climate conditions, oc-
casional brake squeak, squeal or other noise
may be heard. Occasional brake noise during
light to moderate stops is normal and does not
affect the function or performance of the brake
system.The rear drum brakes (if so equipped) do not
have audible wear indicators. Should you ever
hear an unusually loud noise from the rear
drum brakes, have them inspected as soon as
possible by your NISSAN dealer.
Proper brake inspection intervals should
be followed.For additional information, see
ªPeriodic maintenanceº in the ª9. Mainte-
nanceº section for maintenance intervals.
BRAKE BOOSTERCheck the brake booster function with the
following steps:
1. With the engine off, press and release the
brake pedal several times. When brake
pedal movement (distance of travel) re-
mains the same from one pedal application
to the next, continue on to the next step.
2. While depressing the brake pedal, start the
engine. The pedal height should drop a
little.
3. With the brake pedal depressed, stop the
engine. Keeping the pedal depressed for
about 30 seconds, the pedal height should
not change.
4. Run the engine for one minute without
depressing the brake pedal, then turn it off.
Depress the brake pedal several times. Thepedal travel distance will decrease gradu-
ally with each depression as the vacuum is
released from the booster.
If the brakes do not operate properly, have the
brake checked by your NISSAN dealer.
Do-it-yourself
8-23
Z
00.1.10/R50-D/V5
X