2001 NISSAN PATHFINDER wheel
[x] Cancel search: wheelPage 77 of 289

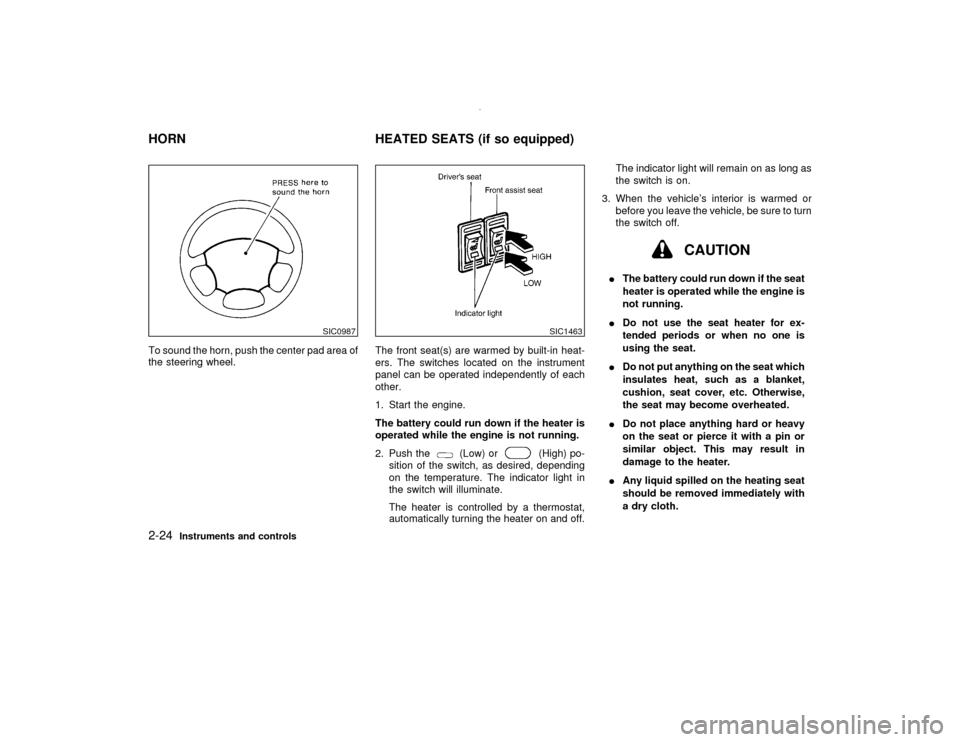
To sound the horn, push the center pad area of
the steering wheel.The front seat(s) are warmed by built-in heat-
ers. The switches located on the instrument
panel can be operated independently of each
other.
1. Start the engine.
The battery could run down if the heater is
operated while the engine is not running.
2. Push the
(Low) or
(High) po-
sition of the switch, as desired, depending
on the temperature. The indicator light in
the switch will illuminate.
The heater is controlled by a thermostat,
automatically turning the heater on and off.The indicator light will remain on as long as
the switch is on.
3. When the vehicle's interior is warmed or
before you leave the vehicle, be sure to turn
the switch off.
CAUTION
IThe battery could run down if the seat
heater is operated while the engine is
not running.
IDo not use the seat heater for ex-
tended periods or when no one is
using the seat.
IDo not put anything on the seat which
insulates heat, such as a blanket,
cushion, seat cover, etc. Otherwise,
the seat may become overheated.
IDo not place anything hard or heavy
on the seat or pierce it with a pin or
similar object. This may result in
damage to the heater.
IAny liquid spilled on the heating seat
should be removed immediately with
a dry cloth.
SIC0987
SIC1463
HORN HEATED SEATS (if so equipped)2-24
Instruments and controls
Z
00.1.10/R50-D/V5
X
Page 100 of 289

3 Pre-driving checks and adjustmentsKeys .......................................................................... 3-2
Doors ......................................................................... 3-2
Locking with key ................................................... 3-3
Locking with inside lock knob............................... 3-3
Locking with power door lock switch (if so
equipped).............................................................. 3-4
Child safety rear door lock ................................... 3-4
Multi-remote control system ...................................... 3-5
How to use multi-remote control system.............. 3-5
Hood .......................................................................... 3-9
Rear door ................................................................ 3-10
Key operation ..................................................... 3-10
Spare tire carrier (if so equipped) ........................... 3-10
Glass hatch ............................................................. 3-11Key operation ..................................................... 3-11
Fuel filler lid ............................................................. 3-12
Opener operation ............................................... 3-12
Fuel filler cap ...................................................... 3-12
Steering wheel ........................................................ 3-14
Tilt operation....................................................... 3-14
Sun visors ............................................................... 3-14
Using the sun visors ........................................... 3-14
Mirrors ..................................................................... 3-15
Inside mirror ....................................................... 3-15
Outside mirrors ................................................... 3-15
Automatic seat positioner (if so equipped) ............. 3-16
Automatic seat positioner operation ................... 3-16
Cancel switch ..................................................... 3-18
Z
00.1.10/R50-D/V5
X
Page 113 of 289

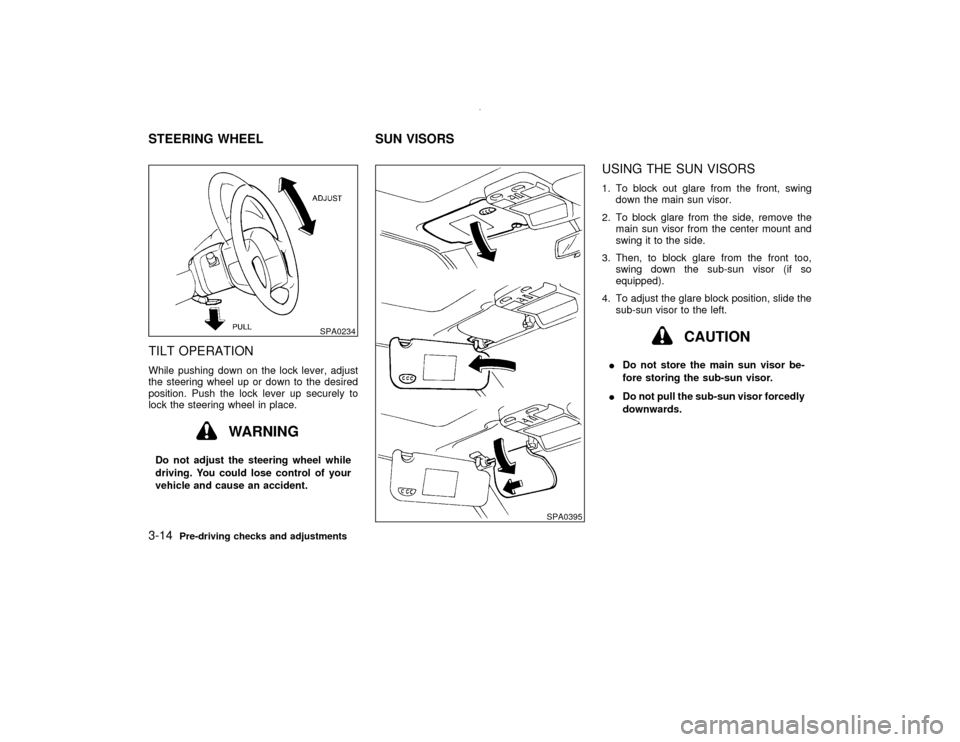
TILT OPERATIONWhile pushing down on the lock lever, adjust
the steering wheel up or down to the desired
position. Push the lock lever up securely to
lock the steering wheel in place.
WARNING
Do not adjust the steering wheel while
driving. You could lose control of your
vehicle and cause an accident.
USING THE SUN VISORS1. To block out glare from the front, swing
down the main sun visor.
2. To block glare from the side, remove the
main sun visor from the center mount and
swing it to the side.
3. Then, to block glare from the front too,
swing down the sub-sun visor (if so
equipped).
4. To adjust the glare block position, slide the
sub-sun visor to the left.
CAUTION
IDo not store the main sun visor be-
fore storing the sub-sun visor.
IDo not pull the sub-sun visor forcedly
downwards.
SPA0234
SPA0395
STEERING WHEEL SUN VISORS3-14
Pre-driving checks and adjustments
Z
00.1.10/R50-D/V5
X
Page 115 of 289

Foldable outside mirrorsPush the mirror backward to fold it.
AUTOMATIC SEAT POSITIONER
OPERATIONThis system is designed so that the driver's
seat will automatically move when the auto-
matic transmission selector lever is in the P
(Park) position. This allows the driver to get
into and out of the driver's seat more easily.
When one of the following conditions is met,
the driver's seat will slide backward:
IWhen the key is removed from the ignition
switch.
IWhen the driver's door is opened with the
key turned to ACC or LOCK.
IWhen the key is turned from ON to LOCK
with the driver's door open.
When one of the following conditions is met,
the driver's seat will return to the positions
before being set.
IWhen the key is inserted into the ignition
switch.
IWhen the driver's door is closed with the
key turned to ACC or LOCK.
IWhen the key is turned to ON.Procedure for storing memoryTwo positions can be stored in the automaticdrive positioner memory.Follow these proce-
dures to use the memory system.
1. Set the automatic transmission selector le-
ver to the P (Park) position.
2. Turn the ignition ON.
3. Adjust the driver's seat and steering column
to the desired positions by manually oper-
ating each adjusting switch. For additional
information, see ªSeatsº in the ª1. Seats,
restraints and supplemental air bag sys-
temsº section and ªSteering wheelº earlier
in this section.
During this step, do not turn the ignition to
M008
SPA1164
AUTOMATIC SEAT POSITIONER
(if so equipped)
3-16
Pre-driving checks and adjustments
Z
00.1.10/R50-D/V5
X
Page 118 of 289

4 Heater, air conditioner and audio systemsVentilators ................................................................. 4-2
Heater and air conditioner (Manual) ......................... 4-2
Controls ................................................................ 4-3
Heater operation................................................... 4-4
Air conditioner operation ...................................... 4-5
Air flow charts....................................................... 4-5
Heater and air conditioner (Automatic) ..................... 4-8
Automatic operation ............................................. 4-9
Manual operation.................................................. 4-9
Operating tips ..................................................... 4-10
Servicing air conditioner .......................................... 4-10
Audio system........................................................... 4-11FM radio reception ............................................. 4-11
AM radio reception ............................................. 4-12
Audio operation precautions .............................. 4-12
FM-AM radio with cassette player and compact disc
(CD) player ......................................................... 4-14
FM-AM radio with cassette player...................... 4-20
Compactdisc (CD) autochanger .............................. 4-24
Compactdisc (CD) autochanger operation ......... 4-24
Steering wheel switch for audio control
(if so equipped) ....................................................... 4-25
Antenna .............................................................. 4-26
Car phone or CB radio ........................................... 4-27
Z
00.1.10/R50-D/V5
X
Page 142 of 289

The disc loading procedure is the same as
above, and so continue on.
When all the discs are set or no more discs are
loaded for about 15 seconds after the slot door
is open, the first disc loaded will start to play.
CAUTION
When loading, wait for green light at the
CD slot and insert only one disc at a
time. Forcing in the compact disc could
damage the player.
Hold the disc only on the edges and center
hole. Never touch the surface of the disc.Disc eject (DISC EJECT button
)
One-disc eject:
When the DISC EJECT button is pressed for
less than 1.5 seconds while a disc is playing or
stopped, the current or last disc played will be
ejected.
When the DISC EJECT button is pressed, the
DISC indicator light will start flashing amber
until the disc is ready to be ejected. The light
will turn off when the disc is ejected.To select a disc to eject, press the DISC
EJECT button within 3 seconds after a DISC
select button is pressed, or do it in reverse
order.
All-disc eject:
When the DISC EJECT button is pressed for
more than 1.5 seconds while any disc is play-
ing or stopped, the all-disc eject mode will
activate with a beep.
When the DISC EJECT button is pressed, the
all DISC indicator lights of the disc stored
holder will start flashing amber. Each light will
turn off when the disc is ejected. When the disc
is released from the slot and then the slot door
is closed, the unit will start to eject the next
disc, and so on continuously upto full disc
eject. After all discs are ejected, the all DISC
indicator lights will turn off.The audio system can be operated using the
controls on the steering wheel.
With the ignition key turned to the ACC or ON
position, turn the audio system ON or OFF.
MODE select switchPush the mode select switch to change the
mode in the sequence of AM, FM1, FM2,
Tape, CD and CD autochanger (if so
equipped).Volume control switchPush the upper or lower side switch to in-
crease or decrease the volume.
SAA0474A
STEERING WHEEL SWITCH FOR
AUDIO CONTROL (if so equipped)
Heater, air conditioner and audio systems
4-25
Z
00.1.10/R50-D/V5
X
Page 146 of 289

5 Starting and drivingPrecautions when starting and driving ...................... 5-2
Exhaust gas (Carbon monoxide).......................... 5-2
Three way catalyst ............................................... 5-3
On-pavement and offroad driving precautions ..... 5-3
Avoiding collision and rollover .............................. 5-4
Drinking alcohol/drugs and driving ....................... 5-4
Driving safety precautions .................................... 5-4
Ignition switch............................................................ 5-6
Automatic transmission ........................................ 5-6
Manual transmission ............................................ 5-7
Key positions ........................................................ 5-8
Nissan vehicle immobilizer system ...................... 5-8
Before starting the engine ......................................... 5-9
Starting the engine .................................................... 5-9
Driving the vehicle ................................................... 5-10
Automatic transmission ...................................... 5-10
Manual transmission .......................................... 5-14
Parking brake .......................................................... 5-16
Cruise control (if so equipped) ................................ 5-17
Precautions on cruise control ............................. 5-17
Cruise control operations ................................... 5-17Break-in schedule ................................................... 5-19
Increasing fuel economy ......................................... 5-19
Using part time four wheel drive (4WD) ................. 5-20
Transfer case shifting procedures ...................... 5-21
Using all-mode four wheel drive (4WD) .................. 5-23
Transfer case shifting procedures ...................... 5-23
Parking/parking on hills ........................................... 5-30
Power steering ........................................................ 5-31
Brake system .......................................................... 5-32
Braking precautions............................................ 5-32
Anti-lock brake system (ABS) ............................ 5-32
Cold weather driving ............................................... 5-34
Freeing a frozen door lock ................................. 5-34
Anti-freeze .......................................................... 5-34
Battery ................................................................ 5-34
Draining of coolant water ................................... 5-34
Tire equipment ................................................... 5-34
Special winter equipment ................................... 5-35
Driving on snow or ice ....................................... 5-35
Engine block heater (if so equipped) ................. 5-35
Z
00.1.10/R50-D/V5
X
Page 148 of 289

compartment.
c. You notice a change in the sound
of the exhaust system.
d. You have had an accident involv-
ing damage to the exhaust system,
underbody, or rear of the vehicle.
THREE WAY CATALYSTThe three way catalyst is an emission control
device, installed in the exhaust system. In the
converter, exhaust gases are burned at high
temperatures to help reduce pollutants.
WARNING
IThe exhaust gas and the exhaust sys-
tem are very hot. Keep people, ani-
mals or flammable materials away
from the exhaust system compo-
nents.
IDo not stop or park the vehicle over
flammable materials, such as dry
grass, waste paper or rags. They may
ignite and cause a fire.
CAUTION
IDo not use leaded gasoline. Deposits
from leaded gasoline seriously re-
duce the three way catalyst's ability
to help reduce exhaust pollutants.
IKeep your engine tuned up. Malfunc-
tions in the ignition, fuel injection, or
electrical systems can cause over-
rich fuel flow into the three way cata-
lyst, causing it to overheat. Do not
keep driving if the engine misfires, or
if noticeable loss of performance or
other unusual operating conditions
are detected. Have the vehicle in-
spected promptly by an authorized
NISSAN dealer.
IAvoid driving with an extremely low
fuel level. Running out of fuel could
cause the engine to misfire, damag-
ing the three way catalyst.
IDo not race the engine while warming
it up.IDo not push or tow your vehicle to
start the engine.
ON-PAVEMENT AND OFFROAD
DRIVING PRECAUTIONSUtility vehicles have a significantly higher
rollover rate than other types of vehicles.
They have higher ground clearance than pas-
senger cars to make them capable of perform-
ing in a variety of on-pavement and offroad
applications. This gives them a higher center
of gravity than ordinary cars. An advantage of
higher ground clearance is a better view of the
road, allowing you to anticipate problems.
However, they are not designed for cornering
at the same speeds as conventional two-wheel
drive vehicles any more than low-slung sports
cars are designed to perform satisfactorily
under offroad conditions. If at all possible,
avoid sharp turns or abrupt maneuvers, par-
ticularly at high speeds. As with other vehicles
of this type, failure to operate this vehicle
correctly may result in loss of control or vehicle
rollover.
Be sure to read the driving safety precautions
later in this section.
Starting and driving
5-3
Z
00.1.10/R50-D/V5
X