2001 NISSAN PATHFINDER CD player
[x] Cancel search: CD playerPage 137 of 289

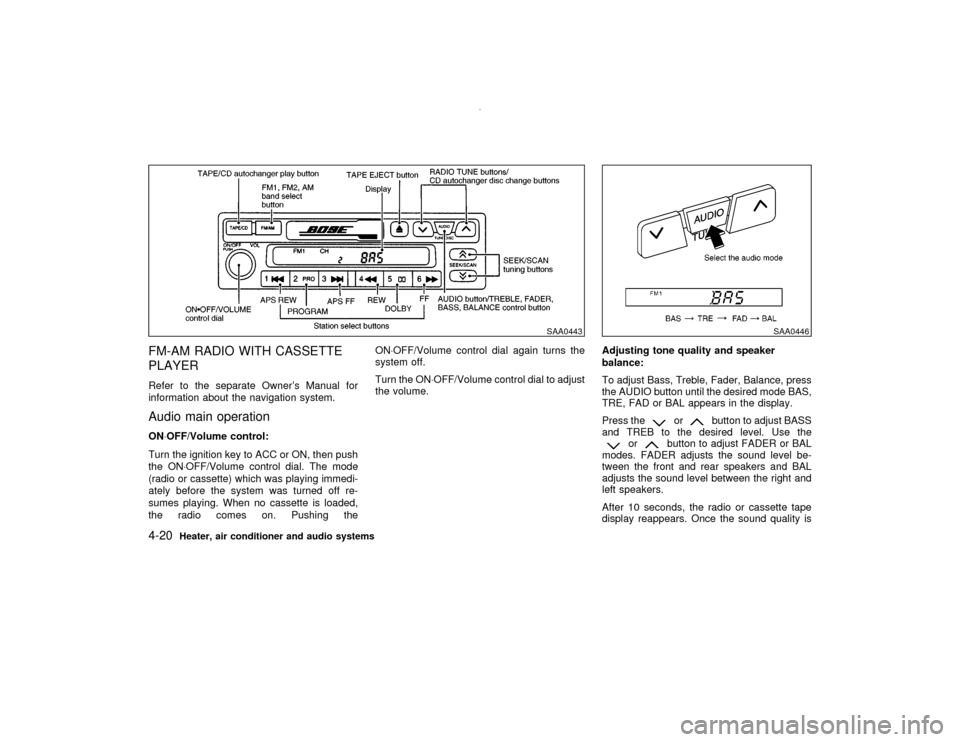
FM-AM RADIO WITH CASSETTE
PLAYERRefer to the separate Owner's Manual for
information about the navigation system.Audio main operationON×OFF/Volume control:
Turn the ignition key to ACC or ON, then push
the ON×OFF/Volume control dial. The mode
(radio or cassette) which was playing immedi-
ately before the system was turned off re-
sumes playing. When no cassette is loaded,
the radio comes on. Pushing theON×OFF/Volume control dial again turns the
system off.
Turn the ON×OFF/Volume control dial to adjust
the volume.Adjusting tone quality and speaker
balance:
To adjust Bass, Treble, Fader, Balance, press
the AUDIO button until the desired mode BAS,
TRE, FAD or BAL appears in the display.
Press the
or
button to adjust BASS
and TREB to the desired level. Use the
or
button to adjust FADER or BAL
modes. FADER adjusts the sound level be-
tween the front and rear speakers and BAL
adjusts the sound level between the right and
left speakers.
After 10 seconds, the radio or cassette tape
display reappears. Once the sound quality is
SAA0443
SAA0446
4-20
Heater, air conditioner and audio systems
Z
00.1.10/R50-D/V5
X
Page 139 of 289

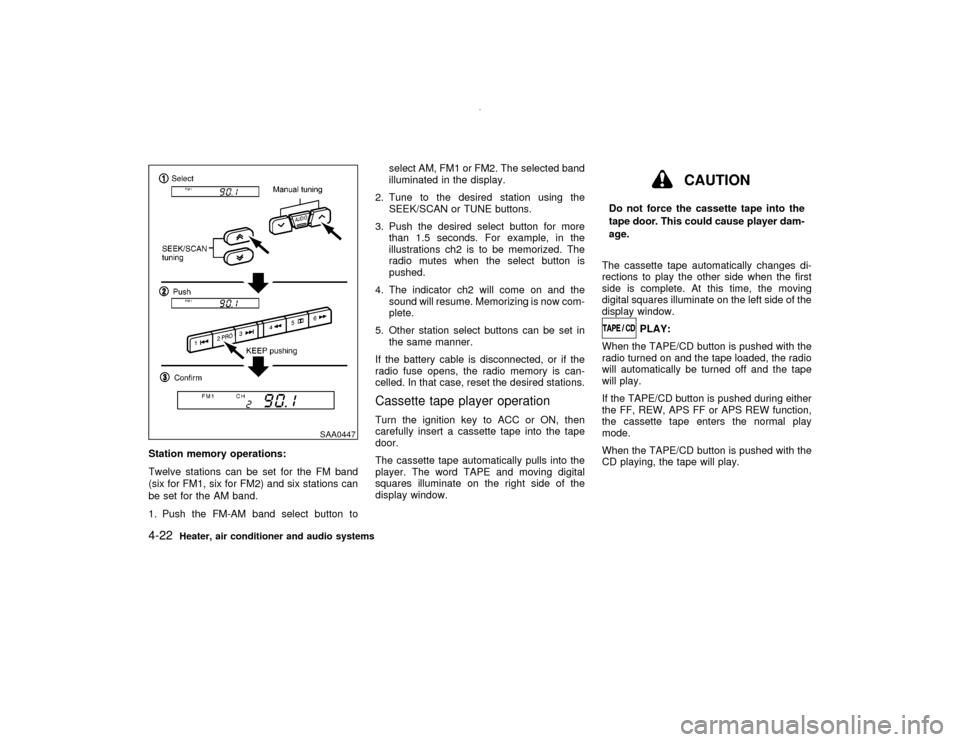
Station memory operations:
Twelve stations can be set for the FM band
(six for FM1, six for FM2) and six stations can
be set for the AM band.
1. Push the FM-AM band select button toselect AM, FM1 or FM2. The selected band
illuminated in the display.
2. Tune to the desired station using the
SEEK/SCAN or TUNE buttons.
3. Push the desired select button for more
than 1.5 seconds. For example, in the
illustrations ch2 is to be memorized. The
radio mutes when the select button is
pushed.
4. The indicator ch2 will come on and the
sound will resume. Memorizing is now com-
plete.
5. Other station select buttons can be set in
the same manner.
If the battery cable is disconnected, or if the
radio fuse opens, the radio memory is can-
celled. In that case, reset the desired stations.
Cassette tape player operationTurn the ignition key to ACC or ON, then
carefully insert a cassette tape into the tape
door.
The cassette tape automatically pulls into the
player. The word TAPE and moving digital
squares illuminate on the right side of the
display window.
CAUTION
Do not force the cassette tape into the
tape door. This could cause player dam-
age.
The cassette tape automatically changes di-
rections to play the other side when the first
side is complete. At this time, the moving
digital squares illuminate on the left side of the
display window.
PLAY:
When the TAPE/CD button is pushed with the
radio turned on and the tape loaded, the radio
will automatically be turned off and the tape
will play.
If the TAPE/CD button is pushed during either
the FF, REW, APS FF or APS REW function,
the cassette tape enters the normal play
mode.
When the TAPE/CD button is pushed with the
CD playing, the tape will play.
SAA0447
4-22
Heater, air conditioner and audio systems
Z
00.1.10/R50-D/V5
X
Page 140 of 289

FF (fast forward), REW
(rewind):
Push either the FF or REW button for the
desired direction.
The FF or REW symbol illuminates in the
display.
To stop the FF or REW function, press the FF
or REW button again, or the TAPE/CD button.APS (automatic program
search) FF, APS REW:
Push either the APS FF or APS REW button
while the cassette tape is playing. The tape
runs quickly, stops, then plays the next selec-
tion. Either the FF or REW symbol flashes in
the display while searching for the selection.
This system searches at the blank intervals
between selections. If there is a blank interval
within one selection or there is no interval
between selections, the system may not stop
in the desired or expected location.
PROG (program):
Push the PROG button. The moving digital
squares illuminate on either the right or left
side of the display window to indicate the side
of program play.
If the PROG button is pushed during either theFF or REW function the tape enters the normal
play mode.
Dolby NR (Noise Reduction):
Push the Dolby NR
button for Dolby NR
encoded tapes to reduce high frequency tape
noise. The
indicator light comes on.
Dolby NR is manufactured under license from
Dolby Laboratories Licensing Corporation.
DOLBY NR and the double-D symbol
are trademarks of Dolby Laboratories
Licensing Corporation.
Metal or chrome tape usage:
The cassette player is automatically set to high
performance play when playing a metal or
chrome cassette tape.TAPE EJECT:
Push the EJECT button. The cassette tape
automatically comes out.
Heater, air conditioner and audio systems
4-23
Z
00.1.10/R50-D/V5
X
Page 142 of 289

The disc loading procedure is the same as
above, and so continue on.
When all the discs are set or no more discs are
loaded for about 15 seconds after the slot door
is open, the first disc loaded will start to play.
CAUTION
When loading, wait for green light at the
CD slot and insert only one disc at a
time. Forcing in the compact disc could
damage the player.
Hold the disc only on the edges and center
hole. Never touch the surface of the disc.Disc eject (DISC EJECT button
)
One-disc eject:
When the DISC EJECT button is pressed for
less than 1.5 seconds while a disc is playing or
stopped, the current or last disc played will be
ejected.
When the DISC EJECT button is pressed, the
DISC indicator light will start flashing amber
until the disc is ready to be ejected. The light
will turn off when the disc is ejected.To select a disc to eject, press the DISC
EJECT button within 3 seconds after a DISC
select button is pressed, or do it in reverse
order.
All-disc eject:
When the DISC EJECT button is pressed for
more than 1.5 seconds while any disc is play-
ing or stopped, the all-disc eject mode will
activate with a beep.
When the DISC EJECT button is pressed, the
all DISC indicator lights of the disc stored
holder will start flashing amber. Each light will
turn off when the disc is ejected. When the disc
is released from the slot and then the slot door
is closed, the unit will start to eject the next
disc, and so on continuously upto full disc
eject. After all discs are ejected, the all DISC
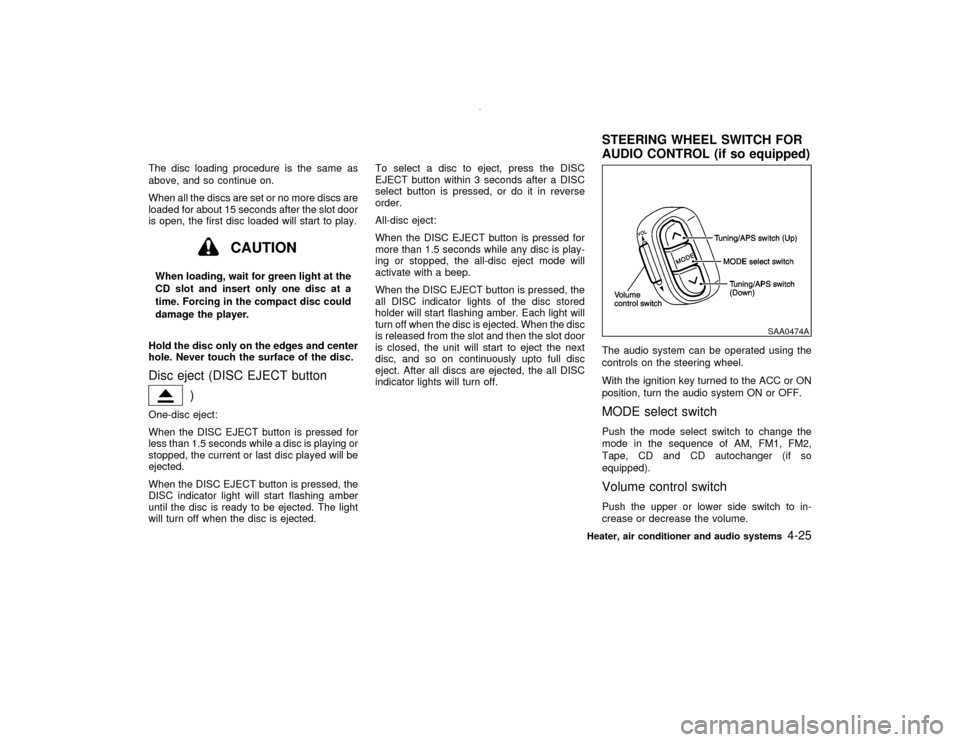
indicator lights will turn off.The audio system can be operated using the
controls on the steering wheel.
With the ignition key turned to the ACC or ON
position, turn the audio system ON or OFF.
MODE select switchPush the mode select switch to change the
mode in the sequence of AM, FM1, FM2,
Tape, CD and CD autochanger (if so
equipped).Volume control switchPush the upper or lower side switch to in-
crease or decrease the volume.
SAA0474A
STEERING WHEEL SWITCH FOR
AUDIO CONTROL (if so equipped)
Heater, air conditioner and audio systems
4-25
Z
00.1.10/R50-D/V5
X
Page 282 of 289

11 Index
A
ABS (Anti-lock brake system) ......................... 5-32
Air bag system
Front (See supplemental front airbag
system) ...................................................... 1-16
Side (See supplemental side air bag
system) ...................................................... 1-18
Air bag warning labels .................................... 1-20
Air bag warning light.............................. 1-21, 2-12
Air cleaner housing filter ................................. 8-20
Air conditioner
Air conditioner operation ...................... 4-2, 4-8
Air conditioner service ................ 4-2, 4-8, 4-10
Air conditioner specification
label .......................................... 4-2, 4-8, 10-14
Air conditioner system refrigerant and
lubrication recommendations ............... 4-2, 4-8
Heater and air conditioner (automatic) (if so
equipped)..................................................... 4-8
Heater and air conditioner controls ............. 4-2
Servicing air conditioner .............................. 4-2
Air conditioning system refrigerant and lubricant
recommendations ........................................... 10-8
Air flow charts ............................................ 4-5, 4-8
Alcohol, drugs and driving ................................ 5-4
AM-FM radio with cassette player .................. 4-11
AM-FM radio with cassette player and compact
disc player....................................................... 4-11
AM-FM radio with compact disc player .......... 4-11Anchor point locations
Top tether strap ......................................... 1-41
Antenna
Manual ....................................................... 4-26
Power ........................................................ 4-26
Anti-lock Brake System (ABS) ........................ 5-32
Appearance care
Exterior appearance care ............................ 7-2
Interior appearance care ............................. 7-3
Armrest ............................................................. 1-9
Ashtray (See cigarette lighter and ashtray) .... 2-26
Audible reminders ........................................... 2-15
Audio system .................................................. 4-11
Autochanger, Compact Disc (CD) .................. 4-24
Automatic
Automatic transmission fluid (ATF) ........... 8-13
Drive positioner ......................................... 3-16
Driving with automatic transmission.......... 5-10
Seat positioner, seat ................................. 3-16
Transmission selector lever lock
release ....................................................... 5-13
Avoiding collision and rollover .......................... 5-4
B
Battery............................................................. 8-18
Battery saver system................................. 2-20
Battery replacement, (See multi-remote control
system) ............................................................. 3-8Before starting the engine ................................ 5-9
Belts (See drive belts) .................................... 8-19
Brake
Anti-lock brake system (ABS) ................... 5-32
Brake and clutch fluid................................ 8-15
Brake booster ............................................ 8-23
Brake fluid ................................................. 8-15
Brake pedal ............................................... 8-22
Brake pedal check..................................... 8-23
Parking brake check ........................ 5-16, 8-22
Parking brake operation ............................ 5-16
System....................................................... 5-32
Warning light ............................................. 2-10
Break-in schedule ........................................... 5-19
Bulb check/instrument panel ............................ 2-9
Bulb replacement ............................................ 8-26
C
Capacities and recommended
fuel/lubricants .................................................. 10-2
Car phone ....................................................... 4-28
Car phone or CB radio ................................... 4-28
Cargo (See vehicle loading information) ........ 2-32
Cargo net ........................................................ 2-32
Cassette player (See audio system) .............. 4-22
Cassette tape operation ................................. 4-11
Catalytic converter, Three way catalyst............ 5-3
CD care and cleaning ..................................... 4-19
Z
00.1.10/R50-D/V5
X
Page 283 of 289

Child restraints ................................................ 1-31
Installation on front passenger seat .......... 1-42
Installation on rear seat outboard
positions .................................................... 1-35
Installation on rear seat center position .... 1-33
Precautions on child restraints .................. 1-31
Top tether strap anchor point locations .... 1-41
With top tether strap.................................. 1-40
Child safety ..................................................... 1-24
Child safety rear door lock................................ 3-4
Cigarette lighter (accessory) and ashtray....... 2-26
Circuit breaker, Fusible link ............................ 8-25
Cleaning exterior and interior .................... 7-2, 7-3
Clock ............................................................... 2-25
Clutch
Clutch pedal .............................................. 8-24
Fluid ........................................................... 8-15
Housing drain (4x4 only) ........................... 8-37
Cold weather driving ....................................... 5-34
Compact Disc (CD) autochanger operation ... 4-24
Compact Disc (CD) player (See audio
system) ........................................................... 4-17
Compact disc (CD) player operation .............. 4-11
Compact spare tire ......................................... 8-36
Compass display .............................................. 2-7
Console box .................................................... 2-29
Controls
Audio controls............................................ 4-11
Audio controls (rear).................................. 4-11
Audio controls (steering wheel)................. 4-11
Heater and air conditioner controls ............. 4-2
Heater and air conditioner controls
(automatic)................................................... 4-8Coolant
Capacities and recommended fuel/
lubricants ................................................... 10-2
Changing engine coolant ............................ 8-7
Checking engine coolant level .................... 8-6
Corrosion protection ......................................... 7-4
Cruise control.................................................. 5-17
Cup holders .................................................... 2-28
D
Daytime running light system ......................... 2-21
Defogger switch, Glass hatch and outside mirror
defogger switch............................................... 2-19
Dimensions and weights ............................... 10-11
Door open warning light ................................. 2-11
Drive belts ....................................................... 8-19
Drive positioner, Automatic ............................. 3-16
Driving
Cold weather driving ................................. 5-34
Driving with automatic transmission.......... 5-10
Driving with manual transmission ............. 5-14
On-pavement and offroad driving ............... 5-3
Precautions when starting and driving ........ 5-2
Safety precautions....................................... 5-4
E
Economy, Fuel ................................................ 5-19
Electric sunroof ............................................... 2-36
Emission control information label ................ 10-14
Emission control system warranty ................ 10-21Engine
Before starting the engine ........................... 5-9
Block heater .............................................. 5-35
Capacities and recommended fuel/
lubricants ................................................... 10-2
Changing engine coolant ............................ 8-7
Changing engine oil .................................. 8-11
Changing engine oil filter .......................... 8-12
Checking engine coolant level .................... 8-6
Checking engine oil level .......................... 8-10
Coolant temperature gauge ........................ 2-4
Engine compartment check locations ......... 8-4
Engine cooling system ................................ 8-6
Engine oil................................................... 8-10
Engine oil and oil filter recommendation... 10-6
Engine oil viscosity .................................... 10-6
Engine serial number .............................. 10-13
Engine specifications................................. 10-9
If your engine overheats ........................... 6-11
Starting the engine ...................................... 5-9
Exhaust gas (Carbon monoxide) ...................... 5-2
F
F.M.V.S.S. certification label......................... 10-13
Filter, Air cleaner housing filter ....................... 8-20
Flashers (See hazard warning flasher
switch) ............................................................. 2-23
Flat tire .............................................................. 6-2
Floor mat cleaning ............................................ 7-4
Fluid
Automatic transmission fluid (ATF) ........... 8-13
Brake and clutch fluid................................ 8-15
Brake fluid ................................................. 8-15
Z
00.1.10/R50-D/V5
X
11-2