Page 36 of 247
2. Route the seat belt tongue through the child
restraint and insert it into the buckle until
you hear and feel the latch engage.
Be sure to follow the child restraint manu-
facturer's instructions for belt routing.3. Pull on the shoulder belt until all of the belt
is fully extended. At this time, the belt
retractor is in the automatic locking mode
(child restraint mode). It reverts back to
emergency locking mode when the belt is
fully retracted.
SSS0154
SSS0043
SSS0107
Seats, restraints and supplemental air bag systems
1-31
Z
00.1.17/A33-D/V5.0
X
Page 37 of 247
4. Allow the belt to retract. Pull up on the belt
to remove any slack in the belt.5. Before placing the child in the child re-
straint, use force to tilt the child restraint
from side to side, and tug it forward to make
sure that it is securely held in place.
6. Check that the retractor is in the automatic
locking mode by trying to pull more belt out
of the retractor. If you cannot pull any more
belt webbing out of the retractor, the belt is
in the automatic locking mode.
7. Check to make sure that the child restraint
is properly secured prior to each use. If the
belt is not locked, repeat steps 3 through 6.
After the child restraint is removed and the
seat belt is allowed to wind back into theretractor, the automatic locking mode (child
restraint mode) is canceled; the seat belt only
locks during a sudden stop or impact.
SSS0062
SSS0108
1-32
Seats, restraints and supplemental air bag systems
Z
00.1.17/A33-D/V5.0
X
Page 38 of 247
Rear facingWhen you install a child restraint in a rear
outboard or center seat, follow these steps:
1. Position the child restraint on the seat. The
direction of the child restraint depends on
the type of the child restraint and the size of
the child. Always follow the restraint manu-
facturer's instructions.2. Route the seat belt tongue through the child
restraint and insert it into the buckle until
you hear and feel the latch engage.
Be sure to follow the child restraint manu-
facturer's instructions for belt routing.
SSS0155
SSS0156
SSS0046
Seats, restraints and supplemental air bag systems
1-33
Z
00.1.17/A33-D/V5.0
X
Page 39 of 247

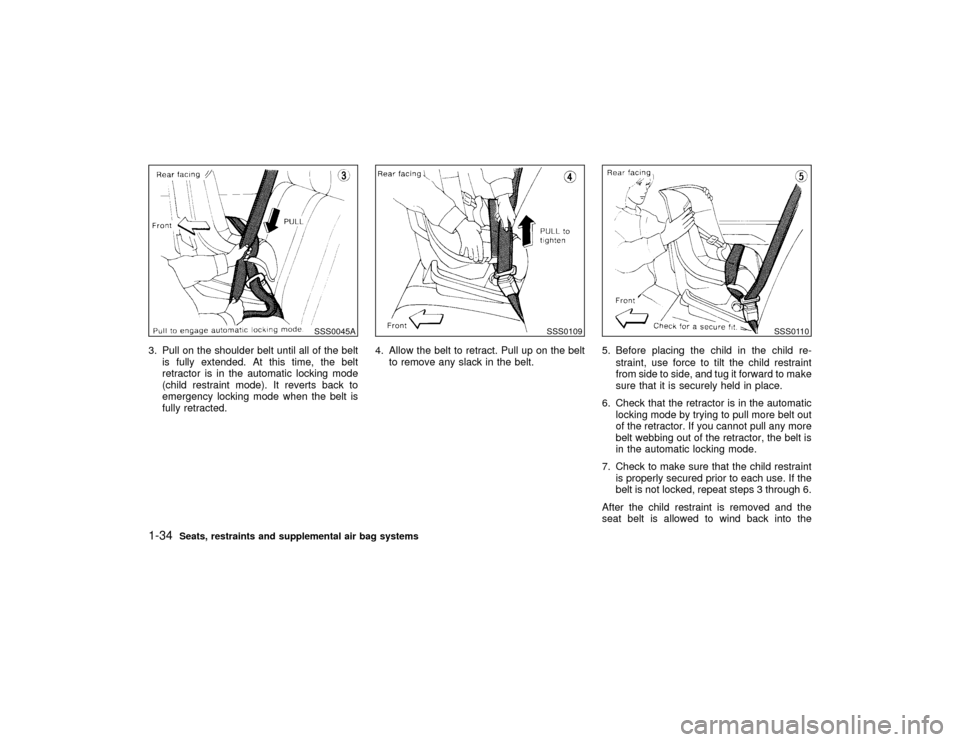
3. Pull on the shoulder belt until all of the belt
is fully extended. At this time, the belt
retractor is in the automatic locking mode
(child restraint mode). It reverts back to
emergency locking mode when the belt is
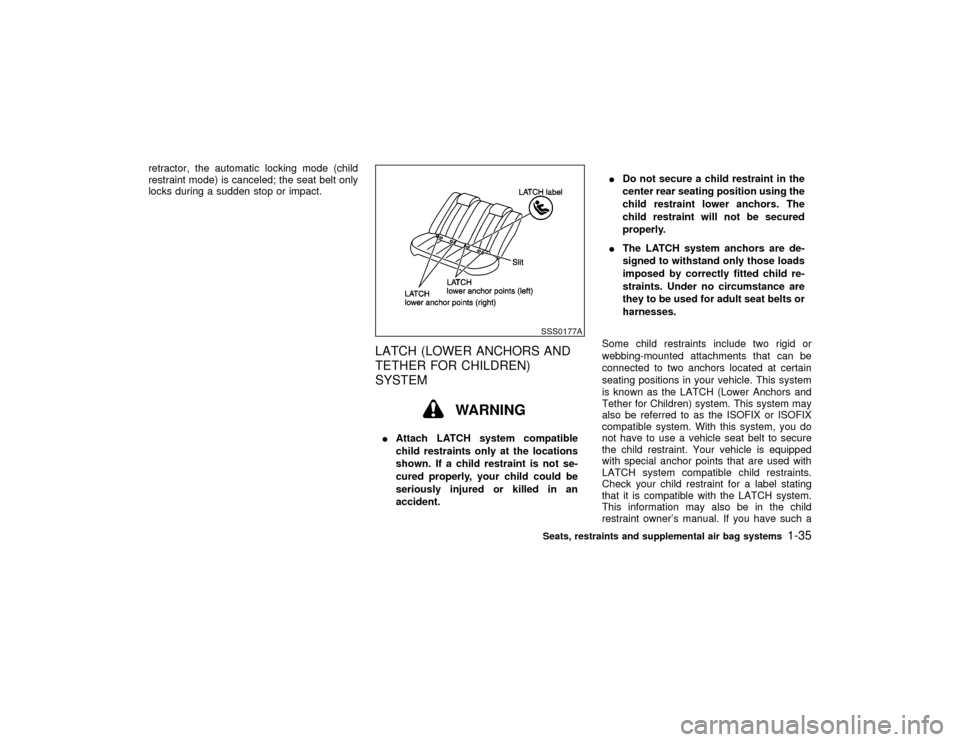
fully retracted.4. Allow the belt to retract. Pull up on the belt
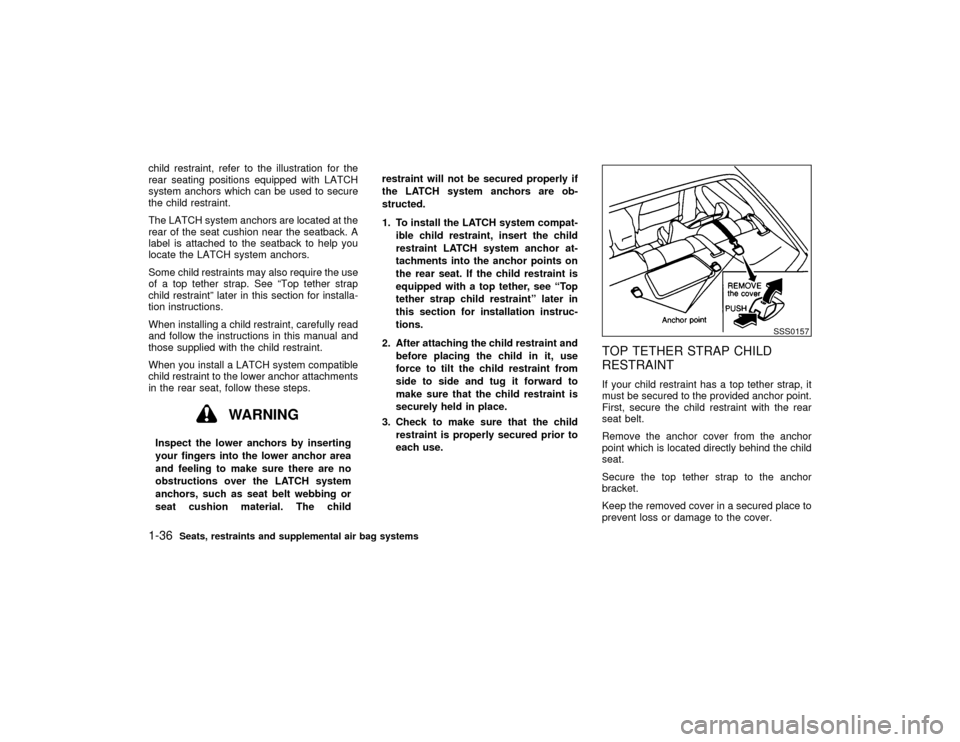
to remove any slack in the belt.5. Before placing the child in the child re-
straint, use force to tilt the child restraint
from side to side, and tug it forward to make
sure that it is securely held in place.
6. Check that the retractor is in the automatic
locking mode by trying to pull more belt out
of the retractor. If you cannot pull any more
belt webbing out of the retractor, the belt is
in the automatic locking mode.
7. Check to make sure that the child restraint
is properly secured prior to each use. If the
belt is not locked, repeat steps 3 through 6.
After the child restraint is removed and the
seat belt is allowed to wind back into the
SSS0045A
SSS0109
SSS0110
1-34
Seats, restraints and supplemental air bag systems
Z
00.1.17/A33-D/V5.0
X
Page 40 of 247

retractor, the automatic locking mode (child
restraint mode) is canceled; the seat belt only
locks during a sudden stop or impact.
LATCH (LOWER ANCHORS AND
TETHER FOR CHILDREN)
SYSTEM
WARNING
IAttach LATCH system compatible
child restraints only at the locations
shown. If a child restraint is not se-
cured properly, your child could be
seriously injured or killed in an
accident.IDo not secure a child restraint in the
center rear seating position using the
child restraint lower anchors. The
child restraint will not be secured
properly.
IThe LATCH system anchors are de-
signed to withstand only those loads
imposed by correctly fitted child re-
straints. Under no circumstance are
they to be used for adult seat belts or
harnesses.
Some child restraints include two rigid or
webbing-mounted attachments that can be
connected to two anchors located at certain
seating positions in your vehicle. This system
is known as the LATCH (Lower Anchors and
Tether for Children) system. This system may
also be referred to as the ISOFIX or ISOFIX
compatible system. With this system, you do
not have to use a vehicle seat belt to secure
the child restraint. Your vehicle is equipped
with special anchor points that are used with
LATCH system compatible child restraints.
Check your child restraint for a label stating
that it is compatible with the LATCH system.
This information may also be in the child
restraint owner's manual. If you have such a
SSS0177ASeats, restraints and supplemental air bag systems
1-35
Z
00.1.17/A33-D/V5.0
X
Page 41 of 247

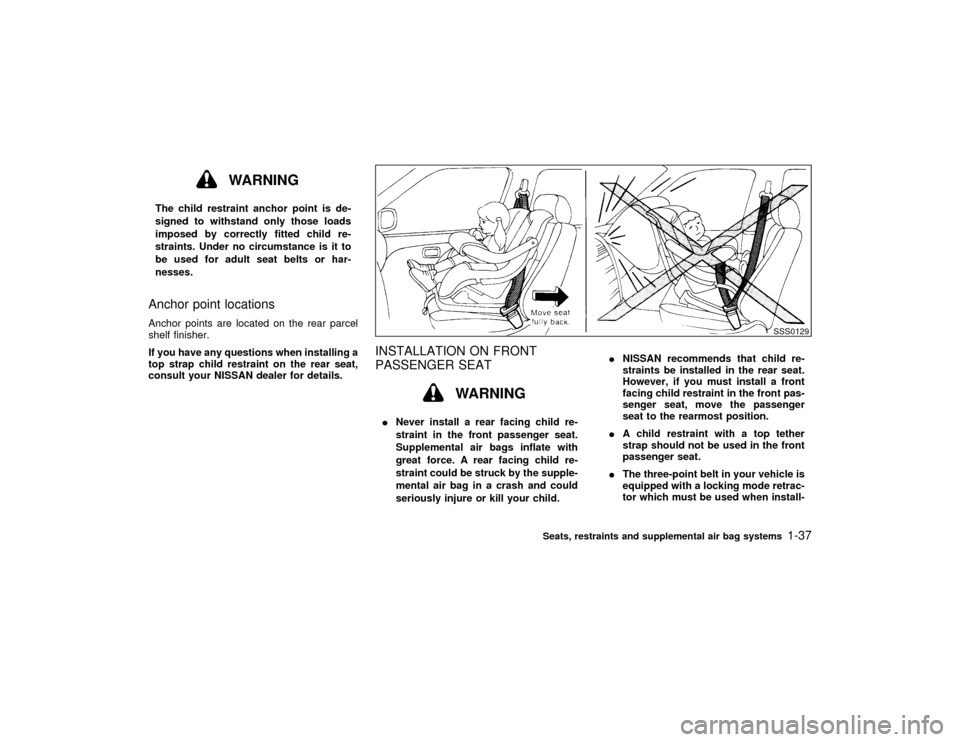
child restraint, refer to the illustration for the
rear seating positions equipped with LATCH
system anchors which can be used to secure
the child restraint.
The LATCH system anchors are located at the
rear of the seat cushion near the seatback. A
label is attached to the seatback to help you
locate the LATCH system anchors.
Some child restraints may also require the use
of a top tether strap. See ªTop tether strap
child restraintº later in this section for installa-
tion instructions.
When installing a child restraint, carefully read
and follow the instructions in this manual and
those supplied with the child restraint.
When you install a LATCH system compatible
child restraint to the lower anchor attachments
in the rear seat, follow these steps.
WARNING
Inspect the lower anchors by inserting
your fingers into the lower anchor area
and feeling to make sure there are no
obstructions over the LATCH system
anchors, such as seat belt webbing or
seat cushion material. The childrestraint will not be secured properly if
the LATCH system anchors are ob-
structed.
1. To install the LATCH system compat-
ible child restraint, insert the child
restraint LATCH system anchor at-
tachments into the anchor points on
the rear seat. If the child restraint is
equipped with a top tether, see ªTop
tether strap child restraintº later in
this section for installation instruc-
tions.
2. After attaching the child restraint and
before placing the child in it, use
force to tilt the child restraint from
side to side and tug it forward to
make sure that the child restraint is
securely held in place.
3. Check to make sure that the child
restraint is properly secured prior to
each use.
TOP TETHER STRAP CHILD
RESTRAINTIf your child restraint has a top tether strap, it
must be secured to the provided anchor point.
First, secure the child restraint with the rear
seat belt.
Remove the anchor cover from the anchor
point which is located directly behind the child
seat.
Secure the top tether strap to the anchor
bracket.
Keep the removed cover in a secured place to
prevent loss or damage to the cover.
SSS0157
1-36
Seats, restraints and supplemental air bag systems
Z
00.1.17/A33-D/V5.0
X
Page 42 of 247

WARNING
The child restraint anchor point is de-
signed to withstand only those loads
imposed by correctly fitted child re-
straints. Under no circumstance is it to
be used for adult seat belts or har-
nesses.Anchor point locationsAnchor points are located on the rear parcel
shelf finisher.
If you have any questions when installing a
top strap child restraint on the rear seat,
consult your NISSAN dealer for details.
INSTALLATION ON FRONT
PASSENGER SEAT
WARNING
INever install a rear facing child re-
straint in the front passenger seat.
Supplemental air bags inflate with
great force. A rear facing child re-
straint could be struck by the supple-
mental air bag in a crash and could
seriously injure or kill your child.INISSAN recommends that child re-
straints be installed in the rear seat.
However, if you must install a front
facing child restraint in the front pas-
senger seat, move the passenger
seat to the rearmost position.
IA child restraint with a top tether
strap should not be used in the front
passenger seat.
IThe three-point belt in your vehicle is
equipped with a locking mode retrac-
tor which must be used when install-
SSS0129
Seats, restraints and supplemental air bag systems
1-37
Z
00.1.17/A33-D/V5.0
X
Page 43 of 247
ing a child restraint.
IFailure to use the retractor's locking
mode will result in the child restraint
not being properly secured. The child
restraint could tip over or otherwise
be unsecured and cause injury to the
child in a sudden stop or collision.
Front facingIf you must install a child restraint in the front
seat, follow these steps:
1. Position the child restraint on the front
passenger seat.It should be placed in a
front facing direction only.Move the seat
to the rearmost position. Always follow the
child restraint manufacturer's instructions.
Child restraints for infants must be used
in the rear facing direction and therefore
must not be used in the front seat.2. Route the seat belt tongue through the child
restraint and insert it into the buckle until
you hear and feel the latch engage. Be sure
to follow the child restraint manufacturer's
instructions for belt routing.
SSS0135
SSS0055
1-38
Seats, restraints and supplemental air bag systems
Z
00.1.17/A33-D/V5.0
X