Page 10 of 258
FRONT MANUAL SEAT
ADJUSTMENT
WARNING
cDo not adjust the driver's seat while
driving so full attention may be given
to vehicle operation. The seat may
move suddenly and could cause
loss of control of the vehicle.
cAfter adjustment, gently rock in the
seat to make sure it is securely
locked.
Forward and backward
Pull the lever up while you slide the seat
forward or backward to the desired position.
Release the lever to lock the seat in posi-
tion.
Reclining
To recline the seatback, pull the lever up
and lean back. To bring the seatback for-
ward again, pull the lever and move your-
body forward.
WRS0001
Seats, restraints and supplemental air bag systems1-3
ZX
Page 11 of 258
Seat lifter (Driver's seat)
Turn either dial to adjust the angle and
height of the seat cushion to the desired
position.
FRONT POWER SEAT
ADJUSTMENT (if so equipped)
WARNING
cDo not adjust the driver's seat while
driving so full attention may be given
to vehicle operation. The seat may
move suddenly and could cause
loss of control of the vehicle.cDo not leave children unattended in-
side the vehicle. They could un-
knowingly activate switches or con-
trols. Unattended children could
become involved in serious acci-
dents.
Operating Tips
cThe motor has an auto-reset overload
protection circuit. If the motor stops dur-
ing operation, wait 30 seconds, then re-
activate the switch.
SPA0099ALRS0016
1-4Seats, restraints and supplemental air bag systems
ZX
Page 15 of 258

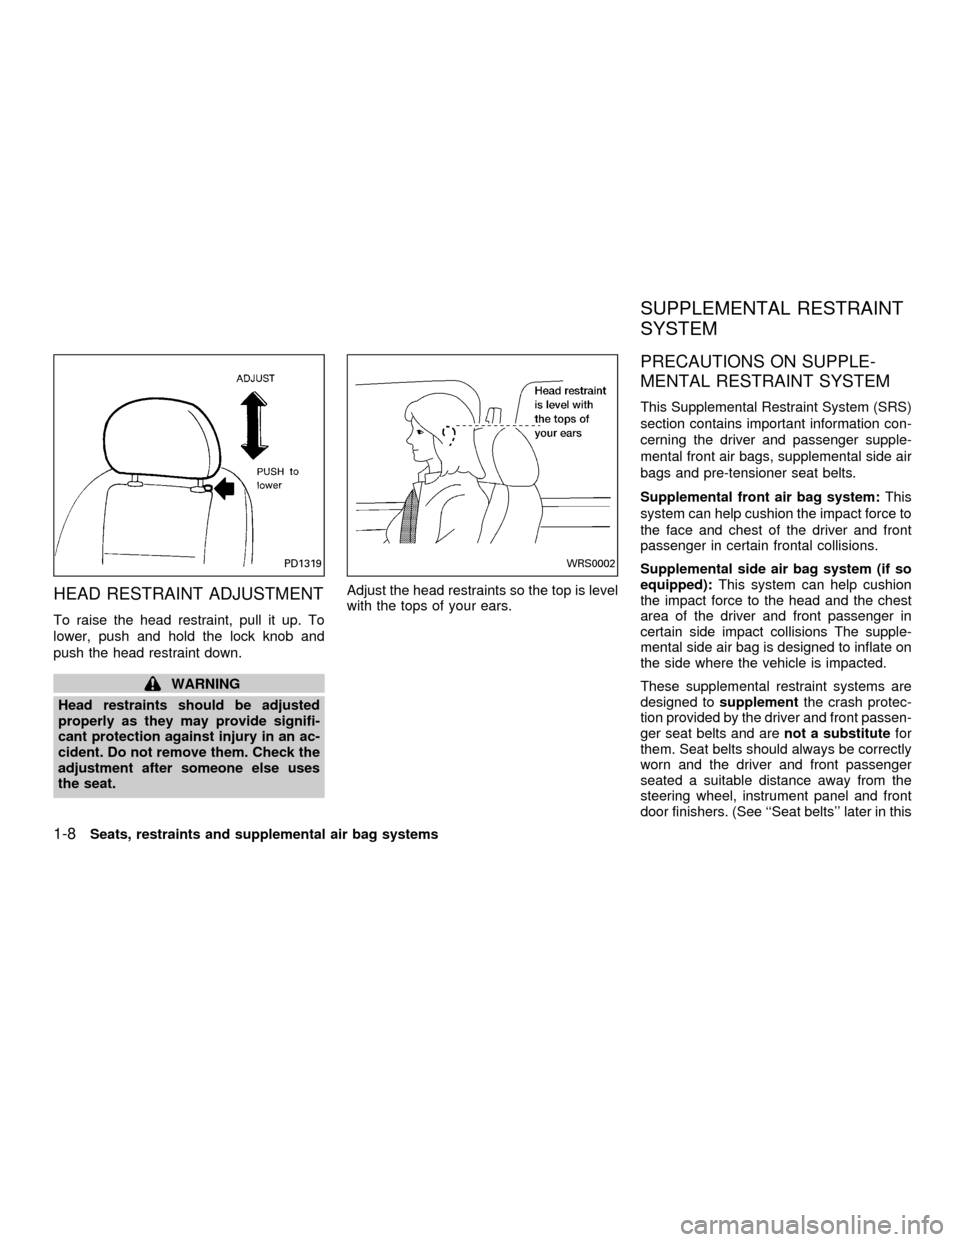
HEAD RESTRAINT ADJUSTMENT
To raise the head restraint, pull it up. To
lower, push and hold the lock knob and
push the head restraint down.
WARNING
Head restraints should be adjusted
properly as they may provide signifi-
cant protection against injury in an ac-
cident. Do not remove them. Check the
adjustment after someone else uses
the seat.Adjust the head restraints so the top is level
with the tops of your ears.
PRECAUTIONS ON SUPPLE-
MENTAL RESTRAINT SYSTEM
This Supplemental Restraint System (SRS)
section contains important information con-
cerning the driver and passenger supple-
mental front air bags, supplemental side air
bags and pre-tensioner seat belts.
Supplemental front air bag system:This
system can help cushion the impact force to
the face and chest of the driver and front
passenger in certain frontal collisions.
Supplemental side air bag system (if so
equipped):This system can help cushion
the impact force to the head and the chest
area of the driver and front passenger in
certain side impact collisions The supple-
mental side air bag is designed to inflate on
the side where the vehicle is impacted.
These supplemental restraint systems are
designed tosupplementthe crash protec-
tion provided by the driver and front passen-
ger seat belts and arenot a substitutefor
them. Seat belts should always be correctly
worn and the driver and front passenger
seated a suitable distance away from the
steering wheel, instrument panel and front
door finishers. (See ``Seat belts'' later in this
PD1319WRS0002
SUPPLEMENTAL RESTRAINT
SYSTEM
1-8Seats, restraints and supplemental air bag systems
ZX
Page 34 of 258

WARNING
cAfter adjustment, release the adjust-
ment button and try to move the
shoulder belt anchor up and down to
make sure it is securely fixed in
position.
cThe shoulder belt anchor height
should be adjusted to the position
best for you. Failure to do so may
reduce the effectiveness of the en-
tire restraint system and increase
the chance or severity of injury in an
accident.SEAT BELT EXTENDERS
If, because of body size or driving position,
it is not possible to properly fit the lap-
shoulder belt and fasten it, an extender is
available which is compatible with the in-
stalled seat belts. The extender adds ap-
proximately 8 inches (200 mm) of length
and may be used for either the driver or front
passenger seating position. See your NIS-
SAN dealer for assistance if an extender is
required.
WARNING
cOnly NISSAN seat belt extenders,
made by the same company which
made the original equipment seat
belts, should be used with NISSAN
seat belts.
cPersons who can use the standard
seat belt should not use an extender.
Such unnecessary use could result
in serious personal injury in the
event of an accident.
SEAT BELT MAINTENANCE
cTo clean the seat belt webbings,apply
a mild soap solution or any solution rec-
ommended for cleaning upholstery or
carpet. Then wipe with a cloth and allow
the seat belts to dry in the shade. Do not
allow the seat belts to retract until they
are completely dry.
cIf dirt builds up on the shoulder belt
guideof the seat belt anchors, the seat
belts may retract slowly. Wipe the shoul-
der belt guide with a clean, dry cloth.
cPeriodically check to see that the seat
belt and the metal components,such
as buckles, tongues, retractors, flexible
wires and anchors, work properly. If
loose parts, deterioration, cuts or other
damage on the webbing is found, the
entire seat belt assembly should be re-
placed.
Seats, restraints and supplemental air bag systems
1-27
ZX
Page 89 of 258
OPENER OPERATION
WARNING
cDo not drive with the trunk lid open.
This could allow dangerous exhaust
gases to be drawn into the vehicle.
See ``Exhaust gas'' in the ``Starting
and driving'' section of this manual.
cClosely supervise children when
they are around cars to prevent them
from playing and becoming lockedin the trunk where they could be seri-
ously injured. Keep the car locked, with
the trunk closed, when not in use, and
prevent children's access to car keys.
The trunk lid opener lever is located on the
outside of the driver's seat. To open the
trunk lid, pull the opener lever up.
To close the trunk lid, lower and push the
trunk lid down securely.
KEY OPERATION
To open the trunk lid, turn the key clock-
wise. To close the trunk lid, lower and push
the trunk lid down securely.
WPD0007WPD0008
TRUNK LID
3-10Pre-driving checks and adjustments
ZX
Page 91 of 258
OPENER OPERATION
The fuel filler lid opener lever is located on
the outside of the driver's seat. To open the
fuel filler lid, push the opener lever down. To
lock, close the fuel filler lid securely.
FUEL FILLER CAP
The fuel filler cap is a ratcheting type.
Tighten the cap clockwise until ratcheting
clicks are heard.
WPD0009WPD0049
FUEL FILLER LID
3-12Pre-driving checks and adjustments
ZX
Page 202 of 258

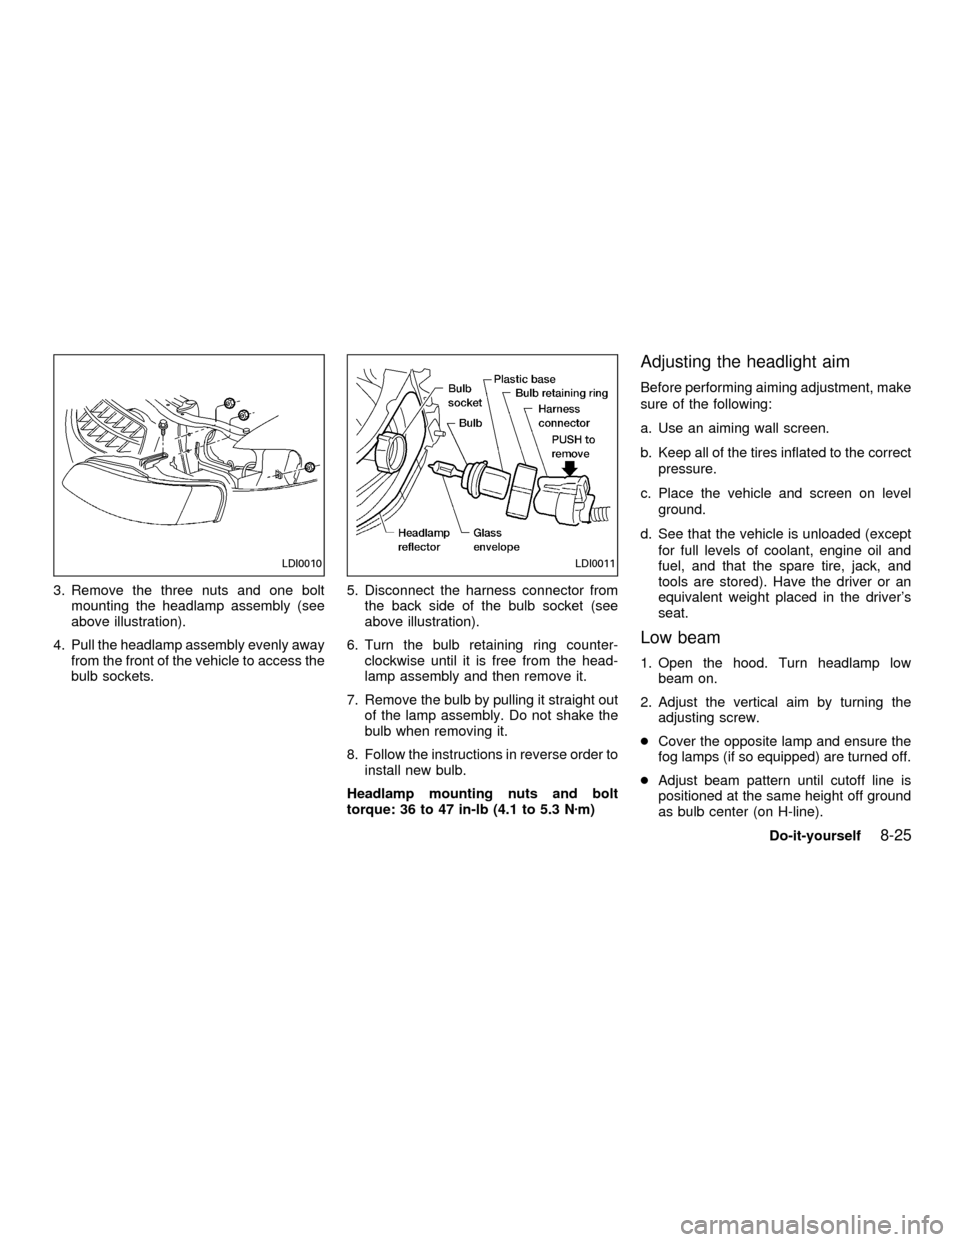
3. Remove the three nuts and one bolt
mounting the headlamp assembly (see
above illustration).
4. Pull the headlamp assembly evenly away
from the front of the vehicle to access the
bulb sockets.5. Disconnect the harness connector from
the back side of the bulb socket (see
above illustration).
6. Turn the bulb retaining ring counter-
clockwise until it is free from the head-
lamp assembly and then remove it.
7. Remove the bulb by pulling it straight out
of the lamp assembly. Do not shake the
bulb when removing it.
8. Follow the instructions in reverse order to
install new bulb.
Headlamp mounting nuts and bolt
torque: 36 to 47 in-lb (4.1 to 5.3 Nzm)
Adjusting the headlight aim
Before performing aiming adjustment, make
sure of the following:
a. Use an aiming wall screen.
b. Keep all of the tires inflated to the correct
pressure.
c. Place the vehicle and screen on level
ground.
d. See that the vehicle is unloaded (except
for full levels of coolant, engine oil and
fuel, and that the spare tire, jack, and
tools are stored). Have the driver or an
equivalent weight placed in the driver's
seat.
Low beam
1. Open the hood. Turn headlamp low
beam on.
2. Adjust the vertical aim by turning the
adjusting screw.
cCover the opposite lamp and ensure the
fog lamps (if so equipped) are turned off.
cAdjust beam pattern until cutoff line is
positioned at the same height off ground
as bulb center (on H-line).
LDI0010LDI0011
Do-it-yourself8-25
ZX