2001 NISSAN ALTIMA brake pads
[x] Cancel search: brake padsPage 54 of 258
While the cruise main switch indicator light
comes on, the cruise control system is
operational.
Cruise set indicator light
(if so equipped)
The light comes on while the vehicle speed
is controlled by the cruise control system. If
the light blinks while the engine is running, it
may indicate the cruise control system is not
functioning properly. Have the system
checked by your NISSAN dealer.
Malfunction indicator lamp
(MIL)
If this indicator lamp comes on steady or
blinks while the engine is running, it may
indicate a potential emission control mal-
function.
The malfunction indicator lamp may also
come on steady if the fuel filler cap is loose
or missing, or if the vehicle runs out of fuel.
Check to make sure the fuel filler cap is
installed and closed tightly, and that the
vehicle has at least three gallons of fuel in
the fuel tank.
After a few driving trips, the
lamp
should turn off if no other potential emissioncontrol system malfunction exists.
Operation
The malfunction indicator lamp will come on
in one of two ways:
cMalfunction indicator lamp on steady - An
emission control system malfunction has
been detected. Check the fuel filler cap. If
the fuel filler cap is loose or missing,
tighten or install the cap and continue to
drive the vehicle. The
lamp should
turn off after a few driving trips. If the
lamp does not turn off after a few
driving trips, have the vehicle inspected
by an authorized NISSAN dealer. You do
not need to have your vehicle towed to
the dealer.
cMalfunction indicator lamp blinking - An
engine misfire has been detected which
may damage the emission control sys-
tem. To reduce or avoid emission control
system damage:
a) do not drive at speeds above 45 MPH
(72 km/h).
b) avoid hard acceleration or decelera-
tion.
c) avoid steep uphill grades.
d) if possible, reduce the amount ofcargo being hauled or towed.
The malfunction indicator lamp may stop
blinking and come on steady. Have the
vehicle inspected by an authorized NISSAN
dealer. You do not need to have your ve-
hicle towed to the dealer.
CAUTION
Continued vehicle operation without
having the emission control system
checked and repaired as necessary
could lead to poor driveability, reduced
fuel economy, and possible damage to
the emission control system.
CHIMES
Brake pad wear warning
The disc brake pads have audible wear
warnings. When a brake pad requires re-
placement, it makes a high pitched scraping
sound when the vehicle is in motion,
whether or not the brake pedal is depressed.
Have the brakes checked as soon as pos-
sible if the warning sound is heard.
Instruments and controls2-9
ZX
Page 150 of 258
cHEADED UPHILL WITH CURB:s2
Turn the wheels away from the curb and
move the vehicle back until the curb side
wheel gently touches the curb.
cHEADED UPHILL OR DOWNHILL, NO
CURB:
s3
Turn the wheels toward the side of the
road so the vehicle will move away from
the center of the road if it moves.
4. Turn the ignition key to the LOCK posi-
tion and remove the key.The power assisted steering is designed to
use a hydraulic pump, driven by the engine,
to assist steering.
If the engine stops or the hydraulic pump
drive belt breaks, you will still have control of
the vehicle. However, much greater steer-
ing effort is needed, especially in sharp
turns and at low speeds.
WARNING
If the engine is not running or is turned
off while driving, the power assist for
the steering will not work. Steering will
be much harder to operate.The brake system has two separate
hydraulic circuits. If one circuit malfunctions,
you will still have braking at two wheels.
BRAKING PRECAUTIONS
Vacuum assisted brake
The brake booster aids braking by using
engine vacuum. If the engine stops, you can
stop the vehicle by depressing the brake
pedal. However, greater foot pressure on
the brake pedal will be required to stop the
vehicle and stopping distance will be longer.
Using the brakes
Avoid resting your foot on the brake pedal
while driving. This overheats the brakes,
increases wear on the brake linings and
pads, and reduces gas mileage.
To help save the brakes and to prevent the
brakes from overheating, reduce speed and
downshift to a lower gear before going down
a slope or long grade. Overheated brakes
may reduce braking performance and could
result in loss of vehicle control.
POWER STEERING BRAKE SYSTEM
Starting and driving5-17
ZX
Page 197 of 258
Self-adjusting brakes
Your vehicle is equipped with self-adjusting
brakes.
The front (and rear, if equipped) disc-type
brakes self-adjust every time the brake
pedal is applied. The rear drum-type brakes
also self-adjust every time the brake pedal
is applied.
If the brake pedal goes down farther than
normal, it may be due to a lack of adjust-
ment of the rear drum brakes. To adjust,
apply the parking brake several times.
WARNING
See an authorized NISSAN dealer for a
brake system check if the brake pedal
height does not return to normal.
Brake pad wear indicators
The disc brake pads on your vehicle have
audible wear indicators. When a brake pad
requires replacement, it makes a high
pitched scraping or screeching sound when
the vehicle is in motion whether or not the
brake pedal is depressed. Have the brakes
checked as soon as possible if the wearindicator sound is heard.
Under some driving or climate conditions,
occasional brake squeak, squeal or other
noise may be heard. Occasional brake
noise during light to moderate stops is nor-
mal and does not affect the function or
performance of the brake system.
The rear drum brakes (if so equipped) do
not have audible wear indicators. Should
you ever hear an unusually loud noise from
the rear drum brakes, have them inspected
as soon as possible by an authorized
NISSAN dealer.
Proper brake inspection intervals should
be followed.For more information regard-
ing brake inspections, see the appropriate
maintenance schedule information in the
``Maintenance'' section of this manual.
BRAKE BOOSTER
Check the brake booster function as fol-
lows:
1. With the engine off, press and release
the brake pedal several times. When
brake pedal movement (distance of
travel) remains the same from one pedalapplication to the next, continue on to the
next step.
2. While depressing the brake pedal, start
the engine. The pedal height should drop
a little.
3. With the brake pedal depressed, stop the
engine. Keep the pedal depressed for
about 30 seconds. The pedal height
should not change.
4. Run the engine for one minute without
depressing the brake pedal, then turn it
off. Depress the brake pedal several
times. The pedal travel distance will de-
crease gradually with each depression
as the vacuum is released from the
booster.
If the brakes do not operate properly, see an
authorized NISSAN dealer.
8-20Do-it-yourself
ZX
Page 224 of 258
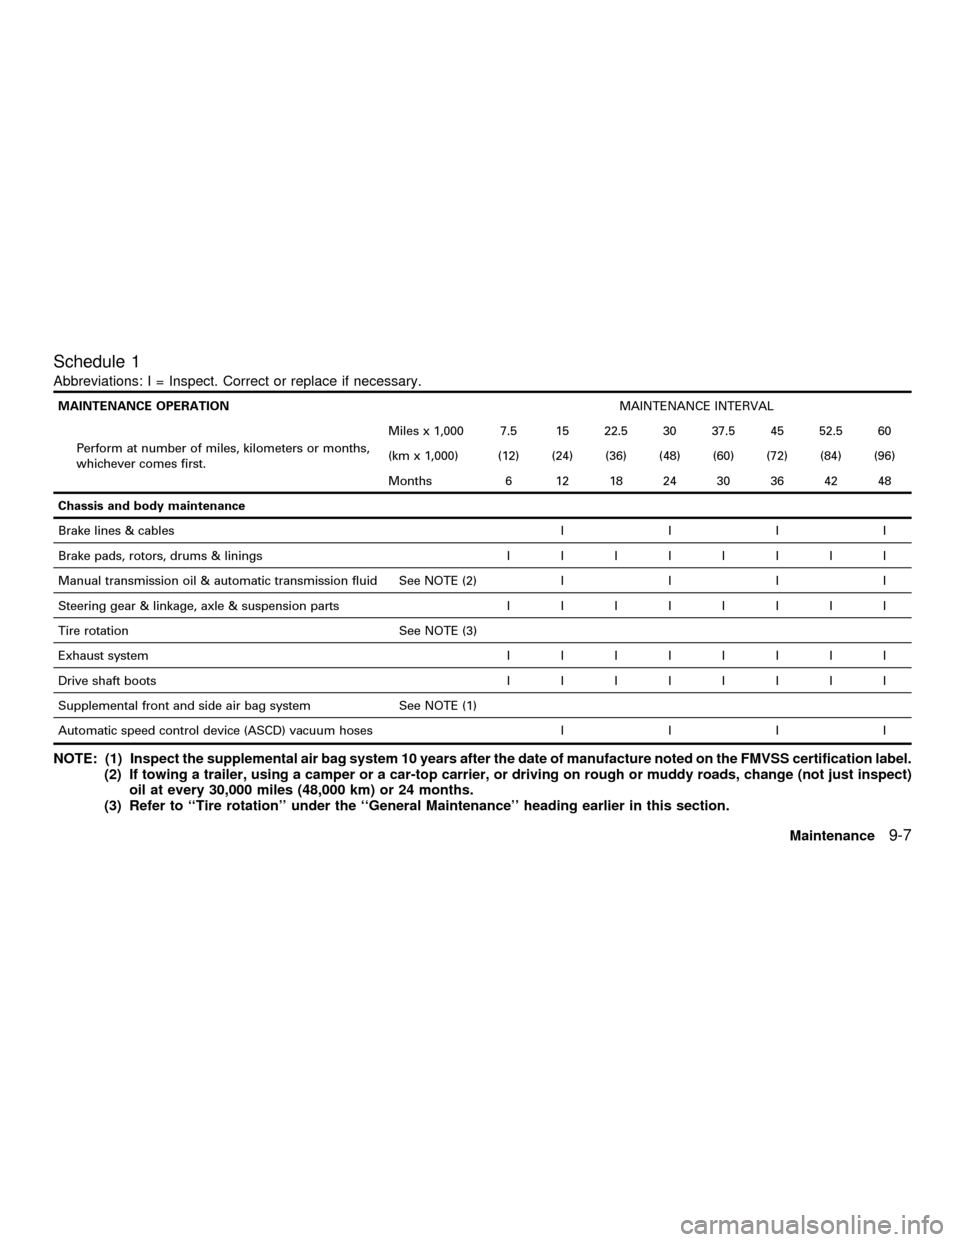
Schedule 1
Abbreviations: I = Inspect. Correct or replace if necessary.
MAINTENANCE OPERATIONMAINTENANCE INTERVAL
Perform at number of miles, kilometers or months,
whichever comes first.Miles x 1,000 7.5 15 22.5 30 37.5 45 52.5 60
(km x 1,000) (12) (24) (36) (48) (60) (72) (84) (96)
Months 6 12 18 24 30 36 42 48
Chassis and body maintenance
Brake lines & cablesIIII
Brake pads, rotors, drums & liningsIIIIIIII
Manual transmission oil & automatic transmission fluid See NOTE (2)IIII
Steering gear & linkage, axle & suspension partsIIIIIIII
Tire rotation See NOTE (3)
Exhaust systemIIIIIIII
Drive shaft bootsIIIIIIII
Supplemental front and side air bag system See NOTE (1)
Automatic speed control device (ASCD) vacuum hosesIIII
NOTE: (1) Inspect the supplemental air bag system 10 years after the date of manufacture noted on the FMVSS certification label.
(2) If towing a trailer, using a camper or a car-top carrier, or driving on rough or muddy roads, change (not just inspect)
oil at every 30,000 miles (48,000 km) or 24 months.
(3) Refer to ``Tire rotation'' under the ``General Maintenance'' heading earlier in this section.
Maintenance
9-7
ZX
Page 226 of 258
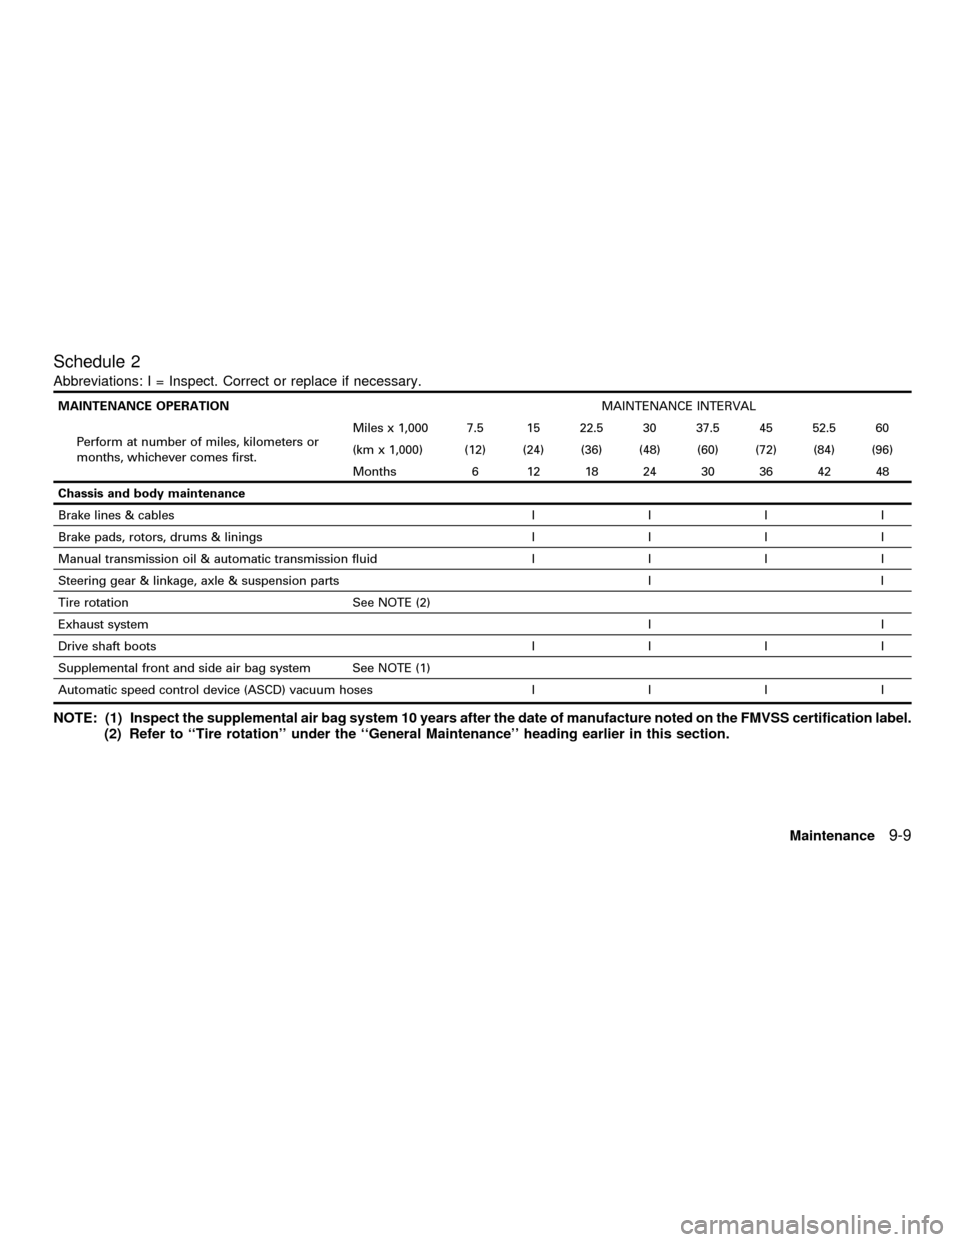
Schedule 2
Abbreviations: I = Inspect. Correct or replace if necessary.
MAINTENANCE OPERATIONMAINTENANCE INTERVAL
Perform at number of miles, kilometers or
months, whichever comes first.Miles x 1,000 7.5 15 22.5 30 37.5 45 52.5 60
(km x 1,000) (12) (24) (36) (48) (60) (72) (84) (96)
Months 6 12 18 24 30 36 42 48
Chassis and body maintenance
Brake lines & cablesIIII
Brake pads, rotors, drums & liningsIIII
Manual transmission oil & automatic transmission fluidIIII
Steering gear & linkage, axle & suspension parts I I
Tire rotation See NOTE (2)
Exhaust systemII
Drive shaft bootsIIII
Supplemental front and side air bag system See NOTE (1)
Automatic speed control device (ASCD) vacuum hosesIIII
NOTE: (1) Inspect the supplemental air bag system 10 years after the date of manufacture noted on the FMVSS certification label.
(2) Refer to ``Tire rotation'' under the ``General Maintenance'' heading earlier in this section.
Maintenance
9-9
ZX
Page 227 of 258

EXPLANATION OF
MAINTENANCE ITEMS
Additional information on the following
items marked with an ``*'' is found in the
``Do-it- yourself'' section of this manual.
Emission control system
maintenance
Drive belts* ÐCheck drive belts for wear,
fraying or cracking and also for proper ten-
sion. Replace any damaged drive belts.
Air cleaner filter ÐUnder normal driving
conditions, the air cleaner filter should be
replaced in accordance with the mainte-
nance schedule. However, driving the ve-
hicle in dusty areas may cause rapid clog-
ging of the element. Consequently, the
element may have to be replaced more
frequently.
EVAP vapor lines ÐCheck vapor lines
and connections for leaks, looseness or
deterioration. If leaks are found, replace
them.
Fuel lines ÐCheck the fuel hoses, piping
and connections for leaks, looseness or
deterioration. Replace any damaged parts.Fuel filter ÐIf the vehicle is operated
under extremely adverse weather condi-
tions or in areas where ambient tempera-
tures are either extremely low or extremely
high, the filter might become clogged. In
such an event, replace the filter immedi-
ately.
Engine coolant* ÐDrain and flush the
cooling system.
Engine oil & oil filter* ÐUnder normal
driving conditions, the engine oil and oil filter
should be replaced in accordance with the
maintenance schedule. However, under se-
vere driving conditions, they may have to be
replaced more frequently.
Spark plugs* ÐReplace with new plugs
having the correct heat range.
Intake & exhaust valve clearance Ð
Check the valve clearance if valve noise
increases.
Chassis and body maintenance
Brake lines & cables ÐCheck the brake
lines and hoses (including brake booster
vacuum hoses, connections & check valve)
and parking brake cables for proper attach-ment, leaks, cracks, chafing, abrasion, de-
terioration, etc.
Brake pads, rotors, drums & linings Ð
Check these and the other neighboring
brake components for wear, deterioration
and leaks. Under severe driving conditions,
they may have to be inspected more fre-
quently.
Manual & automatic transmission fluid*
ÐCheck the fluid level and visually inspect
for signs of leakage.
Under severe driving conditions, the fluid
should be replaced at the specified interval.
Steering gear & linkage, axle & suspen-
sion parts, and drive shaft boots Ð
Check for damage, looseness and leakage
of oil or grease. Under severe driving con-
ditions, inspection should be performed
more frequently.
Exhaust system ÐVisually check the ex-
haust pipes, muffler, and hangers for proper
attachment, leaks, cracks, chafing, abra-
sion, deterioration, etc. Under severe driv-
ing conditions, inspection should be per-
formed more frequently.
9-10Maintenance
ZX