2001 NISSAN ALTIMA automatic transmission fluid
[x] Cancel search: automatic transmission fluidPage 51 of 258
CHECKING BULBS
With all doors closed, apply the parking
brake and turn the ignition key to the ON
position without starting the engine. The
following lights come on:
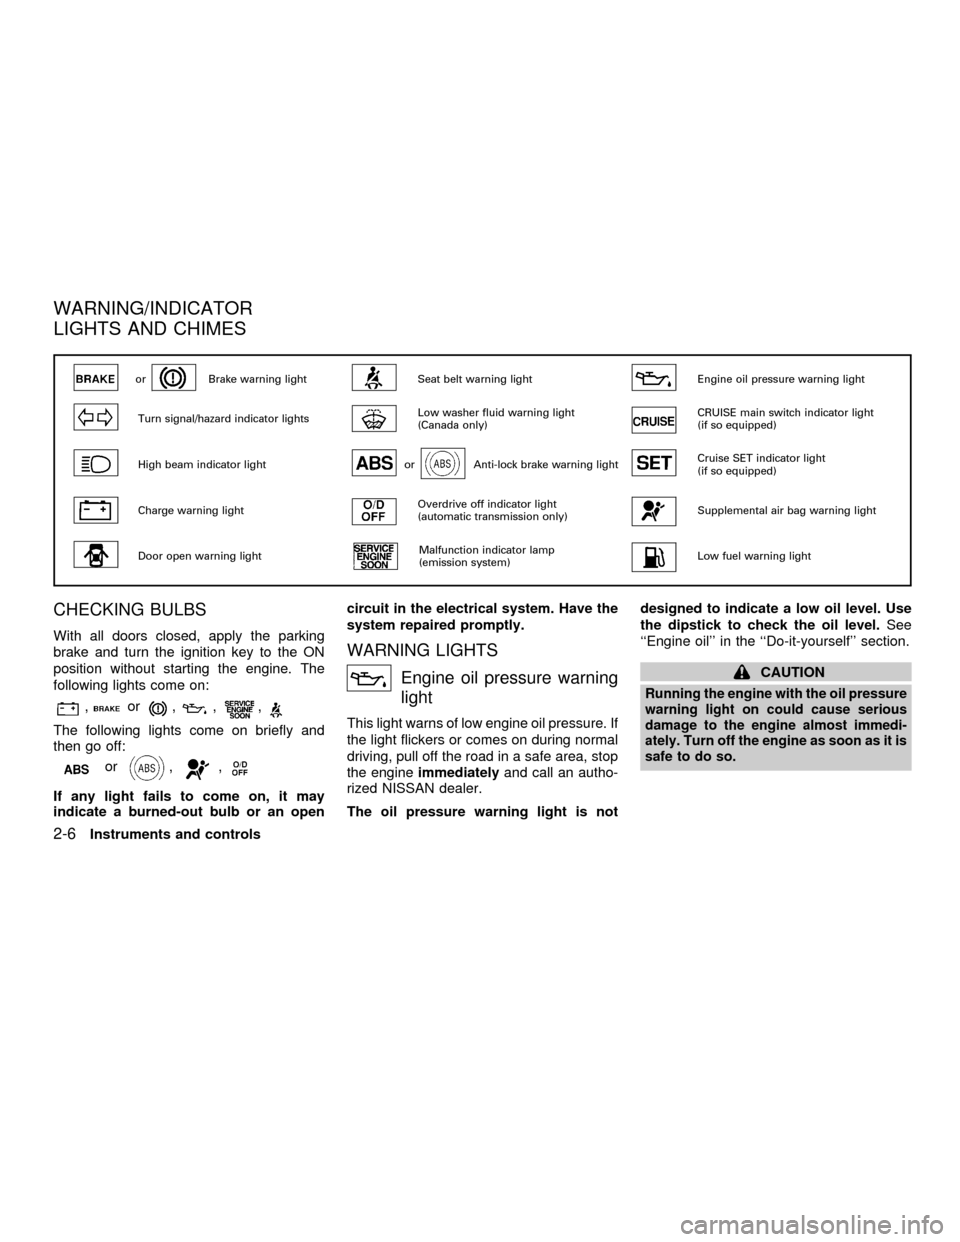
,or,,,
The following lights come on briefly and
then go off:
or,,
If any light fails to come on, it may
indicate a burned-out bulb or an opencircuit in the electrical system. Have the
system repaired promptly.
WARNING LIGHTS
Engine oil pressure warning
light
This light warns of low engine oil pressure. If
the light flickers or comes on during normal
driving, pull off the road in a safe area, stop
the engineimmediatelyand call an autho-
rized NISSAN dealer.
The oil pressure warning light is notdesigned to indicate a low oil level. Use
the dipstick to check the oil level.See
``Engine oil'' in the ``Do-it-yourself'' section.
CAUTION
Running the engine with the oil pressure
warning light on could cause serious
damage to the engine almost immedi-
ately. Turn off the engine as soon as it is
safe to do so.
orBrake warning lightSeat belt warning lightEngine oil pressure warning light
Turn signal/hazard indicator lightsLow washer fluid warning light
(Canada only)CRUISE main switch indicator light
(if so equipped)
High beam indicator lightorAnti-lock brake warning lightCruise SET indicator light
(if so equipped)
Charge warning lightOverdrive off indicator light
(automatic transmission only)Supplemental air bag warning light
Door open warning lightMalfunction indicator lamp
(emission system)Low fuel warning light
WARNING/INDICATOR
LIGHTS AND CHIMES
2-6Instruments and controls
ZX
Page 177 of 258

8 Do-it-yourself
Maintenance precautions .......................................8-2
Engine compartment check locations ....................8-4
Engine cooling system ...........................................8-5
Checking engine coolant level ..........................8-5
Changing engine coolant ..................................8-6
Engine oil ...............................................................8-8
Checking engine oil level ..................................8-8
Changing engine oil ..........................................8-9
Changing engine oil filter.................................8-10
Automatic transmission fluid ................................8-11
Temperature conditions for checking ..............8-11
Power steering fluid..............................................8-12
Brake and clutch fluid...........................................8-12
Brake fluid........................................................8-12
Clutch fluid .......................................................8-13
Window washer fluid ............................................8-13
Battery ..................................................................8-14
Jump starting ...................................................8-15
Drive belts ............................................................8-15
Spark plugs ..........................................................8-16
Replacing spark plugs .....................................8-16
Air cleaner ............................................................8-17Windshield wiper blades ......................................8-18
Cleaning ..........................................................8-18
Replacing .........................................................8-18
Parking brake and brake pedal ............................8-19
Checking parking brake...................................8-19
Checking brake pedal .....................................8-19
Brake booster ..................................................8-20
Clutch pedal .........................................................8-21
Checking clutch pedal .....................................8-21
Fuses ....................................................................8-21
Engine compartment .......................................8-21
Passenger compartment .................................8-22
Multi-remote controller battery replacement ........8-23
Lights ....................................................................8-24
Headlights ........................................................8-24
Front turn signal lamp .....................................8-28
Front parking and cornering lamp ...................8-28
Front sidemarker lamp ....................................8-29
Fog lights .........................................................8-30
Exterior and interior lights ...............................8-31
Wheels and tires ..................................................8-35
Tire pressure ...................................................8-35
ZX
Page 179 of 258
When performing any inspection or mainte-
nance work on your vehicle, always take
care to prevent serious accidental injury to
yourself or damage to the vehicle. The
following are general precautions which
should be closely observed.
WARNING
cPark the vehicle on a level surface,
apply the parking brake securely and
block the wheels to prevent the ve-
hicle from moving. For manual trans-
mission models, move the shift lever
to (N) Neutral. For an automatic
transmission models, move the shift
selector lever to P (Park).
cBe sure the ignition key is in the OFF
or LOCK position when performing
any parts replacement or repairs.
cYour vehicle is equipped with an
automatic engine cooling fan. It may
come on at any time without warn-
ing, even if the ignition key is in the
OFF position and the engine is not
running. To avoid injury, always dis-
connect the negative battery cable
before working near the fan.c
If you must work with the engine run-
ning, keep your hands, clothing, hair
and tools away from moving fans,
belts and any other moving parts.
cIt is advisable to secure or remove
any loose clothing and remove any
jewelry, such as rings, watches, etc.
before working on your vehicle.
cAlways wear eye protection when-
ever you work on your vehicle.
cIf you must run the engine in an
enclosed space such as a garage, be
sure there is proper ventilation for
exhaust gases to escape.
cNever get under the vehicle while it
is supported only by a jack. If it is
necessary to work under the vehicle,
support it with safety stands.
c
Keep smoking materials, flame and
sparks away from the fuel tank and
battery.cOn gasoline engine models with the
multiport fuel injection (MFI) system,
the fuel filter or fuel lines should be
serviced by an authorized NISSAN
dealer because the fuel lines are un-
der high pressure even when the en-
gine is off.
CAUTION
cDo not work under the hood while
the engine is hot. Turn off the engine
and wait until it cools down.
cNever connect or disconnect the bat-
tery or any transistorized compo-
nent while the ignition is in the ON
position.
cNever leave the engine or automatic
transmission related component
harnesses disconnected while the
ignition is in the ON position.
c
Avoid contact with used engine oil
and coolant. Improperly disposed
engine oil, engine coolant, and/or
other vehicle fluids can damage the
environment. Always conform to lo-
cal regulations for disposal of ve-
hicle fluid.
MAINTENANCE
PRECAUTIONS
8-2Do-it-yourself
ZX
Page 188 of 258
WARNING
cWhen the engine is running, keep
hands, jewelry and clothing away
from any moving parts such as the
cooling fan and drive belts.
cAutomatic transmission fluid is poi-
sonous and should be stored care-
fully in marked containers out of the
reach of children.
TEMPERATURE CONDITIONS
FOR CHECKING
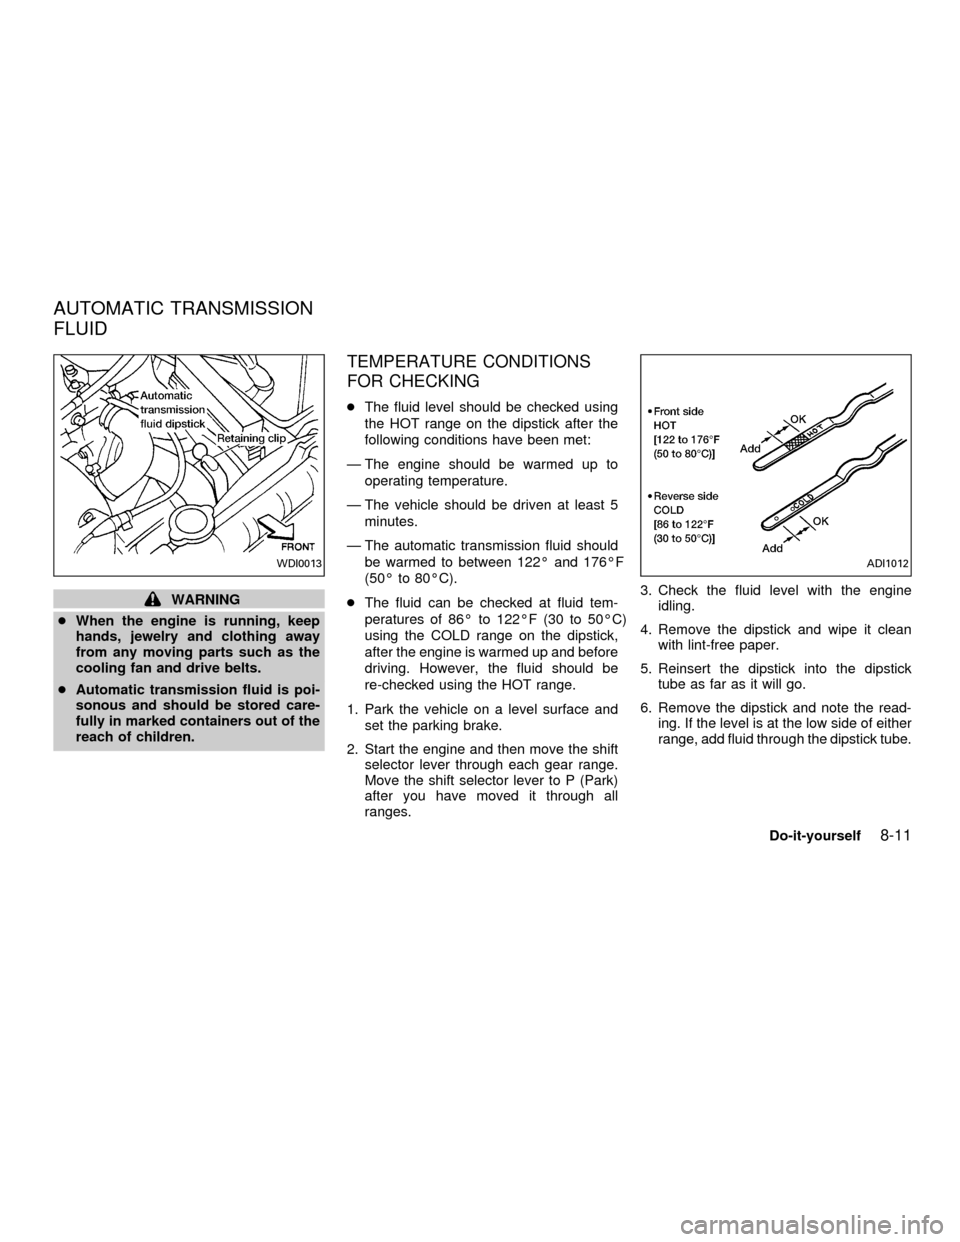
cThe fluid level should be checked using
the HOT range on the dipstick after the
following conditions have been met:
Ð The engine should be warmed up to
operating temperature.
Ð The vehicle should be driven at least 5
minutes.
Ð The automatic transmission fluid should
be warmed to between 122É and 176ÉF
(50É to 80ÉC).
cThe fluid can be checked at fluid tem-
peratures of 86É to 122ÉF (30 to 50ÉC)
using the COLD range on the dipstick,
after the engine is warmed up and before
driving. However, the fluid should be
re-checked using the HOT range.
1. Park the vehicle on a level surface and
set the parking brake.
2. Start the engine and then move the shift
selector lever through each gear range.
Move the shift selector lever to P (Park)
after you have moved it through all
ranges.3. Check the fluid level with the engine
idling.
4. Remove the dipstick and wipe it clean
with lint-free paper.
5. Reinsert the dipstick into the dipstick
tube as far as it will go.
6. Remove the dipstick and note the read-
ing. If the level is at the low side of either
range, add fluid through the dipstick tube.
WDI0013ADI1012
AUTOMATIC TRANSMISSION
FLUID
Do-it-yourself8-11
ZX
Page 189 of 258
CAUTION
DO NOT OVERFILL. USE ONLY NISSAN
Matic `D' (Continental U.S. and Alaska)
or Canada NISSAN Automatic Trans-
mission Fluid. DexronŸ III/MerconŸ or
equivalent may also be used. Outside
the continental United States and
Alaska contact an authorized NISSAN
dealership for more information re-
garding suitable fluids, including rec-
ommended brand(s) of DexronŸ
III/MerconŸ Automatic Transmission
Fluid.
NOTE:
If the vehicle has been driven for a long
time at high speeds, or in city traffic in
hot weather, or if it is being used to pull
a trailer, the accurate fluid level cannot
be read. You should wait until the fluid
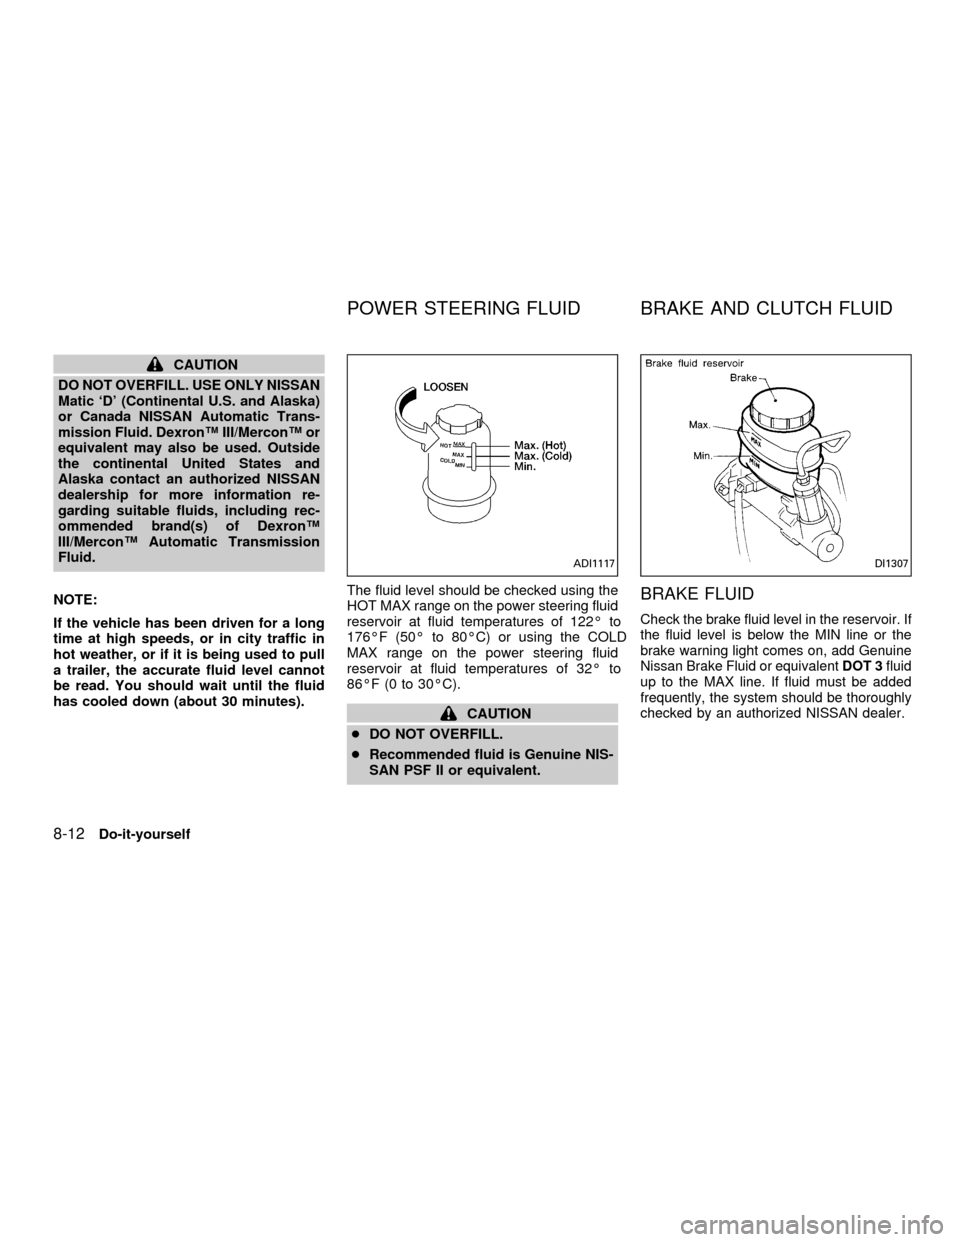
has cooled down (about 30 minutes).The fluid level should be checked using the
HOT MAX range on the power steering fluid
reservoir at fluid temperatures of 122É to
176ÉF (50É to 80ÉC) or using the COLD
MAX range on the power steering fluid
reservoir at fluid temperatures of 32É to
86ÉF (0 to 30ÉC).
CAUTION
cDO NOT OVERFILL.
cRecommended fluid is Genuine NIS-
SAN PSF II or equivalent.
BRAKE FLUID
Check the brake fluid level in the reservoir. If
the fluid level is below the MIN line or the
brake warning light comes on, add Genuine
Nissan Brake Fluid or equivalentDOT 3fluid
up to the MAX line. If fluid must be added
frequently, the system should be thoroughly
checked by an authorized NISSAN dealer.
ADI1117DI1307
POWER STEERING FLUID BRAKE AND CLUTCH FLUID
8-12Do-it-yourself
ZX
Page 221 of 258

Brake pedal and booster* ÐCheck the
pedal for smooth operation and make sure it
has the proper distance under it when de-
pressed fully. Check the brake booster func-
tion. Be certain to keep the floor mat away
from the pedal.
Parking brake* ÐCheck that the lever has
the proper travel and confirm that your
vehicle is held securely on a fairly steep hill
with only the parking brake applied.
Automatic transmission P position
mechanism ÐOn a fairly steep hill check
that your vehicle is held securely with the
shift selector lever in the P (Park) position
without applying any brakes.
Under the hood and vehicle
The maintenance items listed here should
be checked periodically, such as each time
you check the engine oil or refuel.
Additional information on the items
marked with an ª*º can be found in the
ªDo-it-yourself'' section of this manual.
Windshield washer fluid* ÐCheck that
there is adequate fluid in the tank.
Engine oil level* ÐCheck the level after
parking the vehicle on a level surface, withthe engine off. Wait a few minutes for the oil
to drain back into the oil pan.
Brake and (if so equipped) clutch fluid
levels* ÐMake sure that the brake and
clutch fluid level are between the MIN and
MAX lines on each reservoir.
Power steering fluid level* and lines Ð
Check the level when the fluid is cold and
with the engine off. Check the lines for
proper attachment, leaks, cracks, etc.
Automatic transmission fluid level* Ð
Check the level after putting the shift selec-
tor lever in P (Park) with the engine idling at
operating temperature.
Engine coolant level* ÐCheck the cool-
ant level when the engine is cold.
Radiator and hoses ÐCheck the front of
the radiator and clean off any dirt, insects,
leaves, etc., that may have accumulated.
Make sure the hoses have no cracks, de-
formation, rot or loose connections.
Engine drive belts* ÐMake sure the drive
belts are not frayed, worn, cracked or oily.
Battery* ÐCheck the fluid level in each
cell. It should be between the MAX and MIN
lines.Exhaust system ÐMake sure there are no
cracks, holes, loose joints or supports. If the
sound of the exhaust seems unusual or
there is a smell of exhaust fumes, immedi-
ately have the exhaust system inspected by
a qualified individual. (See the carbon mon-
oxide warning in the ``Starting and driving''
section of this manual.)
Underbody ÐThe underbody is frequently
exposed to corrosive substances such as
those used on icy roads or to control dust. It
is very important to remove these sub-
stances from the underbody, otherwise rust
may form on the floor pan, frame, fuel
linesand exhaust system. At the end of
winter, the underbody should be thoroughly
flushed with plain water, especially those
areas where mud and dirt may accumulate.
See the ``Appearance and care'' section for
additional information.
Fluid leaks ÐCheck under the vehicle for
fuel, oil, water or other fluid leaks after the
vehicle has been parked for a while. Water
dripping from the air conditioner after use is
normal. If you should notice any leaks or if
gasoline fumes are evident, check for the
cause and have it corrected immediately by
an authorized NISSAN dealer.
9-4Maintenance
ZX
Page 224 of 258
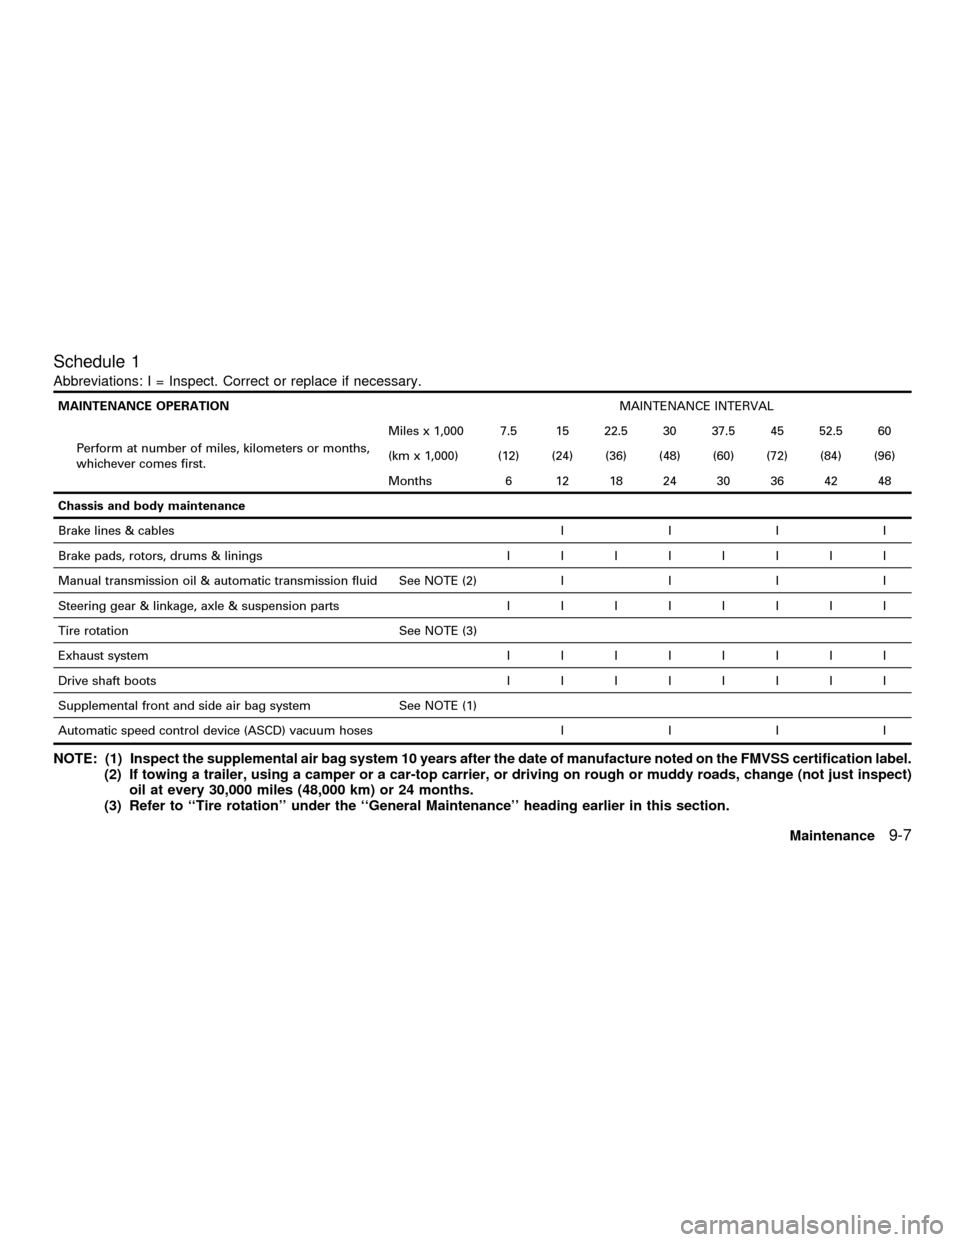
Schedule 1
Abbreviations: I = Inspect. Correct or replace if necessary.
MAINTENANCE OPERATIONMAINTENANCE INTERVAL
Perform at number of miles, kilometers or months,
whichever comes first.Miles x 1,000 7.5 15 22.5 30 37.5 45 52.5 60
(km x 1,000) (12) (24) (36) (48) (60) (72) (84) (96)
Months 6 12 18 24 30 36 42 48
Chassis and body maintenance
Brake lines & cablesIIII
Brake pads, rotors, drums & liningsIIIIIIII
Manual transmission oil & automatic transmission fluid See NOTE (2)IIII
Steering gear & linkage, axle & suspension partsIIIIIIII
Tire rotation See NOTE (3)
Exhaust systemIIIIIIII
Drive shaft bootsIIIIIIII
Supplemental front and side air bag system See NOTE (1)
Automatic speed control device (ASCD) vacuum hosesIIII
NOTE: (1) Inspect the supplemental air bag system 10 years after the date of manufacture noted on the FMVSS certification label.
(2) If towing a trailer, using a camper or a car-top carrier, or driving on rough or muddy roads, change (not just inspect)
oil at every 30,000 miles (48,000 km) or 24 months.
(3) Refer to ``Tire rotation'' under the ``General Maintenance'' heading earlier in this section.
Maintenance
9-7
ZX
Page 226 of 258
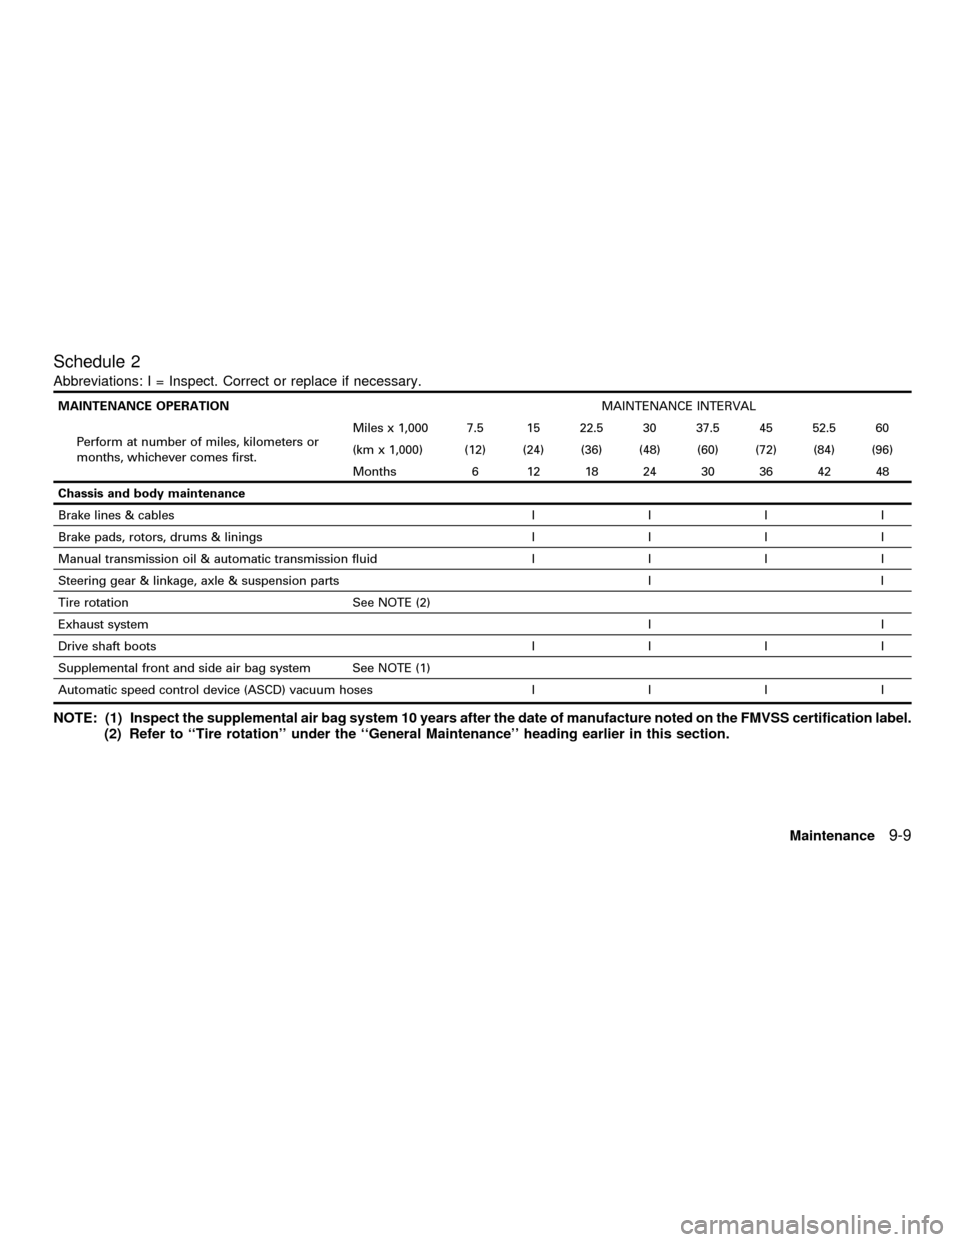
Schedule 2
Abbreviations: I = Inspect. Correct or replace if necessary.
MAINTENANCE OPERATIONMAINTENANCE INTERVAL
Perform at number of miles, kilometers or
months, whichever comes first.Miles x 1,000 7.5 15 22.5 30 37.5 45 52.5 60
(km x 1,000) (12) (24) (36) (48) (60) (72) (84) (96)
Months 6 12 18 24 30 36 42 48
Chassis and body maintenance
Brake lines & cablesIIII
Brake pads, rotors, drums & liningsIIII
Manual transmission oil & automatic transmission fluidIIII
Steering gear & linkage, axle & suspension parts I I
Tire rotation See NOTE (2)
Exhaust systemII
Drive shaft bootsIIII
Supplemental front and side air bag system See NOTE (1)
Automatic speed control device (ASCD) vacuum hosesIIII
NOTE: (1) Inspect the supplemental air bag system 10 years after the date of manufacture noted on the FMVSS certification label.
(2) Refer to ``Tire rotation'' under the ``General Maintenance'' heading earlier in this section.
Maintenance
9-9
ZX