2001 NISSAN ALTIMA trunk
[x] Cancel search: trunkPage 89 of 258
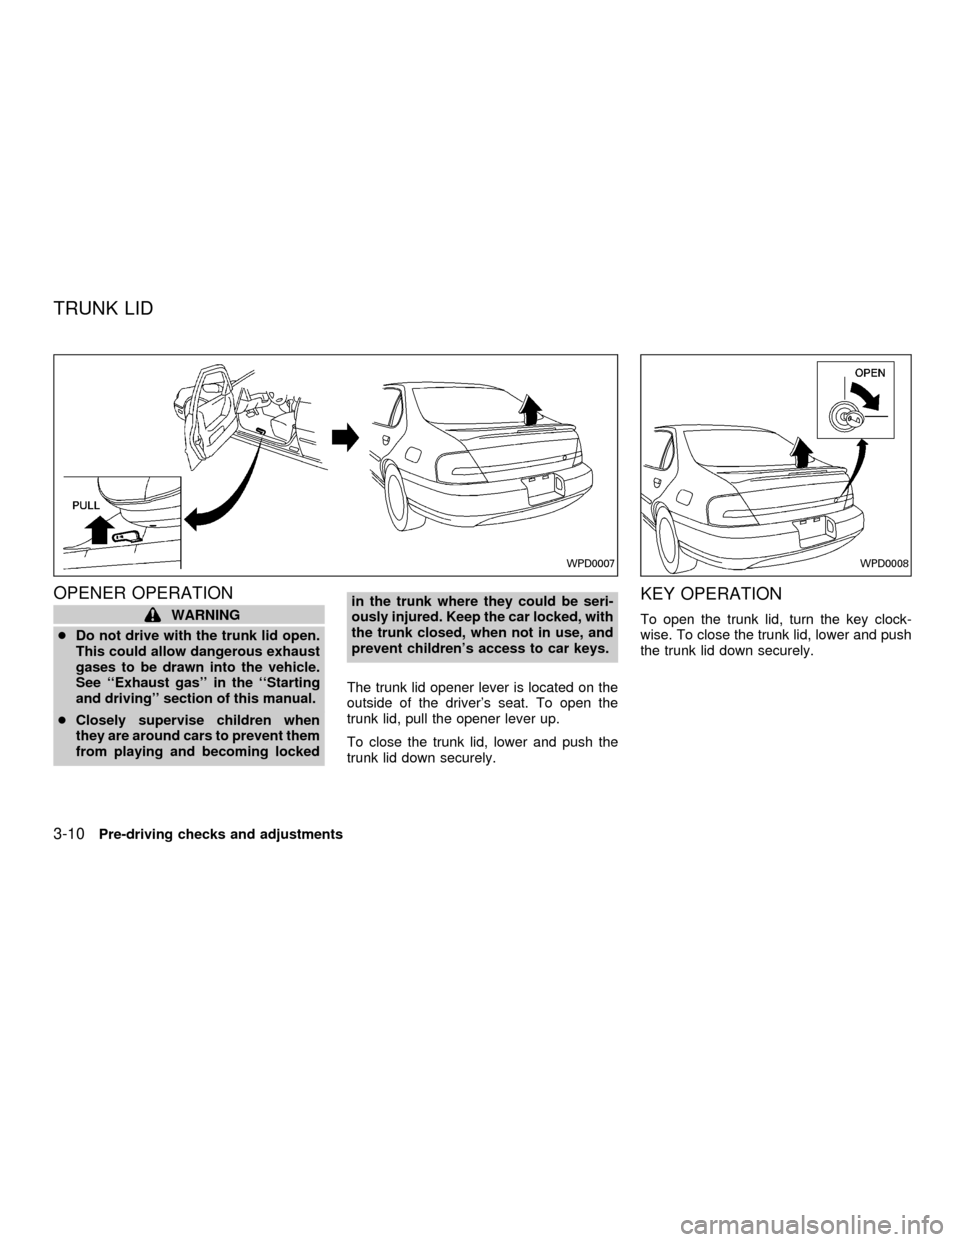
OPENER OPERATION
WARNING
cDo not drive with the trunk lid open.
This could allow dangerous exhaust
gases to be drawn into the vehicle.
See ``Exhaust gas'' in the ``Starting
and driving'' section of this manual.
cClosely supervise children when
they are around cars to prevent them
from playing and becoming lockedin the trunk where they could be seri-
ously injured. Keep the car locked, with
the trunk closed, when not in use, and
prevent children's access to car keys.
The trunk lid opener lever is located on the
outside of the driver's seat. To open the
trunk lid, pull the opener lever up.
To close the trunk lid, lower and push the
trunk lid down securely.
KEY OPERATION
To open the trunk lid, turn the key clock-
wise. To close the trunk lid, lower and push
the trunk lid down securely.
WPD0007WPD0008
TRUNK LID
3-10Pre-driving checks and adjustments
ZX
Page 90 of 258
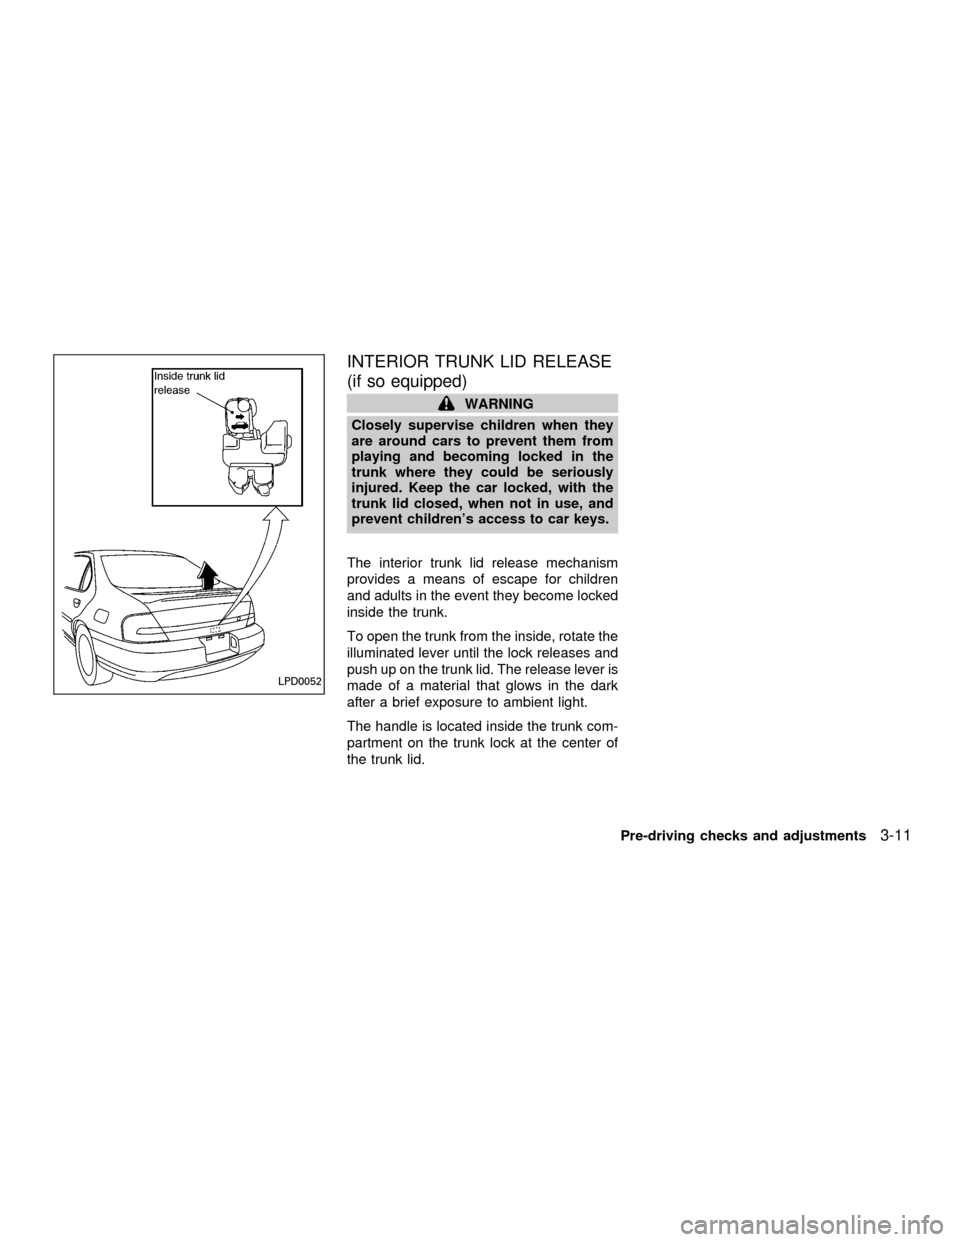
INTERIOR TRUNK LID RELEASE
(if so equipped)
WARNING
Closely supervise children when they
are around cars to prevent them from
playing and becoming locked in the
trunk where they could be seriously
injured. Keep the car locked, with the
trunk lid closed, when not in use, and
prevent children's access to car keys.
The interior trunk lid release mechanism
provides a means of escape for children
and adults in the event they become locked
inside the trunk.
To open the trunk from the inside, rotate the
illuminated lever until the lock releases and
push up on the trunk lid. The release lever is
made of a material that glows in the dark
after a brief exposure to ambient light.
The handle is located inside the trunk com-
partment on the trunk lock at the center of
the trunk lid.
LPD0052
Pre-driving checks and adjustments3-11
ZX
Page 135 of 258
WARNING
cDo not leave children, impaired
adults, or pets alone in your vehicle.
They could accidentally injure them-
selves or others through inadvertent
operation of the vehicle. Also, on
hot, sunny days, temperatures in a
closed vehicle could quickly become
high enough to cause severe or pos-
sibly fatal injuries to people or ani-
mals.
cClosely supervise children when
they are around cars to prevent them
from playing and becoming locked
in the trunk where they could be
seriously injured. Keep the car
locked, with the trunk closed, when
not in use, and prevent children's
access to car keys.
EXHAUST GAS
(Carbon Monoxide)
WARNING
Do not breathe exhaust gases; they
contain colorless and odorless carbonmonoxide. Carbon monoxide is dan-
gerous. It can cause unconsciousness
or death.
cIf you suspect that exhaust fumes
are entering the vehicle, drive with
all windows fully open, and have the
vehicle inspected immediately.
cDo not run the engine in closed
spaces such as a garage.
cDo not park the vehicle with the
engine running for any extended
length of time.
cKeep the trunk lid closed while driv-
ing, otherwise exhaust gases could
be drawn into the passenger com-
partment. If you must drive with the
trunk lid open, follow these precau-
tions:
1. Open all the windows.
2. Set the
air recirculation but-
ton (if so equipped) to the off
position and turn the fan control
dial to 4 (high) to circulate the air.cIf electrical wiring or other cable
connections must pass to a trailer
through the seal on the trunk lid or
the body, follow the manufacturer's
recommendation to prevent carbon
monoxide entry into the vehicle.
cThe exhaust system and body
should be inspected by a qualified
mechanic whenever:
a. The vehicle is raised for service.
b. You suspect that exhaust fumes
are entering into the passenger
compartment.
c. You notice a change in the sound
of the exhaust system.
d.
You have had an accident involv-
ing damage to the exhaust system,
underbody, or rear of the vehicle.
THREE-WAY CATALYST
The three-way catalyst is an emission con-
trol device installed in the exhaust system.
Exhaust gases in the three-way catalyst are
burned at high temperatures to help reduce
pollutants.
PRECAUTIONS WHEN
STARTING AND DRIVING
5-2Starting and driving
ZX
Page 158 of 258

Getting the spare tire and tools
1. Open the trunk. Lift the trunk floor carpet-
ing and spare tire cover. Remove the tool
bag (which contains the jack rod and
wheel nut wrench) and the spare tire. If
necessary, use the flat end of the jack
rod as shown to loosen the spare tire
hold-down bolt.
2. Push the release clip on the jack access
door to open. To remove the jack, turn
the jack screw counterclockwise. Use
either end of the jack rod to loosen the
jack from its storage position.
ACE1002
WCE0001
In case of emergency6-3
ZX
Page 162 of 258
Installing the spare tire
The spare tire is designed for emergency
use. See specific instructions under the
heading ``Wheels and tires'' in the ``Do-
it-yourself'' section.
1. Clean any mud or dirt from the surface
between the wheel and hub.
2. Carefully put the spare tire on and install
the wheel nuts finger-tight.
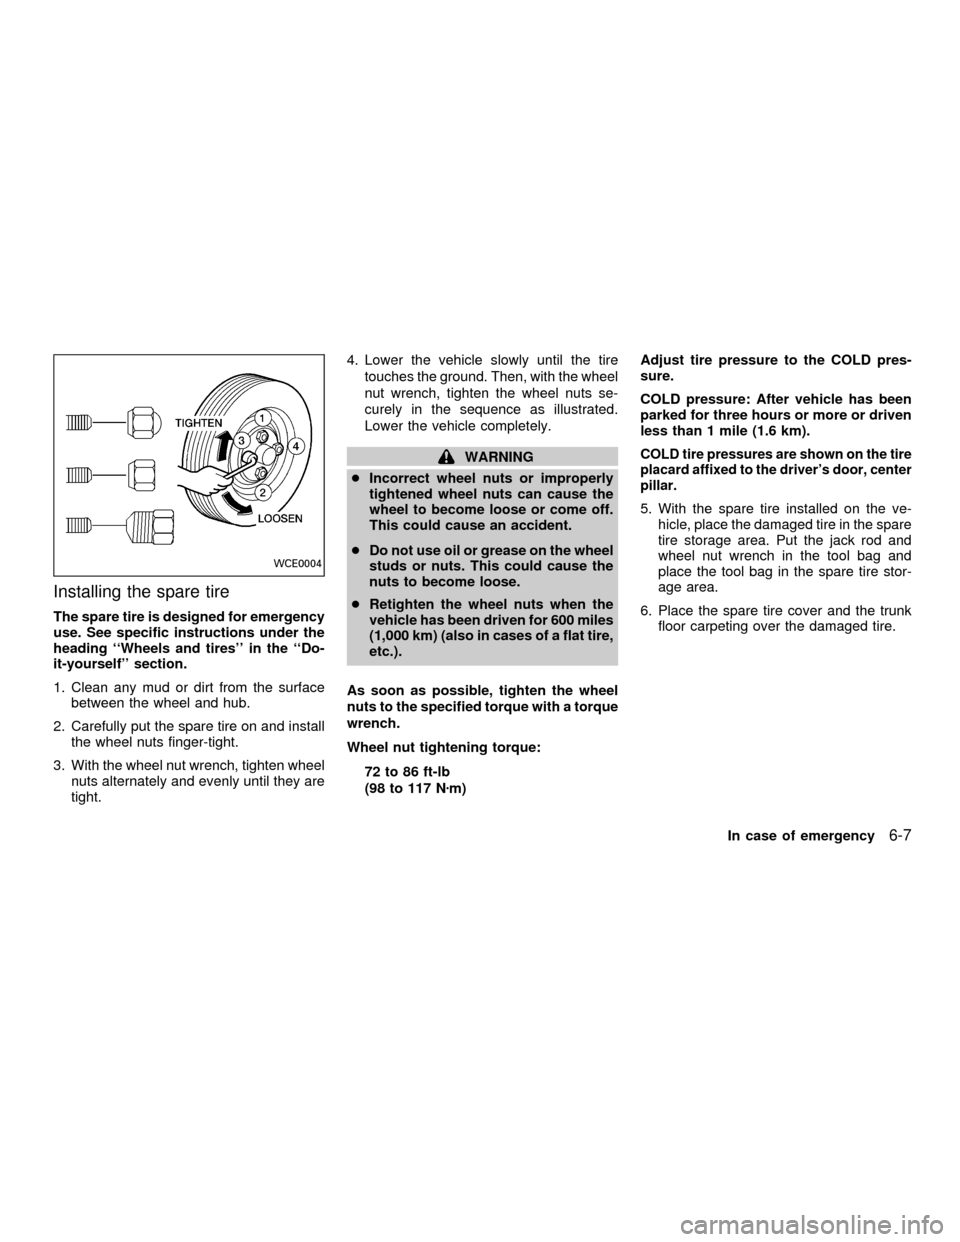
3. With the wheel nut wrench, tighten wheel
nuts alternately and evenly until they are
tight.4. Lower the vehicle slowly until the tire
touches the ground. Then, with the wheel
nut wrench, tighten the wheel nuts se-
curely in the sequence as illustrated.
Lower the vehicle completely.
WARNING
cIncorrect wheel nuts or improperly
tightened wheel nuts can cause the
wheel to become loose or come off.
This could cause an accident.
cDo not use oil or grease on the wheel
studs or nuts. This could cause the
nuts to become loose.
cRetighten the wheel nuts when the
vehicle has been driven for 600 miles
(1,000 km) (also in cases of a flat tire,
etc.).
As soon as possible, tighten the wheel
nuts to the specified torque with a torque
wrench.
Wheel nut tightening torque:
72 to 86 ft-lb
(98 to 117 Nzm)Adjust tire pressure to the COLD pres-
sure.
COLD pressure: After vehicle has been
parked for three hours or more or driven
less than 1 mile (1.6 km).COLD tire pressures are shown on the tire
placard affixed to the driver's door, center
pillar.
5. With the spare tire installed on the ve-
hicle, place the damaged tire in the spare
tire storage area. Put the jack rod and
wheel nut wrench in the tool bag and
place the tool bag in the spare tire stor-
age area.
6. Place the spare tire cover and the trunk
floor carpeting over the damaged tire.
WCE0004
In case of emergency6-7
ZX
Page 163 of 258
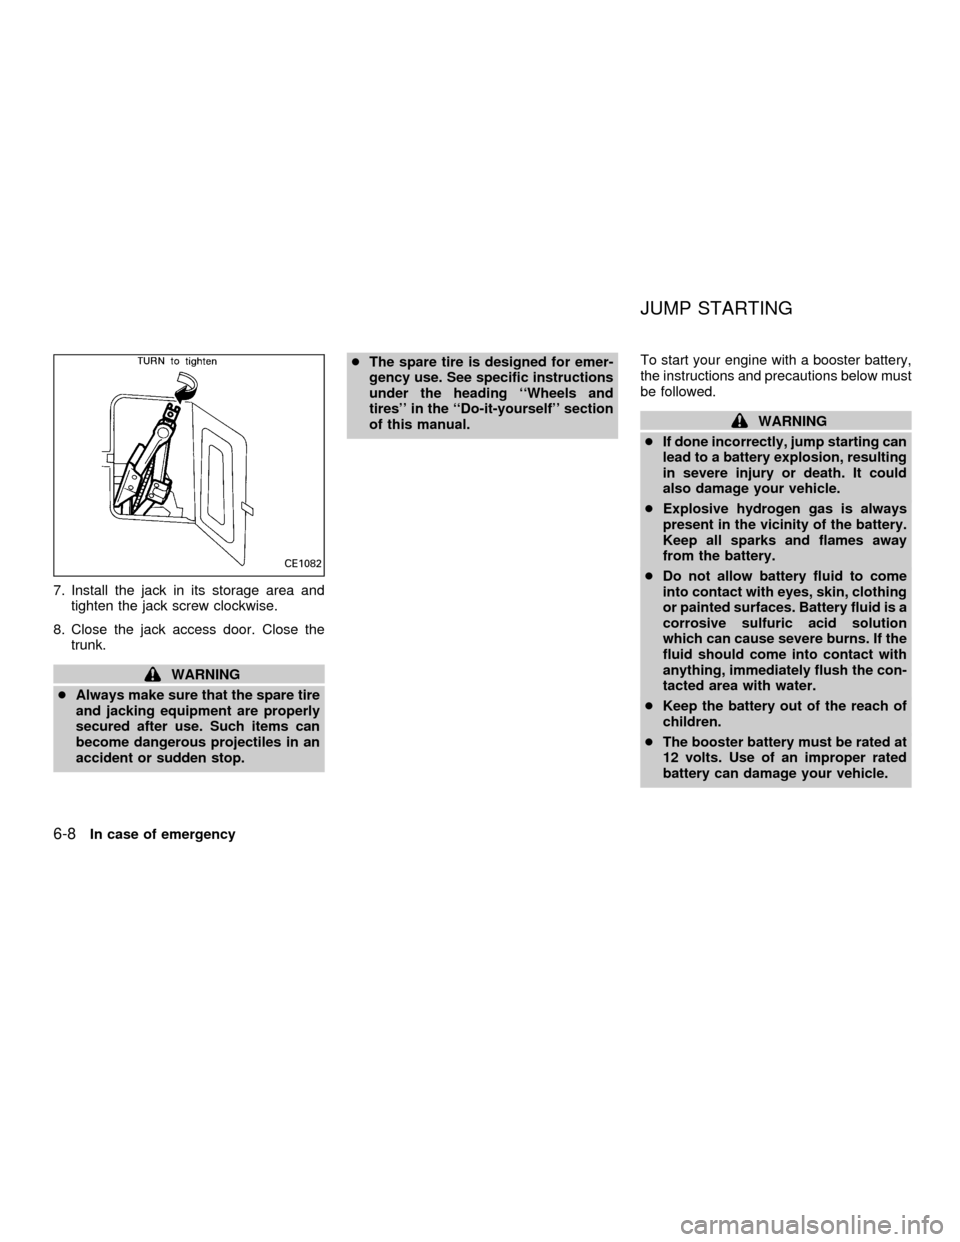
7. Install the jack in its storage area and
tighten the jack screw clockwise.
8. Close the jack access door. Close the
trunk.
WARNING
cAlways make sure that the spare tire
and jacking equipment are properly
secured after use. Such items can
become dangerous projectiles in an
accident or sudden stop.cThe spare tire is designed for emer-
gency use. See specific instructions
under the heading ``Wheels and
tires'' in the ``Do-it-yourself'' section
of this manual.To start your engine with a booster battery,
the instructions and precautions below must
be followed.
WARNING
cIf done incorrectly, jump starting can
lead to a battery explosion, resulting
in severe injury or death. It could
also damage your vehicle.
cExplosive hydrogen gas is always
present in the vicinity of the battery.
Keep all sparks and flames away
from the battery.
cDo not allow battery fluid to come
into contact with eyes, skin, clothing
or painted surfaces. Battery fluid is a
corrosive sulfuric acid solution
which can cause severe burns. If the
fluid should come into contact with
anything, immediately flush the con-
tacted area with water.
cKeep the battery out of the reach of
children.
cThe booster battery must be rated at
12 volts. Use of an improper rated
battery can damage your vehicle.
CE1082
JUMP STARTING
6-8In case of emergency
ZX
Page 208 of 258
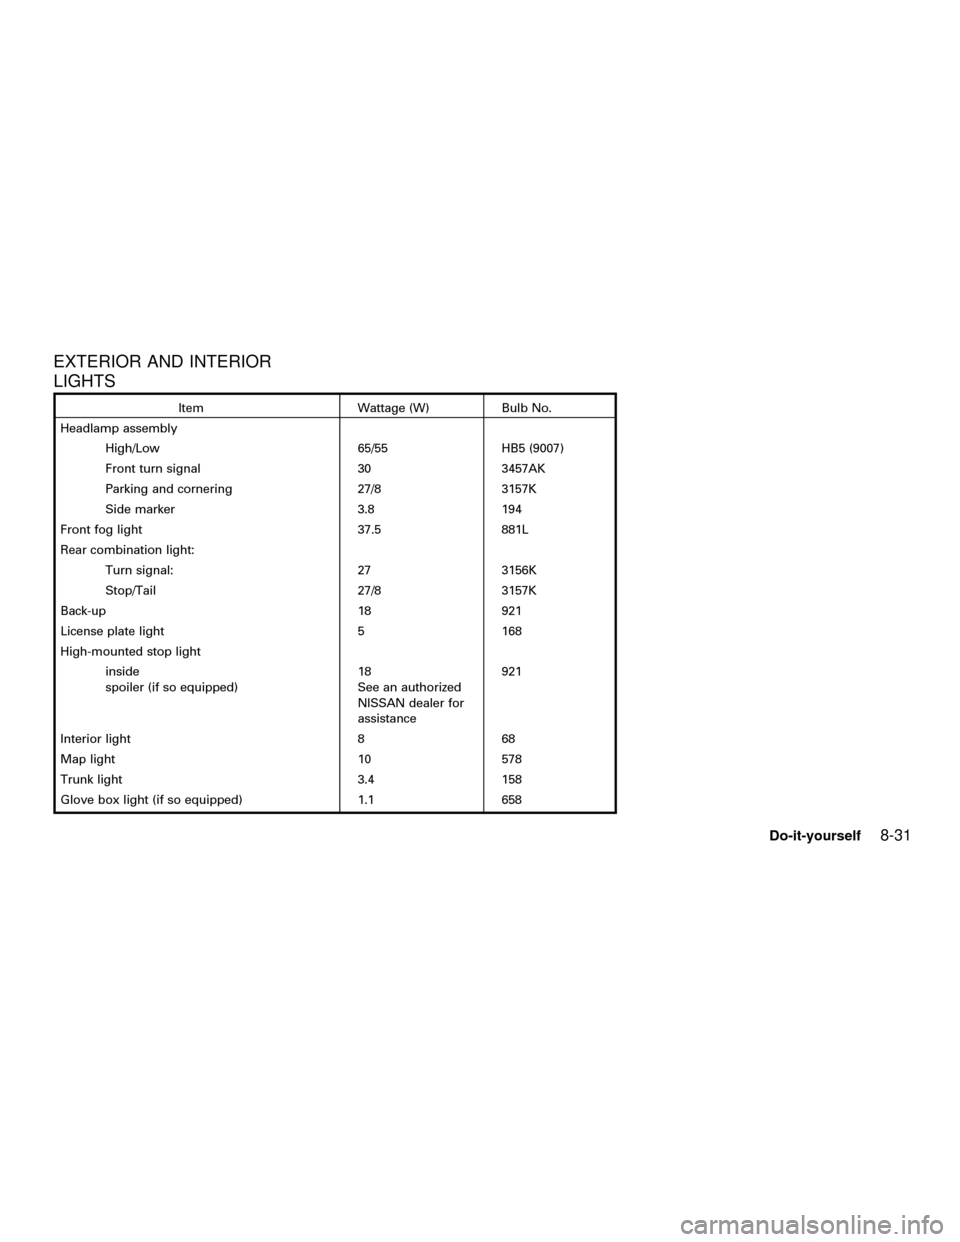
EXTERIOR AND INTERIOR
LIGHTS
Item Wattage (W) Bulb No.
Headlamp assembly
High/Low 65/55 HB5 (9007)
Front turn signal 30 3457AK
Parking and cornering 27/8 3157K
Side marker 3.8 194
Front fog light 37.5 881L
Rear combination light:
Turn signal: 27 3156K
Stop/Tail 27/8 3157K
Back-up 18 921
License plate light 5 168
High-mounted stop light
inside
spoiler (if so equipped)18
See an authorized
NISSAN dealer for
assistance921
Interior light 8 68
Map light 10 578
Trunk light 3.4 158
Glove box light (if so equipped) 1.1 658
Do-it-yourself8-31
ZX
Page 254 of 258
General maintenance .................................. 9-2
Glasses case ............................................. 2-21
Glove box................................................... 2-23
Glove box lock ........................................... 2-23
H
Hazard warning flasher switch .................. 2-18
Head restraints ............................................ 1-8
Headlight and turn signal switch ............... 2-16
Heater
Heater and air conditioner controls ........ 4-3
Heater operation ..................................... 4-4
Homelink Transceiver
Integrated HomeLinkTUniversal
Transceiver (If so equipped) ................ 2-29
Hood release ............................................... 3-9
Horn ........................................................... 2-19
I
Ignition switch .............................................. 5-4
Immobilizer system ..................... 2-12, 3-2, 5-6
Important vehicle information label.......... 10-11
Increasing fuel economy............................ 5-15
Indicator lights and chimes (See warning/
indicator lights and chimes) ......................... 2-6
Inside mirror ............................................... 3-15
Instrument brightness control .................... 2-17
Integrated HomeLinkTUniversal Transceiver
(If so equipped).......................................... 2-29Interior light ................................................ 2-28
Interior trunk lid release ............................. 3-11
J
Jump starting ...................................... 6-8, 8-15
K
Key ............................................................... 3-2
Keyless entry system (See multi-remote
control system) ............................................ 3-5
L
Labels
Air conditioner specification label ....... 10-12
Emission control information label...... 10-12
Engine serial number ......................... 10-11
F.M.V.S.S. certification label .............. 10-11
Vehicle identification number (VIN)
plate .................................................... 10-10
Warning labels (for SRS) ..................... 1-18
License plate
Installing the license plate .................. 10-13
Light
Air bag warning light ............ 1-14, 1-19, 2-7
Brake light (See stop light) ................... 8-34
Bulb check/instrument panel .................. 2-6
Bulb replacement.................................. 8-31
Charge warning light .............................. 2-7Cornering light ...................................... 2-18
Front fog light switch ............................ 2-18
Headlight and turn signal switch .......... 2-16
Interior light ........................................... 2-28
Low washer fluid warning light ............... 2-7
Spotlights (See map light) .................... 2-28
Trunk light ............................................. 2-29
Warning/indicator lights and chimes ...... 2-6
Lock
Child safety rear door lock ..................... 3-5
Door locks............................................... 3-2
Fuel filler lid lock opener lever ............. 3-12
Glove box lock ...................................... 2-23
Power door locks .................................... 3-3
Trunk lid lock opener lever ................... 3-10
M
Maintenance
General maintenance ............................. 9-2
Inside the vehicle.................................... 9-3
Maintenance precautions ....................... 8-2
Outside the vehicle ................................. 9-2
Periodic maintenance schedules ............ 9-5
Seat belt maintenance.......................... 1-27
Under the hood and vehicle ................... 9-4
Malfunction indicator lamp (MIL) ................. 2-9
Map lights .................................................. 2-28
Map pocket ................................................ 2-21
Meters and gauges ...................................... 2-2
Mirror
Inside mirror.......................................... 3-15
11-3
ZX