Page 263 of 317
260 Exterior lamps
Te ch n ica l
data Instruments
and controlsOperation DrivingInstrument
cluster displayPractical hintsCar care Index
Exterior lamps
Headlamp adjustment
Correct headlamp adjustment is extremely important.
Check and readjust headlamps at regular intervals and
when a bulb has been replaced.
For adjusting headlamp aim see page 268.Replacing bulbs
To prevent a possible electrical short circuit, switch off
lamp prior to replacing a bulb.
When replacing bulbs, install only 12 volt bulbs with
the specified watt rating.
When replacing halogen bulbs do not touch glass
portion of bulb with bare hands. Use plain paper or a
clean cloth.
Wa r n i n g !
Bulbs and bulb holders can be very hot. Allow the
lamp to cool down before changing a bulb.
Halogen lamps contain pressurized gas. A bulb can
explode if you:
• touch or move it when hot,
•drop the bulb,
•scratch the bulb.Wear eye and hand protection.
Wa r n i n g !
Because of high voltage in Xenon lamps, it is
dangerous to replace the bulb of repair the lamp
and its components. We recommend that you have
such work done by a qualified technician.
Page 264 of 317
261 Exterior lamps
Te ch n ica l
data Instruments
and controlsOperation DrivingInstrument
cluster displayPractical hintsCar care Index Headlamp assembly (Halogen)
1Headlamp vertical adjustment screw
2Headlamp horizontal adjustment screw
3Headlamp cover with locking tab
4Bulb socket for turn signal, parking, standing, and
side marker lamp5Electrical connector for low beam headlamp bulb
6Electrical connector for high beam headlamp bulb
7Level for headlamp vertical adjustment
8Scale for headlamp horizontal adjustment
9Auxiliary fog lamp (if so equipped)
Page 265 of 317
262 Exterior lamps
Te ch n ica l
data Instruments
and controlsOperation DrivingInstrument
cluster displayPractical hintsCar care Index
Headlamp assembly (Xenon)
1Headlamp vertical adjustment screw
2Headlamp horizontal adjustment screw
3Headlamp cover with locking tab
4Bulb socket for turn signal, parking, standing, and
side marker lamp5Electrical connector for low beam headlamp bulb
6Electrical connector for high beam headlamp bulb
7Auxiliary fog lamp (if so equipped)
Page 266 of 317
263 Exterior lamps
Te ch n ica l
data Instruments
and controlsOperation DrivingInstrument
cluster displayPractical hintsCar care Index Bulbs for high beam (only Halogen headlamps)
H1 U (55 W)
Bulbs for low beam
H7 (55 W)
Open hood.
Push down tab at top end of cover (3) and remove. Pull
off electrical connector (5 or 6). Unhook and move aside
clamping ring. Remove bulb.
Insert new bulb (seating properly in cutouts of bulb
socket), mount clamping ring. Reinstall and push
electrical connector on securely. Reinstall cover (3).Xenon (optional)
Bulb for low beam
Xenon (optional)
Bulb for high beam
Note:
Vehicles with Xenon headlamps:
We recommend that you have changed the bulb for the
high beam by a qualified technician.
Wa r n i n g !
Because of high voltage in Xenon lamps, it is
dangerous to replace the bulb or repair the lamp
and its components. We recommend that you have
such work done by a qualified technician.
Page 271 of 317
268 Exterior lamps
Te ch n ica l
data Instruments
and controlsOperation DrivingInstrument
cluster displayPractical hintsCar care Index
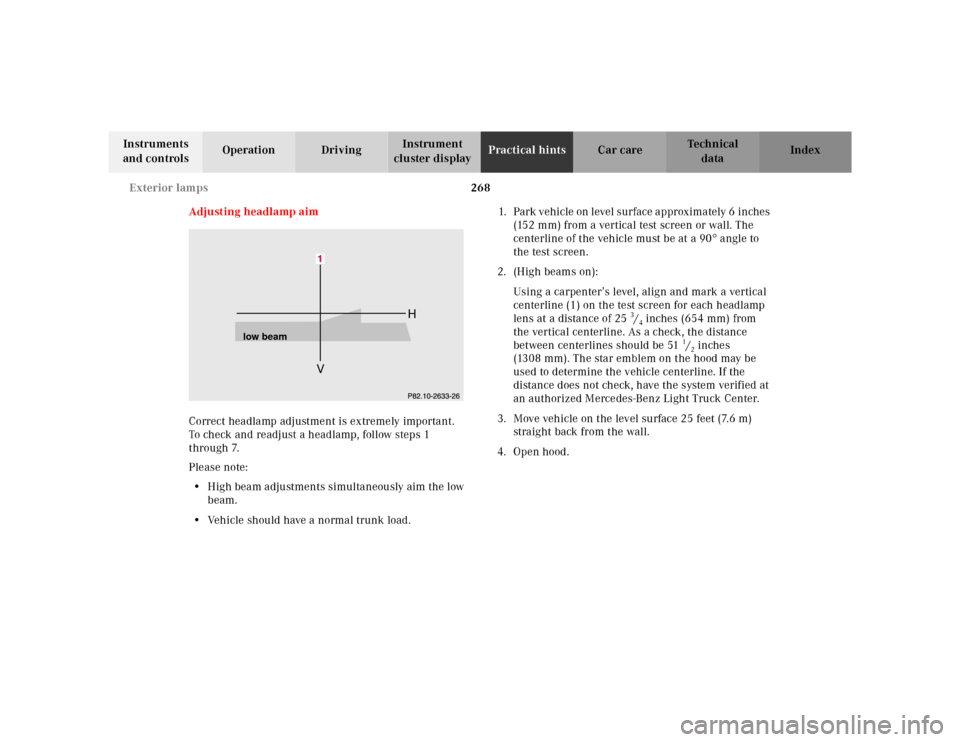
Adjusting headlamp aim
Correct headlamp adjustment is extremely important.
To check and readjust a headlamp, follow steps 1
through 7.
Please note:
•High beam adjustments simultaneously aim the low
beam.
•Vehicle should have a normal trunk load.1. Park vehicle on level surface approximately 6 inches
(152 mm) from a vertical test screen or wall. The
centerline of the vehicle must be at a 90° angle to
the test screen.
2. (High beams on):
Using a carpenter’s level, align and mark a vertical
centerline (1) on the test screen for each headlamp
lens at a distance of 25
3/4inches (654 mm) from
the vertical centerline. As a check, the distance
between centerlines should be 51
1/2inches
(1308 mm). The star emblem on the hood may be
used to determine the vehicle centerline. If the
distance does not check, have the system verified at
an authorized Mercedes-Benz Light Truck Center.
3. Move vehicle on the level surface 25 feet (7.6 m)
straight back from the wall.
4. Open hood.
VH
low beam
Page 272 of 317
269 Exterior lamps
Te ch n ica l
data Instruments
and controlsOperation DrivingInstrument
cluster displayPractical hintsCar care Index 5. (High beams on):
Simultaneously turn adjusting screws (1 and 2 on
page 261 or 262) counterclockwise to adjust
headlamp downward, clockwise upward) equally
until bubble in the level (7 on page 261) is centered
on the “0” mark.
Graduations:
screw 1: 0.50° pitch,
screw 2: 0.67° pitch.
6. Horizontal headlamp aim (High beams on):
Turn adjusting screw (2) (left headlamp:
counterclockwise to adjust to the left, clockwise to
the right [right headlamp in opposite direction])
until the headlamp (high beam pattern) is centered
about the vertical centerline (1) as shown.
The left and right headlamps must be adjusted
individually.7. For proper aim, the indicator (8 on page 261) should
align with the “0” mark after horizontal adjustment.
Graduations: 0.33° pitch.
Note:
If it is not possible to obtain a proper headlamp
adjustment, have the system checked at your authorized
Mercedes-Benz Light Truck Center.
Page 280 of 317
277 Contents - Vehicle care
Te ch n ica l
data Instruments
and controlsOperation DrivingInstrument
cluster displayPractical hintsCar careIndex
Vehicle careCleaning and care
of the vehicle .............................278
Power washer ..............................279
Tar stains .....................................279
Paintwork, painted body
components .................................279
Engine cleaning ..........................280
Vehicle washing .........................280
Ornamental moldings ................280
Headlamps, taillamps,
turn signal lenses ......................280Window cleaning ....................... 281
Wiper blades .............................. 281
Light alloy wheels ..................... 281
Instrument cluster ..................... 281
Steering wheel and
gear selector lever ..................... 281
Cup holder .................................. 282
Seat belts ..................................... 282
Headliner .................................... 282
Upholstery .................................. 282
Hard plastic trim items ............. 282
Plastic and rubber parts ........... 282
Page 283 of 317
280 Cleaning and care of the vehicle
Te ch n ica l
data Instruments
and controlsOperation DrivingInstrument
cluster displayPractical hintsCar careIndex
Engine cleaning
Prior to cleaning the engine compartment make sure to
protect electrical components and connectors from the
intrusion of water and cleaning agents.
Corrosion protection, such as MB Anticorrosion Wax
should be applied to the engine compartment after
every engine cleaning. Before applying, all control
linkage bushings and joints should be lubricated. The
poly-V-belt and all pulleys should be protected from any
wax.
Ve h i c l e w a s h i n g
Do not use hot water or wash your vehicle in direct
sunlight. Use only a mild car wash detergent, such as
Mercedes-Benz approved Car Shampoo.
Thoroughly spray the vehicle with a diffused jet of
water. Direct only a very weak spray towards the
ventilation intake. Use plenty of water and rinse the
sponge and chamois frequently.
Rinse with clear water and thoroughly wipe dry with a
chamois. Do not allow cleaning agents to dry on the
finish.Due to the width of the vehicle, prior to running the
vehicle through an automatic car wash, fold back the
outside mirrors to prevent them from getting damaged.
In the winter, thoroughly remove all traces of road salt
as soon as possible.
When washing the underbody, do not forget to clean the
inner sides of the wheels.
Ornamental moldings
For regular cleaning and care of very dirty chrome-
plated parts, use a chrome cleaner.
Headlamps, taillamps, turn signal lenses
Use a mild car wash detergent, such as Mercedes-Benz
approved Car Shampoo, with plenty of water.
To prevent scratches, never apply strong force and use
only a soft, non-scratchy cloth when cleaning the lenses.
Do not attempt to wipe dirty lenses with a dry cloth or
sponge.