Page 125 of 317
122 Interior equipment
Te ch n ica l
data Instruments
and controlsOperationDrivingInstrument
cluster displayPractical hints Car care Index
To return seat bench section to sitting position:
1. Pull lever (1) and raise seat bench section until it
locks in place.
2. Pull lock button (2) up, and unfold seat back to
upright position. Check for secure locking by
pushing and pulling on the backrest. The red
backrest lock indicators at the lock buttons (2) are
not visible in locked position.
3. Pull lever (1) in direction of arrow, and slide seat
bench section rearward to desired position.4. Install and adjust head restraint.
For installation of head restraints see page 124.
Wa r n i n g !
Failure to assure that seats are locked into place
could result in an increased chance of injury in an
accident.Never place hands under seat or near any moving
parts while a seat is being adjusted.
Page 126 of 317

123 Interior equipment
Te ch n ica l
data Instruments
and controlsOperationDrivingInstrument
cluster displayPractical hints Car care Index Easy entry/exit feature
(only in vehicles with third row seats)
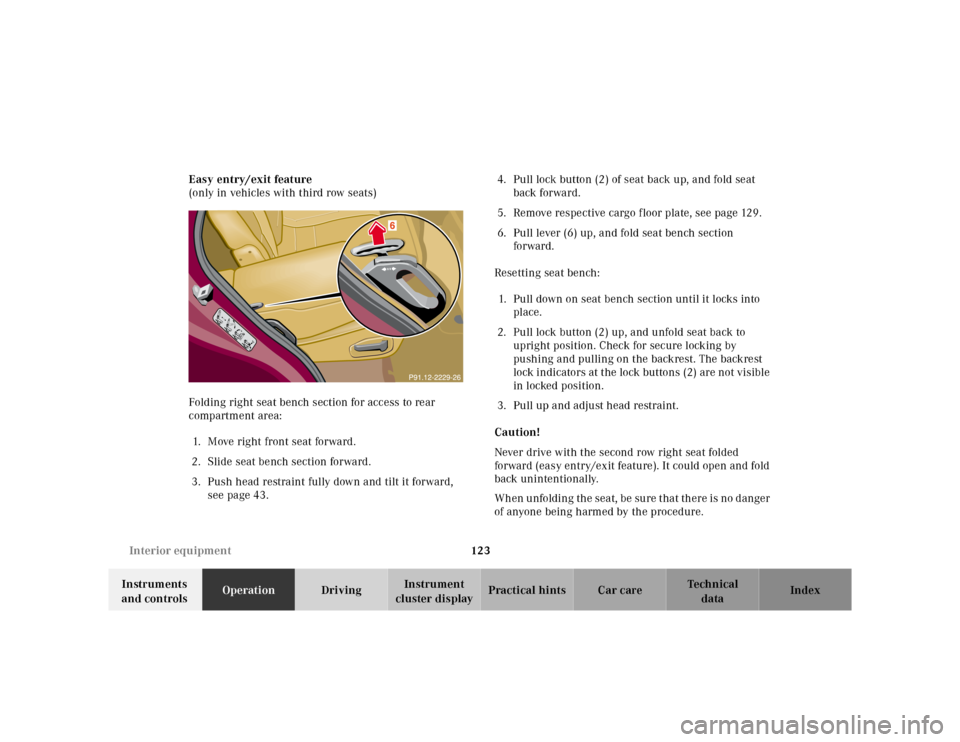
Folding right seat bench section for access to rear
compartment area:
1. Move right front seat forward.
2. Slide seat bench section forward.
3. Push head restraint fully down and tilt it forward,
see page 43.4. Pull lock button (2) of seat back up, and fold seat
back forward.
5. Remove respective cargo floor plate, see page 129.
6. Pull lever (6) up, and fold seat bench section
forward.
Resetting seat bench:
1. Pull down on seat bench section until it locks into
place.
2. Pull lock button (2) up, and unfold seat back to
upright position. Check for secure locking by
pushing and pulling on the backrest. The backrest
lock indicators at the lock buttons (2) are not visible
in locked position.
3. Pull up and adjust head restraint.
Caution!
Never drive with the second row right seat folded
forward (easy entry/exit feature). It could open and fold
back unintentionally.
When unfolding the seat, be sure that there is no danger
of anyone being harmed by the procedure.
Page 129 of 317
126 Interior equipment
Te ch n ica l
data Instruments
and controlsOperationDrivingInstrument
cluster displayPractical hints Car care Index
Third row seats (MB Accessory)
Two single seats can be unfolded to enlarge the seating
area.
To fold seat down:
1. Remove head restraint from seat cushion.
2. Remove cargo f loor plate, see page 129.
3. Lift tensioner (1) upward to a horizontal position to
release tension of the strap.4. Disengage hook (2) and attach belt at hook and loop
strip on underside of seat.
5. Fold seat down until it locks securely in place.
Important!
When seat is correctly unfolded, the red marking on
the seat release (4) should not be visible.
6. Store cargo floor plates inside the backrest, see
page 130.
4
Page 130 of 317

127 Interior equipment
Te ch n ica l
data Instruments
and controlsOperationDrivingInstrument
cluster displayPractical hints Car care Index 7. Pull release lever (3) and unfold seat back until it
locks securely in place.
8. Install head restraint in seat back.
Note:
For removal and installation of head restraint refer to
rear seat head restraints on page 124.
To sto r e s ea t:
1. Remove head restraint from seat back.
2. Pull release lever (3) and fold seat back forward
until it audibly locks securely in place. Place seat
belt between lever (3) and backrest.
3. Remove cargo floor plates from the backrest.
4. Pull seat release (4) and fold seat up. Engage
hook (2) in ceiling mount. Pull on free end of strap
until tight.
5. Install head restraint in openings provided in seat
cushion.
6. Install cargo floor plates, see page 129.
Wa r n i n g !
Failure to assure that seats are locked into place
could result in an increased chance of injury in an
accident.Never place hands under seat or near any moving
parts while a seat is being adjusted.For your protection, drive only with properly
positioned head restraints.Adjust head restraint to support the back of the
head approximately at ear level.
Page 135 of 317
132 Interior equipment
Te ch n ica l
data Instruments
and controlsOperationDrivingInstrument
cluster displayPractical hints Car care Index
Cargo tie-down ringsCarefully secure cargo by applying even load on all
rings with rope of sufficient strength to hold down the
cargo. The cargo area is provided with four tie-down
anchors. Additional two rings are located at the rear of
front seats.
Caution!
While the partition net will help protect you from
smaller objects, it cannot prevent the movement of
large, heavier objects into the passenger area in an
accident. Such items must be properly secured using
the cargo tie-down rings in the cargo area floor.
Page 136 of 317
133 Interior equipment
Te ch n ica l
data Instruments
and controlsOperationDrivingInstrument
cluster displayPractical hints Car care Index Hooks
Four hooks, located on the rear compartment trim
panels can be used to secure light weight items
(maximum permissible weight per hook: 9 lbs. [4 kg]).Partiti on net (Optional)
Use of the partition net is a particularly important safety
factor when the vehicle is loaded higher than the top of
the seat backrests with smaller objects.
The partition net can be installed behind the backrests
of the front or rear seats.
Note:
Passenger use of seats behind installed partition net is
restricted because of the footwell being taken up by the
net.
Page 138 of 317
135 Interior equipment
Te ch n ica l
data Instruments
and controlsOperationDrivingInstrument
cluster displayPractical hints Car care Index Installation behind rear seats
1. Insert tie down hooks (2) in rings (3) behind the
rear seats.
2. Pull on loose ends of tie downs until net is tight.Removal:
1. Lift tensioner (4) upward to a horizontal position to
release tensioning of the strap.
2. Disengage tie down hooks (2) from rings (3).
3. Remove partition net from holders (1) and close the
covers.
Storage:
1. Roll up and close partition net.
2. Store partition net behind rear seat bench.
Caution!
While the partition net will help protect you from
smaller objects, it cannot prevent the movement of
large, heavier objects into the passenger area in an
accident. Such items must be properly secured using
the cargo tie-down rings in the cargo area floor, see
page 132.
Page 139 of 317

136 Interior equipment
Te ch n ica l
data Instruments
and controlsOperationDrivingInstrument
cluster displayPractical hints Car care Index
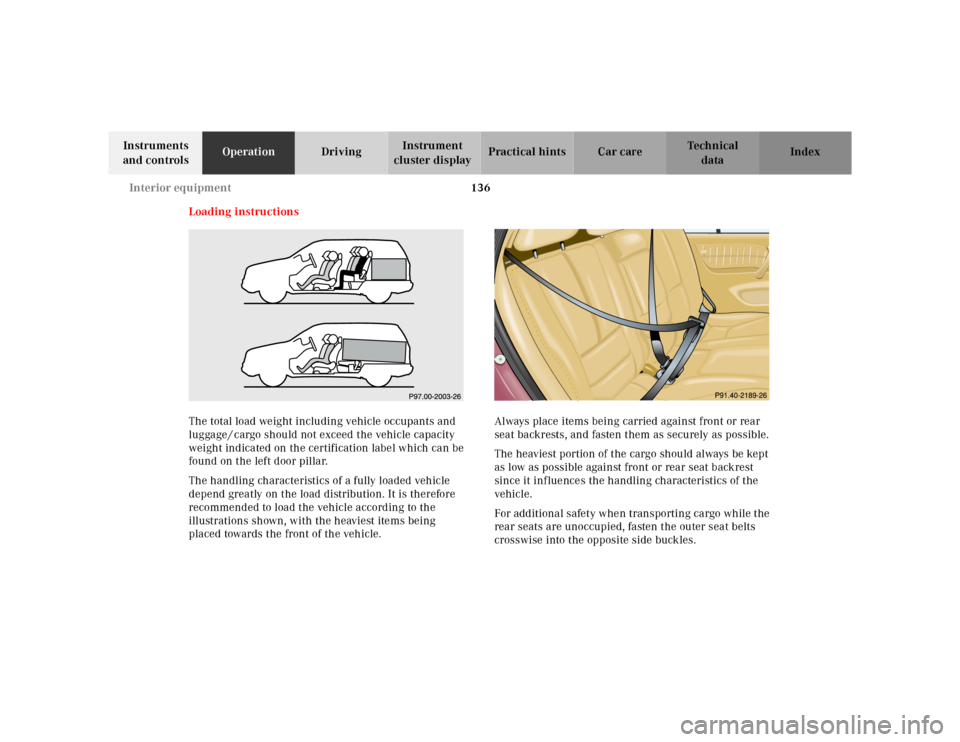
Loading instructions
The total load weight including vehicle occupants and
luggage / cargo should not exceed the vehicle capacity
weight indicated on the certification label which can be
found on the left door pillar.
The handling characteristics of a fully loaded vehicle
depend greatly on the load distribution. It is therefore
recommended to load the vehicle according to the
illustrations shown, with the heaviest items being
placed towards the front of the vehicle.Always place items being carried against front or rear
seat backrests, and fasten them as securely as possible.
The heaviest portion of the cargo should always be kept
as low as possible against front or rear seat backrest
since it influences the handling characteristics of the
vehicle.
For additional safety when transporting cargo while the
rear seats are unoccupied, fasten the outer seat belts
crosswise into the opposite side buckles.