2001 MERCEDES-BENZ ML320 wheel
[x] Cancel search: wheelPage 103 of 317
100 Climate control
Te ch n ica l
data Instruments
and controlsOperationDrivingInstrument
cluster displayPractical hints Car care Index
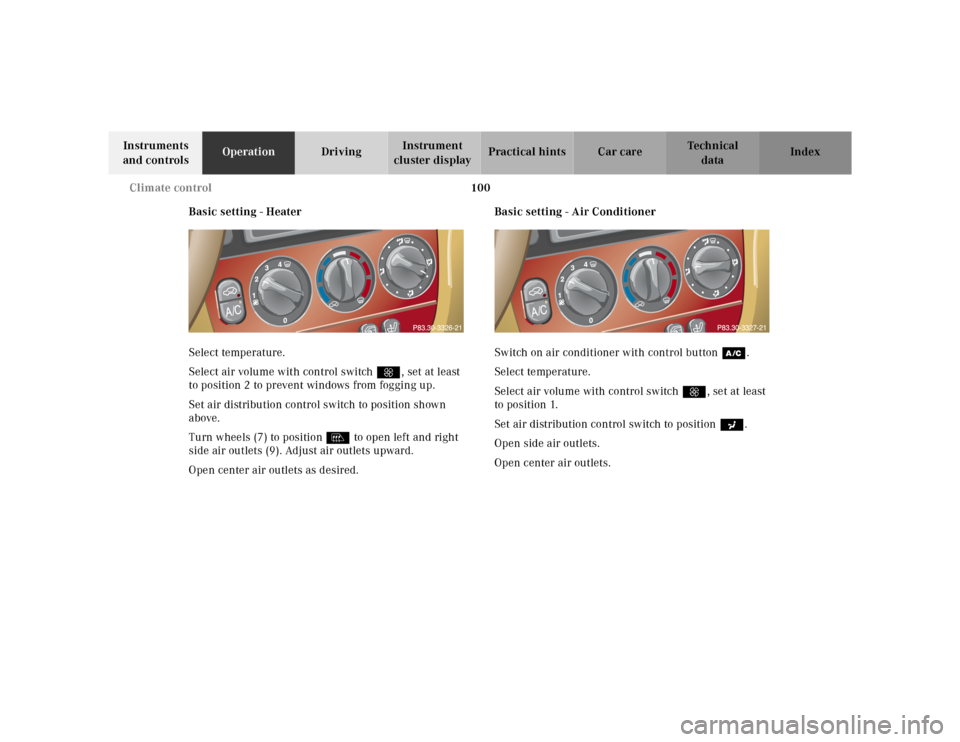
Basic setting - Heater
Select temperature.
Select air volume with control switch Q, set at least
to position 2 to prevent windows from fogging up.
Set air distribution control switch to position shown
above.
Turn wheels (7) to position l to open left and right
side air outlets (9). Adjust air outlets upward.
Open center air outlets as desired.Basic setting - Air Conditioner
Switch on air conditioner with control buttonœ.
Select temperature.
Select air volume with control switchQ, set at least
to position 1.
Set air distribution control switch to positiona.
Open side air outlets.
Open center air outlets.
Page 104 of 317
101 Climate control
Te ch n ica l
data Instruments
and controlsOperationDrivingInstrument
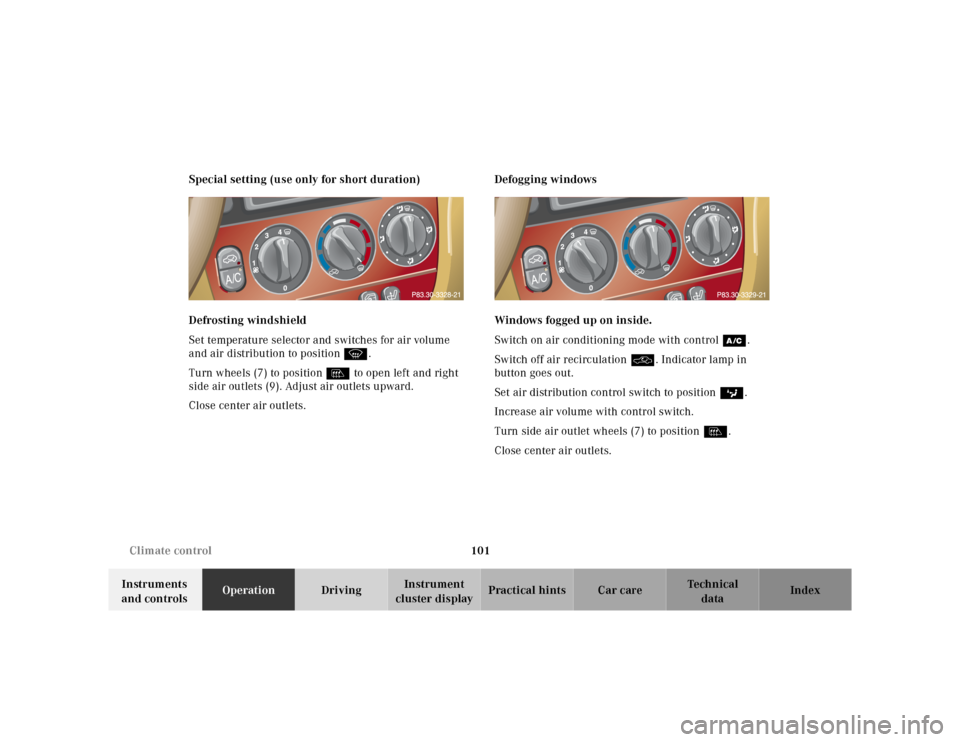
cluster displayPractical hints Car care Index Special setting (use only for short duration)
Defrosting windshield
Set temperature selector and switches for air volume
and air distribution to position P.
Turn wheels (7) to position l to open left and right
side air outlets (9). Adjust air outlets upward.
Close center air outlets.Defogging windows
Windows fogged up on inside.
Switch on air conditioning mode with controlœ.
Switch off air recirculationO. Indicator lamp in
button goes out.
Set air distribution control switch to positionc.
Increase air volume with control switch.
Turn side air outlet wheels (7) to position l.
Close center air outlets.
Page 148 of 317
145 Contents - Driving
Te ch n ica l
data Instruments
and controlsOperationDrivingInstrument
cluster displayPractical hints Car care Index
DrivingControl and operation of
radio transmitters ..................... 146
The first 1 000 miles
(1 500 km) ................................. 147
Maintenance ................................... 147
Tele Aid ........................................... 148
Catalytic converter ........................ 160
Emission control ............................ 161
Steering lock ................................... 162
Starting and turning off
the engine .................................. 164
Automatic transmission ............... 165
Parking brake ................................. 173Driving instructions .......................174
Drive sensibly – save fuel .........174
Drinking and driving .................174
Pedals ...........................................174
Power assistance ........................ 175
Brakes .......................................... 175
Driving off .................................... 176
Parking ......................................... 176
Tires ............................................. 177
Snow chains ............................... 179
Winter driving instructions ......180
Deep water ...................................181
Passenger compartment ............182
Traveling abroad .........................182Off-Road driving ............................. 183
Trailer towing ................................. 190
Cruise control ................................. 196
Brake assist system (BAS) ............ 199
Antilock brake system (ABS) ....... 201
Four-wheel electronic
traction system (4-ETS+) ..........203
Electronic brake
proportioning (EBP) ..................204
Electronic stability program
(ESP) ...........................................205
Transmission control –
LOW RANGE mode ...................209
What you should know
at the gas station ....................... 212
Check regularly and
before a long trip ...................... 215
Page 165 of 317
162 Steering lock
Te ch n ica l
data Instruments
and controlsOperationDrivingInstrument
cluster displayPractical hints Car care Index
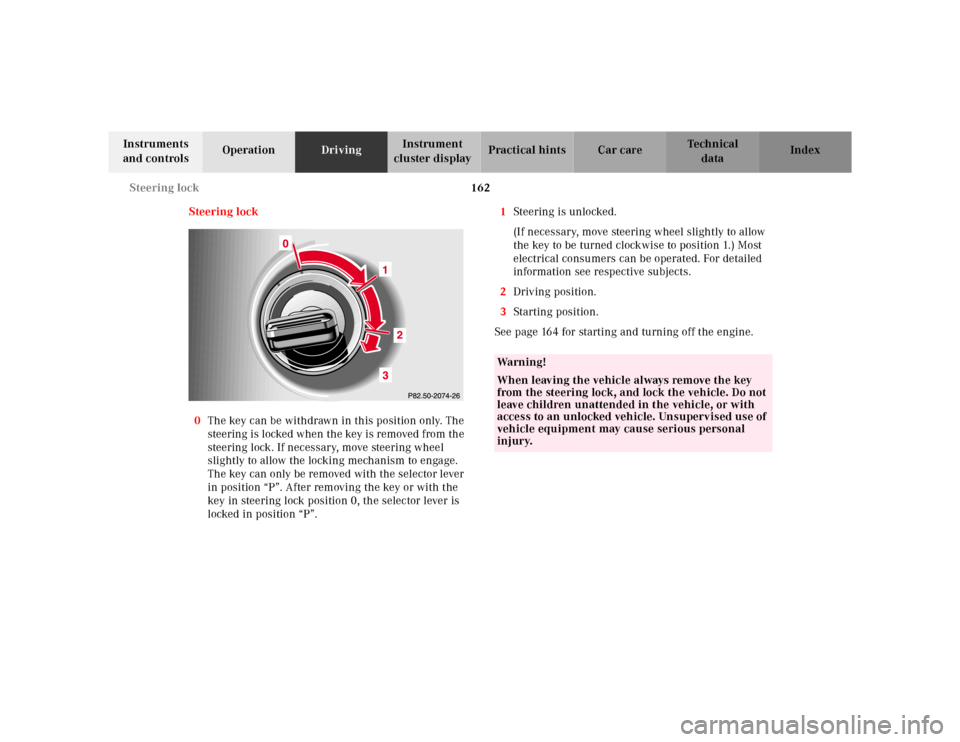
Steering lock
0The key can be withdrawn in this position only. The
steering is locked when the key is removed from the
steering lock. If necessary, move steering wheel
slightly to allow the locking mechanism to engage.
The key can only be removed with the selector lever
in position “P”. After removing the key or with the
key in steering lock position 0, the selector lever is
locked in position “P”.1Steering is unlocked.
(If necessary, move steering wheel slightly to allow
the key to be turned clockwise to position 1.) Most
electrical consumers can be operated. For detailed
information see respective subjects.
2Driving position.
3Starting position.
See page 164 for starting and turning off the engine.
Wa r n i n g !
When leaving the vehicle always remove the key
from the steering lock, and lock the vehicle. Do not
leave children unattended in the vehicle, or with
access to an unlocked vehicle. Unsupervised use of
vehicle equipment may cause serious personal
injury.
Page 170 of 317
167 Automatic transmission
Te ch n ica l
data Instruments
and controlsOperationDrivingInstrument
cluster displayPractical hints Car care Index Maneuvering
To maneuver in tight areas, e.g. when pulling into a
parking space, control the vehicle speed by gradually
releasing the brakes. Accelerate gently and never
abruptly step on the accelerator.
To rock a vehicle out of soft ground (mud or snow),
alternately shift from forward to reverse, while applying
slight partial throttle.
Rocking a vehicle free in this manner may cause the
ABS or traction system malfunction indicator lamp to
come on. Turn off and restart the engine to clear the
malfunction indication.Towing a trailer
If the transmission hunts between gears on inclines,
manually shift to a lower gear (select “4”, “3”, “2”
or “1”). A lower gear and reduction of speed reduces the
chance of engine overloading and / or overheating.
At very steep inclines, not manageable with selector
lever in position “1”, switch transfer case to LOW
RANGE, see page 209 for instructions on how to engage
LOW RANGE.
For instructions on trailer towing refer to page 190.
Wa r n i n g !
Getting out of your vehicle with the selector lever
not fully engaged in position “P” is dangerous.
Also, when parked on an incline, position “P” alone
may not prevent your vehicle from moving,
possibly hitting people or objects.Always set the parking brake in addition to shifting
to position “P”, see page 173 for parking brake. When parked on an incline, also turn front wheel
against curb.
Wa r n i n g !
When leaving the vehicle always remove the key
from the steering lock, and lock the vehicle. Do not
leave children unattended in the vehicle, or with
access to an unlocked vehicle. Children could move
the gear selector lever from position “P”, which
could result in an accident or serious injury.
Page 173 of 317
170 Automatic transmission
Te ch n ica l
data Instruments
and controlsOperationDrivingInstrument
cluster displayPractical hints Car care Index
Press and hold selector lever in the ædirection:
The transmission will shift from the current gear
directly to gear range “D”.
Important!
With transmission in gear range “D”, “4” or “3”,
upshifting from 1st to 2nd to 3rd gear is delayed
depending on vehicle speed and engine temperature.
This allows the catalytic converter to heat up more
quickly to operating temperatures.During the brief warm-up period this delayed upshift
and increased engine noise might be perceived as a
malfunction. However, neither the engine nor
transmission are negatively affected by this mode of
operation.
The delayed upshift is effective with vehicle speeds
below 31 mph (50 km / h) at partial throttle and engine
temperatures below 95°F (35°C).
To avoid overrevving the engine when the selector lever
is moved to a lower gear range, the transmission will not
shift to a lower gear, if the engine’s revolutions per
minute limit would be exceeded. In this case there will
be no downshift, even when the vehicle speed reaches
the engine’s RPM limit of that gear, e.g. by applying the
service brakes. Continue driving in the usual manner.
The transmission will then shift down automatically.
To prevent the engine from laboring at low RPM when
driving uphill gradients or with your vehicle heavily
loaded, the automatic transmission will downshift when
necessary to maintain engine RPM within the best
torque range.
Wa r n i n g !
On slippery road surfaces, never downshift in order
to obtain braking action. This could result in drive
wheel slip and reduced vehicle control. Your
vehicle’s ABS will not prevent this type of loss of
control.
Page 179 of 317
176 Driving instructions
Te ch n ica l
data Instruments
and controlsOperationDrivingInstrument
cluster displayPractical hints Car care Index
Caution!
When driving down long and steep grades, relieve the
load on the brakes by shifting into a lower gear to use
the engine’s braking power. This helps prevent
overheating of the brakes and reduces brake pad wear.
After hard braking, it is advisable to drive on for some
time, rather than immediately parking, so the air stream
will cool down the brakes faster.
Driving off
Apply the service brakes to test them briefly after
driving off. Perform this procedure only when the road
is clear of other traffic.
Warm up the engine smoothly. Do not place full load on
the engine until the operating temperature has been
reached.
When starting off on a slippery surface, do not allow one
drive wheel to spin for an extended period with the ESP
switched off. Doing so may cause serious damage to the
drive train which is not covered by the Mercedes-Benz
Limited Warranty.Parking
Important!
It is advisable to set the parking brake whenever
parking or leaving the vehicle. In addition, move
selector lever to position “P”.
When parking on hills, always set the parking brake.
Wa r n i n g !
To reduce the risk of personal injury as a result of
vehicle movement, before
turning off the engine
and leaving the vehicle, always:
1. Keep right foot on the service brake pedal.
2. Firmly depress parking brake pedal.
3. Move the selector lever to position “P”.
4. Slowly release the service brake pedal.
5. Turn front wheels towards the road curb.
6. Turn the key to steering lock position 0 and
remove.
7. Take the key and lock vehicle when leaving.
Page 181 of 317
178 Driving instructions
Te ch n ica l
data Instruments
and controlsOperationDrivingInstrument
cluster displayPractical hints Car care Index
Specified tire pressures must be maintained. This
applies particularly if the tires are subjected to high
loads (e.g. high speeds, heavy loads, high ambient
temperatures).
Aquaplaning
Depending on the depth of the water layer on the road,
aquaplaning may occur, even at low speeds and with
new tires. Reduce vehicle speed, avoid track grooves in
the road and apply brakes cautiously in the rain.Tire traction
The safe speed on a wet, snow covered or icy road is
always lower than on a dry road.
You should pay particular attention to the condition of
the road whenever the outside temperatures are close to
the freezing point.
We recommend M+S rated radial-ply tires with a
minimum tread depth of approximately 1/8 in (4 mm)
for the winter season for all four wheels to insure
normal balanced handling characteristics. On packed
snow, they can reduce your stopping distance as
compared with summer tires. Stopping distance,
however, is still considerably greater than when the
road is not snow or ice covered.
Wa r n i n g !
Do not drive with a flat tire. A flat tire affects the
ability to steer or brake the vehicle. You may lose
control of the vehicle. Continued driving with a flat
tire or driving at high speed with a flat tire will
cause excessive heat build-up and possibly a fire.
Wa r n i n g !
If ice has formed on the road, tire traction will be
substantially reduced. Under such weather
conditions, drive, steer and brake with extreme
caution.