Page 258 of 317
255 Towing
Te ch n ica l
data Instruments
and controlsOperation DrivingInstrument
cluster displayPractical hintsCar care Index Tow in g t h e ve hic l e
Important!
When towing the vehicle, please, note the following:
With the automatic central locking activated and the
engine running, the vehicle doors lock if the left front
wheel is turning at vehicle speeds of approximately
9 mph (15 km / h) or more.
To prevent the vehicle door locks from locking,
deactivate the automatic central locking, see page 32.The front towing eye is located on the passenger side
below the bumper.
1To w i n g eye , f r o n t
Prior to towing the vehicle with all wheels on the
ground, make certain that the key is in steering
lock position 2.
P88.20-2160-26
Page 261 of 317
258 Towing
Te ch n ica l
data Instruments
and controlsOperation DrivingInstrument
cluster displayPractical hintsCar care Index
To be certain to avoid additional damage to the vehicle
powertrain, however you should d o the following:
•With damage to front axle, raise front axle. Remove
flexible drive shaft between rear axle and transfer
case
•With damage to rear axle, raise rear axle and tow
vehicle with wheel lift or dolly placed under front
wheels.
•With damage to transfer case, remove flexible drive
shafts to the drive axles.
Note:
Always install new self-locking nuts when reinstalling
the flexible drive shaft.Caution!
If the vehicle is towed with the front axle raised, the
engine must be shut off (key in steering lock position 1).
Otherwise, the 4-ETS+ may become engaged which may
cause loss of towing control. Switch off the tow-away
alarm (see page 36) as well as the ESP (see page 207).
Note:
To signal turns while being towed with hazard warning
flasher in use, turn key in steering lock to position 2
and activate combination switch for left or right turn
signal in usual manner. Now deactivate the hazard
warning flasher, only the selected turn signal will
operate. Upon canceling the turn signal, the hazard
warning flasher must be activated again.
Wa r n i n g !
With the engine not running, there is no power
assistance for the braking and steering systems. In
this case, it is important to keep in mind that a
considerably higher degree of effort is necessary to
brake and steer the vehicle.
Page 274 of 317
271 Remote control
Te ch n ica l
data Instruments
and controlsOperation DrivingInstrument
cluster displayPractical hintsCar care Index Synchronizing remote control
If the remote control does not function correctly and the
batteries are in order, the system may have to be
resynchronized.
Turn key in steering lock to position 2, then to
position 0 and remove.
Within 10 seconds, push and hold button‹ while
pushing buttonΠfive times.
Release the button, and press‹, Œ orŠ once.
Check all functions. The remote control should once
again be operational.
Note:
If it is not possible to resynchronize the remote control,
have the system checked at your authorized Mercedes-
Benz Light Truck Center.Important!
Batteries contain materials that can harm the
environment if disposed of improperly. Recycling of
batteries is the preferred method of disposal. For
disposal, please follow manufacturer’s recommendation
on battery package.
Replacement Battery:
Lithium, type CR 2025 or equivalent.
Page 278 of 317
275 Replacing wiper blades
Te ch n ica l
data Instruments
and controlsOperation DrivingInstrument
cluster displayPractical hintsCar care Index Replacing wiper blades
For safety reasons, remove key from steering lock before
replacing the wiper blade, otherwise the motor can
suddenly turn on and cause injury.
Notes:
Do not open engine hood with wiper arm folded forward.
Do not allow the wiper arm to contact the windshield
glass without a wiper blade inserted. The glass may be
scratched or broken.
Make certain that the wiper blade is properly installed.
An improperly installed wiper blade may cause
windshield damage.
The wiper with air spoiler should be mounted on the
driver’s side.Replacing windshield/rear window wiper blade
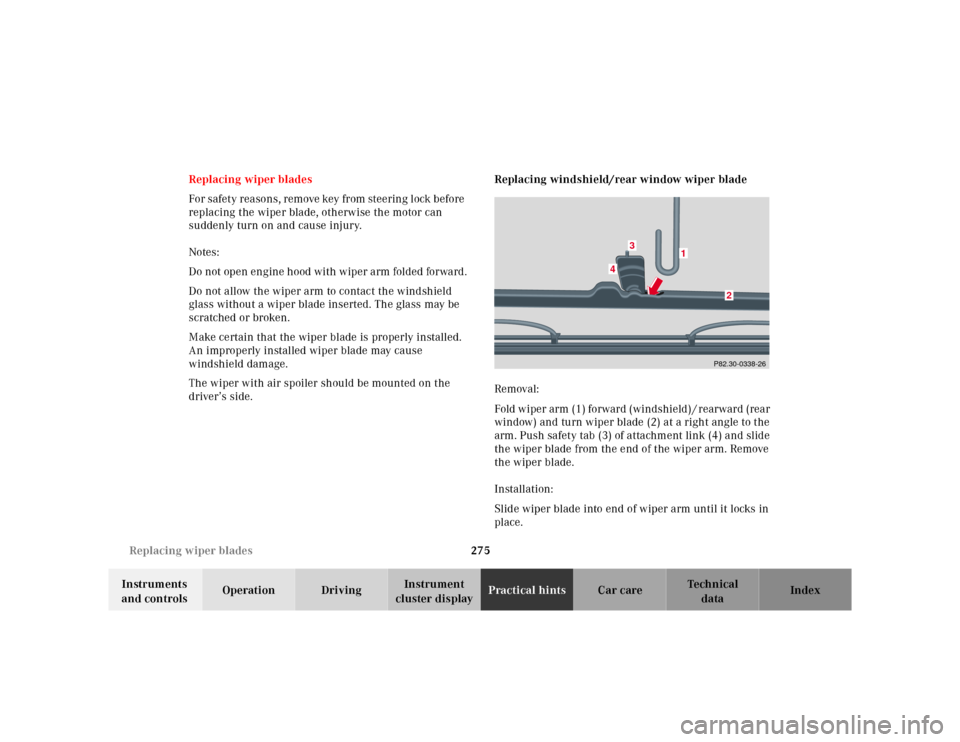
Removal:
Fold wiper arm (1) forward (windshield) / rearward (rear
window) and turn wiper blade (2) at a right angle to the
arm. Push safety tab (3) of attachment link (4) and slide
the wiper blade from the end of the wiper arm. Remove
the wiper blade.
Installation:
Slide wiper blade into end of wiper arm until it locks in
place.
P82.30-0338-26
1
2
3
4
Page 280 of 317
277 Contents - Vehicle care
Te ch n ica l
data Instruments
and controlsOperation DrivingInstrument
cluster displayPractical hintsCar careIndex
Vehicle careCleaning and care
of the vehicle .............................278
Power washer ..............................279
Tar stains .....................................279
Paintwork, painted body
components .................................279
Engine cleaning ..........................280
Vehicle washing .........................280
Ornamental moldings ................280
Headlamps, taillamps,
turn signal lenses ......................280Window cleaning ....................... 281
Wiper blades .............................. 281
Light alloy wheels ..................... 281
Instrument cluster ..................... 281
Steering wheel and
gear selector lever ..................... 281
Cup holder .................................. 282
Seat belts ..................................... 282
Headliner .................................... 282
Upholstery .................................. 282
Hard plastic trim items ............. 282
Plastic and rubber parts ........... 282
Page 284 of 317
281 Cleaning and care of the vehicle
Te ch n ica l
data Instruments
and controlsOperation DrivingInstrument
cluster displayPractical hintsCar careIndex Window cleaning
Use a window cleaning solution on all glass surfaces. An
automotive glass cleaner is recommended.
Note:
For safety reasons, switch off wipers and remove key
from steering lock before cleaning the windshield,
otherwise the wiper motor can suddenly turn on and
cause injury.
Wiper blades
Clean the wiper blade rubbers with a clean cloth and
detergent solution.
Note:
For safety reasons, switch off wipers and remove key
from steering lock before cleaning the wiper blades,
otherwise the wiper motor can suddenly turn on and
cause injury.Light alloy wheels
Mercedes-Benz approved Wheel Care should be used for
regular cleaning of the light alloy wheels.
If possible, clean wheels once a week with
Mercedes-Benz approved Wheel Care, using a soft
bristle brush and a strong spray of water.
Follow instructions on container.
Note:
Use only acid-free cleaning materials. The acid could
lead to corrosion or may damage the clear coat.
Instrument cluster
Use a gentle dishwashing detergent or mild detergent
for delicate fabrics as a washing solution. Wipe with a
cloth moistened in lukewarm solution. Do not use
scouring agents.
Steering wheel and gear selector lever
Wipe with a damp cloth and dry thoroughly or clean
with Mercedes-Benz approved Leather Care.
Page 289 of 317
286 Technical data
Te ch n ica l
data Instruments
and controlsOperation DrivingInstrument
cluster displayPractical hints Car care Index
Layout of poly-V-belt drive 1Automatic belt tensioner
2Crankshaft
3Air conditioner compressor
4Coolant pump
5Generator (alternator)
6Idler pulley
7Power steering pump
For dimensions of the poly-V-belt, see technical data.
Page 295 of 317
292 Fuels, coolants, lubricants etc. - capacities
Te ch n ica l
data Instruments
and controlsOperation DrivingInstrument
cluster displayPractical hints Car care Index
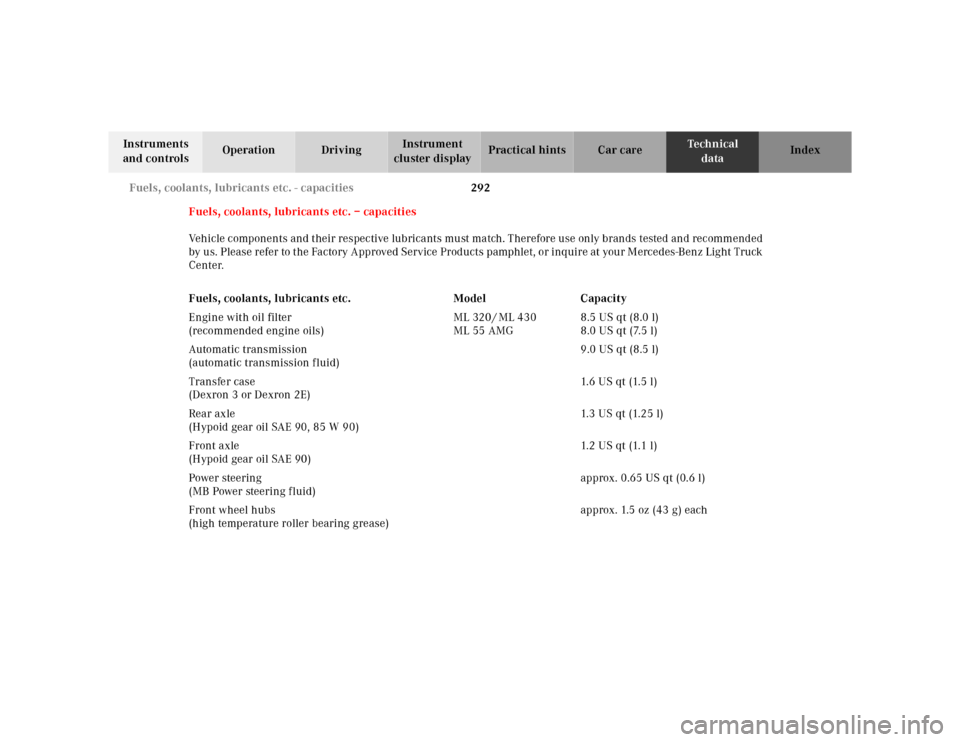
Fuels, coolants, lubricants etc. – capacities
Vehicle components and their respective lubricants must match. Therefore use only brands tested and recommended
by us. Please refer to the Factory Approved Service Products pamphlet, or inquire at your Mercedes-Benz Light Truck
Center.
Fuels, coolants, lubricants etc. Model Capacity
Engine with oil filter
(recommended engine oils)ML 320 / ML 430
ML 55 AMG8.5 US qt (8.0 l)
8.0 US qt (7.5 l)
Automatic transmission
(automatic transmission fluid)9.0 US qt (8.5 l)
Transfer case
(Dexron 3 or Dexron 2E)1. 6 U S q t (1. 5 l )
Rear axle
(Hypoid gear oil SAE 90, 85 W 90)1.3 US qt (1.25 l)
Front axle
(Hypoid gear oil SAE 90)1. 2 U S q t (1. 1 l )
Power steering
(MB Power steering fluid)approx. 0.65 US qt (0.6 l)
Front wheel hubs
(high temperature roller bearing grease)approx. 1.5 oz (43 g) each