Page 276 of 341
273 Tires, Wheels
Technical
data Instruments
and controlsOperation DrivingInstrument
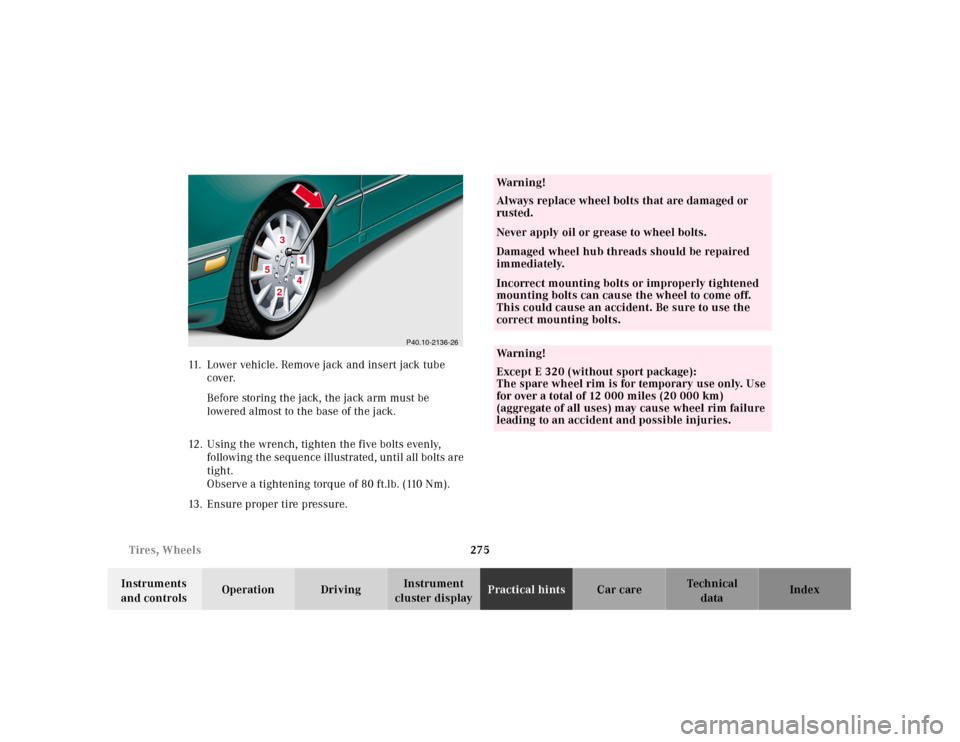
cluster displayPractical hintsCar care Index 6. Insert jack arm fully into the tube hole up to the
stop. Place jack on firm ground. Position the jack so
that it is always vertical (plumb-line) as seen from
the side (see arrow), even if the vehicle is parked on
an incline.
7. Jack up the vehicle until the wheel is clear of the
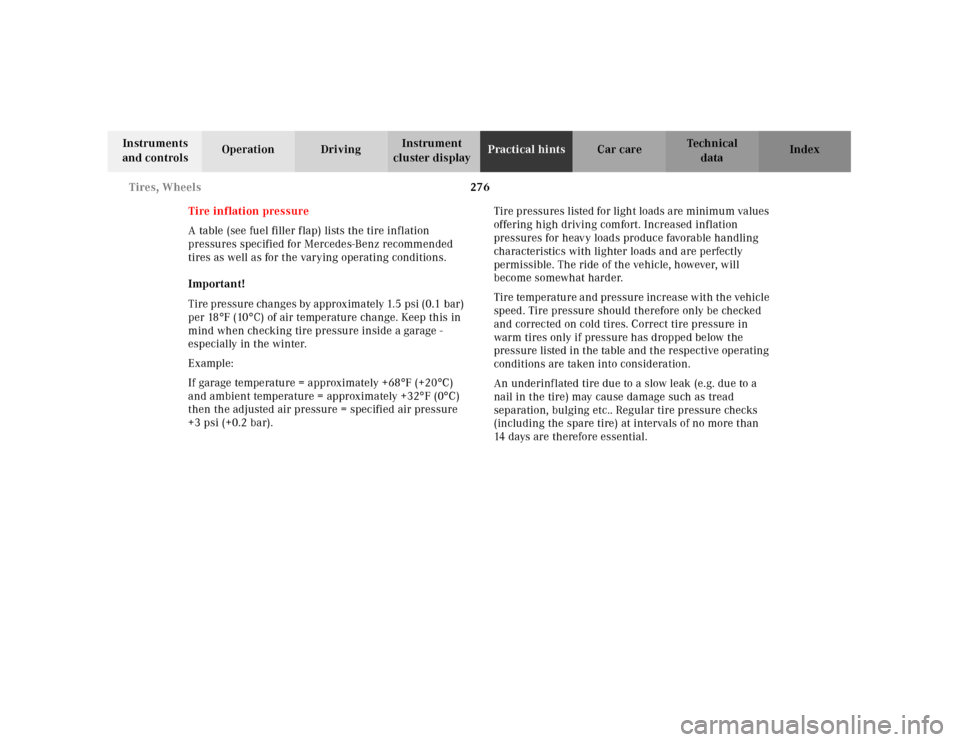
ground. Never start engine while vehicle is raised.8. Unscrew upper-most wheel bolt and install
alignment bolt (1) supplied in the tool kit. Remove
the remaining bolts. Keep bolt threads protected
from dirt and sand.
9. Remove wheel. Grip wheel from the sides. Keep
hands from beneath the wheels.
P40.10-2133-26
P40.10-2134-26
1
Page 277 of 341
274 Tires, Wheels
Technical
data Instruments
and controlsOperation DrivingInstrument
cluster displayPractical hintsCar care Index
Important!
E 320 (except sport package) only:
When installing steel spare wheel rim, make certain to
use the correct wheel bolts, supplied in the vehicle tool
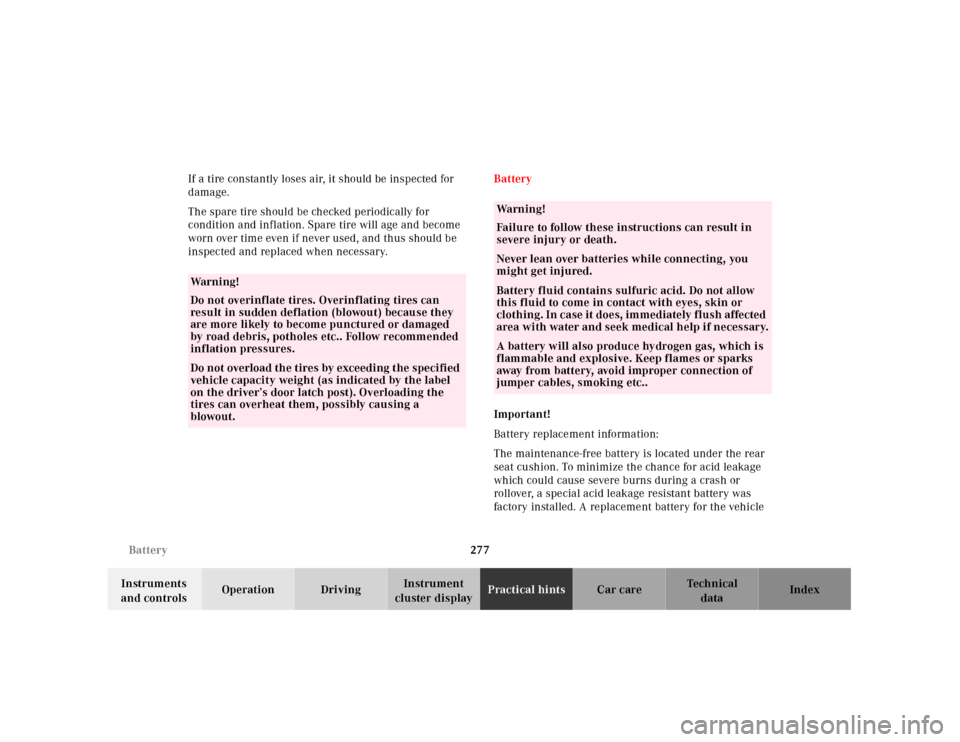
kit, see page 268 and page 264.10. Clean contact surfaces of wheel and wheel hub.
Install wheel on wheel hub. Insert wheel bolts and
tighten them slightly.
To avoid paint damage, place wheel f lat against hub
and hold it there while installing first wheel bolt.
Unscrew the alignment bolt (1) to install the last
wheel bolt.
P40.10-2135-26
1
Page 278 of 341

275 Tires, Wheels
Technical
data Instruments
and controlsOperation DrivingInstrument
cluster displayPractical hintsCar care Index 11. Lower vehicle. Remove jack and insert jack tube
cover.
Before storing the jack, the jack arm must be
lowered almost to the base of the jack.
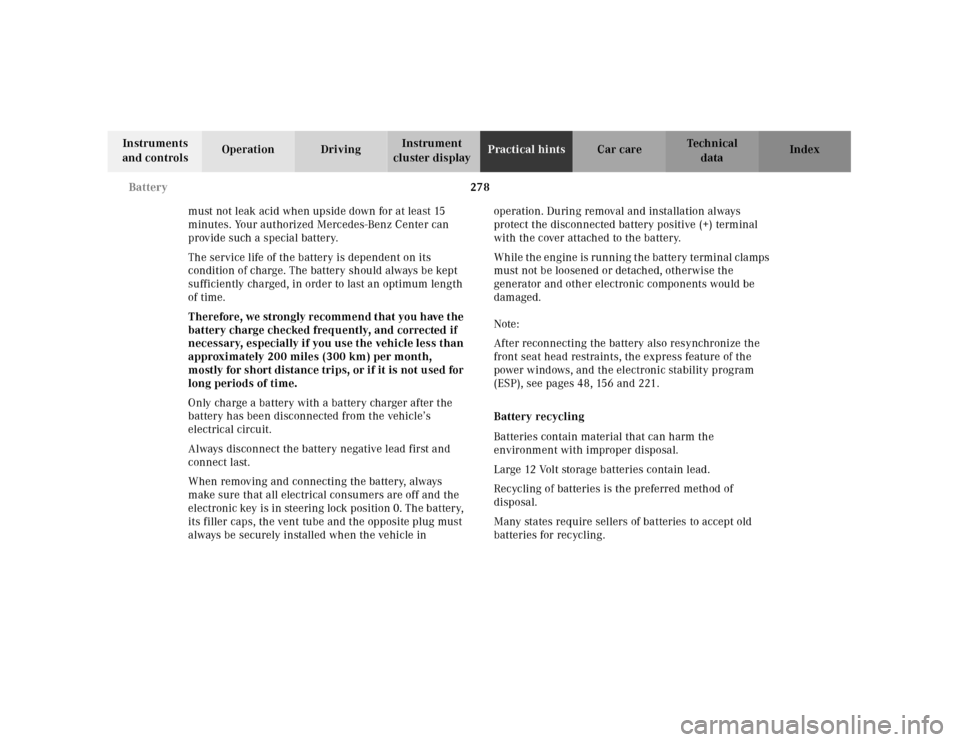
12. Using the wrench, tighten the five bolts evenly,
following th e sequ ence ill ustrated , until all bolts a re
tight.
Observe a tightening torque of 80 ft.lb. (110 Nm).
13. Ensure proper tire pressure.
P40.10-2136-26
32
41
5
Wa r n i n g !
Always replace wheel bolts that are damaged or
rusted.Never apply oil or grease to wheel bolts.Damaged wheel hub threads should be repaired
immediately.Incorrect mounting bolts or improperly tightened
mounting bolts can cause the wheel to come off.
This could cause an accident. Be sure to use the
correct mounting bolts.Wa r n i n g !
Except E 320 (without sport package):
The spare wheel rim is for temporary use only. Use
for over a total of 12 000 miles (20 000 km)
(aggregate of all uses) may cause wheel rim failure
leading to an accident and possible injuries.
Page 279 of 341

276 Tires, Wheels
Technical
data Instruments
and controlsOperation DrivingInstrument
cluster displayPractical hintsCar care Index
Tire inflation pressure
A table (see fuel filler f lap) lists the tire inflation
pressures specified for Mercedes-Benz recommended
tires as well as for the varying operating conditions.
Important!
Tire pressure changes by approximately 1.5 psi (0.1 bar)
per 18°F (10°C) of air temperature change. Keep this in
mind when checking tire pressure inside a garage -
especially in the winter.
Example:
If garage temperature = approximately +68°F (+20°C)
and ambient temperature = approximately +32°F (0°C)
then the adjusted air pressure = specified air pressure
+3 psi (+0.2 bar).Tire pressures listed for light loads are minimum values
offering high driving comfort. Increased inflation
pressures for heavy loads produce favorable handling
characteristics with lighter loads and are perfectly
permissible. The ride of the vehicle, however, will
become somewhat harder.
Tire temperature and pressure increase with the vehicle
speed. Tire pressure should therefore only be checked
and corrected on cold tires. Correct tire pressure in
warm tires only if pressure has dropped below the
pressure listed in the table and the respective operating
conditions are taken into consideration.
An underinf lated tire due to a slow leak (e.g. due to a
nail in the tire) may cause damage such as tread
separation, bulging etc.. Regular tire pressure checks
(including the spare tire) at intervals of no more than
14 days are therefore essential.
Page 280 of 341

277 Battery
Technical
data Instruments
and controlsOperation DrivingInstrument
cluster displayPractical hintsCar care Index If a tire constantly loses air, it should be inspected for
damage.
The spare tire should be checked periodically for
condition and inflation. Spare tire will age and become
worn over time even if never used, and thus should be
inspected and replaced when necessary.Battery
Important!
Battery replacement information:
The maintenance-free battery is located under the rear
seat cushion. To minimize the chance for acid leakage
which could cause severe burns during a crash or
rollover, a special acid leakage resistant battery was
factory installed. A replacement battery for the vehicle
Wa r n i n g !
Do not overinflate tires. Overinflating tires can
result in sudden deflation (blowout) because they
are more likely to become punctured or damaged
by road debris, potholes etc.. Follow recommended
inflation pressures.Do not overload the tires by exceeding the specified
vehicle capacity weight (as indicated by the label
on the driver’s door latch post). Overloading the
tires can overheat them, possibly causing a
blowout.
Wa r n i n g !
Failure to follow these instructions can result in
severe injury or death.Never lean over batteries while connecting, you
might get injured.Battery fluid contains sulfuric acid. Do not allow
this fluid to come in contact with eyes, skin or
cloth ing. In c ase it does, im mediately f lush affected
area with water and seek medical help if necessary.A battery will also produce hydrogen gas, which is
flammable and explosive. Keep flames or sparks
away from battery, avoid improper connection of
jumper cables, smoking etc..
Page 281 of 341

278 Battery
Technical
data Instruments
and controlsOperation DrivingInstrument
cluster displayPractical hintsCar care Index
must not leak acid when upside down for at least 15
minutes. Your authorized Mercedes-Benz Center can
provide such a special battery.
The service life of the battery is dependent on its
condition of charge. The battery should always be kept
sufficiently charged, in order to last an optimum length
of time.
Therefore, we strongly recommend that you have the
battery charge checked frequently, and corrected if
necessary, especially if you use the vehicle less than
approximately 200 miles (300 km) per month,
mostly for short distance trips, or if it is not used for
long periods of time.
Only charge a battery with a battery charger after the
battery has been disconnected from the vehicle’s
electrical circuit.
Always disconnect the battery negative lead first and
connect last.
When removing and connecting the battery, always
make sure that all electrical consumers are off and the
electronic key is in steering lock position 0. The battery,
its filler caps, the vent tube and the opposite plug must
always be securely installed when the vehicle in operation. During removal and installation always
protect the disconnected battery positive (+) terminal
with the cover attached to the battery.
While the engine is running the battery terminal clamps
must not be loosened or detached, otherwise the
generator and other electronic components would be
damaged.
Note:
After reconnecting the battery also resynchronize the
front seat head restraints, the express feature of the
power windows, and the electronic stability program
(ESP), see pages 48, 156 and 221.
Battery recycling
Batteries contain material that can harm the
environment with improper disposal.
Large 12 Volt storage batteries contain lead.
Recycling of batteries is the preferred method of
disposal.
Many states require sellers of batteries to accept old
batteries for recycling.
Page 282 of 341

279 Jump starting
Technical
data Instruments
and controlsOperation DrivingInstrument
cluster displayPractical hintsCar care Index Jump startingImportant!
A discharged battery can freeze at approximately +14°F
(-10°C). In that case, it must be thawed out before
jumper cables are used. Attempting to jump start a
frozen battery can result in it exploding, causing
personal injury.
Jumper cable specifications:
•Minimum cable cross-section of 25 mm
2 or
approximately 2 AWG
•Maximum length of 11.5 ft. (3.5 m).
If th e battery is discha rged, th e eng ine shoul d be started
with jumper cables and the (12 V) battery of another
vehicle.
Only use 12 V battery to jump start your vehicle. Jump
starting with more powerful battery could damage the
vehicle’s electrical systems, which will not be covered
by the Mercedes-Benz Limited Warranty.
Jump start the vehicle by using the battery terminals
located under hood.
Wa r n i n g !
Failure to follow these directions will cause
damage to the electronic components, and can lead
to a battery explosion and severe injury or death.Never lean over batteri es wh ile connec ting or jump
starting, you might get injured.Battery fluid contains sulfuric acid. Do not allow
this fluid to come in contact with eyes, skin or
cloth ing. In c ase it does, imm edi ately f lu sh af fec ted
area with water, and seek medical help if
necessary.A battery will also produce hydrogen gas, which is
flammable and very explosive. Keep flames or
sparks away from battery, avoid improper
connection of jumper cables, smoking etc..Read all instructions before proceeding.
Page 283 of 341
280 Jump starting
Technical
data Instruments
and controlsOperation DrivingInstrument
cluster displayPractical hintsCar care Index
Proceed as follows:
1. Position the vehicle with the charged battery so that
the jumper cables will reach, but never let the
vehicles touch. Make sure the jumper cables do not
have loose or missing insulation.
2. On both vehicles:
•Turn off engine and all lights and accessories,
except hazard warning flashers or work lights.
•Apply parking brake and shift selector lever to
position “P”.
Important!
3. Lift cover (1) and clamp one end of the first jumper
cable to the positive (+) under hood terminal (2) of
the discharged battery and the other end to the
positive (+) terminal of the charged battery. Make
sure the cable clamps do not touch any other metal
parts.