Page 117 of 341

114 Flexible service system
Technical
data Instruments
and controlsOperationDrivingInstrument
cluster displayPractical hints Car care Index
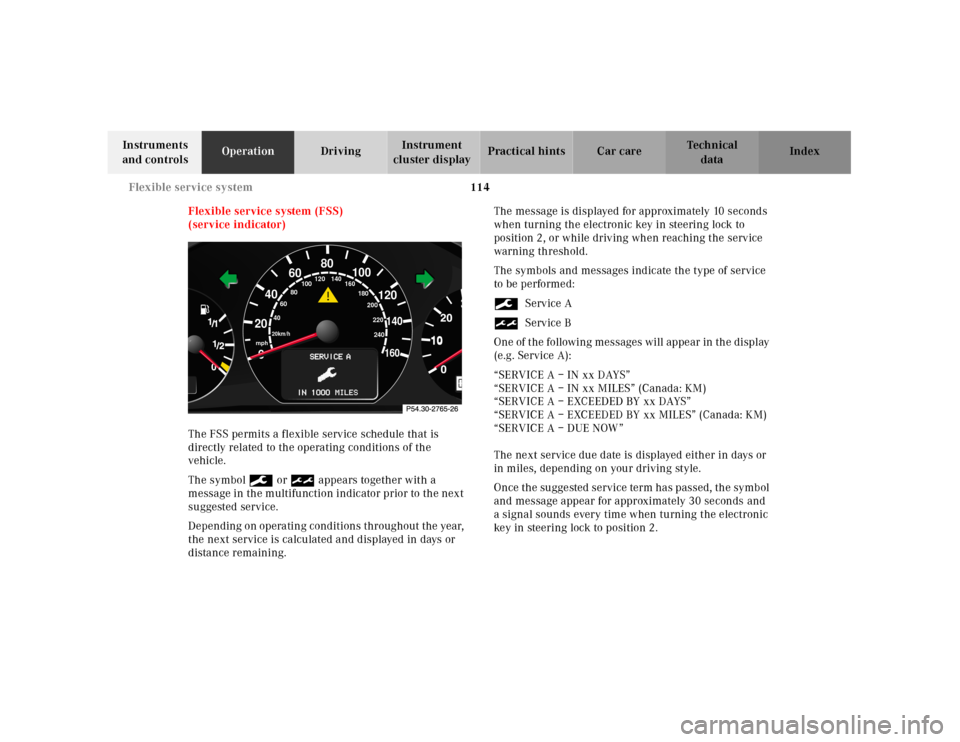
Flexible service system (FSS)
(service indicator)
The FSS permits a flexible service schedule that is
directly related to the operating conditions of the
vehicle.
The symbol 9 or ½ appears together with a
message in the multifunction indicator prior to the next
suggested service.
Depending on operating conditions throughout the year,
the next service is calculated and displayed in days or
distance remaining.The message is displayed for approximately 10 seconds
when turning the electronic key in steering lock to
position 2, or while driving when reaching the service
warning threshold.
The symbols and messages indicate the type of service
to be performed:
9Service A
½Service B
One of t he following messages will appe ar in th e displ ay
(e.g. Service A):
“SERVICE A – IN xx DAYS”
“SERVICE A – IN xx MILES” (Canada: KM)
“SERVICE A – EXCEEDED BY xx DAYS”
“SERVICE A – EXCEEDED BY xx MILES” (Canada: KM)
“SERVICE A – DUE NOW”
The next service due date is displayed either in days or
in miles, depending on your driving style.
Once th e su gge sted service term ha s passed, th e symb ol
and message appear for approximately 30 seconds and
a signal sounds every time when turning the electronic
key in steering lock to position 2.
10
0
406080
60
40
mph
20km/h
20100
120
140160
80
100
180
200
220
240 160 120 140
Page 119 of 341

116 Flexible service system
Technical
data Instruments
and controlsOperationDrivingInstrument
cluster displayPractical hints Car care Index
Fo l l ow i n g a c omp l e te d A o r B s e r v i c e t h e M e rc e d e s -Be n z
Center sets the counter mileage to 10 000 miles
(Canada: 15 000 km) and 365 days.
The counter can also be set by any individual. To do so:
Turn the electronic key in steering lock to position 2.
To call up the trip odometer and main odometer, press
button è or ÿ on the multifunction steering
wheel until the display appears. See page 96.
Press button j or k until the FSS indicator
appears.
Press buttonJon the instrument cluster for
approximately 2 seconds.The multifunction display will show the question:
“DO YOU WANT TO RESET SERVICE INTERVAL?
CONFIRM BY PRESSING R”
Press button J on the instrument cluster again, and
hold until a signal sounds. The message “SERVICE
INTERVAL HAS BEEN RESET” appears in the
multifunction display.
The new service indicator is displayed with the reset
distance of 10 000 miles (Canada 15 000 km).
If the FSS counter was inadvertently reset, have a
Mercedes-Benz Center correct it.
However you choose to set your reference numbers, the
scheduled services as posted in the Service Booklet
must be followed to properly care for your vehicle.
Page 123 of 341

120 Exterior lamp switch
Technical
data Instruments
and controlsOperationDrivingInstrument
cluster displayPractical hints Car care Index
Note:
With the electronic key removed and the driver’s door
open, a warning sounds and the message “SWITCH OFF
LIGHTS!” in the multifunction indicator appears if the
vehicle’s exterior lamps (except standing lamps) are not
switched off.
Fog lamps will operate with the parking lamps and / or
the low beam headlamps on. Fog lamps should only be
used in conjunction with low beam headlamps. Consult
your State or Province Motor Vehicle Regulations
regarding allowable lamp operation.
Fog lamps are automatically switched off when the
exterior lamp switch is turned to position D.Daytime running lamps
(Canada only)
When the engine is running and the selector lever is in
a driving position, the low beam headlamps (includes
parking lamps, side marker lamps, taillamps and
license plate lamps) are automatically switched on.
When shifting from a driving position to position “N”
or “P”, the low beam switches off (2 seconds delay).
For nighttime driving the exterior lamp switch should
be turned to position B to permit activation of the
high beam headlamps.
Night security illumination
When exiting the vehicle after driving with the exterior
lamps on, they switch on again for added illumination
for approximately 30 seconds after closing the last door.
The lamp-on time period can be changed at your
Mercedes-Benz Center.
Page 125 of 341
122 Combination switch
Technical
data Instruments
and controlsOperationDrivingInstrument
cluster displayPractical hints Car care Index
Combination switch
1Low beam (exterior lamp switch position B)
2High beam (exterior lamp switch position B)
3High beam flasher (high beam available
independent of exterior lamp switch position)4Turn signals, right
5Turn signals, left
To signal minor directional changes, such as changing
lanes on a highway, move combination switch to the
point of resistance only and hold it there.
To operate the turn signals continuously, move the
combination switch past the point of resistance (up or
down). The switch is automatically canceled when the
steering wheel is turned to a large enough degree.
Turn signal failure
If one of the turn signals fails, the turn signal indicator
system f lashes and sounds at a faster than normal rate.
4
4
2
5
5
3
1
Page 143 of 341
140 Audio system
Technical
data Instruments
and controlsOperationDrivingInstrument
cluster displayPractical hints Car care Index
Fader
1
Press the AUD key repeatedly
until “FADER” appears on the
display. Press the “R” key to
move the sound to the rear
speakers or the “F” key to
move the sound to the front speakers.
Balance
Press the AUD key repeatedly
until “BALANCE” appears in
the display.
Press the “L” key to move the
sound to the left speaker or the “R” key to move the
sound to the right speaker.
1 not available on all models
Centering all audio functions
Push and hold down the
“AUD” key. All audio
functions (bass, treble,
balance and fader) are set to
center or flat positions, and
the volume is adjusted to a pre-set level.
Page 146 of 341

143 Audio system
Technical
data Instruments
and controlsOperationDrivingInstrument
cluster displayPractical hints Car care Index Cassette mode
Note:
Vehicles equipped with the COMAND system do not
come with a factory installed cassette mechanism.
A standard 1/8” stereo phono plug for auxiliary audio
input (located in glove box) is provided for connection of
a portable battery operated cassette player or any other
portable device which uses a headphone output. Please
refer to the COMAND operating manual for information
concerning the activation of the audio input.Playing cassettes
Press the “TAPE” button. When the eject (EJ) key is
pressed, the display folds down and the cassette slot
becomes visible. Push the cassette into the slot until it
engages. The cassette will be pulled in automatically.
Notes:
Do not press directly on the radio display face.
Return the display panel to its normal position by
folding it back up and pressing gently on the display
frame to lock in place.
When playing mono recorded tapes (e.g. books) through
a stereo system the sound from one track might bleed to
the other track, despite setting the balance to the full
left or full right speakers.
Page 194 of 341

191 Steering lock
Technical
data Instruments
and controlsOperationDrivingInstrument
cluster displayPractical hints Car care Index Important!
If the el ectronic key is lef t in th e steering lock position 0
for an extended period of time, it can no longer be
turned in the lock. In this case, remove electronic key
from steering lock and reinsert.
Caution!
To prevent accelerated battery discharge and a possible
dead battery, always remove the electronic key from the
steering lock. Do not leave th e ele ctronic key in steering
lock position 0.Notes:
A warning sounds when the driver’s door is opened
while the electronic key is in steering lock position 1
or 0.
With the engine at idle speed, the charging rate of the
alternator (output) is limited.
It is therefore recommended that you turn off
unnecessary electrical consumers while driving in
stop-and-go traffic. This precaution helps to avoid
draining of the battery.
Unnecessary strain on the battery and charging system
may be minimized by turning off the following power
consumers, for example:
Heated seats, rear window defroster. In addition, the
automatic climate air volume control should be set to
the lowest position.
The steering lock can only be unlocked with the vehicle
battery properly charged and connected.
Page 205 of 341
202 Parking brake
Technical
data Instruments
and controlsOperationDrivingInstrument
cluster displayPractical hints Car care Index
Parking brakeTo engage, firmly depress parking brake pedal. When
the electronic key is in steering lock position 2, the
brake warning lamp in the instrument cluster should
come on brightly.
To rel ease t he parking bra ke, pull h andl e on instru ment
panel. The brake warning lamp in the instrument
cluster should go out.
A warning sounds, if you start to drive without having
released the parking brake.
Also see brake warning lamp on page 235.
P42.20-2059-26
Wa r n i n g !
When leaving the vehicle always remove the
electronic key from the steering lock, and lock the
vehicle. Do not leave children unattended in the
vehicle, or with access to an unlocked vehicle.
Children could release the parking brake, which
could result in an accident or serious injury.