Page 88 of 341

85 Rear view mirrors
Technical
data Instruments
and controlsOperationDrivingInstrument
cluster displayPractical hints Car care Index Parking position
The passenger-side exterior mirror can be adjusted and
programmed to assist the driver during parking
maneuvers (e.g. to observe the curb or other objects
close to the vehicle).
With electronic key in steering lock position 2, and the
exterior rear view mirror switch in the passenger-side
position, the passenger-side mirror will be turned
downward when placing the gear selector lever in “R”
Reverse.
The mirror position can now be adjusted as desired.
At speeds above approximately 6 mph (10 km / h), upon
shifting gear selector lever from “R” Reverse, or upon
pressing the driver’s side mirror button, the passenger-
side mirror will return to its previous position.One passenger-side mirror position can be stored in
memory. To do so:
1. Turn electronic key to steering lock position 2.
The vehicle must be stationary.
2. Select passenger-side mirror and adjust the mirror
to view the curb.
3. Press green memory button located in switch cluster
for driver seat, see page 49.
4. Within 3 seconds pull the mirror toggle switch
rearward. The mirror should not move.
Repeat the memory procedure if the mirror moves.
5. Select driver side mirror. The passenger-side mirror
will return to its previous position.
Page 90 of 341
87 Instrument cluster
Technical
data Instruments
and controlsOperationDrivingInstrument
cluster displayPractical hints Car care Index 1Push buttons for intensity of instrument lamps, see
page 89
2Push button for resetting trip odometer, see page 91,
or to acknowledge a malfunction warning message,
see page 108
3Coolant temperature gauge, see page 90
4Fuel gauge with reserve and fuel cap placement
warning lamp, see page 236
5Outside temperature indicator, see page 90
6Left turn signal indicator lamp, see combination
switch on page 122
7ESP warning lamp, see page 2378Speedometer
9Trip odometer, see page 91 and 96
10Main odometer, see page 96
11Multifunction indicator, see page 92,
or FSS indicator, see page 114,
or engine oil level indicator, see page 117
12Right turn signal indicator lamp, see combination
switch on page 122
13Tachometer, see page 91
14Gear range indicator display, see page 196
15Clock, see page 110
Page 91 of 341

88 Instrument cluster
Technical
data Instruments
and controlsOperationDrivingInstrument
cluster displayPractical hints Car care Index
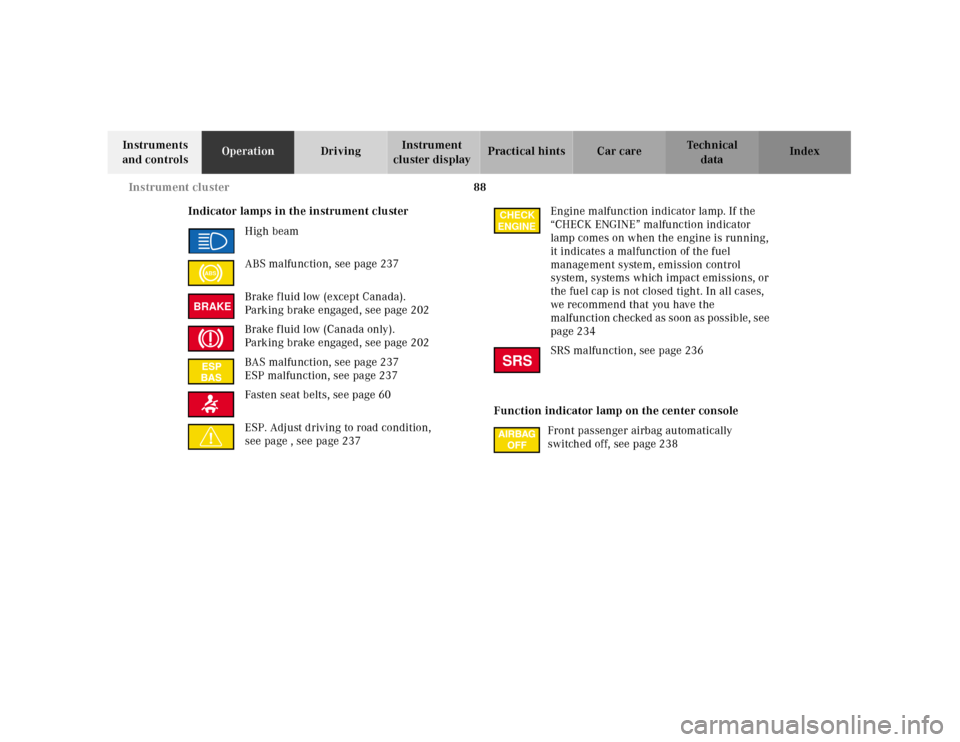
Indicator lamps in the instrument cluster
High beam
ABS malfunction, see page 237
Brake f luid low (except Canada).
Parking brake engaged, see page 202
Brake f luid low (Canada only).
Parking brake engaged, see page 202
BAS malfunction, see page 237
ESP malfunction, see page 237
Fasten seat belts, see page 60
ESP. Adjust driving to road condition,
see page , see page 237Engine malfunction indicator lamp. If the
“CHECK ENGINE” malfunction indicator
lamp comes on when the engine is running,
it indicates a malfunction of the fuel
management system, emission control
system, systems which impact emissions, or
the fuel cap is not closed tight. In all cases,
we recommend that you have the
malfunction checked as soon as possible, see
page 234
SRS malfunction, see page 236
Function indicator lamp on the center console
Front passenger airbag automatically
switched off, see page 238
ABSBRAKE
CHECK
ENGINESRS
Page 94 of 341
91 Instrument cluster
Technical
data Instruments
and controlsOperationDrivingInstrument
cluster displayPractical hints Car care Index Trip odometer (9)
To reset to “0” miles / km:
Activate the instrument cluster if it is not already
activated, see page 89.
Press button è or ÿ on the multifunction
steering wheel repeatedly until the trip odometer
appears if it is not displayed, see page 96.
Press buttonJ(2) on the instrument cluster.Tachometer (13)
The red marking on tachometer denotes excessive
engine speed.
Avoid this engine speed, as it may result in serious
engine damage that is not covered by the
Mercedes-Benz Limited Warranty.
To help protect the engine, the fuel supply is interrupted
if the engine is operated within the red marking.
Page 96 of 341

93 Multifunction steering wheel, multifunction display
Technical
data Instruments
and controlsOperationDrivingInstrument
cluster displayPractical hints Car care Index Depending on your vehicle’s equipment, you may use
the buttons on the multifunction steering wheel to call
up, control and set the following systems in the
multifunction display:
1Trip odometer and main odometer, see page 96
Vehicle speed, see page 96
Flexible service system (FSS), see page 114
Engine oil level indicator, see page 117
2Audio systems, see page 97
Radio, see page 97
CD player (optional), see page 98
Cassette player, see page 99
3Navigation system (if so equipped), see page 105
4Malfunction message memory, see page 108
5Individual settings, see page 110
6Trip computer, see page 106
After start
After reset
Fuel tank content
7Telephone (if so equipped), see page 100Press the è or ÿ button repeatedly until the
required system is displayed.
Pressing the è button advances the display to the
next system.
Pressing the ÿ button returns the display to the
previous system.
You may call up additional displays within some of these
categories by pressing the j or k button.
Wa r n i n g !
A driver’s attention to the road must always be his /
her primary focus when driving. For your safety and the safety of others, selecting
features through the multifunction steering wheel
should only be done by the driver when traffic and
road conditions permit it to be done safely.
Programming individual settings in the system can
only be made while the vehicle is at standstill.
Page 97 of 341
94 Multifunction steering wheel, multifunction display
Technical
data Instruments
and controlsOperationDrivingInstrument
cluster displayPractical hints Car care Index
1Multifunction display
2Multifunction steering wheelTurn the electronic key in steering look to
position 1 or 2.
Press button:
3è for next system
4ÿ for previous system
5j for next display in system
6k for previous display in system
7æ to increase the volume, see page 113
8ç to decrease the volume, see page 113
9í to dial a telephone number, see page 100
See page 104 for instructions on answering an
incoming call.
10ì to end a call
11Horn pad
P46.10-2165-27
1
2
3
4
5
6
7
8
9
11
10
Page 98 of 341
95 Multifunction steering wheel, multifunction display
Technical
data Instruments
and controlsOperationDrivingInstrument
cluster displayPractical hints Car care Index Press the è or ÿ button repeatedly until the
required system is displayed.
Pressing the è button advances the display to the
next system.
Pressing the ÿ button returns the display to the
previous system.
You may call up additional displays in some systems by
pressing the j or k button.Note:
The displays in the multifunction display can be set to
German, English, French, Italian or Spanish language.
See the “TEXT” individual setting on page 110 for
instructions on changing the language setting.
The displays for the audio systems (radio, CD player,
cassette player) will appear in English, regardless of the
language selected.
Page 99 of 341
96 Multifunction steering wheel, multifunction display
Technical
data Instruments
and controlsOperationDrivingInstrument
cluster displayPractical hints Car care Index
Trip and main odometer, vehicle speed, FSS and
engine oil level display1Trip odometer and main odometer
See page 91 for instructions on resetting the trip
odometer.
2Vehicle speed
3FSS (Flexible service system), see page 114
4Engine oil level indicator, see page 117
Press è or ÿ button repeatedly until the trip
odometer and main odometer display (1) appears.
Press the j or k button repeatedly until the
required display (2, 3, 4, 1) appears.
Pressing the è or ÿ button displays the next or
previous system.