Page 34 of 325
31 Central locking system
Te ch n ica l
data Instruments
and controlsOperationDrivingInstrument
cluster displayPractical hints Car care Index Choosing global or selective mode on remote control
Press and hold transmit buttons ‹ and Œ
simultaneously for approx. 6 seconds to reprogram the
remote control. Battery check lamp will blink two times
indicating the completed mode change.
Opening the trunk
The trunk lid will swing open automatically. You should
always make sure there is sufficient clearance.
A minimum height clearance of 5.9 ft. (1.8 m) is
required to open the trunk lid.
Press transmit buttonŠ until trunk lid is open.Important!
Do not place remote control in trunk since trunk is
locked when the lid is closed if the vehicle is centrally
locked.
Note:
If the trunk was previously locked separately, it will
remain locked, see page 38.
Page 43 of 325
40 Central locking system
Te ch n ica l
data Instruments
and controlsOperationDrivingInstrument
cluster displayPractical hints Car care Index
Trunk lid release switch
The switch is located on the center console.A minimum height clearance of 5.9 ft. (1.8 m) is
required to open the trunk lid.
To open the trunk, the vehicle must be at standstill. Pull
up on switch until trunk lid is open.
The indicator lamp in the switch remains on with trunk
lid open.
Notes:
The trunk can also be opened by using the electronic
main key. Press Š button.
The trunk lid cannot be opened by the switch or the
remote control when previously locked separately with
the mechanical key. To open, see page 38.
The trunk lid cannot be opened with the trunk lid
release switch when the vehicle was previously locked
with the remote control. To unlock vehicle with the
remote control, see page 28.
Page 53 of 325

50 Seats
Te ch n ica l
data Instruments
and controlsOperationDrivingInstrument
cluster displayPractical hints Car care Index
Important!
Prior to operating the vehicle, the driver should adjust
the seat height for proper vision as well as fore/aft
placement and backrest angle to insure adequate
control, reach, operation, and comfort. The head
restraint should also be adjusted for proper height. See
also airbag section on page 66 for proper seat
positioning.
In addition, also adjust the steering wheel to ensure
adequate control, reach, operation, and comfort.
Both the inside and outside rear view mirrors should be
adjusted for adequate rearward vision.
Fasten seat belts. Infants and small children should be
seated in a properly secured restraint system that
complies with U.S. Federal Motor Vehicle Safety
Standard 213 and Canadian Motor Vehicle Safety
Standard 213.
All seat, head restraint, steering wheel, and rear view
mirror adjustments as well as fastening of seat belts
should be done before the vehicle is put into motion.
Wa r n i n g !
Children 12 years old and under must never ride in
the front seat, except in a Mercedes-Benz
authorized BabySmart
TM compatible child seat,
which operates with the BabySmart
TM system
installed in the vehicle to deactivate the passenger
side front airbag when it is properly installed.
Otherwise they will be struck by the airbag when it
inflates in a crash. If this happens, serious or fatal
injury can result.
According to accident statistics, children are safer
when properly restrained in the rear seating
positions than in the front seating positions.
Infants and small children must ride in back seats
and be seated in an appropriate infant or child
restraint system, which is properly secured with
the vehicle’s seat belt, fully in accordance with the
child seat manufacturer’s instructions.A child’s risk of serious or fatal injuries is
significantly increased if the child restraints are
not properly secured in the vehicle and the child is
not properly secured in the child restraint.
Page 57 of 325

54 Seats
Te ch n ica l
data Instruments
and controlsOperationDrivingInstrument
cluster displayPractical hints Car care Index
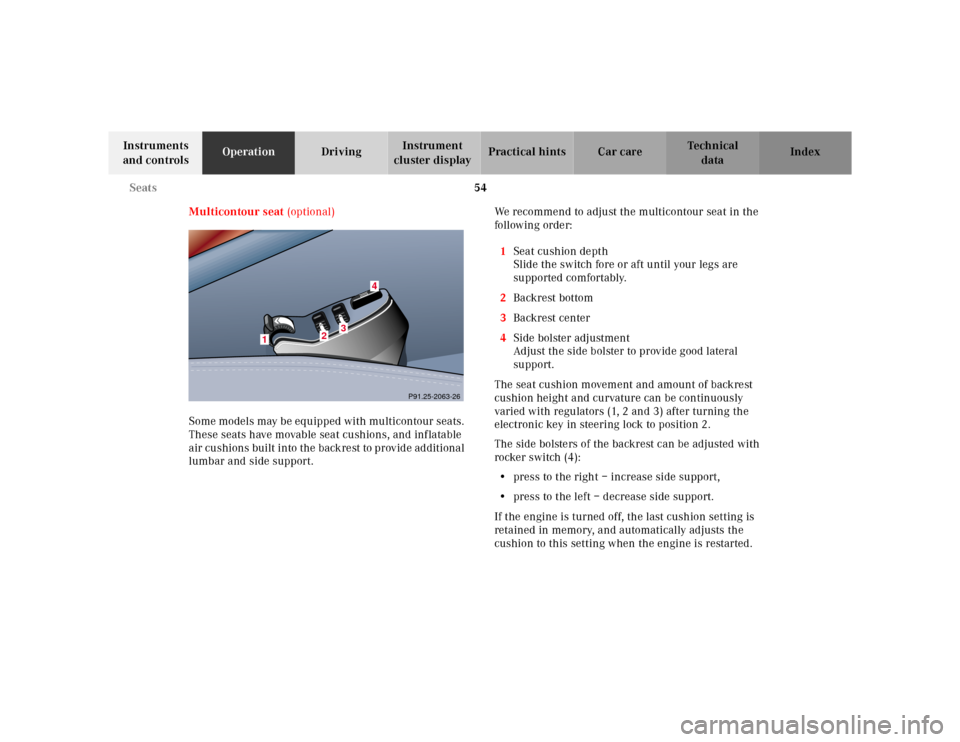
Multicontour seat (optional)
Some models may be equipped with multicontour seats.
These seats have movable seat cushions, and inflatable
air cushions built into the backrest to provide additional
lumbar and side support.We recommend to adjust the multicontour seat in the
follow ing orde r:
1Seat cushion depth
Slide the switch fore or aft until your legs are
supported comfortably.
2Backrest bottom
3Backrest center
4Side bolster adjustment
Adjust the side bolster to provide good lateral
support.
The seat cushion movement and amount of backrest
cushion height and curvature can be continuously
varied with regulators (1, 2 and 3) after turning the
electronic key in steering lock to position 2.
The side bolsters of the backrest can be adjusted with
rocker switch (4):
•press to the right – increase side support,
•press to the left – decrease side support.
If the engine is turned off, the last cushion setting is
retained in memory, and automatically adjusts the
cushion to this setting when the engine is restarted.
1
2
3
4
P91.25-2063-26
Page 63 of 325
60 Restraint systems
Te ch n ica l
data Instruments
and controlsOperationDrivingInstrument
cluster displayPractical hints Car care Index
Tighten the lap portion to a snug fit by pulling shoulder
portion up.
The shoulder portion of the seat belt must be pulled
snug and checked for snugness immediately after
engaging it.
Adjust seat belt so that shoulder portion is located as
close as possible to the middle of your shoulder (it
should not touch the neck). For this purpose, you can
adjust the belt height. Five positions are available.4Button for belt height adjustment
To raise, slide belt height adjustment upward.
To lower, press button (4) and slide belt height
adjustment downward.
Caution!
For safety reasons, avoid adjusting the seat or backrest
into positions which could affect the correct seat belt
position.
1
4
Page 157 of 325
154 Interior equipment
Te ch n ica l
data Instruments
and controlsOperationDrivingInstrument
cluster displayPractical hints Car care Index
Cup holder in center console
To open cup holder:
Briefly press button (7). The cup holder opens
automatically.
To store cup holder:
Push button (7) down until cup holder engages. Close
cover (6).Notes:
The right claw is adjustable to accommodate most
container sizes.
An additional second (smaller size) container can be
placed in the cup holder.
Spilling liquids (e.g. soda or coffee) could restrict the
movement of the claw. Refer to page 294 for cleaning
the cup holder.
Caution!
Keep cup holder closed while traveling. Place only
containers that fit into the cup holder to prevent spills.
Do not fill containers to a height where the contents
could spill during vehicle maneuvers, especially hot
liquids.
Page 158 of 325
155 Interior equipment
Te ch n ica l
data Instruments
and controlsOperationDrivingInstrument
cluster displayPractical hints Car care Index Cup holder in rear bench armrest
Briefly press drawer (1) and pull out to its detent.Caution!
Keep cup holder closed while traveling. Place only
containers that fit into the cup holder to prevent spills.
Do not fill containers to a height where the contents
could spill during vehicle maneuvers, especially hot
liquids.
1
Page 253 of 325
250 Engine compartment
Te ch n ica l
data Instruments
and controlsOperation DrivingInstrument
cluster displayPractical hintsCar care Index
To o pen :
To unlock the hood, pull release lever (1) under the
driver’s side of the instrument panel. At the same time a
handle will extend out of the radiator grill (it may be
necessary to lift the hood up slightly).
Caution!
To avoid damage to the windshield wiper or hood, open
the hood only with wiper in the parked position.Pull handle (2) to its stop out of radiator grill and open
hood (do not pull up on handle).
To c l o s e :
Lower hood and let it drop into lock from a height of
approx. 1 ft. (30 cm), assisting with hands placed flat on
edges of hood (3).
To avoid hood damage, please make sure that hood is
fully closed. If not, repeat closing procedure. Do not
push down on hood to attempt to fully close it.
P88.40-2025-26
1
P88.40-2017-26
3
2
3