Page 199 of 243

197
Introduction
Audio Telephone
Navigation
Index Info Services and
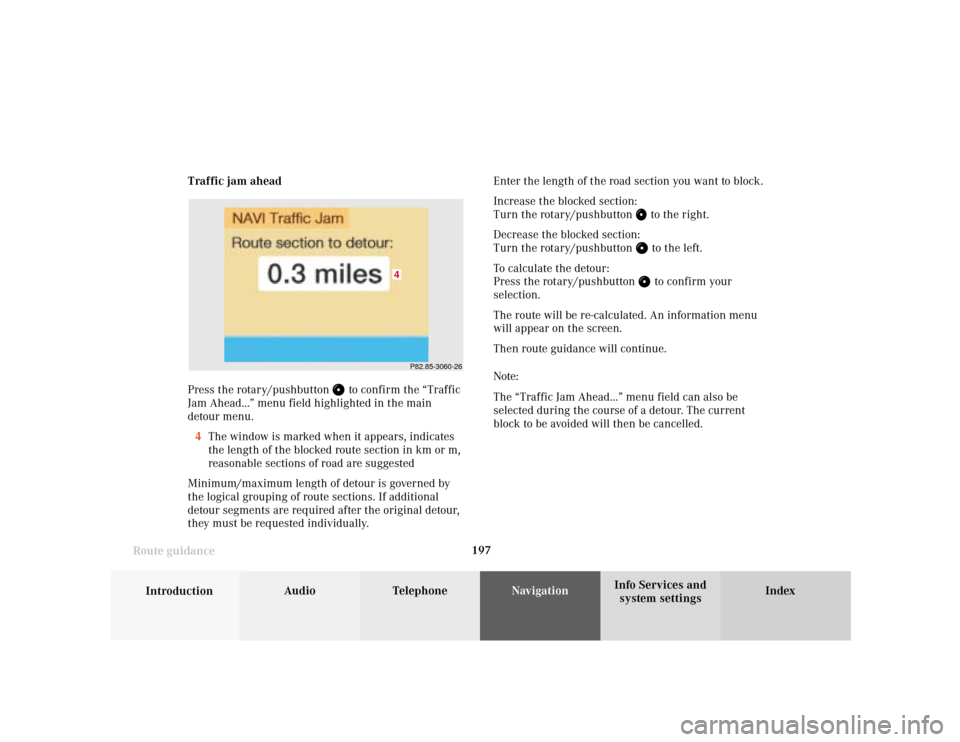
system settings Route guidanceTraffic jam ahead
Press the rotary/pushbutton
to confirm the “Traffic
Jam Ahead...” menu field highlighted in the main
detour menu.
4The window is marked when it appears, indicates
the length of the blocked route section in km or m,
reasonable sections of road are suggested
Minimum/maximum length of detour is governed by
the logical grouping of route sections. If additional
detour segments are required after the original detour,
they must be requested individually.Enter the length of the road section you want to block.
Increase the blocked section:
Turn the rotary/pushbutton
to the right.
Decrease the blocked section:
Turn the rotary/pushbutton to the left.
To calculate the detour:
Press the rotary/pushbutton to confirm your
selection.
The route will be re-calculated. An information menu
will appear on the screen.
Then route guidance will continue.
Note:
The “Traffic Jam Ahead...” menu field can also be
selected during the course of a detour. The current
block to be avoided will then be cancelled.
P82.85-3060-26
4
Page 200 of 243
198
Introduction Audio Telephone
Navigation
Index Info Services and
system settings
Route guidance
Detour in route list
Turn the rotary/pushbutton
to highlight the “Detour
in Route List...” menu field in the main detour menu
and press it to confirm.
The following message will appear: “The route list is
being calculated”.
Then the route list will appear on the screen.Activating the detour function:
Press the rotary/pushbutton
. The street marked will
appear in red.
5Street cannot be blocked off
6“+” symbol – Street contains several sections which
can be blocked off
Press
to access the detailed route list,
page 199
7Blocked street will appear in red
Press to display longer entries in a window in
full.
Press to remove the window from the screen.
P82.85-3061-26
6
7
5
Page 201 of 243

199
Introduction
Audio Telephone
Navigation
Index Info Services and
system settings Route guidance
P82.85-3062-26
8
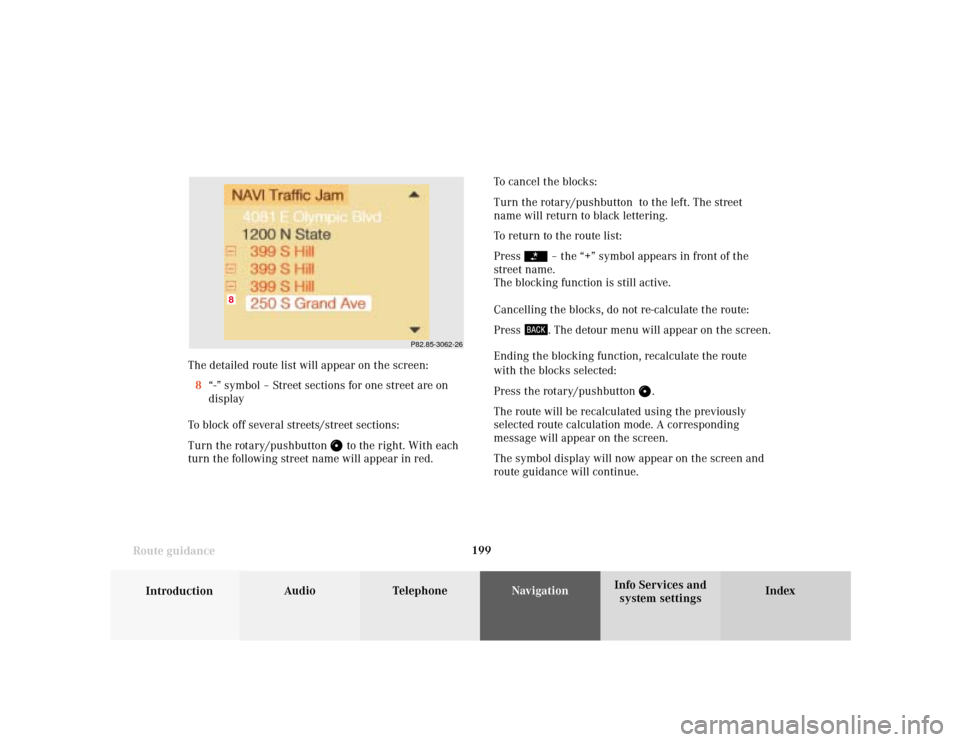
The detailed route list will appear on the screen:
8“-” symbol – Street sections for one street are on
display
To block off several streets/street sections:
Turn the rotary/pushbutton
to the right. With each
turn the following street name will appear in red.To cancel the blocks:
Turn the rotary/pushbutton to the left. The street
name will return to black lettering.
To return to the route list:
Press
– the “+” symbol appears in front of the
street name.
The blocking function is still active.
Cancelling the blocks, do not re-calculate the route:
Press . The detour menu will appear on the screen.
Ending the blocking function, recalculate the route
with the blocks selected:
Press the rotary/pushbutton
.
The route will be recalculated using the previously
selected route calculation mode. A corresponding
message will appear on the screen.
The symbol display will now appear on the screen and
route guidance will continue.
Page 202 of 243
200
Introduction Audio Telephone
Navigation
Index Info Services and
system settings
Route guidance
Resetting functions during route guidance
3Cancels a detour (road sections blocked in the route
list), page 198
4Resets all functions
The route will be recalculated using the previously
selected calculation mode. The corresponding informa-
tion will appear on the screen.
Then the symbol display will appear and route guid-
ance will continue.
Note:
Menu fields (2) and (3) are not available if no detour
has been selected.
P82.85-3042-2632
1
4
Press
during route guidance.
Use the rotary/pushbutton
to highlight the desired
menu field and press it to confirm.
1Delete a way point
2Cancels a detour (traffic jam ahead)
Selecting a detour during route guidance, page 196
Page 221 of 243
System settings
Introduction Audio
Telephone NavigationIndex Info Services and
system settings 219 Activating the main system settings menu
Press
in any menu.
The main system settings menu is loaded.
1Information on the date, time
Format depends on the time format selected,
to select the time format, page 229
2Adjusting the brightness, page 220
3Accessing the settings menu, page 221
4Switching on an external audio source, e.g. a tape
deck, page 2335Country setting,
the time zone can also be displayed
Note on (5):
Information is shown if the clock has been set to GPS
reception and if a country, e.g. USA, Canada and time
zone was selected, page 226.
Setting the clock with GPS reception, page 224.
P82.85-6134-26
4
3
1
2
Page 225 of 243

System settings
Introduction Audio
Telephone NavigationIndex Info Services and
system settings 223Set the date and time
COMAND is equipped with an integrated clock. Press
to display the current time. The clock is used e.g.
for indicating the estimated time of arrival at the
destination, page 176.
There are several ways to set the time:
• With GPS reception, page 224
Set the time in 30 minute steps, page 225
Set the time by selecting a country and the time
zone, page 226
• Without GPS reception, page 224
Set the date and time manually, page 228
Note:
The clock must always be reset if the COMAND
system was disconnected or if the vehicle battery
was discharged. List of languages:
• “Adopt from Instrument Cluster” – the system will
use the same language as is set in instrument
cluster
• “Deutsch”
• “English (metric)” – distance measured in km,
speed in km/h
• “English (imperial)” – distance measured in yards,
miles, speed in mph
• “Español“
• “Français“
• “Italiano“
• “Nederlands“
Page 226 of 243
224 System settings
Audio Introduction
Telephone Navigation IndexInfo Services and
system settings
With GPS reception
Use the rotary/pushbutton
to highlight the “Date/
Time ...” menu field in the “Settings” menu (page 221)
and press to confirm.
1GPS symbol indicates GPS time reception
2Setting the clock to a 30 minute increments,
Activating the setting mode, page 225
3Selecting the country and time zone, page 226
4Selecting the time format, page 229Without GPS reception
5Setting the date and time manually, page 228
Note:
If GPS time is not available, the GPS symbol (1) will not
appear in the display.
P82.85-3071-26
2
1
3
4
P82.85-3072-26
4
5
Page 227 of 243
System settings
Introduction Audio
Telephone NavigationIndex Info Services and
system settings 225 GPS reception: setting the time in 30 minute
increments
Activating the setting mode:
Press the rotary/pushbutton
. The minutes will
appear in red lettering.
Altering the time to a 30 minute increments:
Setting the clock ahead – Turn the rotary/pushbutton
to the right, the time will move back 30 minutes
with each click.
Setting the clock back – Turn the rotary/pushbutton
to the left, the time will move back 30 minutes with
each click.Canceling the setting mode:
Press the rotary/pushbutton
. The minutes will
appear in black lettering.
To activate the main System settings menu, either:
• Press
• Press the rotary/pushbutton
longer than
2 seconds.
The new time will appear in the display.
P82.85-2677-26
P82.85-3073-26